
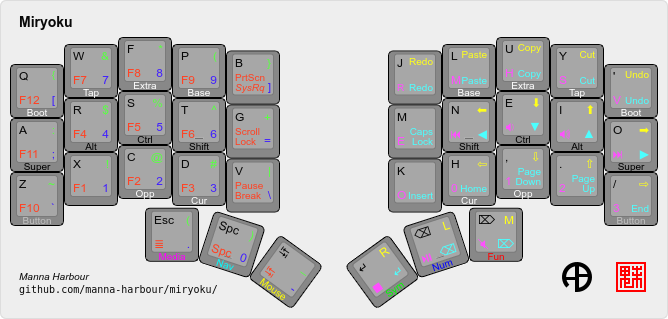
Miryoku is an ergonomic, minimal, orthogonal, and universal keyboard layout. Miryoku ZMK is the Miryoku implementation for ZMK.
This document describes Miryoku ZMK only. For Miryoku documentation, implementations, and discussions and support, see Miryoku.
See the Miryoku ZMK Quickstart Guide to have a personalised build running on your keyboard in a few minutes without installing any software or editing any files.
Building can be performed locally, or via GitHub Actions workflows without use of a local build environment. Many keyboards are supported, and building out of tree keyboards is automatically supported by the workflows.
Workflow builds can be customised by editing one of the examples, or by filling out a form. Local builds can be customised by editing a config file, and an example is included.
The keyboard keymap includes the config file, the Miryoku keymap, and a mapping for the physical layout.
Additional and Experimental Features include mouse keys on the host and key emulation combos.
First set up the ZMK build environment and build and flash the default keymap for your keyboard.
Clone this repository and set ZMK_CONFIG to the absolute path of the config subdirectory. Use the config file to select alternative layout and mapping options.
Firmware can be built via GitHub Actions workflows without use of a local build environment.
First log in to GitHub, fork the Miryoku ZMK repository, and enable workflows.
To access a workflow, visit the Actions tab and select the workflow. To download the firmware from a workflow run, select the workflow, select the workflow run, select the desired Artifacts, and unzip the downloaded zip file.
Workflow files are in .github/workflows.
Copy one of the included Build Example workflow files, edit the name value, edit and add options and values as desired, and push changes. Select Run workflow, select the Branch if desired, and activate Run workflow.
Options are specified in the with section and are of the following form.
option: '["value"]'
For multiple values per option use the following form, and a matrix build will be performed for each combination of values across all options.
option: '["value1","value2"]'
See the Test All workflow files for all supported values for each option.
See Fields / Options below for a description of each option.
The Build Inputs workflow can be used without editing workflow files. Select Run workflow, select the Branch and fill out the form as desired, and activate Run workflow.
Options are specified by entering values directly in the corresponding field. Multiple comma separated values can be entered per option and a matrix build will be performed for each combination of values across all options.
See Fields / Options below for a description of each option.
All Build Inputs fields and corresponding workflow options are described below.
The board option is required and all others are optional.
Specifies the ZMK board.
For keyboards with a separate controller, enter the controller name, e.g. bluemicro840_v1, nice_nano, nice_nano_v2, nrfmicro_13. See here for a list of all supported controllers.
For keyboards with an integrated controller, enter the keyboard name, e.g. ahokore, ble_chiffre, technikable, zaphod. For split keyboards with an integrated controller on each side, enter both keyboard side names separated by a comma to build both sides in the same run, e.g. corne-ish_zen_left,corne-ish_zen_right. See here for a list of all supported keyboards with an integrated controller.
Specifies the ZMK shield.
For keyboards with a separate controller, enter the keyboard name, e.g. absolem, chocv, eek, osprette. For split keyboards with a separate controller on each side, enter both keyboard side names separated by a comma to build both sides in the same run, e.g. corne_left,corne_right, cradio_left,cradio_right, pteron36_left,pteron36_right, tbkmini_left,tbkmini_right. See here for a list of all supported keyboards with separate controllers.
For keyboards with an integrated controller, leave as default.
The alphas, nav, clipboard, and layers options correspond to the alternative layout options. The mapping option corresponds to the alternative mapping options. Alternative layout and mapping options are given in the documentation in the form MIRYOKU_OPTION=VALUE, e.g. MIRYOKU_ALPHAS=QWERTY. To use here, use the value with the corresponding option. Use default to represent the default value. Values for these five options are case-insensitive.
Select an alternative alphas layout, e.g. colemak, dvorak, halmak, qwerty. See here for a list of all supported alphas. For Colemak Mod-DH, leave as default.
Select an alternative Nav layout, e.g. invertedt, vi. See here for details. For home position line nav, leave as default.
Select an alternative clipboard type, e.g. mac, win. See here for details. For CUA bindings, leave as default.
Select an alternative layers layout, e.g. flip. See here for details. For right hand Nav, leave as default.
Select an alternative mapping, e.g. extended_thumbs, pinkie_stagger. See here for details. For the default mapping, leave as default.
Appends to the config file. Join multiple lines with \n. For no additional config, leave as default.
Appends to Kconfig configuration. Join multiple lines with \n. For no additonal config, leave as default.
Used to build from an alternative ZMK fork. The branch is specified as <user>/<repo>/<branch>. For the default ZMK branch, leave as default.
Used to merge branches into ZMK at build time. Branches are specified as <user>/<repo>/<branch>. To merge multiple branches, separate with space. For no merges, leave as default.
Any board supported by ZMK with a keymap in Miryoku ZMK. See the Test All Boards workflow file for a list of all supported boards (including outboards).
Any compatible combination of board supported by ZMK and shield supported by ZMK with a keymap in Miryoku ZMK. See the Test All Shields workflow file for a list of all supported shields (including outboards).
Additionally, building some out of tree boards and shields is automatically supported by the included workflows. See .github/workflows/outboards.
For local builds, copy the board or shield definition to the appropriate location under config.
The config file is used to specify alternative layout and mapping options for local builds. Options are given in the documentation in the form MIRYOKU_OPTION=VALUE. Convert to the form #define MIRYOKU_OPTION_VALUE and add to the config file.
The config file can also be used to set default alternative layout and mapping options for workflow builds, as an alternative to using the corresponding alternative layout and mapping workflow options. In this case setting different values for the same option in the config file and in the workflow options may lead to undefined behaviour.
The config file can also be used to set other Miryoku ZMK configuration options for local and workflow builds.
The file is miryoku/custom_config.h. See the example config file. The config file is included into the keyboard’s keymap file before the mapping with:
#include "../miryoku/custom_config.h"Below is an example config file with the following alternative layout and mapping options:
MIRYOKU_ALPHAS=QWERTYMIRYOKU_NAV=INVERTEDTMIRYOKU_CLIPBOARD=WINMIRYOKU_LAYERS=FLIPMIRYOKU_MAPPING=EXTENDED_THUMBS
// Copyright 2021 Manna Harbour
// https://github.com/manna-harbour/miryoku

#define MIRYOKU_ALPHAS_QWERTY
#define MIRYOKU_NAV_INVERTEDT
#define MIRYOKU_CLIPBOARD_WIN
#define MIRYOKU_LAYERS_FLIP
#define MIRYOKU_MAPPING_EXTENDED_THUMBSThe Miryoku keymap is a ZMK DT keymap file using C preprocessor macros for configuration options and to abstract the physical layout. The Miryoku keymap file is miryoku/miryoku.dtsi. The file is included into the keyboard’s keymap after the config file and mapping with:
#include "../miryoku/miryoku.dtsi"Macros are included from miryoku/miryoku.h. Layer data is generated by Miryoku Babel and is included from files in the miryoku/miryoku_babel directory.
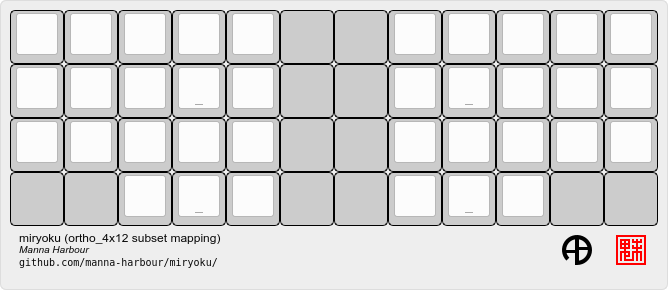
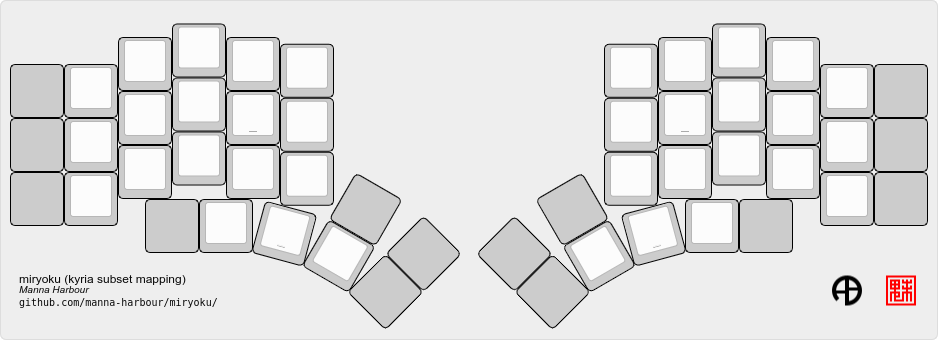
The keymap is mapped onto keyboards with different physical layouts. The keymap is specified in terms of the MIRYOKU_MAPPING macro. The macro is defined in a C header file for each physical layout. Unused keys are mapped to &none. The files are in miryoku/mapping/. The mapping file is included into the keyboard keymap file before the Miryoku keymap with e.g.
#include "../miryoku/mapping/36-minidox.h"On each hand, only the main alpha block of 3 rows by 5 columns and the 3 most appropriate thumb keys are used.
Notes or diagrams are provided below where the selection of keys is not obvious or where alternatives are provided via mapping configuration options.
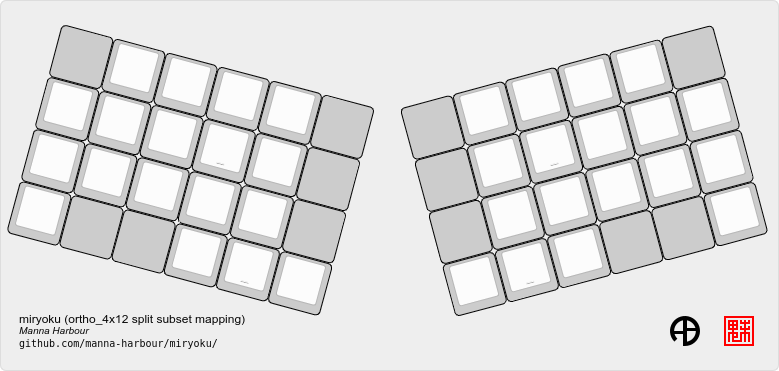
Bottom row combos and thumb combos are enabled.
Thumb combos are enabled.
The middle 2 columns are unused.
Supports ortho and MIT configurations.
MIRYOKU_MAPPING=2X2U
Supports 2x2u configuration.
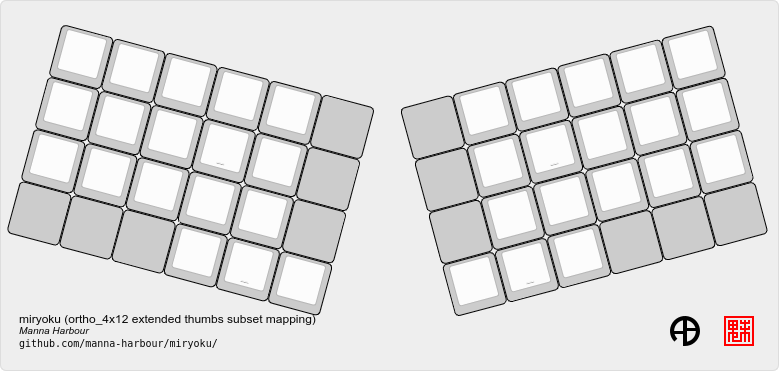
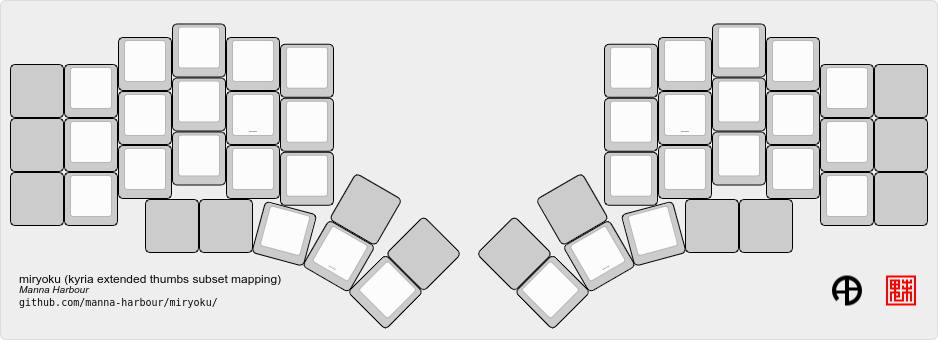
MIRYOKU_MAPPING=EXTENDED_THUMBS
The thumb keys are moved 1u to extend the thumbs. Supports ortho configuration.
MIRYOKU_MAPPING=EXTENDED_THUMBS
MIRYOKU_MAPPING=PINKIE_STAGGER
MIRYOKU_MAPPING=EXTENDED_THUMBS
Keymap files for many keyboards are provided in config.
Kconfig keyboard configuration options can be set in config/<keyboard>.conf for local and workflow builds.
Kconfig configuration can also be specified in the kconfig option for workflow builds.
Examples include CONFIG_ZMK_SLEEP=y, CONFIG_ZMK_DISPLAY=y, CONFIG_BT_CTLR_TX_PWR_PLUS_8=y. Additional documentation is available at https://deploy-preview-722–zmk.netlify.app/docs/config/index/.
The Mouse and Button layers use mouse keys on the host. Middle button, right button, and scroll are not supported.
Emulate a key with a combo of two other keys. Enabled automatically on keyboards with a missing key. Can be enabled on other keyboards for use with hard to reach keys, or for compatibility.
On the top row on each hand, combo the ring and middle finger keys to emulate the pinkie key, and combo the middle and index finger keys to emulate the inner index key.
Requires CONFIG_ZMK_COMBO_MAX_COMBOS_PER_KEY=16 Kconfig configuration.
On the bottom row on each hand, combo the ring and middle finger keys to emulate the pinkie key, and combo the middle and index finger keys to emulate the inner index key.
Requires CONFIG_ZMK_COMBO_MAX_COMBOS_PER_KEY=16 Kconfig configuration.
On each hand, combo the primary and secondary thumb keys to emulate the tertiary thumb key. Requires suitable keycaps to enable the thumb to press both keys simultaneously.
