Spring Java Format is released under the Apache 2.0 license. If you would like to contribute something, or simply want to hack on the code this document should help you get started.
This project adheres to the Contributor Covenant code of conduct. By participating, you are expected to uphold this code. Please report unacceptable behavior to [email protected].
Before we accept a non-trivial patch or pull request we will need you to sign the Contributor License Agreement. Signing the contributor’s agreement does not grant anyone commit rights to the main repository, but it does mean that we can accept your contributions, and you will get an author credit if we do. Active contributors might be asked to join the core team, and given the ability to merge pull requests.
If you don’t have an IDE preference we would recommend that you use Spring Tools Suite or Eclipse when working with the code. We use the M2Eclipse eclipse plugin for maven support. Other IDEs and tools should also work without issue.
To build the source you will need to install JDK 11.
You can import the code into any Eclipse based distribution as long as it had the M2Eclipse eclipse plugin. If you don’t already have m2eclipse installed it is available from the "Eclipse marketplace".
Once imported, you can apply eclipse settings by running:
$ ./mvnw -Peclipse validate
|
Note
|
You’ll need to close the spring-javaformat-formatter-eclipse and spring-javaformat-formatter-eclipse-runtime projects following import since they contain rewritten packages that aren’t supported by the IDE
|
You can import the code as a maven project into IntelliJ IDEA.
When IntelliJ IDEA parses pom.xml, it automatically creates inter-module dependencies if dependent libraries are coming from other modules within the project.
However, when dependent modules perform repackaging (e.g. spring-javaformat-formatter-eclipse-runtime module), the current module cannot resolve all classes by module dependencies because repackaging (shade & binary manipulation) moves around classes.
Therefore, you need to manually update the dependencies from the module to the produced jars.
Following modules perform repackaging.
-
spring-javaformat-formatter-eclipse -
spring-javaformat-formatter-eclipse-runtime
Modules that depend on these modules need jar dependencies instead of module dependencies.
The following steps define jar-based project libraries on IDE and add them to the modules that need jar dependencies.
Add a jar file-based project library
-
"Project Settings" → "Libraries"
-
Click "+" sign, then select "Java"
-
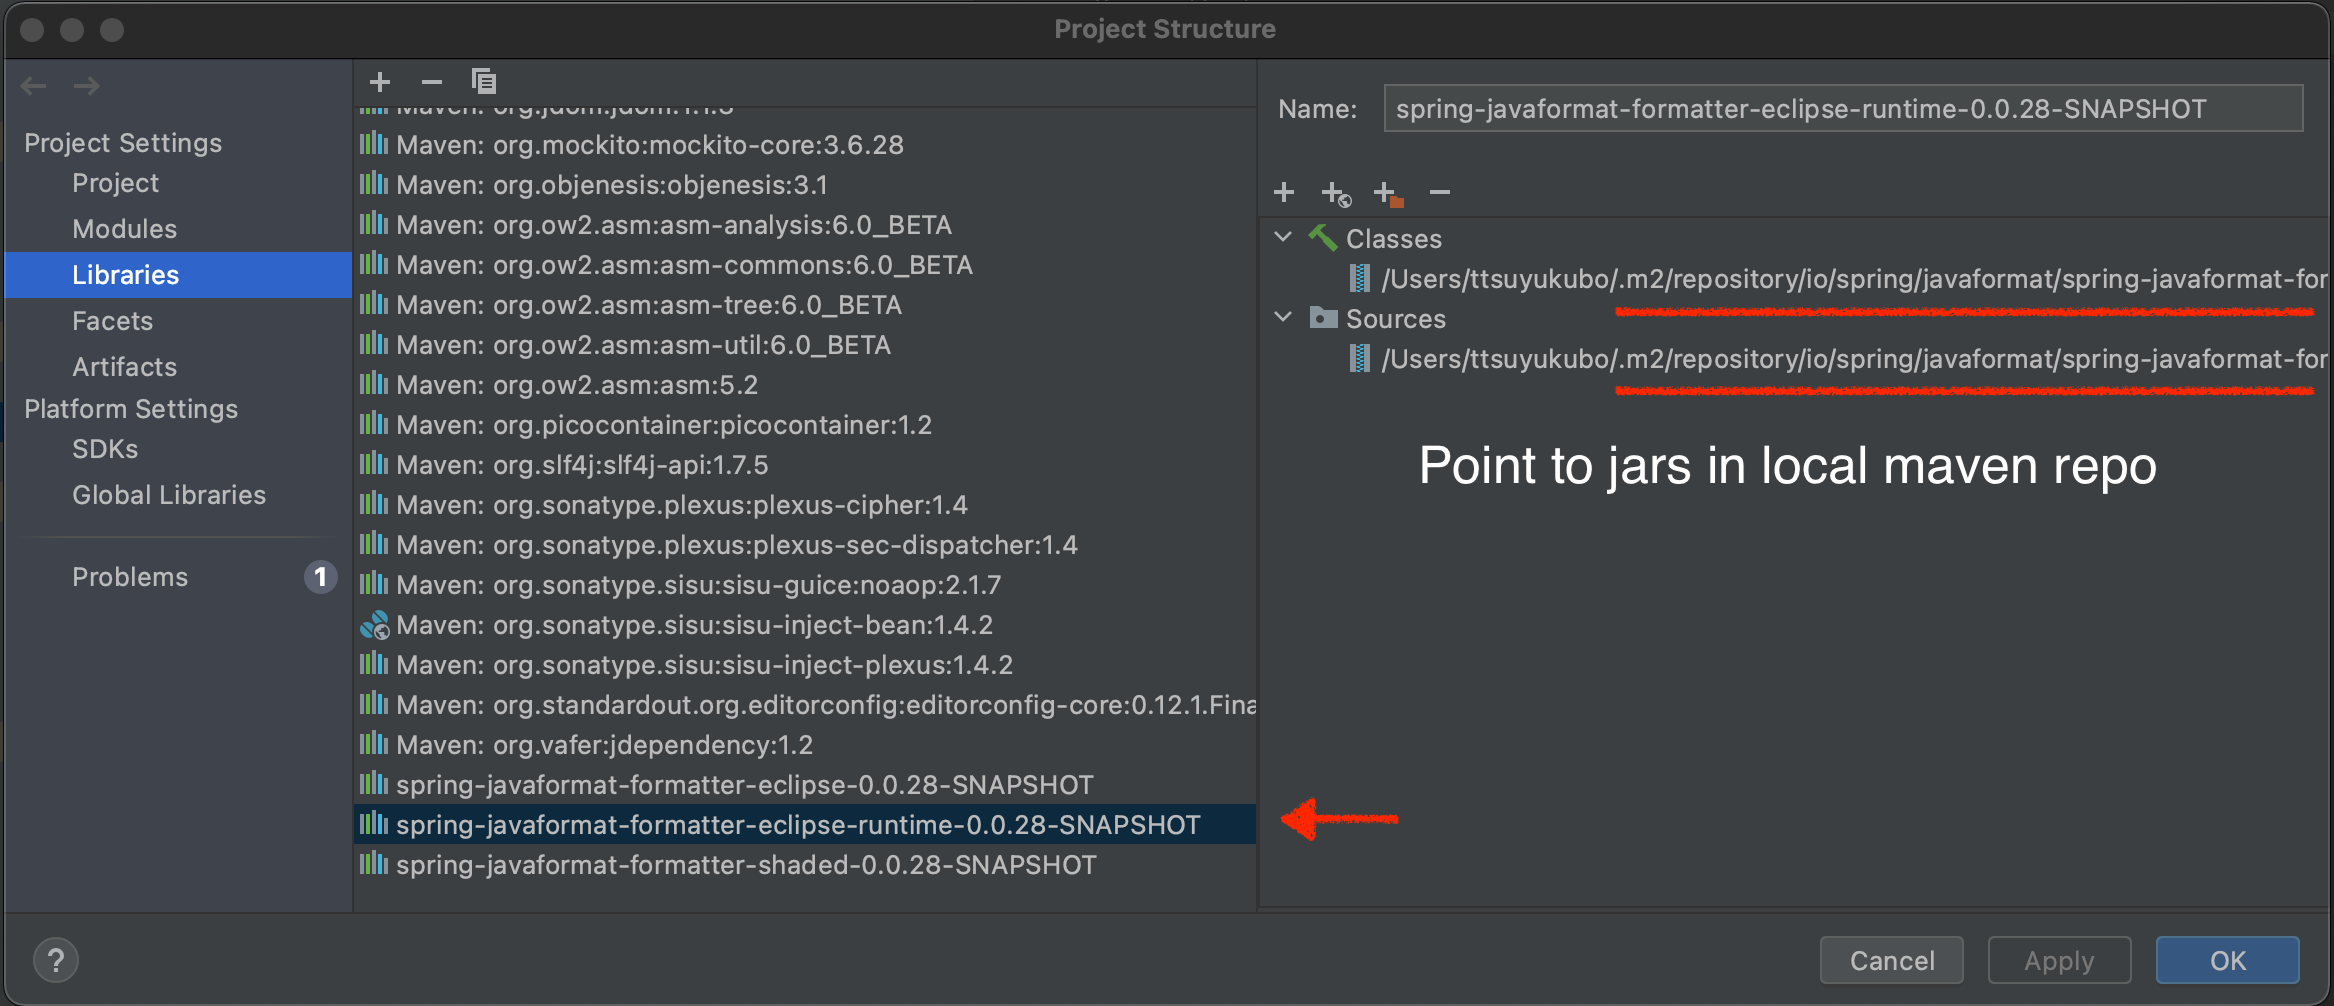
Specify the jar file
For example, you can specify the jar file in the target directory(<PROJECT>/spring-javaformat/spring-javaformat-formatter-eclipse-runtime/target/spring-javaformat-formatter-eclipse-runtime-0.0.28-SNAPSHOT.jar)
or one in the local maven repository(~/.m2/repository/io/spring/javaformat/spring-javaformat-formatter-eclipse-runtime/0.0.28-SNAPSHOT/spring-javaformat-formatter-eclipse-runtime-0.0.28-SNAPSHOT.jar).
Add library dependencies to modules
-
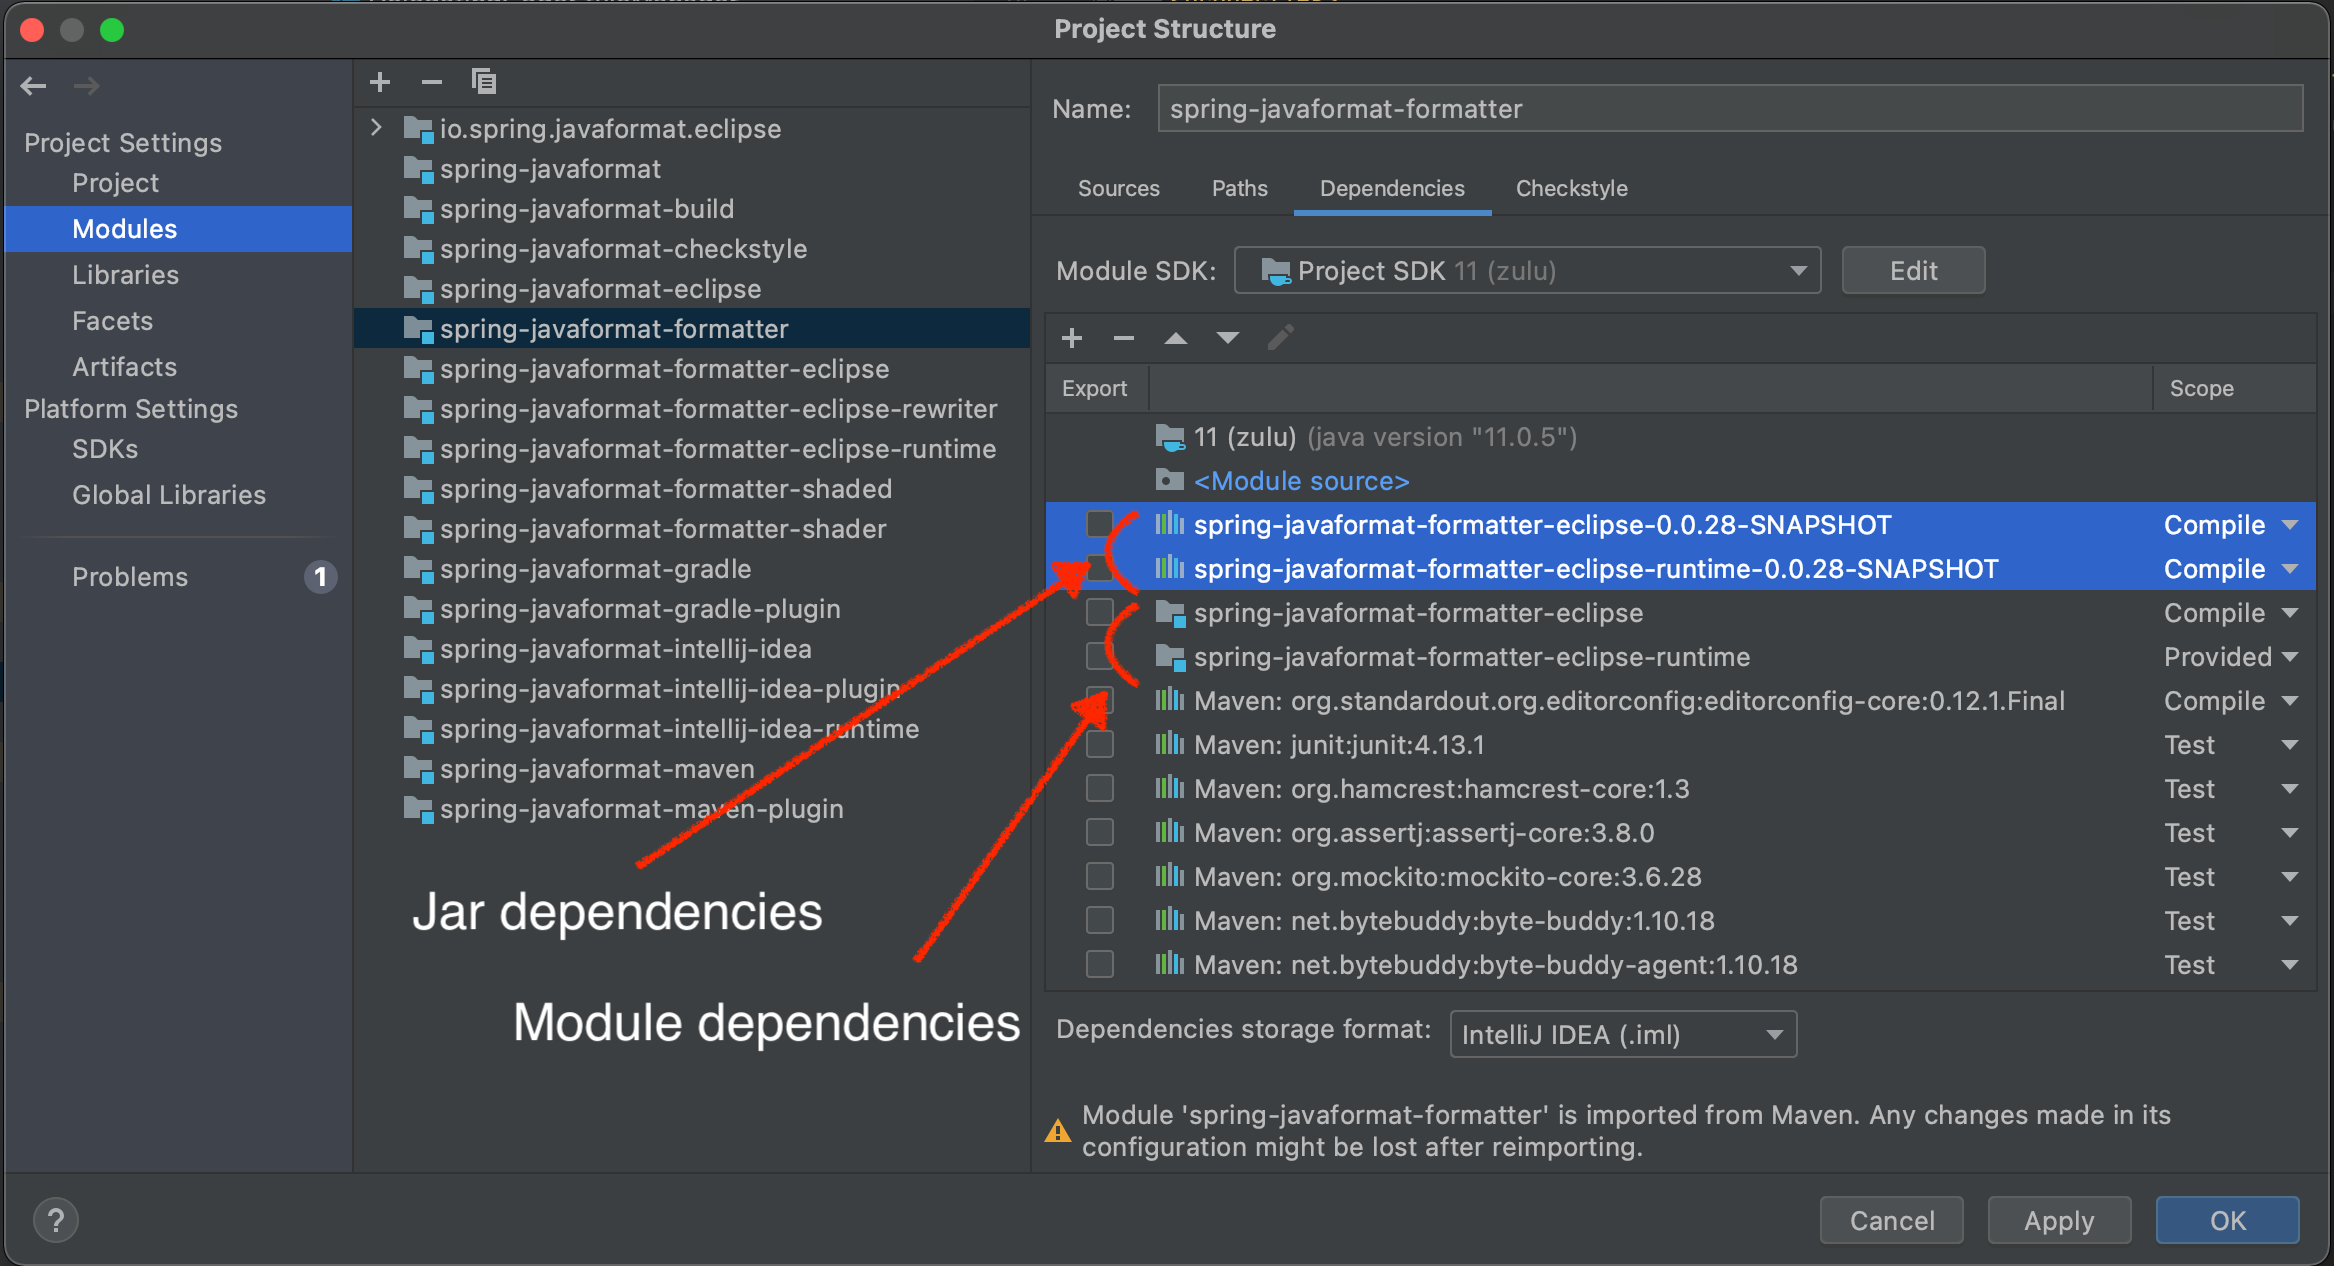
"Project Settings" → "Modules"
-
Select a module that depends on repackaging modules
-
Click "+" sign and "2 Library"
-
"Choose Libraries" and select necessary libraries that have added in the previous step
-
Move up the added libraries higher than the module dependencies (or remove the module dependencies)
To develop the spring-javaformat-intellij-idea-plugin module, you need an IntelliJ IDEA application on your local machine.
-
Open the
pom.xmlinspring-javaformat-intellij-idea/spring-javaformat-intellij-idea-runtime. -
Check
intellij.binaryandintellij.sourceproperties to find out the appropriate IntelliJ IDEA version. -
Download the binary from the url in
intellij.binary. (For OSX, replace the.tar.gzto.dmgto download the image file.) -
Install the image to the local machine
-
Download the source files from github specified in
intellij.sourceand unzip it.
-
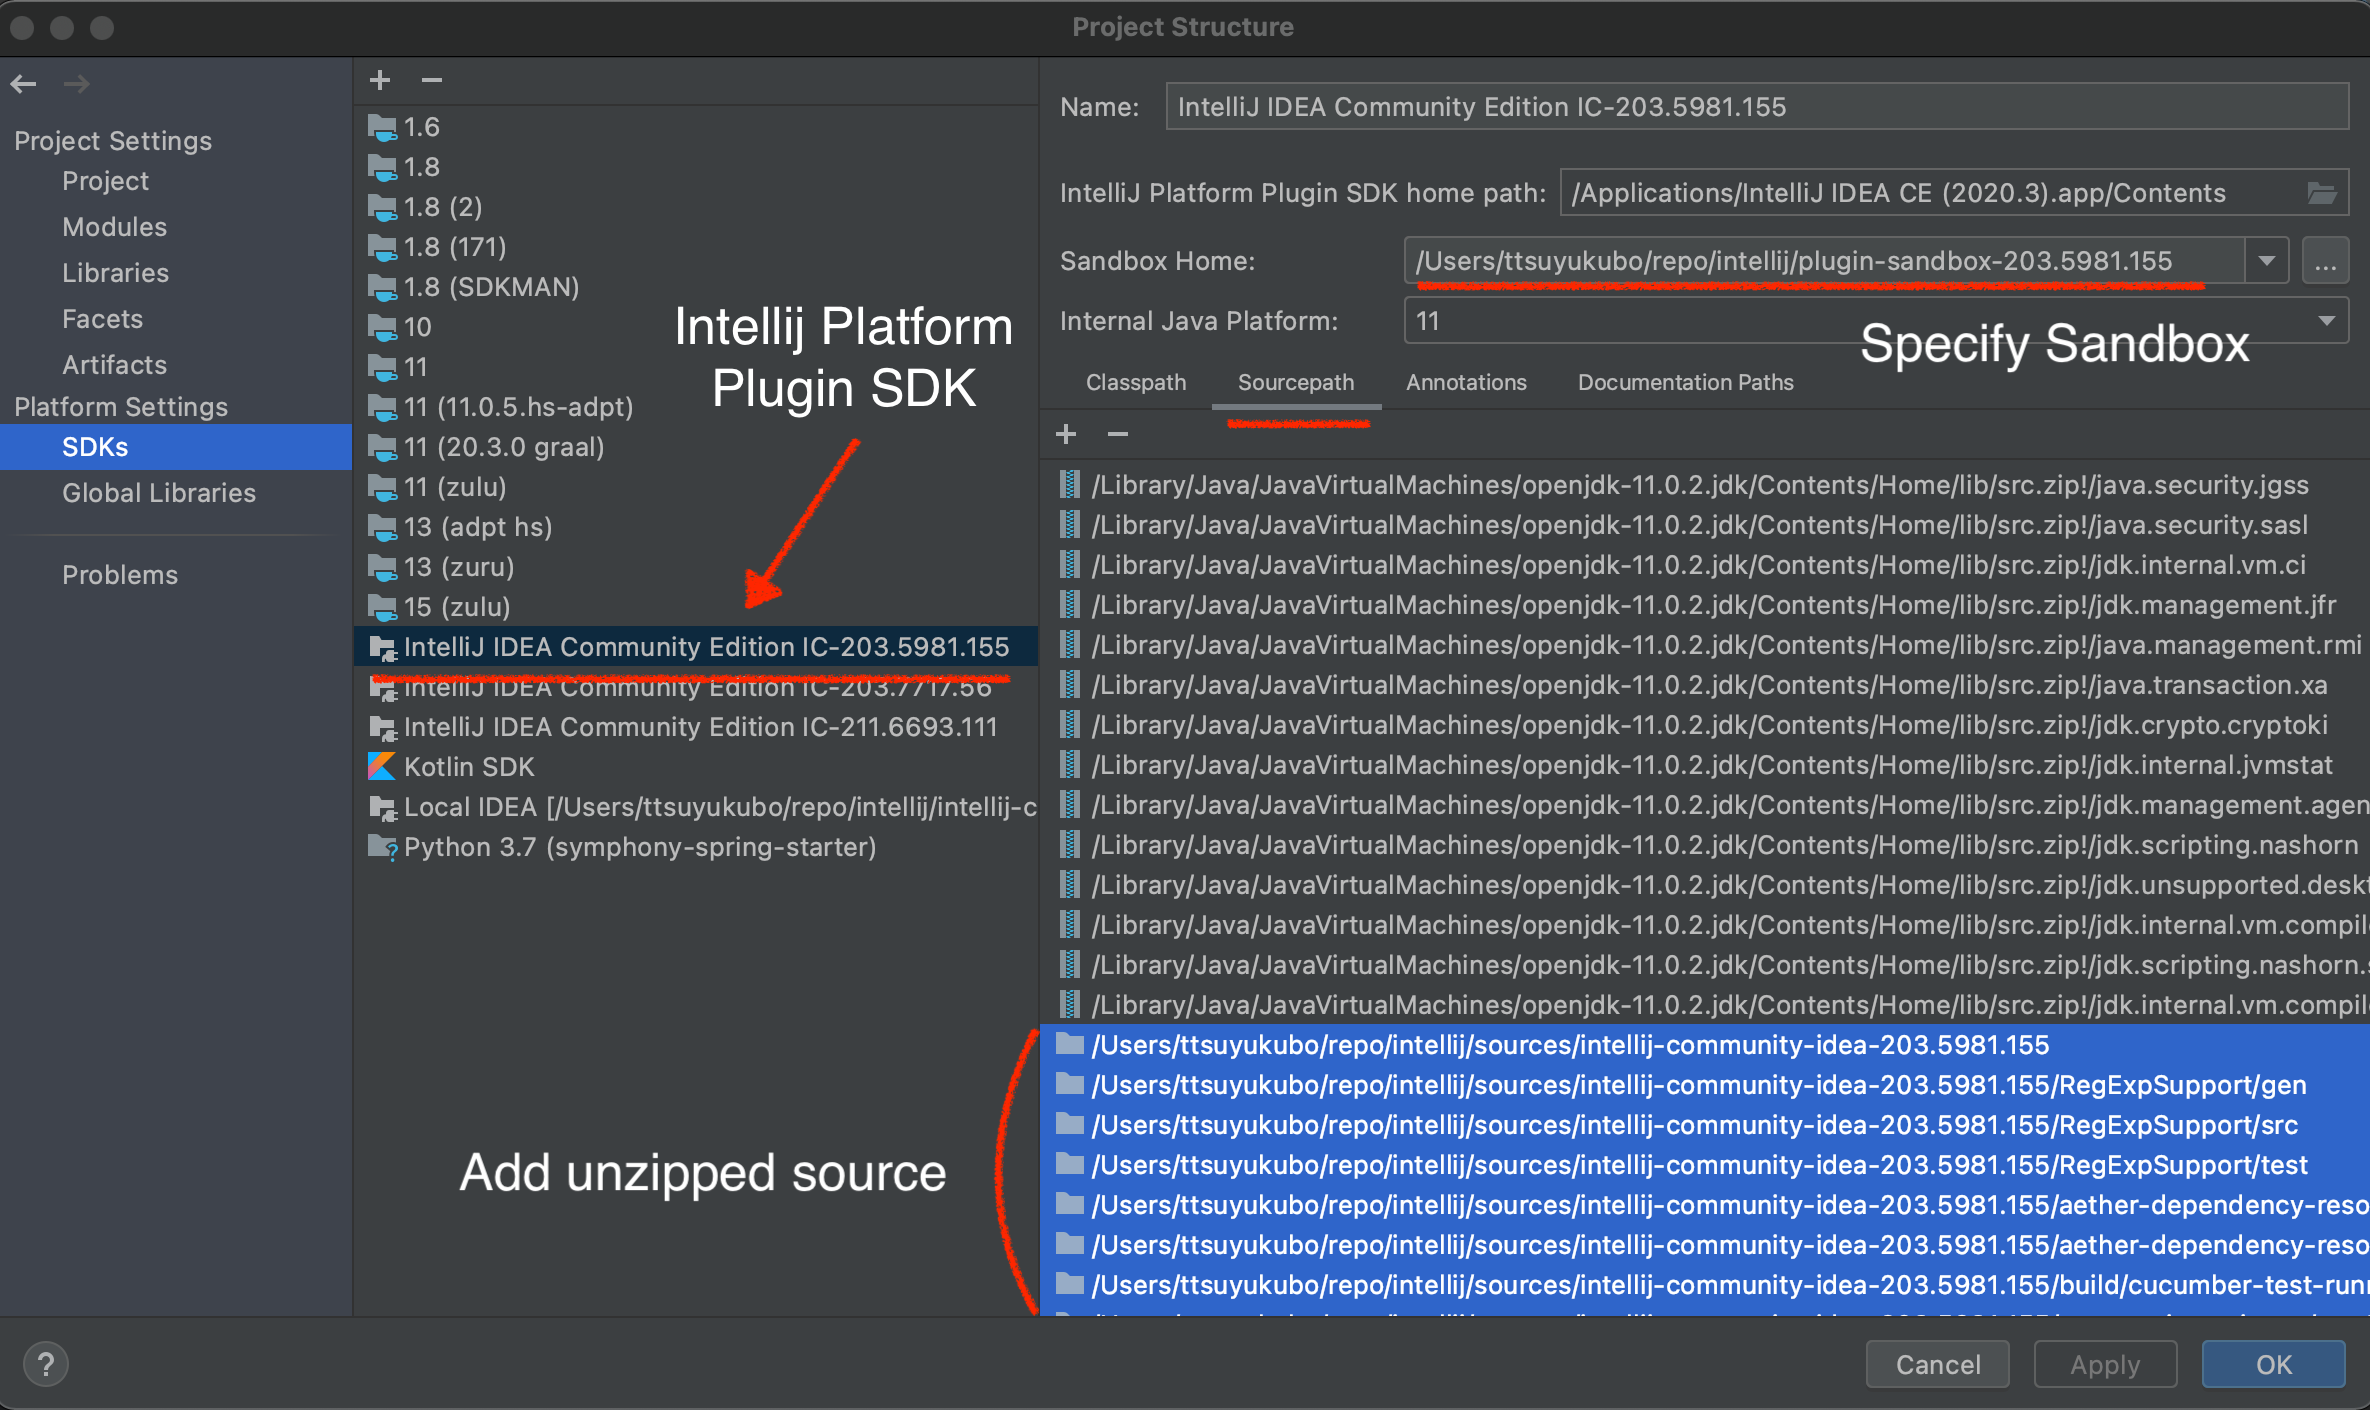
Open "Project Structure" - "Platform Settings" - "SDKs"
-
Click "+" sign, "Add Intellij Platform Plugin SDK…"
-
Specify the installed intellij image. (
/applications/IntelliJ IDEA CEfor OSX) -
On the right panel, "Sourcepath", Click "+" sign, specify unzipped intellij source directory
-
Specify "Sandbox Home" directory
Please see the IntelliJ IDEA reference for how to setup a plugin development in details.
The imported spring-javaformat-intellij-idea-plugin module is recognized as a java module.
This needs to be converted to a plugin module.
-
Open
spring-javaformat-intellij-idea-plugin.imlinspring-javaformat-intellij-idea/spring-javaformat-intellij-idea-plugin -
Change
type="JAVA_MODULE"totype="PLUGIN_MODULE"
<module org.jetbrains.idea.maven.project.MavenProjectsManager.isMavenModule="true" type="PLUGIN_MODULE" version="4">-
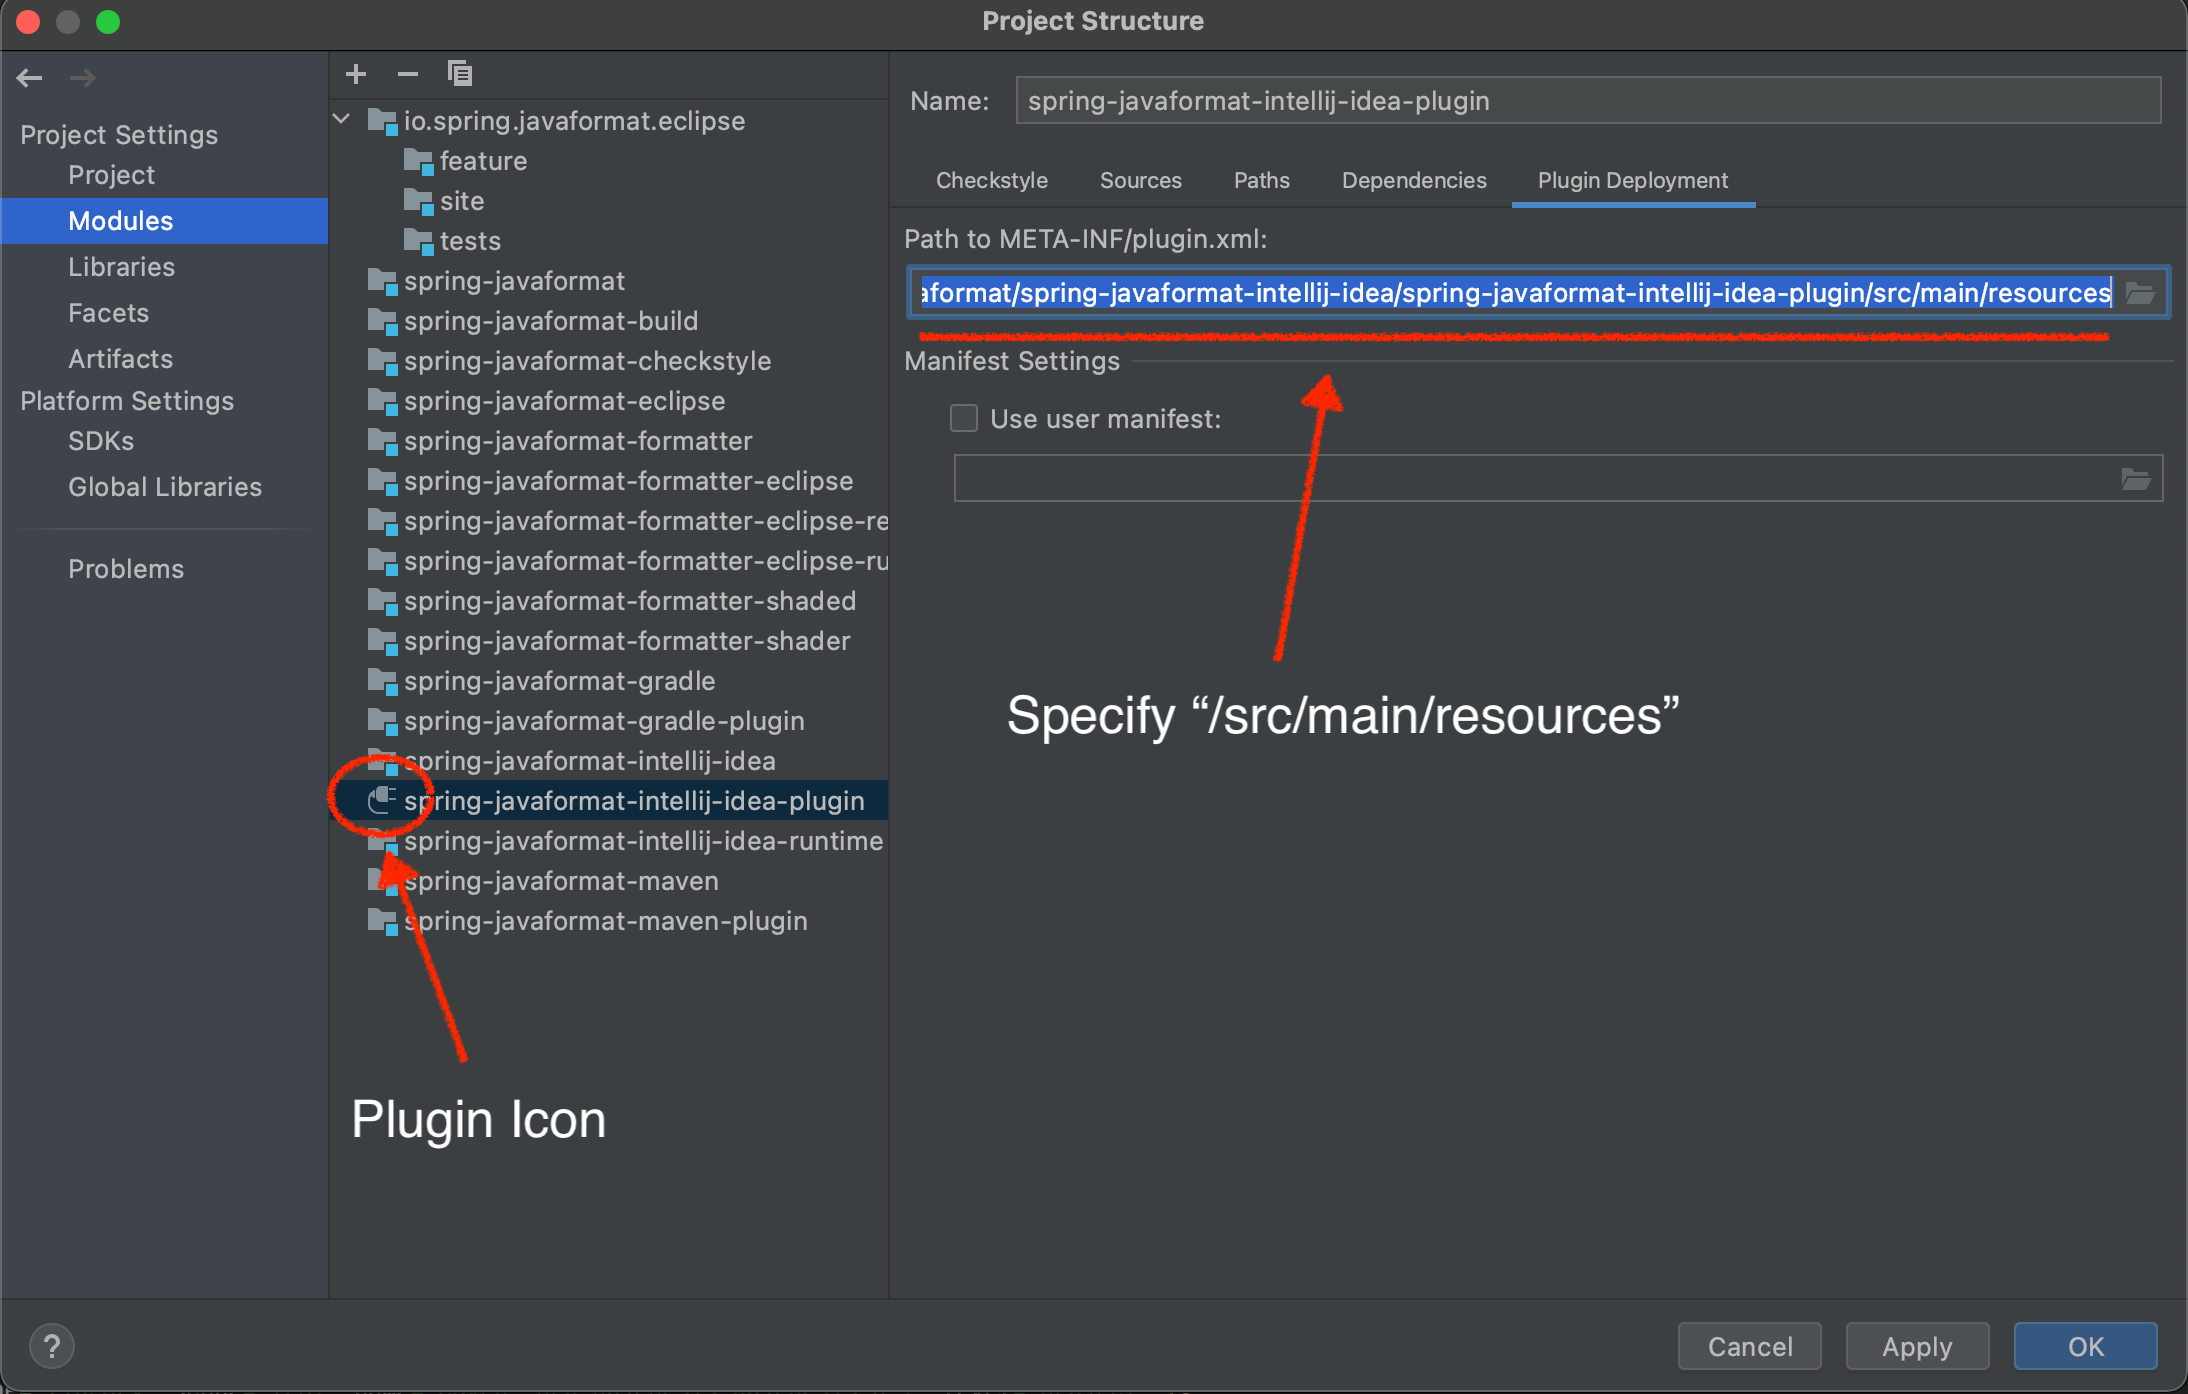
Open "Project Structure" - "Modules"
-
Check
spring-javaformat-intellij-idea-pluginicon turns to a plugin icon -
"Plugin Deployment" - "Path to META-INF/plugin.xml"
-
Specify
<PROJECT>spring-javaformat/spring-javaformat-intellij-idea/spring-javaformat-intellij-idea-plugin/src/main/resources
spring-javaformat-gradle-plugin module is a gradle plugin and requires gradle related classes.
To add gradle classes, convert this module to a gradle project.
-
On the project pain, right-click
build.gradleinspring-javaformat-gradle-pluginmodule -
Select "Import Gradle Project"
There are quite a few moving parts to this project and the build is quite complex. At the top level there are 5 projects:
-
spring-javaformat- The main formatter project -
spring-javaformat-eclipse- The Eclipse plugin -
spring-javaformat-gradle- The Gradle plugin -
spring-javaformat-intellij- The IntelliJ IDEA plugin -
spring-javaformat-maven- The Maven plugin
Under spring-javaformat the following projects are defined:
-
spring-javaformat-checkstyle- The checkstyle plugin -
spring-javaformat-formatter- The main formatter code -
spring-javaformat-formatter-eclipse- The eclipse formatter (repackaged and slightly adapted) -
spring-javaformat-formatter-eclipse-rewriter- Internal utility used to modify eclipse code -
spring-javaformat-formatter-eclipse-runtime- Eclipse runtime JAR for use when running outside of Eclipse
The main formatter is based on the formatter included with Eclipse. The shade plugin is used to repackage the formatter code to ensure that it doesn’t clash with the real one when used in the Eclipse plugin. A small amount of bytecode modification is also applied that increase the visibility of a few methods.
When the formatter runs outside of Eclispe some eclipse runtime files are also needed.
The spring-javaformat-formatter-eclipse-runtime project uses proguard to build a minimal eclipse runime jar.


