
An Arduino library to control LEDs. It uses a non-blocking approach and can control LEDs in simple (on/off) and complex (blinking, breathing and more) ways in a time-driven manner.
JLed got some coverage on Hackaday and someone did a video tutorial for JLed - Thanks!

// breathe LED (on gpio 9) 6 times for 1500ms, waiting for 500ms after each run
#include <jled.h>

auto led_breathe = JLed(9).Breathe(1500).Repeat(6).DelayAfter(500);

void setup() { }

void loop() {
  led_breathe.Update();
}- Features
- Cheat Sheet
- Installation
- Usage
- Platform notes
- Example sketches
- Extending
- Unit tests
- Contributing
- FAQ
- Author and Copyright
- License
- non-blocking
- effects: simple on/off, breathe, blink, candle, fade-on, fade-off, user-defined (e.g. morse)
- supports inverted polarity of LED
- easy configuration using fluent interface
- can control groups of LEDs sequentially or in parallel
- Arduino, ESP8266 and ESP32 platform compatible
- portable
- well tested

In the main menu of the Arduino IDE, select Sketch > Include Library >
Manage Libraries... and search for jled, then press install.
Add jled to your library dependencies in your platformio.ini project file,
e.g.
...
[env:nanoatmega328]
platform = atmelavr
board = nanoatmega328
framework = arduino
lib_deps=jled
...First the LED object is constructed and configured, then the state is updated
with subsequent calls to the Update() method, typically from the loop()
function. While the effect is active, Update returns true, otherwise
false.
The constructor takes the pin, to which the LED is connected to as
only argument. Further configuration of the LED object is done using a fluent
interface, e.g. JLed led = JLed(13).Breathe(2000).DelayAfter(1000).Repeat(5).
See examples section below for further details.
Calling On() turns the LED on. To immediately turn a LED on, make a call
like JLed(LED_BUILTIN).On().Update().
Off() works like On(), except that it turns the LED off, i.e. it sets the
brightness to 0.
Use the Set(uint8_t brightness) method to set the brightness to the given
value, i.e. Set(255) is equivalent to calling On() and Set(0) is
equivalent to calling Off().
#include <jled.h>

// turn builtin LED on after 1 second.
auto led = JLed(LED_BUILTIN).On().DelayBefore(1000);

void setup() { }

void loop() {
  led.Update();
}In blinking mode, the LED cycles through a given number of on-off cycles, on-
and off-cycle duration are specified independently. The Blink() method takes
the duration for the on- and off cycle as arguments.
#include <jled.h>

// blink internal LED every second; 1 second on, 0.5 second off.
auto led = JLed(LED_BUILTIN).Blink(1000, 500).Forever();

void setup() { }

void loop() {
  led.Update();
}In breathing mode, the LED smoothly changes brightness using PWM. The
Breathe() method takes the period of the effect as argument.
#include <jled.h>

// connect LED to pin 13 (PWM capable). LED will breathe with period of
// 2000ms and a delay of 1000ms after each period.
auto led = JLed(13).Breathe(2000).DelayAfter(1000).Forever();

void setup() { }

void loop() {
  led.Update();
}In candle mode the random flickering of a candle or fire is simulated.
The builder method has the following signature:
Candle(uint8_t speed, uint8_t jitter, uin16_t period)
speed- controls the speed of the effect. 0 for fastest, increasing speed divides into halve per increment. Default value is 7.jitter- amount of jittering. 0 none (constant on), 255 maximum. Default value is 15.period- Period of effect in ms. Default is 65535 ms.
The default settings simulate a candle. For a fire effect for example use
call the method with Candle(5 /*speed*/, 100 /* jitter*/).
#include <jled.h>

// Candle on LED pin 13 (PWM capable).
auto led = JLed(13).Candle();

void setup() { }

void loop() {
  led.Update();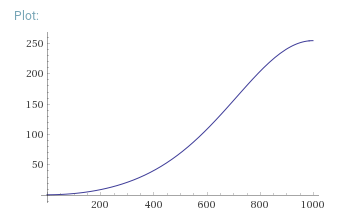
}In FadeOn mode, the LED is smoothly faded on to 100% brightness using PWM. The
FadeOn() method takes the period of the effect as argument.
The brightness function uses an approximation of this function (example with period 1000):
#include <jled.h>

// LED is connected to pin 9 (PWM capable) gpio
auto led = JLed(9).FadeOn(1000).DelayBefore(2000);

void setup() { }

void loop() {
  led.Update();
}In FadeOff mode, the LED is smoothly faded off using PWM. The fade starts at
100% brightness. Internally it is implemented as a mirrored version of the
FadeOn function, i.e. FadeOn(t) = FadeOff(period-t). The FadeOff() method
takes the period of the effect as argument.
It is also possible to provide a user defined brightness evaluator. The class
must be derived from the jled::BrightnessEvaluator class and implement
two methods:
uint8_t Èval(uint32_t t) const- the brightness evaluation function that calculates a brightness for the given timet. The brightness must be returned as an unsigned byte, where 0 means LED off and 255 means full brightness.uint16_t Period() const- period of the effect.
All time values are specified in milliseconds.
The user_func example demonstrates a simple user provided brightness function, while the morse example shows how a more complex application, allowing you to send morse codes (not necessarily with an LED), can be realized.
The example uses a user provided function to calculate the brightness.
class UserEffect : public jled::BrightnessEvaluator {
  public:
    uint8_t Eval(uint32_t t) const override {
        // this function changes between 0 and 255 and
        // vice versa every 250 ms.
        return 255*((t/250)%2);
    }
    // duration of effect: 5 seconds.
    uint16_t Period() const override { return 5000; }
};Use the DelayBefore() method to specify a delay before the first effect starts.
The default value is 0 ms.
Use the DelayAfter() method to specify a delay after each repetition of
an effect. The default value is 0 ms.
Use the Repeat() method to specify the number of repetition. The default
value is 1 repetition. The Forever() methods sets to repeat the effect
forever. Each repetition includes a full period of the effect and the time
specified by DelayAfter() method.
Call Update() periodically to update the state of the LED. Update returns
true if the effect is active, and false when it finished.
IsRunning() returns true if the current effect is running, else false.
A call to Reset() brings the JLed object to it's initial state. Use it when
you want to start-over an effect.
Call Stop() to immediately turn the LED off and stop any running effects.
Further calls to Update() will have no effect unless the Led is reset (using
Reset()) or a new effect activated.
Use the LowActive() method when the connected LED is low active. All output
will be inverted by JLed (i.e. instead of x, the value of 255-x will be set).
The JLedSequence class allows to control a group of JLed objects
simultaneously, either in parallel or sequentially, starting the next JLed
effect when the previous finished. The constructor takes the mode (PARALLEL,
SEQUENCE), an array of JLed objects and the size of the array, e.g.
JLed leds[] = {
    JLed(4).Blink(750, 250).Forever(),
    JLed(3).Breathe(2000).Forever()
};

JLedSequence sequence(JLedSequence::eMode::PARALLEL, leds);

void setup() {
}

void loop() {
    sequence.Update();
}
Because the size of the array is known at compile time in this example, it is
not necessary to pass the array size to the constructor. A second constructor
is available in case the JLed array is created dynamically at runtime:
JLed(eMode mode, JLed* leds, size_t n).
The JLedSequence provides the following methods:
Update()- updates the activeJLedobjects controlled by the sequence. Like theJLed::Update()method, it returnstrueif an effect is running, elsefalse.Stop()- turns off allJLedobjects controlled by the sequence and stops the sequence. Further calls toUpdate()will have no effect.Reset()- Resets allJLedobjects controlled by the sequence and the sequence, resulting in a start-over.
The DAC of the ESP8266 operates with 10 bits, every value JLed writes out gets automatically scaled to 10 bits, since JLed internally only uses 8 bits. The scaling methods makes sure that min/max relationships are preserved, i.e. 0 is mapped to 0 and 255 is mapped to 1023. When using a user defined brightness function on the ESP8266, 8 bit values must be returned, all scaling is done by JLed transparently for the application, yielding platform independent code.
The ESP32 Arduino SDK does not provide an analogWrite() function. To
be able to use PWM, we use the ledc functions of the ESP32 SDK.
(See esspressif documentation for details).
The ledc API connects so called channels to GPIO pins, enabling them to use
PWM. There are 16 channels available. Unless otherwise specified, JLed
automatically picks the next free channel, starting with channel 0 and wrapping
over after channel 15. To manually specify a channel, the JLed object must be
constructed this way:
auto esp32Led = JLed(Esp32Hal(2, 7)).Blink(1000, 1000).Forever();
The Esp32Hal(pin, chan) constructor takes the pin number as the first
argument and the ESP32 ledc channel number on second position. Note that using
the above mentioned constructor yields non-platform independent code, so it
should be avoided and is normally not necessary.
I had success running JLed on a STM32 Nucleo64 F401RE
board using this
STM32 Arduino
core
and compiling from the Arduino IDE. Note that the stlink tool may be
necessary to upload sketches to the micro controller.
PlatformIO does not support the Arduino platform for the F401RE in the current version, but has support on the master branch. See plaform.ini for an example on how to use the Arduino framework with this board.
Examples sketches are provided in the examples directory.
- Hello, world
- Turn LED on after a delay
- Fade LED on
- Fade LED off
- Controlling multiple LEDs in parallel
- Controlling multiple LEDs sequentially
- Simple User provided effect
- Morsecode example
To build an example using the PlatformIO ide, uncomment the example to be built in the platformio.ini project file, e.g.:
...
[platformio]
; uncomment example to build
src_dir = examples/hello
;src_dir = examples/breathe
...To build an example sketch in the Arduino IDE, select an example from
the File > Examples > JLed menu.
JLed uses a very thin hardware abstraction layer (hal) to abstract access to the acutal used MCU (e.g. ESP32, ESP8266). The hal objects encapsulate access to the GPIO and time functionality of the MCU under the framework being used. During unit test, mocked hal instances are used, enabling tests to check the generated output.
JLed comes with an exhaustive host based unit test suite. Info on how to run the host based provided unit tests is provided here.
- fork this repository
- create your feature branch
- add code
- add unit test(s)
- add documentation
- make sure the cpp linter does not
report any problems (run
make lint). Hint: useclang-formatwith the provided settings - commit changes
- submit a PR
- Check the return value of the
JLed::Updatemethod: the method returnstrueif the effect is still running, otherwisefalse. - The
JLed::IsRunningmethod returnstrueif an effect is running, elsefalse.
Call Reset() on a JLed object to start over.
Just 'reconfigure' the JLed with any of the effect methods (e.g. FadeOn,
Breathe, Blink etc). Time wise, the effect will start over.
Copyright 2017, 2018 by Jan Delgado, jdelgado[at]gmx.net.