This walks through the steps to configure your Bandwidth Phone Number Dashboard and Messaging API to work together. This guide is entirely focused on setup with the UI. If you'd like to follow along with the API, head to the via API to follow along there.
- You have downloaded Postman -or- have the ability to make an API request.
⚠️ During the Beta, you MUST use Postman, curl, hurl.it or other http tool to create your application⚠️
- You have your Voice and Messaging API
userId,token,secret - You have your Phone Number API
usernameandpassword - You have contacted Support to link your Voice and Messaging API and Phone Number API
Fill out the form on the Postman page to download the Messaging 2.0 collection.
- Get your account ID
- Create your first Application
- Create subaccount (site)
- Create location (sippeer) and assign the application
- Order Phone numbers to location (sippeer)
- Sending Messages
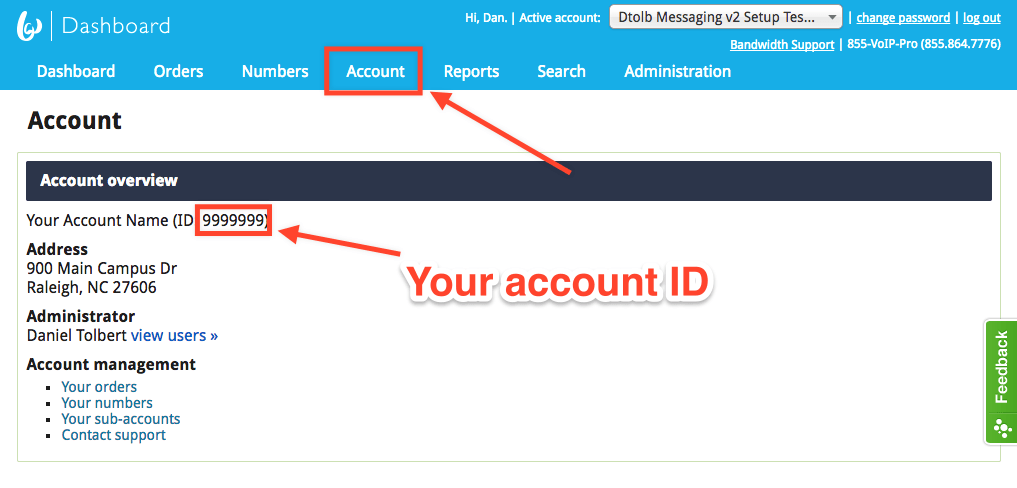
- Log into the Bandwidth Phone Number Dashboard
- Click the Account tab in the menu section to go to your Account Overview
- Under the Account overview section you should see your account ID.
ℹ️ Learn more about Applications ℹ️
The Application contains the HTTP URL you want to use for both inbound and outbound messages.
Save the Application Id After creating the application.
{% extendmethod %}
| Parameters | Mandatory | Description |
|---|---|---|
AppName |
Yes | Plain text name of the application |
CallbackUrl |
Yes | Url to recieve all message events |
CallBackCreds |
No | Basic auth credentials to apply to your message events |
CallBackCreds.UserId |
No | Basic auth UserId |
CallBackCreds.Password |
No | Basic auth Password |
{% common %}
{% sample lang="http" %}
POST https://dashboard.bandwidth.com/api/accounts/{{accountId}}/applications HTTP/1.1
Content-Type: application/xml; charset=utf-8
Authorization: {user:password}

<Application>
    <AppName>Production Server</AppName>
    <CallbackUrl>https://yourSecureSite.com/callbacks</CallbackUrl>
    <CallbackCreds>
      <UserId>Your-User-id</UserId>
      <Password>Your-Password</Password>
  </CallbackCreds>
</Application>
{% common %}
HTTP/1.1 201 Created
Content-Type: application/xml

<?xml version="1.0" encoding="UTF-8" standalone="yes"?>
<ApplicationProvisioningResponse>
    <Application>
        <ApplicationId>d775585a-ed5b-4a49-8b96-f68c0a993ebe</ApplicationId>
        <ServiceType>Messaging-V2</ServiceType>
        <AppName>Production Server</AppName>
        <CallbackUrl>https://yourSecureSite.com/callbacks</CallbackUrl>
        <CallbackCreds>
            <UserId>Your-User-id</UserId>
            <Password>Your-Password</Password>
        </CallbackCreds>
    </Application>
</ApplicationProvisioningResponse>
{% endextendmethod %}
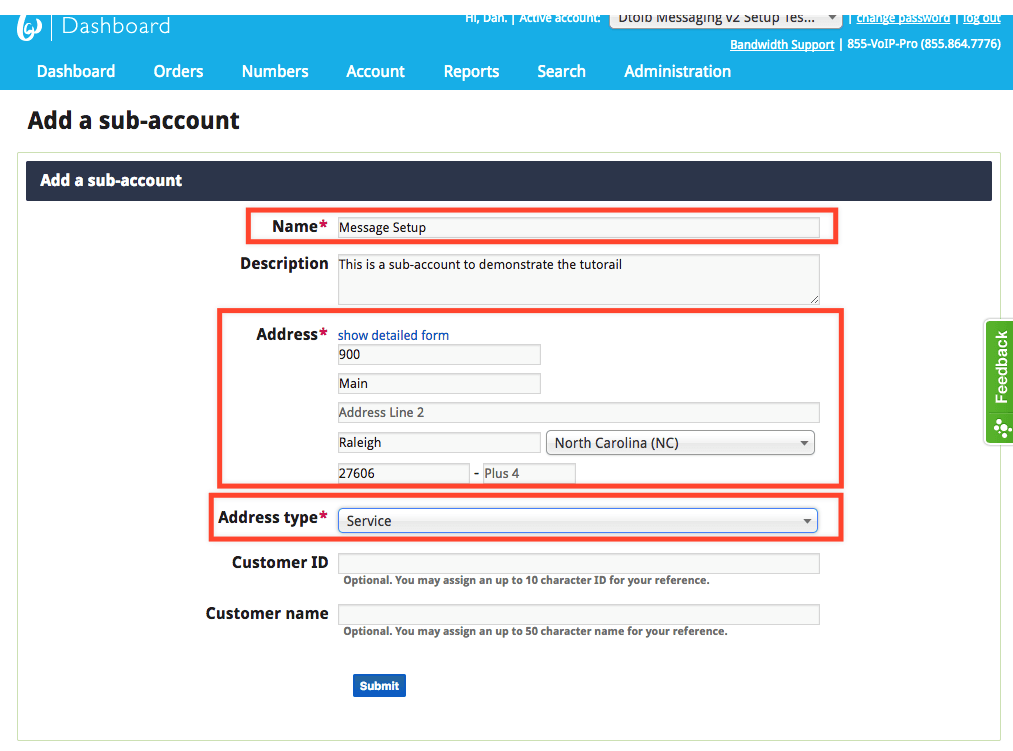
- Navigate to the Add a sub-account page (if you already have a sub-account you'd like to use, you can skip this step)
- Account > Configuration > Sub-accounts > Add a sub-account
- You'll need a sub-account (site) in order to create a location (sippeer).
- Fill in the address and set the
typetoService
Create location (sippeer) and assign the application {#create-location-sippeer-and-assign-the-application}
- Navigate to the Add a location page
- Account > Configuration > Locations > Add a location
- You'll need a location (sippeer) in order to group phone numbers.
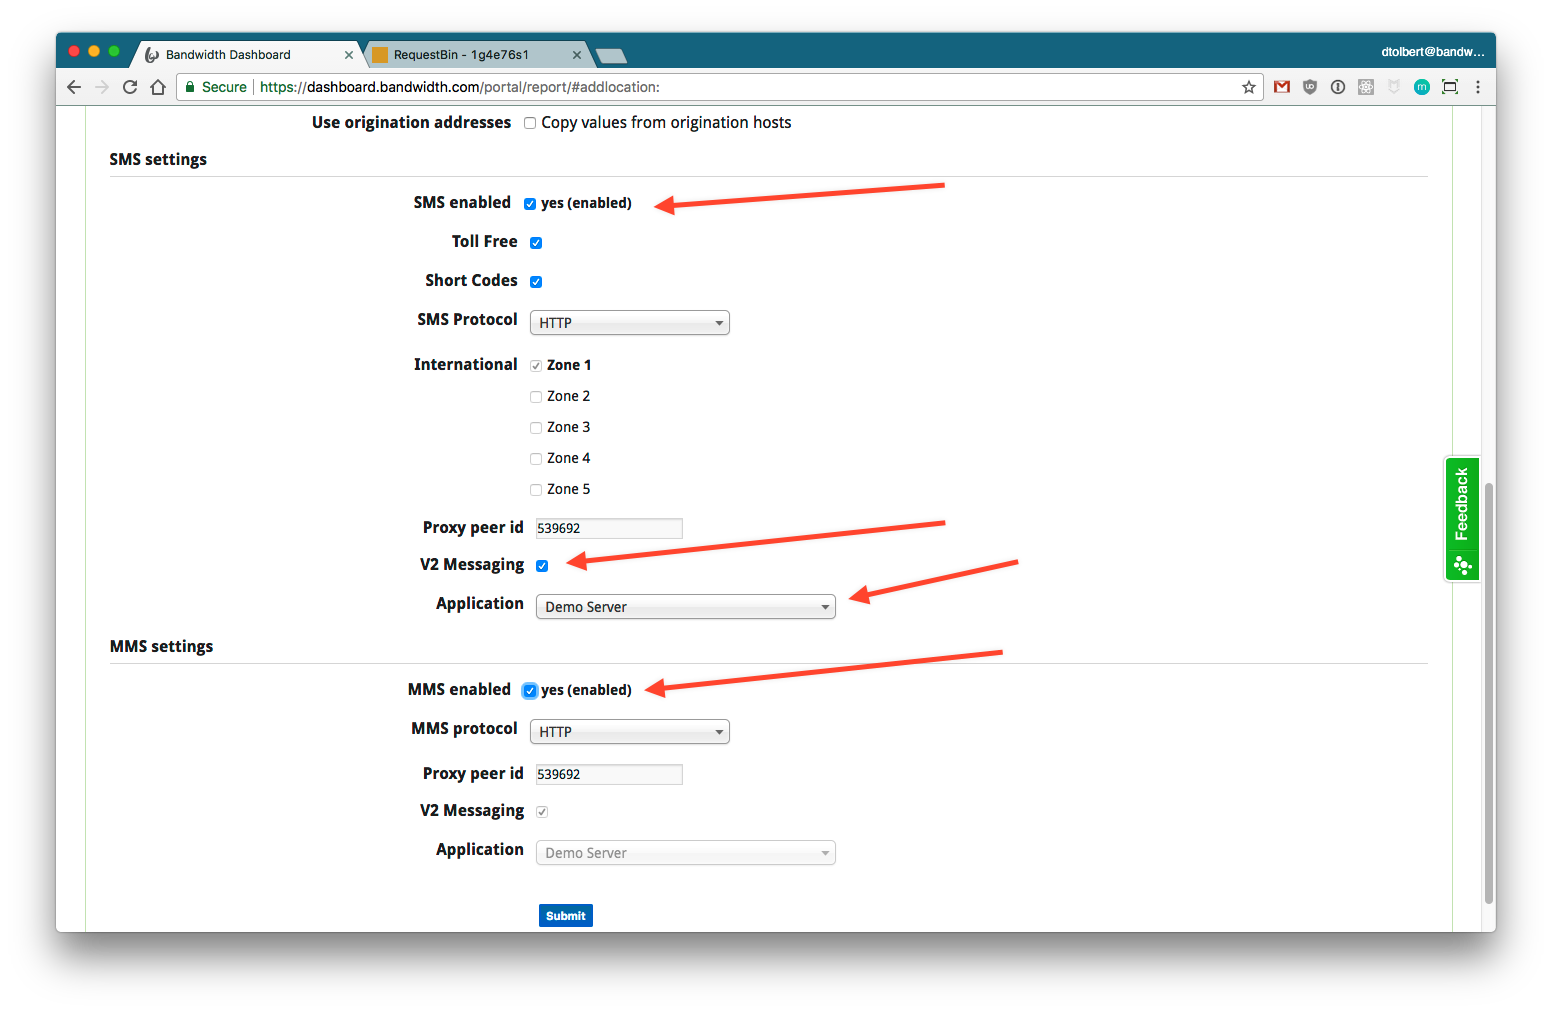
- When creating the location be sure to check:
SMS EnabledToll Free(if available)Short Code(if available)V2 MessagingApplication- Select the application created above
- If you need
Toll FreeorShort Codesupport contact support to enable.
- Navigate to the Order New Numbers page
- Orders > Order New Numbers
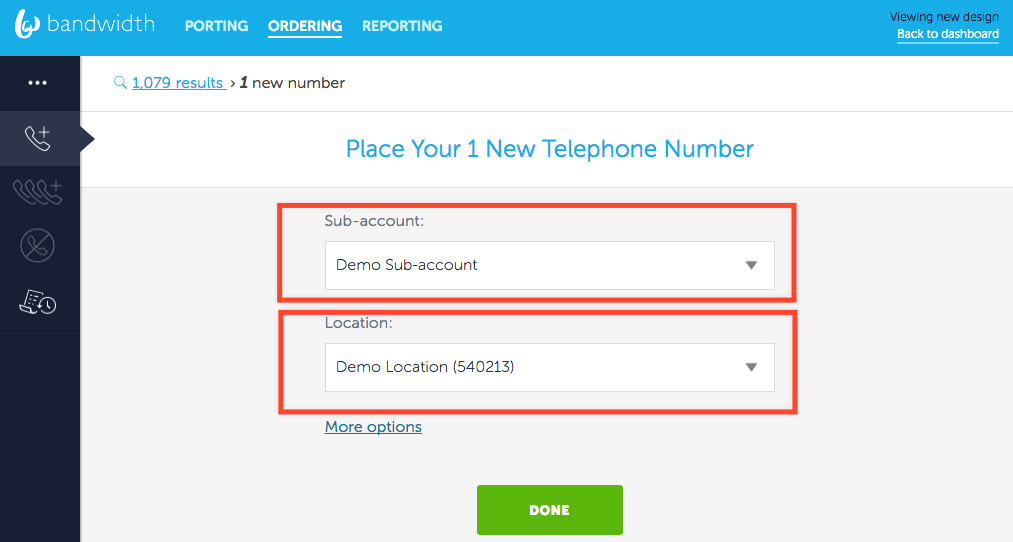
- Once your application, sub-account (site), and location (sippeer) have been configured you're ready to start ordering phone numbers to use.
- Using the UI, search for a number and order it to the sub-account (site) and location (sippeer) created above.
ℹ️ Learn more about Messages ℹ️
- To send a message,
POSTto the/messagesendpoint - In the V2 Messaging API, messages are sent asynchronously. Message validation will happen after the server returns
HTTP 202 - Created. API clients should listen for HTTP callback events to track message state after the initialPOSTrequest.
{% extendmethod %}
| Parameter | Mandatory | Description |
|---|---|---|
from |
Yes | One of your telephone numbers the message should come from (must be in E.164 format, like +19195551212). |
to |
Yes | The phone number the message should be sent to (must be in E.164 format, like +19195551212). |
text |
Yes | The contents of the text message (must be 2048 characters or less). |
applicationId |
Yes | The ID of the Application your from number is associated with in the Bandwidth Phone Number Dashboard. |
{% common %}
{% sample lang="http" %}
POST https://api.catapult.inetwork.com/v2/users/{{userId}}/messages HTTP/1.1
Content-Type: application/json; charset=utf-8
Authorization: {token:secret}

{
  "from"          : "{{your-bandwidth-number}}",
  "to"            : "{{yourTN}}",
  "text"          : "Good morning, this is a test message",
  "applicationId" : "{{your-application-id}}"
}
{% common %}
HTTP/1.1 202
Content-Type: "application/json;charset=UTF-8"

{
    "id"            : "15047516192013g5tuga77zsa6jrp",
    "owner"         : "+19193529968",
    "applicationId" : "05851417-c78b-4636-81a2-014a54d8f119",
    "time"          : "2017-09-07T02:33:39.201Z",
    "direction"     : "out",
    "to"            : ["+19191231234"],
    "from"          : "+19193524444",
    "text"          : "Hi from Bandwidth!"
}
{% endextendmethod %}


