In this readme, we will walk you through step by step instructions on how to use Db2 Event store on cloud pak for data.
The services are not available by default. An administrator must install them on the IBM Cloud Pak for Data platform, and you must be given access to the service. To determine whether the service is installed, Click the Services icon (see below) and check whether the service that you require is enabled.
Following are the services that you need to get installed and provisioned.
- Watson Studio
- Db2 Event Store
- Watson Machine Learning
By default Jupyter notebooks are available part of Watson Studio. You need to make sure Default Spark Python 3.6 kernel is available when creating notebooks. If not, your administrator should help you install it.
Once provisioned you can go to the navigation menu, select My Instances, click on Provisioned instances tab and make sure your instances are available in the list.
- Clone the repo
- Create Watson Studio Project
- Get Db2 Event Store Credentials
- Create an IBM Db2 Event Store database and table
- Add the sample IoT data
- Query the table
- Analyze the data
- Create and deploy a machine learning model
Clone the db2-event-store-iot-analytics repo locally. In a terminal, run:
git clone https://github.com/IBM/db2-event-store-iot-analyticsLogin to your IBM cloud Pak for Data cluster. From the hamburger menu, click Projects -> + New project, select Create an empty project, fill out the details and click Create.
Go to My instances from the hamburger menu and select Provisioned instances. Click on 3 dots on the far right of the Db2 Event Store instance and click View details. Copy the Deployment id from the Db2 EventStore section and Copy the Scala Connection URL from the Access Information section at the bottom and save it for future use.
The Db2 Event Store database and table can be created with one of the Jupyter notebooks provided. Refer to the notebook comments if you need to drop your existing database or table.
- From
Assetstab in your Watson Studio project, click+ Add notebook. - Select the
From Filetab. - Provide a name.
- Click
Choose Fileand navigate to thenotebooks-cpddirectory in your cloned repo. Open the Jupyter notebook file namedEvent_Store_Table_Creation.ipynb. - Make sure to choose
Default Spark Python3.6kernel. Scroll down and click onCreate Notebook. - Edit the Credentials constant in the first code cell as shown in the image below.

- Run the notebook using the menu
Cell ▷ Run allor run the cells individually with the play button.
This repository includes a generated sample IoT dataset in CSV format that contains 1 million records. The sample CSV dataset can be found at data/sample_IOT_table.csv.
Alternatively, a CSV dataset containing a user-specified number of records can be generated with the provided Python script at data/generator.py. A Python environment with pandas and NumPy installed is required to run the script.
cd db2-event-store-iot-analytics/data
python ./generator.py -c <Record Count>- From
Assetstab in your Watson Studio project, clickFind and add dataicon on top right. and upload the generated file or the provided filedata/sample_iot_table.csvfrom the cloned repository. - Similar to step #4, Add the
Event_Store_Data_Feed.ipynbnotebook, modify the credentials and run the notebook.
The notebook loads the table with one million records from the CSV file that you added as a project asset.
Follow the same process to add and run a notebook from notebooks-cpd directory. This time choose the file named Event_Store_Querying.ipynb.
This notebook demonstrates best practices for querying the data stored in the IBM Db2 Event Store database. Verify that you have successfully created and loaded the table before continuing.
Next, run the data analytics notebook from notebooks-cpd directory. Use the file Event_Store_Data_Analytics.ipynb, modify the credentials in the first cell and run.
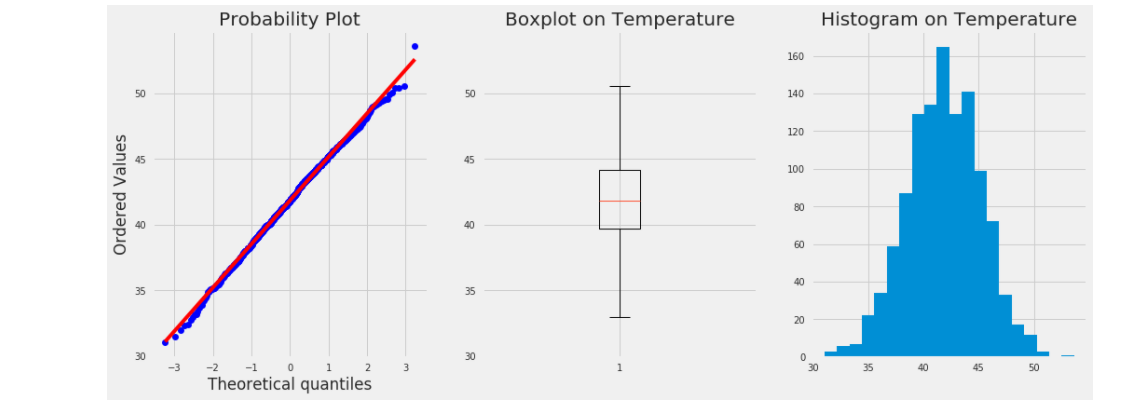
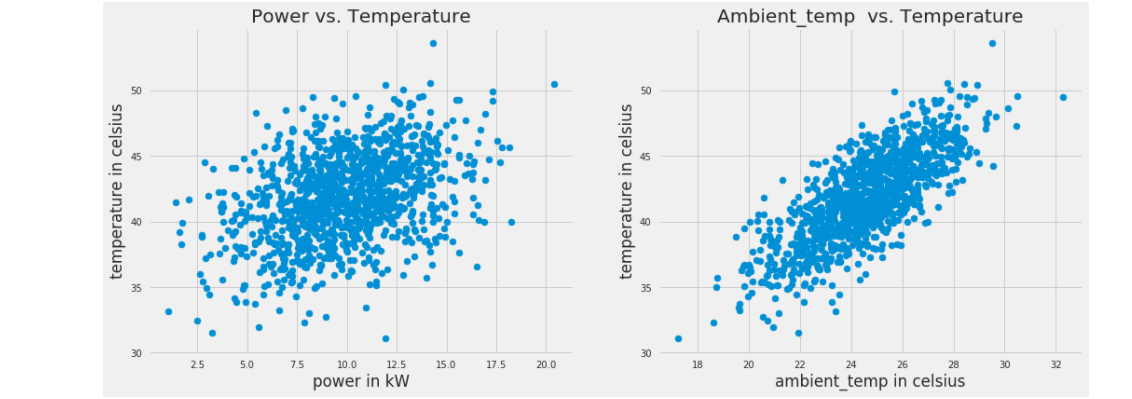
This notebook shows how the IBM Db2 Event Store can be integrated with multiple popular scientific tools to perform various data analytics tasks. As you walk through the notebook, you'll explore the data to filter it and example the correlation and covariance of the measurements. You'll also use some charts to visualize the data.
This section demonstrates building and deploying a machine learning model. The notebook uses Spark MLlib to build and test a prediction model from our IoT temperature sensor data. At the end, it demonstrates how to deploy and use the model.
In order to create and deply machine learning model, make sure Watson Machine Learning service is enabled.
Also in your project create a Deployment space. Go to your project, click Settings tab, and Add a deployment space. Make sure to copy the deployment space name to use it in the notebook.
Load the notebook, using the file Event_Store_ML_Model_Deployment.ipynb from from notebooks-cpd directory, modify the credentials and click run. This will create the model and deploy it.
Note to add the DEPLOYMENT_SPACE constant in the first cell.
new_data = {"deviceID" : 2, "sensorID": 24, "ts": 1541430459386, "ambient_temp": 30, "power": 10}predictions: [48.98055760884435]This code pattern is licensed under the Apache License, Version 2. Separate third-party code objects invoked within this code pattern are licensed by their respective providers pursuant to their own separate licenses. Contributions are subject to the Developer Certificate of Origin, Version 1.1 and the Apache License, Version 2.


