| title | description | keywords | services | documentationcenter | author | manager | editor | ms.assetid | ms.service | ms.workload | ms.tgt_pltfrm | ms.devlang | ms.topic | ms.date | ms.author |
|---|---|---|---|---|---|---|---|---|---|---|---|---|---|---|---|
Consume a Machine Learning web service with a web app template | Microsoft Docs |
Use a web app template in Azure Marketplace to consume a predictive web service in Azure Machine Learning. |
web service,operationalization,REST API,machine learning |
machine-learning |
garyericson |
jhubbard |
cgronlun |
e0d71683-61b9-4675-8df5-09ddc2f0d92d |
machine-learning |
data-services |
na |
na |
article |
01/06/2017 |
garye;raymondl |
Note
This topic describes techniques applicable to a classic web service.
Once you've developed your predictive model and deployed it as an Azure web service using Machine Learning Studio, or using tools such as R or Python, you can access the operationalized model using a REST API.
There are a number of ways to consume the REST API and access the web service. For example, you can write an application in C#, R, or Python using the sample code generated for you when you deployed the web service (available on the API Help Page in the web service dashboard in Machine Learning Studio). Or you can use the sample Microsoft Excel workbook created for you (also available in the web service dashboard in Studio).
But the quickest and easiest way to access your web service is through the Web App Templates available in the Azure Web App Marketplace.
[!INCLUDE machine-learning-free-trial]
The web app templates available in the Azure Marketplace can build a custom web app that knows your web service's input data and expected results. All you need to do is give the web app access to your web service and data, and the template does the rest.
Two templates are available:
- Azure ML Request-Response Service Web App Template
- Azure ML Batch Execution Service Web App Template
Each template creates a sample ASP.NET application, using the API URI and Key for your web service, and deploys it as a web site to Azure. The Request-Response Service (RRS) template creates a web app that allows you to send a single row of data to the web service to get a single result. The Batch Execution Service (BES) template creates a web app that allows you to send many rows of data to get multiple results.
No coding is required to use these templates. You just supply the API URI and Key and the template builds the application for you.
Once you've deployed your web service, you can follow the steps below to use the RRS web app template, as shown in the following diagram.

-
In Machine Learning Studio, open the Web Services tab and then open the web service you want to access. Copy the key listed under API key and save it.
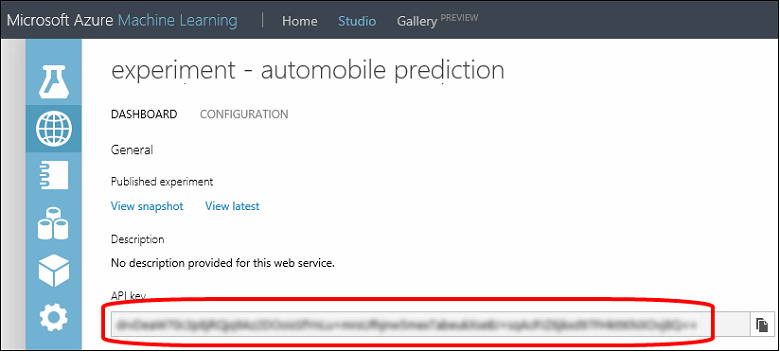
-
Open the REQUEST/RESPONSE API Help Page. At the top of the help page, under Request, copy the Request URI value and save it. This value will look like this:
https://ussouthcentral.services.azureml.net/workspaces/<workspace-id>/services/<service-id>/execute?api-version=2.0&details=true
-
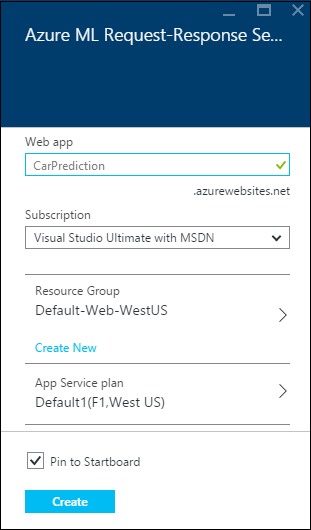
Go to the Azure portal, Login, click New, Search for and select Azure ML Request-Response Service Web App, then click Create.
-
Give your web app a unique name. The URL of the web app will be this name followed by
.azurewebsites.net.For example,http://carprediction.azurewebsites.net. -
Select the Azure subscription and services under which your web service is running.
-
Click Create.
-
-
When Azure has finished deploying the web app, click the URL on the web app settings page in Azure, or enter the URL in a web browser. For example,
http://carprediction.azurewebsites.net. -
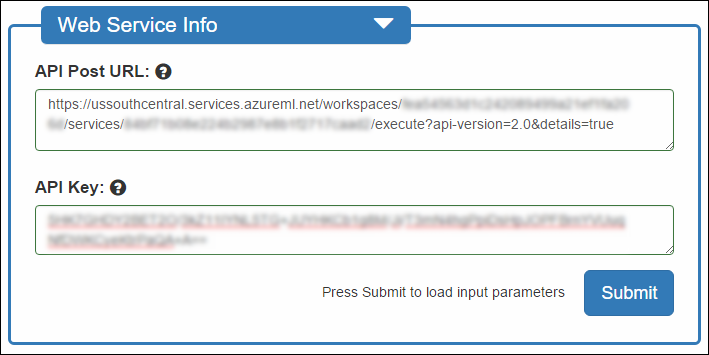
When the web app first runs it will ask you for the API Post URL and API Key. Enter the values you saved earlier:
-
Request URI from the API Help Page for API Post URL
-
API Key from the web service dashboard for the API Key.
Click Submit.
-
-
The web app displays its Web App Configuration page with the current web service settings. Here you can make changes to the settings used by the web app.
[!NOTE] Changing the settings here only changes them for this web app. It doesn't change the default settings of your web service. For example, if you change the Description here it doesn't change the description shown on the web service dashboard in Machine Learning Studio.
When you're done, click Save changes, and then click Go to Home Page.
-
From the home page you can enter values to send to your web service, click Submit, and the result will be returned.


If you want to return to the Configuration page, go to the setting.aspx page of the web app. For example: http://carprediction.azurewebsites.net/setting.aspx. You will be prompted to enter the API key again - you need that to access the page and update the settings.
You can stop, restart, or delete the web app in the Azure portal like any other web app. As long as it is running you can browse to the home web address and enter new values.
You can use the BES web app template in the same way as the RRS template, except that the web app that's created will allow you to submit multiple rows of data and receive multiple results.
The results from a batch execution web service are stored in an Azure storage container; the input values can come from Azure storage or a local file. So, you'll need an Azure storage container to hold the results returned by the web app, and you'll need to get your input data ready.

-
Follow the same procedure to create the BES web app as for the RRS template, except:
- Get the Request URI from the BATCH EXECUTION API Help Page for the web service.
- Go to Azure ML Batch Execution Service Web App Template to open the BES template on Azure Marketplace and click Create Web App.
-
To specify where you want the results stored, enter the destination container information on the web app home page. Also specify where the web app can get the input values, either in a local file or an Azure storage container. Click Submit.
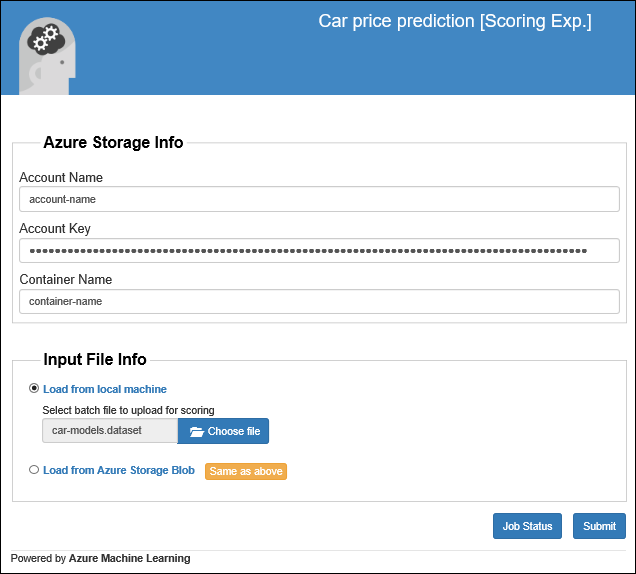

The web app will display a page with job status. When the job has completed you'll be given the location of the results in Azure blob storage. You also have the option of downloading the results to a local file.
To learn more about...
- creating a machine learning experiment with Machine Learning Studio, see Create your first experiment in Azure Machine Learning Studio
- how to deploy your machine learning experiment as a web service, see Deploy an Azure Machine Learning web service
- other ways to access your web service, see How to consume an Azure Machine Learning web service