Thanks to the commitlint and husky packages, the commits are checked for the correct format.
The commit message should be in the following format:
# type: feat, fix, docs, ...
# scope: the part of the project you are working on (optional)
# subject: short description of the changes
git commit -m "<type>(<scope>): <subject>"
Read more about the Conventional Commits
Before you add any environment variables or files to the project, please read section Environment variables
in README.md file in the root directory.
yarn upgrade-interactive --latestThe ESLint configuration is located in the .eslintrc.json file in the root directory
and is imported and extended in the apps if needed.
There is no Prettier in this monorepo for a good reason. Having yet another tool to format the code and solving
the conflicts between Prettier and ESLint is avoided thanks to the Anthony Fu's @stylistic/eslint-plugin package.
Now ESLint can do the same and at the same time warn us about the code quality.
More on this subject
ESLint Stylistic
RECOMMENDED
Add in your IDE the ESLint extension and activate formatting on save.
Visual Studio Code settings
To use the ESLint extension in Visual Studio Code, install the dbaeumer.vscode-eslint extension.
Add the following settings to the settings.json file in Visual Studio Code for the best experience.
You can open the settings.json by going to File -> Preferences -> Settings
and pressing on the {} icon in the top right corner.
🟦 Note
If you use the default
.code-workspacefile from the root directory, you don't need to add these settings.
They are already there.
{
    "[html]": {
        "editor.defaultFormatter": "dbaeumer.vscode-eslint"
    },
    "[javascript]": {
        "editor.defaultFormatter": "dbaeumer.vscode-eslint"
    },
    "[typescript]": {
        "editor.defaultFormatter": "dbaeumer.vscode-eslint"
    },
    "[vue]": {
        "editor.defaultFormatter": "dbaeumer.vscode-eslint"
    },
    "editor.codeActionsOnSave": {
        "source.fixAll.eslint": "explicit"
    },
    "eslint.format.enable": true,
    "eslint.options": {
        "extensions": [
            ".html",
            ".js",
            ".cjs",
            ".vue",
            ".jsx"
        ]
    },
    "eslint.validate": [
        "html",
        "vue",
        "language",
        "javascriptreact",
        "typescript",
        "javascript"
    ],
}Rider settings
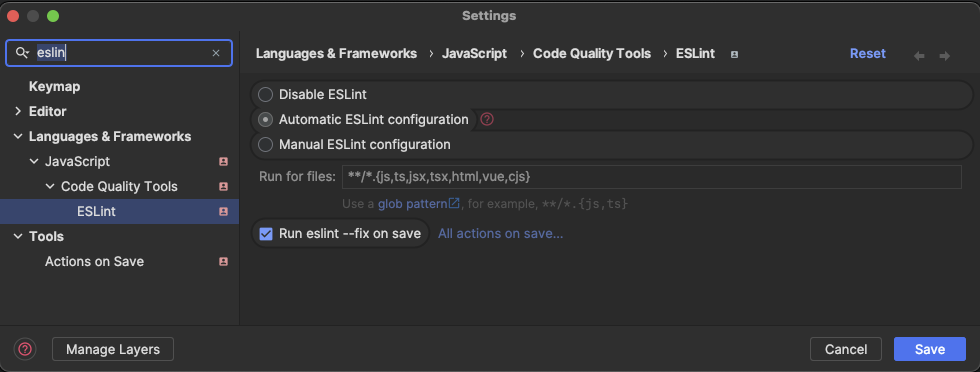
To use the ESLint extension in Rider, you need to open settings and search for ESLint and set the following settings:
- Automatic ESLint configuration
- Run for files:
**/*.{js,ts,jsx,tsx,html,vue,cjs} - Run eslint --fix on save
🟦 Note
If you are on a Mac you can open two windows of Rider in the same application.
Just open the second Project in the second window and choose theWindow -> Merge All Project Windowsoption.
More on this subject here
To work with a projects utilizing Tailwind CSS, you should (strongly recommended) install the Tailwind CSS IntelliSense extension.
You will find one in the marketplace for Visual Studio Code as well as for Rider.
The extension will provide you with the IntelliSense for the Tailwind CSS classes, but not everywhere you could need it.
That's why we developed additional configuration.
Visual Studio Code settings
To use the Tailwind extension in Visual Studio Code, install the bradlc.vscode-tailwindcss extension.
Add the following settings to the settings.json file in Visual Studio Code for the best experience.
You can open the settings.json by going to File -> Preferences -> Settings
and pressing on the {} icon in the top right corner.
🟦 Note
If you use the default
.code-workspacefile from the root directory, you don't need to add these settings.
They are already there.
{
    "tailwindCSS.experimental.classRegex": [
        // for VuePrime styling. Example: class: [strings_in_this_array]
        [
            "class:\\s*\\[((?:[^[\\]]|\\[(?:[^[\\]]|\\[[^[\\]]*\\])*])*?)\\]",
            "(?:['\"`]([^'\"`]*)['\"`])"
        ],
        // for computed functions. Example: const textClass = computed(() => ['text-red'])
        [
            "computed\\(\\s*\\(\\s*\\)\\s*=>\\s*([\\s\\S]*?)\\)",
            "(?:['\"`]([^'\"`]*)['\"`])"
        ],
        // additional inline option - add /*tw:*/ before any string
        "\\/\\*\\s?tw:\\s?\\*\\/\\s?['\"`](.*)['\"`]"
    ],
}Rider settings
Install the Tailwind CSS plugin from the JetBrains marketplace.
Then go to the File -> Settings -> Languages & Frameworks -> Style Sheets -> Tailwind CSS
and ad this configuration to the experimental > classRegex field.
{
    "experimental": {
        "classRegex": [
            [
                "class:\\s*\\[((?:[^[\\]]|\\[(?:[^[\\]]|\\[[^[\\]]*\\])*])*?)\\]",
                "(?:['\"`]([^'\"`]*)['\"`])"
            ],
            [
                "computed\\(\\s*\\(\\s*\\)\\s*=>\\s*([\\s\\S]*?)\\)",
                "(?:['\"`]([^'\"`]*)['\"`])"
            ],
            "\\/\\*\\s?tw:\\s?\\*\\/\\s?['\"`](.*)['\"`]"
        ]
    }
}The typescript configuration is located in the tsconfig.base.json file in the root directory.
Keep in mind that referencing the tsconfig.json file in a project and changing any of the settings
will not merge everything with the tsconfig.base.json file but partially override it.
More on this subject
To see the typescript configuration, you can run the following command from the directory
in which you want to see the local one - a merge/overwrite of the base and the extending one.
npx tsc --showconfig