Pizzly is an OAuth Integration Proxy that acts as an abstraction layer to simplify integrating with OAuth API. It lets you connect 50+ OAuth APIs out-of-the-box and automatically manages retrieving, storing, and refreshing OAuth tokens. It also supports adding new OAuth APIs by using a simple file definition.
Pizzly is made available as an open-source project by Bearer.sh.
Pizzly originally started at Bearer.sh as a way to simplify the developer's journey and ease the building of API integrations. OAuth is a great framework, but the difficulty and wide range of implementation makes it painful to use and tends to slow down the ability to integrate with new APIs.
But seriously, why Pizzly? We're fan of bears and fell in love with this sweet hybrid one 🐻
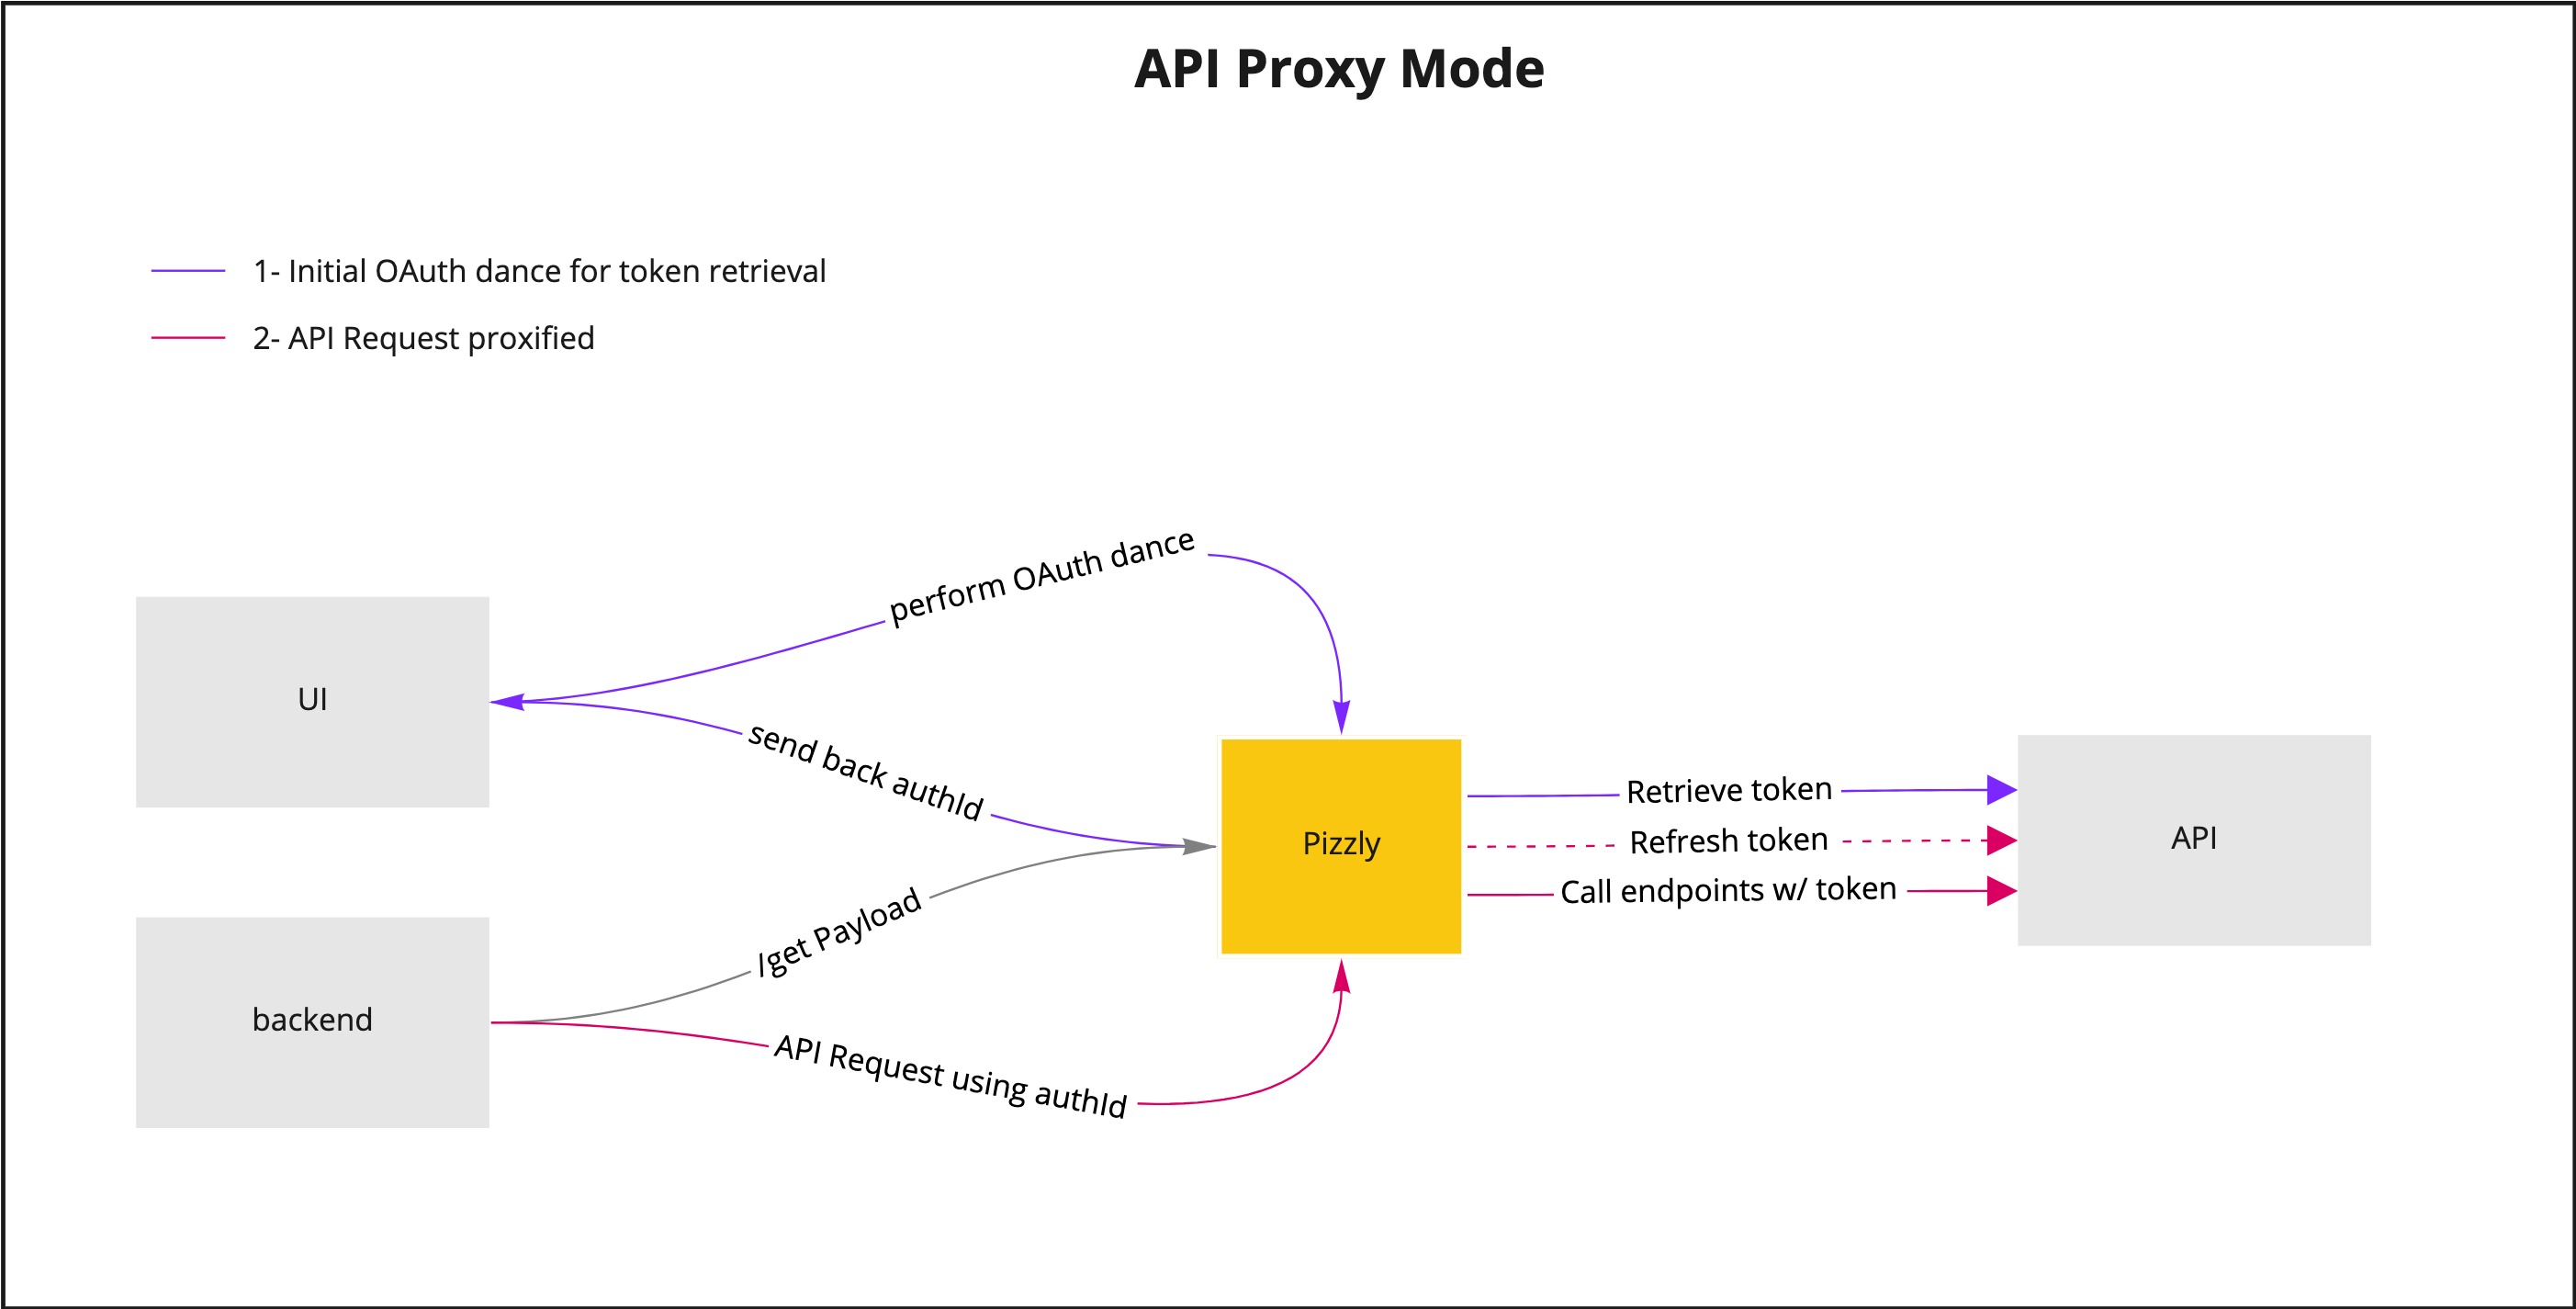
You can use Pizzly as a complete API proxy, it means that each API request will go through the service. Pizzly forwards each request to the third-party API using a config file, it authenticates each request with the right access_token and handles token refreshness if needed.
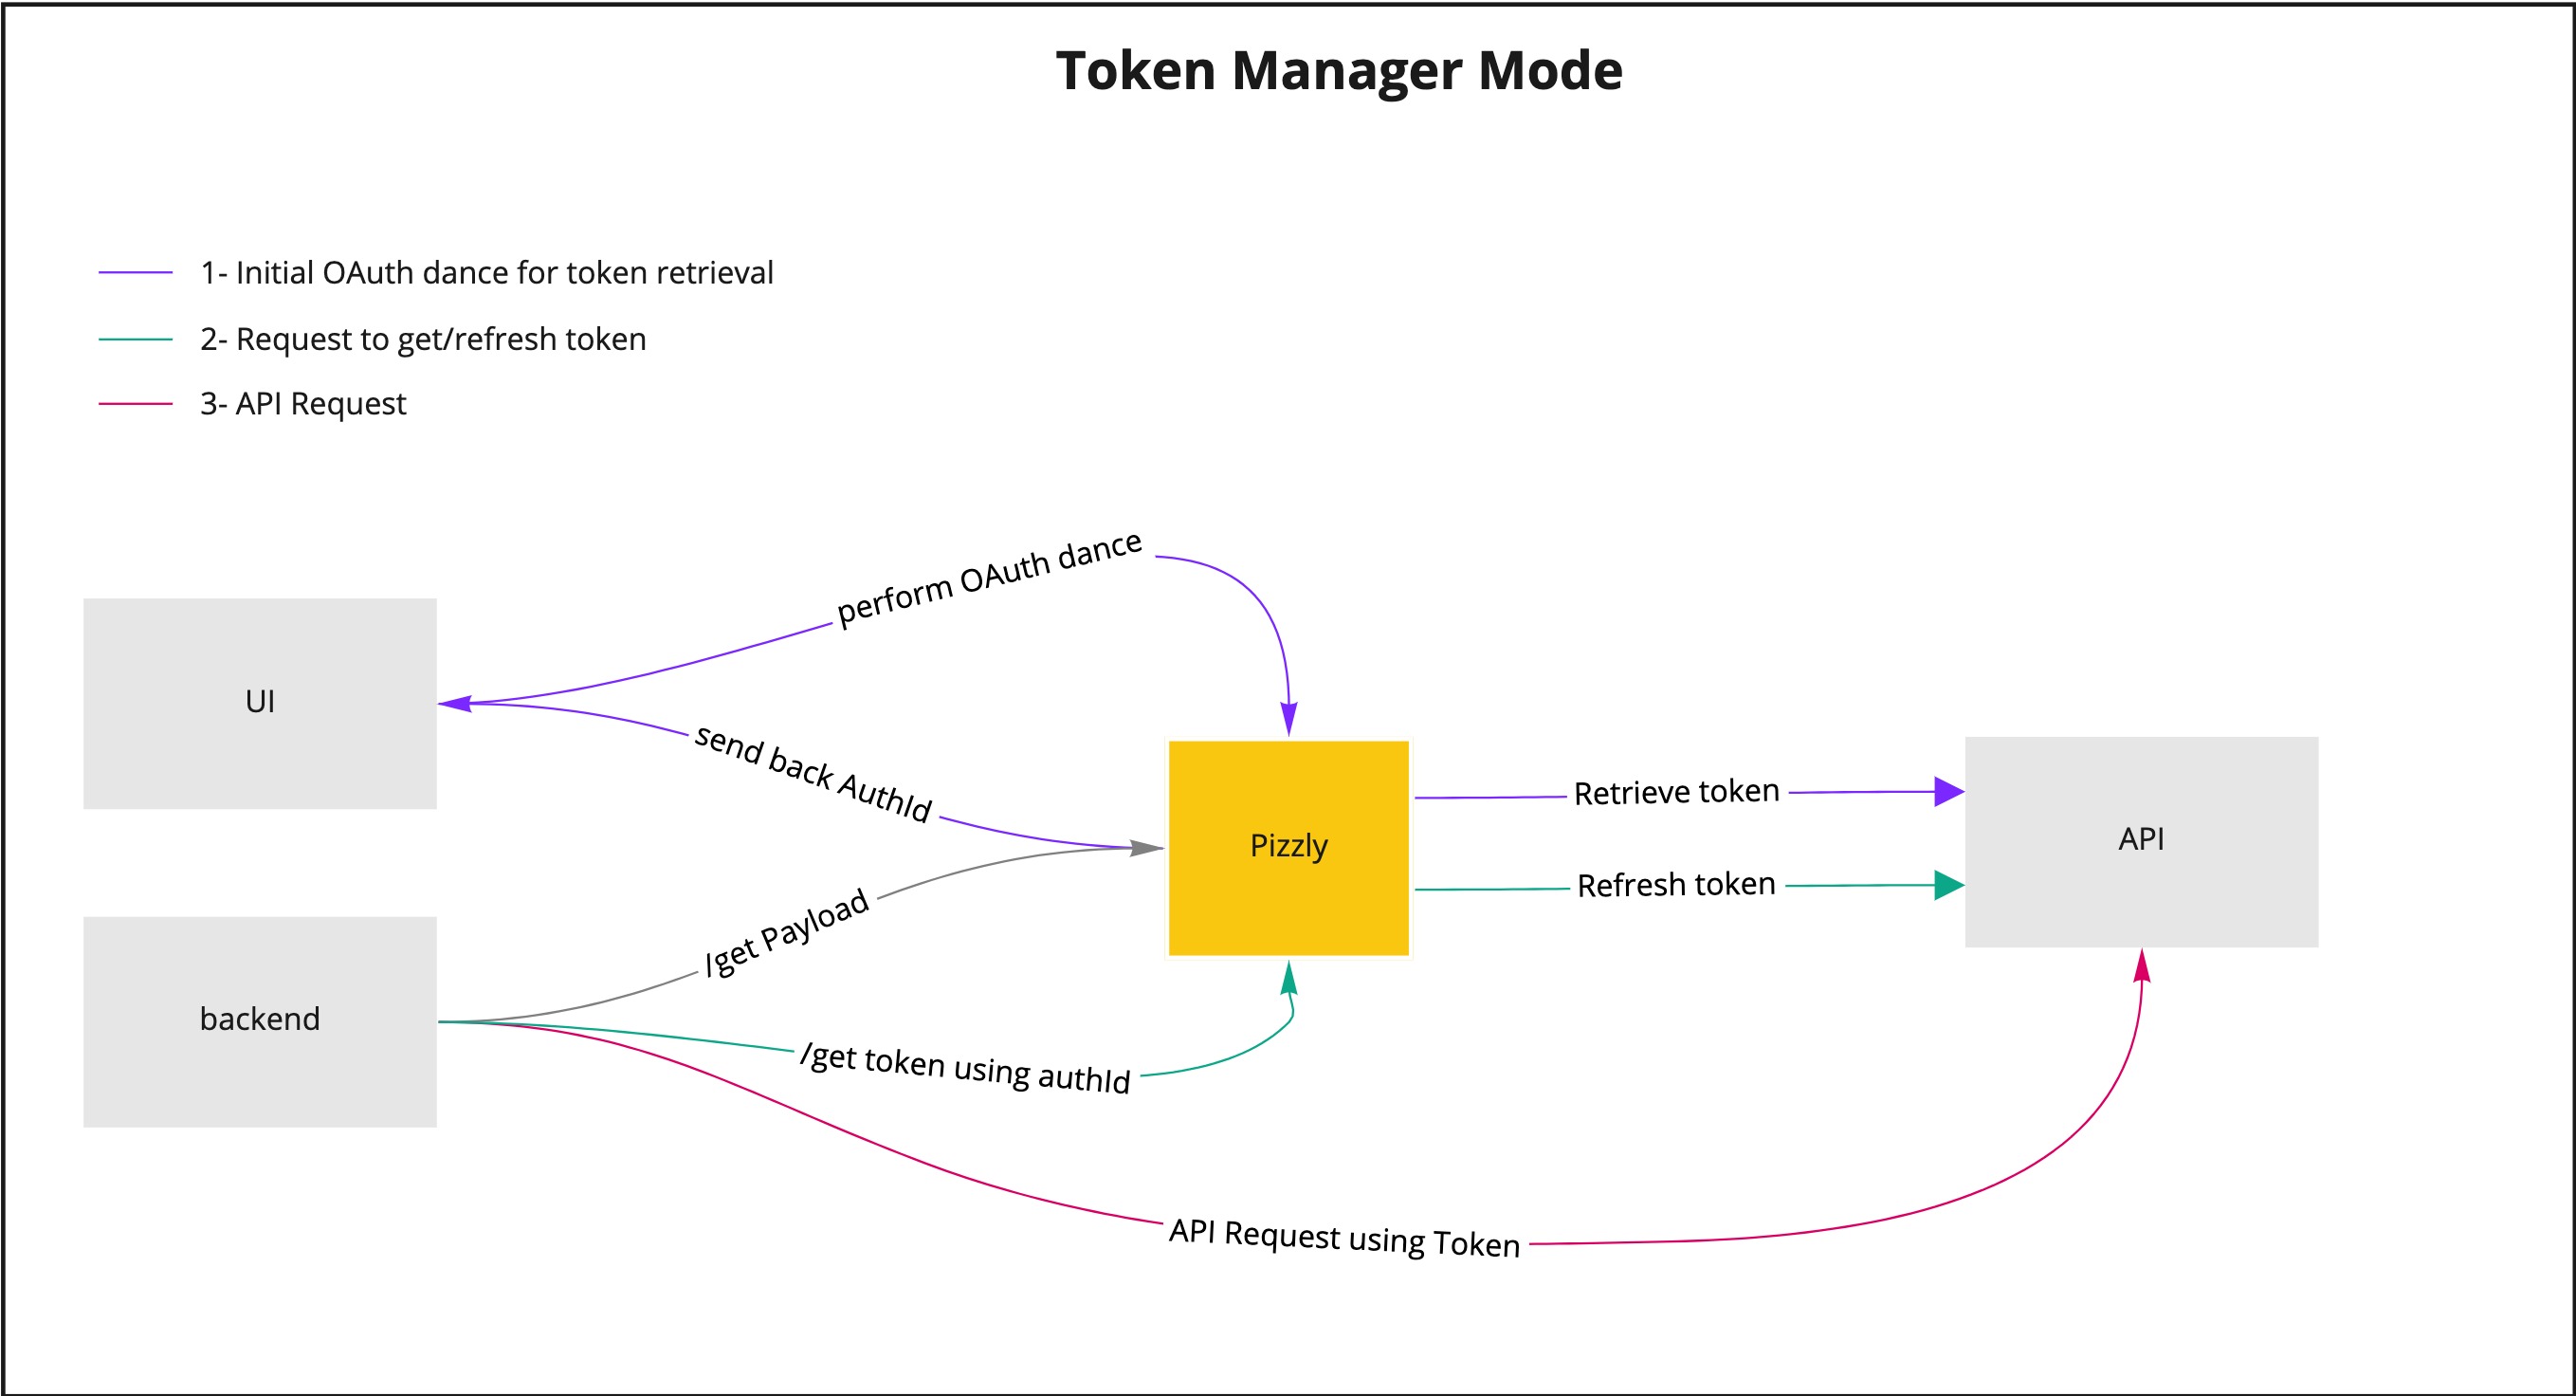
Pizzly is also available as a standalone OAuth manager, helping you retrieve the initial token, but you'll have to refresh it when needed. (see Getting Started below).
It's important to understand the AuthId concept behind Pizzly. The AuthId is an identifier masking OAuth tokens. Since most OAuth tokens need to be refreshed, and therefore will change, the AuthId serves as an abstraction layer to the identity itself. To say it differently, an AuthId represents an identity that will have many tokens overtime.
- Manage retrieving, storing, and refreshing OAuth tokens (aka the OAuth dance)
- No scope limitations
- Retrieve and store complete OAuth payload
- Support of OAuth 1, OAuth 1a and OAuth 2.0
- JavaScript library to connect from your web-app (three-legged OAuth flow)
- Provides configurations for over 50+ OAuth APIs (see list below)
- Support adding new OAuth APIs using a file definition
- 1-click deploy to Heroku or major cloud hosting solutions
At the heart of Pizzly is a Node.js application that uses PostgreSQL as a database. It is straightforward to install on Heroku using the Deploy to Heroku button, but you can install it anywhere.
To run Pizzly on your machine, follow these steps (or follow our step-by-step guides):
git clone https://github.com/Bearer/Pizzly
cd pizzly
yarn install
yarn db:setup
yarn start
Then open the dashboard in your browser at:
http://localhost:8080/
You will need Node.js and PostgreSQL installed first. Read our getting started to follow a step-by-step installation guide.
Deploy it to Heroku and test it.
Once deployed, go to the heroku application and connect to an API.
Follow this step-by-step guide on how to use Pizzly as a proxy service and learn how to:
- Save a configuration for an API (with clientId/clientSecret and scopes)
- Initiate the OAuth dance to retrieve a token
- Call the third-party API
- Retrieve data from that API
Follow a step-by-step guide on how to use Pizzly as an OAuth manager and learn how to:
- Save a configuration for an API (with clientId/clientSecret and scopes)
- Initiate the OAuth dance to retrieve a token
- Use Pizzly's API to retrieve the OAuth payload (e.g.
access_token,refresh_token, etc.)
If you're looking to monitor, track performance, detect anomalies to your API requests, have a look to Bearer.sh, the monitoring agent. If you're using Pizzly in API proxy mode, it's as simple as adding your Bearer Developer Key to the environment variable
$BEARER_SECRET_KEY- you can get yours for free here 🚀
More than 50 APIs are preconfigured to work out-of-the-box. Including: GitHub, Salesforce, Facebook, Google Sheets, Gmail, LinkedIn, Typeform, Zoom, and more... Each API consists of a JSON configuration file, stored within the /integrations directory.
Here's an example with the GitHub configuration file (/integrations/github.json):
{
  "name": "GitHub",
  "auth": {
    "authorizationURL": "https://github.com/login/oauth/authorize",
    "tokenURL": "https://github.com/login/oauth/access_token",
    "authType": "OAUTH2",
    "tokenParams": {},
    "authorizationParams": {},
    "auth": { "accessType": "offline" }
  },
  "request": {
    "baseURL": "https://api.github.com/",
    "headers": {
      "Accept": "application/vnd.github.v3+json",
      "Authorization": "token ${auth.accessToken}",
      "User-Agent": "Pizzly"
    }
  }
}
To add a new API, create a new configuration file. Here's a step-by-step guide on how to create a new configuration file.
This project is licensed under the terms of the MIT license. See the LICENSE file for more information.


