Just started the development do not use.
Software for the ESP32 (DoIT ESP DEVKIT v1/NodeMcu 32s etc.) that sends P1 smart meter (DSMR) data to a MQTT broker, with the possibility for Over The Air (OTA) firmware updates.
This fork was based on a ESP8266 and I only had a ESP32 laying around so I'm trying to make this work on my ESP32 DoIT board.
The original project of fliphess has issues with DSMR 5.0 meters, which send telegrams every 1 second at a high 115200 baud rate. This causes the used SoftwareSerial to struggle to keep up and thus only receives corrupted messages.
The project of daniel-jong switches to using the main hardware serial port (RX) for communication with the p1 meter and is tested on the Landys and Gyr E360 smartmeter (DSMR 5.0).
Then I noticed the project of WhoSayIn, that takes a much more minimalistic approach, which I liked. However, I discovered this project was also designed for the DSMR 4.0 meters.
With this fork, I want to accomplish the following:
- Combine the projects mentioned above in a minimalistic setup for the newer DSMR 5.0 smart meters (at the time of writing: 402 vs 681 lines of code, tested on the
ISKRA AM550). - Separate code in multiple files for readability.
- Add solar panel meter: read out delivered energy.
- Add an alternative data quality (DQ) check for the CRC check. See the
getValueWithDqCheckmethod.
To add to the last point: I don't exactly know why, but the CRC check never worked for me. It always said that the data read out from the serial port was corrupted. When I turned this off, I noticed that most of the time the data is actually fine, but it sometimes drops back to zero or some lower value. This of course shouldn't be possible (you can't suddenly have used less energy than you did in the past), so I built a check into the code to see whether the current value is higher than the previous value. If that's not the case, the last known (previous) value is send again.
This setup requires:
- An ESP32 (DoIT DEVKIT v1 has been tested)
- Small breadboard
- A 10k ohm resistor
- A 4 pin (RJ11) or 6 pin (RJ12) cable. Both cables work great, but a 6 pin cable can also power the ESP8266 on most DSMR5+ meters.
Setting up your Arduino IDE:
- Ensure you have selected the right board (you might need to install your esp32board in the Arduino IDE).
- I have tested this on the 80 MHz and 160 MHz CPU frequency mode, pick either one.
- Using the Tools->Manage Libraries... install
PubSubClient. - In the file
Settings.hchange all values accordingly - Write to your device via USB the first time, you can do it OTA all times thereafter.
Note: I have only tested this on the ISKRA AM550.
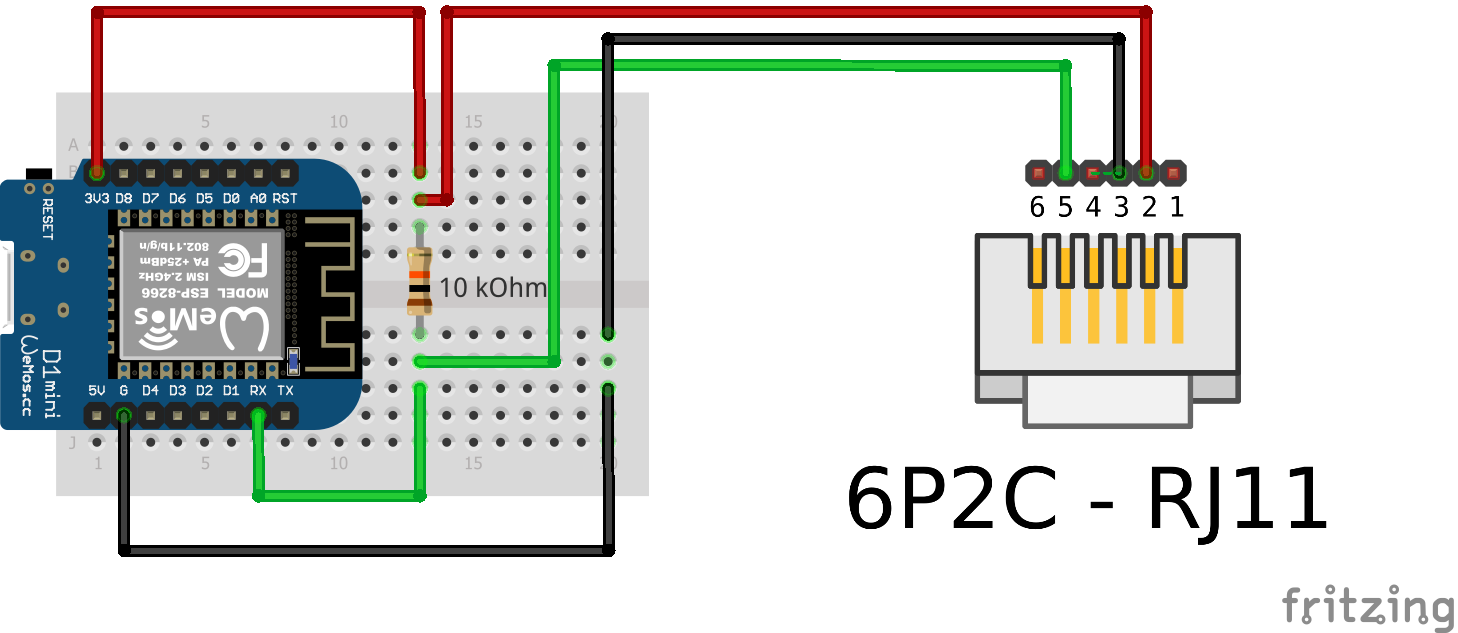
Connect the ESP32 to an RJ11 cable/connector following the diagram.
| P1 pin | ESP8266 Pin |
|---|---|
| 2 - RTS | 3.3v |
| 3 - GND | GND |
| 4 - | |
| 5 - RXD (data) | RX (gpio3) |
On most models a 10K resistor should be used between the ESP's 3.3v and the p1's DATA (RXD) pin. Many howto's mention RTS requires 5V (VIN) to activate the P1 port, but for me 3V3 suffices.
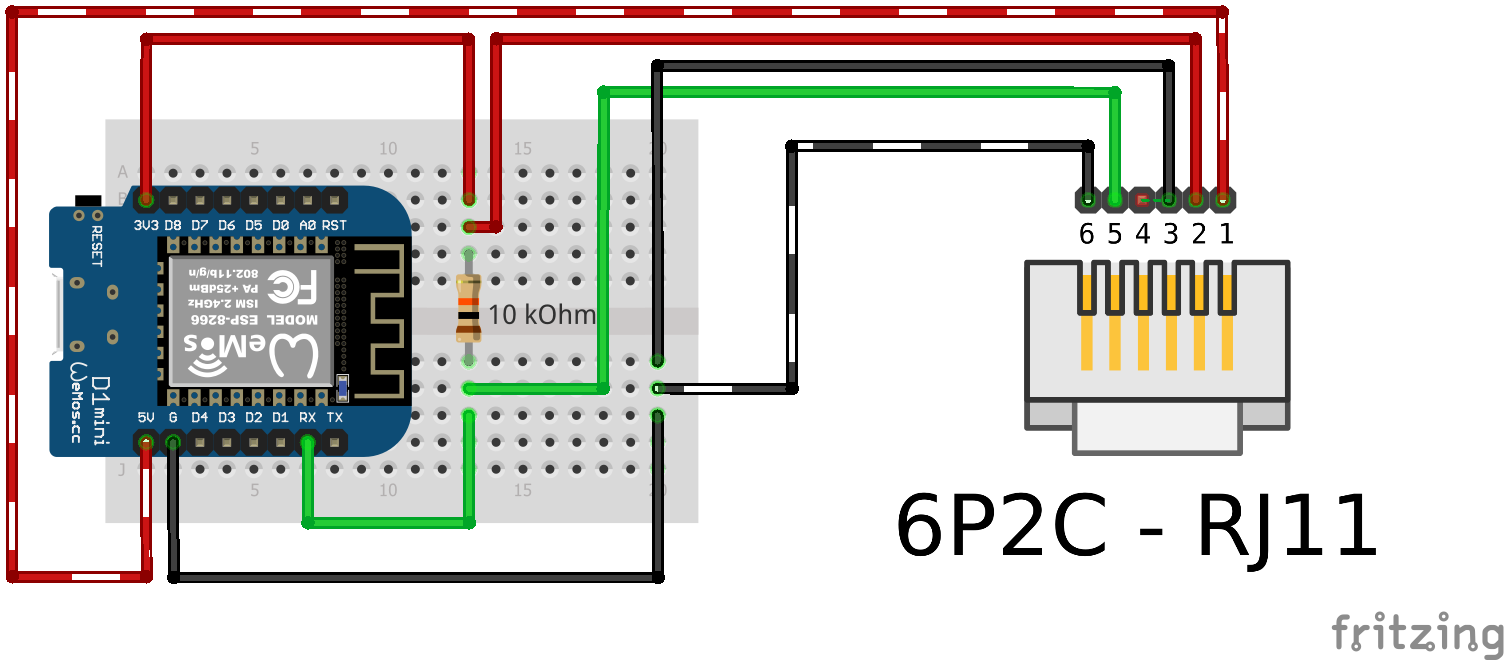
Optional: Powering the ESP8266 using your DSMR5+ meter
When using a 6 pin cable you can use the power source provided by the meter.
| P1 pin | ESP8266 Pin |
|---|---|
| 1 - 5v out | 5v or Vin |
| 2 - RTS | 3.3v |
| 3 - GND | GND |
| 4 - | |
| 5 - RXD (data) | RX (gpio3) |
| 6 - GND | GND |
All metrics are send to their own MQTT topic. The software sends out to the following MQTT topics:
sensors/power/p1meter/consumption_low_tarif
sensors/power/p1meter/consumption_high_tarif
sensors/power/p1meter/delivered_low_tarif
sensors/power/p1meter/delivered_high_tarif
sensors/power/p1meter/gas_meter_m3
sensors/power/p1meter/actual_consumption
sensors/power/p1meter/instant_power_usage
sensors/power/p1meter/instant_power_current
sensors/power/p1meter/actual_tarif_group
sensors/power/p1meter/short_power_outages
sensors/power/p1meter/long_power_outages
sensors/power/p1meter/short_power_drops
sensors/power/p1meter/short_power_peaks
Use this example for home assistant's sensor.yaml
In case you power a Wemos D1 mini by the ISKRA AM550 (and possibly other DSMR 5.0 meters), every so often the device might loose the connection to the MQTT server for a couple of seconds. I believe the device also resets itself, so this probably means that a temporary power loss is causing the loose connection (maybe the meter stops providing current for a second or something). If this happens and you are using the custom DQ checks I built (getValueWithDqCheck method), the last know/previous value is of course zero, and you can thus still encounter drops to zero, even with the custom DQ fix. Therefore I implemented a "power-loss-reset fix", by adding an if statement before sending data to the MQTT broker. Assuming you initialize all the values with zero, the if statement checks if the value being send is larger than zero.
As fliphess thanked a few people, I want to list them here as well:
- https://github.com/jantenhove/P1-Meter-ESP8266
- https://github.com/neographikal/P1-Meter-ESP8266-MQTT
- http://gejanssen.com/howto/Slimme-meter-uitlezen/
- https://github.com/rroethof/p1reader/
- http://romix.macuser.nl/software.html
- http://blog.regout.info/category/slimmeter/
- http://domoticx.com/p1-poort-slimme-meter-hardware/
In addition, I'd like thank and refer to the following projects which served as a source of information:
Other sources: