| title | description | author | ms.author | ms.date | ms.topic | ms.service | services | ms.custom | manager |
|---|---|---|---|---|---|---|---|---|---|
Add a real device to an Azure IoT Central application | Microsoft Docs |
As an operator, add a real device to your Azure IoT Central application. |
sandeeppujar |
sandeepu |
10/12/2018 |
tutorial |
iot-central |
iot-central |
mvc |
peterpr |
This tutorial shows you how to add and configure a real device to your Microsoft Azure IoT Central application.
This tutorial is made up of two parts:
- First, as an operator, you learn how to add and configure a real device in your Azure IoT Central application. At the end of this part, you retrieve a connection string to use in the second part.
- Then, as a device developer, you learn about the code in your real device. You add the connection string from the first part to the sample code.
In this tutorial, you learn how to:
[!div class="checklist"]
- Add a new real device
- Configure the real device
- Get connection string for real device from the application
- Understand how client code maps to the application
- Configure client code for the real device
Before you begin, the builder should complete at least the first builder tutorial to create the Azure IoT Central application:
- Define a new device type (Required)
- Configure rules and actions for your device (Optional)
- Customize the operator's views (Optional)
To add a real device to your application, you use the Connected Air Conditioner device template you created in the Define a new device type tutorial.
-
To add a new device as an operator choose Device Explorer in the left navigation menu:

The Device Explorer shows the Connected Air Conditioner device template and the simulated device that was automatically created when the builder created the device template.
-
To start connecting a real connected air conditioner device, choose New, then Real:

-
Enter the Device Id (should be lower case) or use the suggested Device Id. You can also enter the name for your new device and choose Create.


The real device is created from the Connected Air Conditioner device template. You can use Settings to configure your device and set property values to record information about your device.
-
On the Settings page, notice that the Set Temperature setting status is no update. It stays in this state until the real device connects to the application and acknowledges that it has acted on the setting.

-
On the Properties page for your new, real connected air conditioner device, location of service and the last service date are both editable properties of the device. The serial number and firmware version fields are empty until the device is connected to the application. These are read-only values that are sent from the device and cannot be edited.

-
You can view the Measurements, Rules, and Dashboard pages for your real device.


A device developer needs to embed the connection string for your real device in the code that runs on the device. The connection string enables the device to connect securely to your Azure IoT Central application. You generate the connection string as part of preparing the client code written in Node.js in the next steps. The Node.js application represents the real connected air conditioner.
The example code in this article is written in Node.js and shows just enough code to:
- Connect as a device to your Azure IoT Central application.
- Send temperature telemetry as a connected air conditioner device.
- Send device properties to your Azure IoT Central application.
- Respond to an operator who uses the Set Temperature setting.
- Handle the Echo command from your Azure IoT Central application.
The "How to" articles referenced in the Next Steps section provide more complete samples and show the use of other programming languages. For more information about how devices connect to Azure IoT Central, see the Device connectivity article.
The following steps show how to prepare the Node.js sample:
-
Install Node.js version 4.0.x or later in your machine. Node.js is available for a wide variety of operating systems.
-
Create a folder called
connectedairconditioneron your machine. -
In your command-line environment, navigate to the
connectedairconditionerfolder you created. -
Install the DPS key generator by using the following command:
npm i -g dps-keygenLearn more about the command line tool here.
-
Download and unzip (Windows) the dps_cstr tool from GitHub
Make sure you choose the one that matches your platform. For example, on Windows the dps_cstr.exe and the dll files should be now available in your folder.
-
The connection string for a device instance in your application is generated from device information provided by the IoT Central.
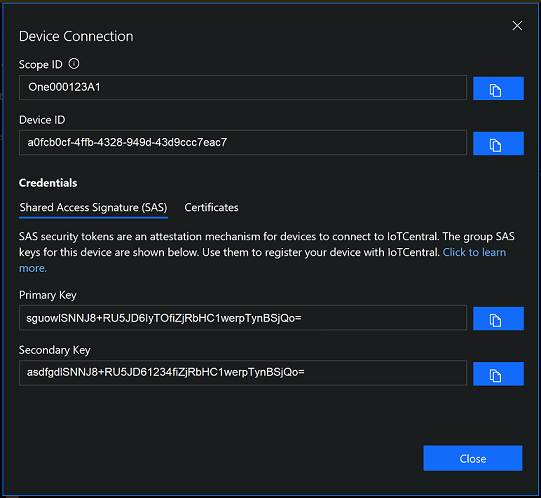
Return to the IoT Central portal. On the device screen for your real connected air conditioner, choose Connect.

-
On the Device Connection page, copy and paste Scope ID, Device ID and Primary Key on to a text editor, then save. You use these values in the next step.
-
Return to the command line environment and generate your connection string by executing:
dps_cstr <scope_id> <device_id> <Primary Key>Copy the output and save in a new file (for example, connection.txt).
-
To initialize your Node.js project, run the following command accepting all the defaults:
npm init -
To install the necessary packages, run the following command:
npm install azure-iot-device azure-iot-device-mqtt --save -
Using a text editor, create a file called ConnectedAirConditioner.js in the
connectedairconditionerfolder. -
Add the following
requirestatements at the start of the ConnectedAirConditioner.js file:'use strict'; var clientFromConnectionString = require('azure-iot-device-mqtt').clientFromConnectionString; var Message = require('azure-iot-device').Message; var ConnectionString = require('azure-iot-device').ConnectionString;
-
Add the following variable declarations to the file:
var connectionString = '{your device connection string}';
var targetTemperature = 0;
var client = clientFromConnectionString(connectionString);
[!NOTE] You update the placeholder
{your device connection string}in a later step. -
Save the changes you have made so far, but keep the file open.


In the previous section, you created a skeleton Node.js project for an application that connects to your Azure IoT Central application. In this section, you add the code to:
- Connect to your Azure IoT Central application.
- Send telemetry to your Azure IoT Central application.
- Send device properties to your Azure IoT Central application.
- Receive settings from your Azure IoT Central application.
- Handle the Echo command from your Azure IoT Central application.
-
To send temperature telemetry to your Azure IoT Central application, add the following code to the ConnectedAirConditioner.js file:
// Send device telemetry.
function sendTelemetry() {
  var temperature = targetTemperature + (Math.random() * 15);
  var data = JSON.stringify({ temperature: temperature });
  var message = new Message(data);
  client.sendEvent(message, (err, res) => console.log(`Sent message: ${message.getData()}` +
    (err ? `; error: ${err.toString()}` : '') +
    (res ? `; status: ${res.constructor.name}` : '')));
}
The name of the field in the JSON you send must match the name of the field you specified for temperature telemetry in your device template. In this example, the name of the field is temperature.
-
To send the device properties such as firmwareVersion and serialNumber, add the following definition:
// Send device properties
function sendDeviceProperties(twin) {
  var properties = {
    firmwareVersion: "9.75",
    serialNumber: "10001"
  };
  twin.properties.reported.update(properties, (errorMessage) =>
    console.log(` * Sent device properties ` + (errorMessage ? `Error: ${errorMessage.toString()}` : `(success)`)));
}
-
To define the settings your device supports, such as setTemperature, add the following definition:
// Add any settings your device supports
// mapped to a function that is called when the setting is changed.
var settings = {
  'setTemperature': (newValue, callback) => {
    // Simulate the temperature setting taking two steps.
    setTimeout(() => {
      targetTemperature = targetTemperature + (newValue - targetTemperature) / 2;
      callback(targetTemperature, 'pending');
      setTimeout(() => {
        targetTemperature = newValue;
        callback(targetTemperature, 'completed');
      }, 5000);
    }, 5000);
  }
};
-
To handle settings sent from Azure IoT Central, add the following function that locates and executes the appropriate device code:
// Handle settings changes that come from Azure IoT Central via the device twin.
function handleSettings(twin) {
  twin.on('properties.desired', function (desiredChange) {
    for (let setting in desiredChange) {
      if (settings[setting]) {
        console.log(`Received setting: ${setting}: ${desiredChange[setting].value}`);
        settings[setting](desiredChange[setting].value, (newValue, status, message) => {
          var patch = {
            [setting]: {
              value: newValue,
              status: status,
              desiredVersion: desiredChange.$version,
              message: message
            }
          }
          twin.properties.reported.update(patch, (err) => console.log(`Sent setting update for ${setting}; ` +
            (err ? `error: ${err.toString()}` : `status: success`)));
        });
      }
    }
  });
}
This function:
- Watches for Azure IoT Central sending a desired property.
- Locates the appropriate function to call to handle the setting change.
- Sends an acknowledgement back to your Azure IoT Central application.
-
To respond to a command such as echo from your Azure IoT Central application, add the following definition:
// Respond to the echo command
function onCommandEcho(request, response) {
  // Display console info
  console.log(' * Echo command received');
  // Respond
  response.send(10, 'Success', function (errorMessage) {});
}
-
Add the following code to complete the connection to Azure IoT Central and hook up the functions in the client code:
// Handle device connection to Azure IoT Central.
var connectCallback = (err) => {
  if (err) {
    console.log(`Device could not connect to Azure IoT Central: ${err.toString()}`);
  } else {
    console.log('Device successfully connected to Azure IoT Central');
    // Send telemetry measurements to Azure IoT Central every 1 second.
    setInterval(sendTelemetry, 1000);
    // Setup device command callbacks
    client.onDeviceMethod('echo', onCommandEcho);
    // Get device twin from Azure IoT Central.
    client.getTwin((err, twin) => {
      if (err) {
        console.log(`Error getting device twin: ${err.toString()}`);
      } else {
        // Send device properties once on device start up
        sendDeviceProperties(twin);
        // Apply device settings and handle changes to device settings.
        handleSettings(twin);
      }
    });
  }
};

client.open(connectCallback);
-
Save the changes you have made so far, but keep the file open.
To configure your client code to connect to your Azure IoT Central application, you need to add the connection string for your real device that you noted earlier in this tutorial.
-
In the ConnectedAirConditioner.js file, find the following line of code:
var connectionString = '{your device connection string}';
-
Replace
{your device connection string}with the connection string of your real device. You saved the connection string earlier in a text editor. -
Save the changes to the ConnectedAirConditioner.js file.
-
To run the sample, enter the following command in your command-line environment:
node ConnectedAirConditioner.js[!NOTE] Make sure you are in the
connectedairconditionerfolder when you run this command. -
The application prints output to the console:

-
After about 30 seconds, you see the telemetry on the device Measurements page:

-
On the Settings page, you can see the setting is now synchronized. When the device first connected, it received the setting value and acknowledged the change:

-
On the Settings page, set the device temperature to 95 and choose Update device. Your sample application receives and processes this change:

[!NOTE] There are two "setting update" messages. One when the
pendingstatus is sent and one when thecompletedstatus is sent. -
On the Measurements page you can see that the device is sending higher temperature values:


In this tutorial, you learned how to:
[!div class="nextstepaction"]
- Add a new real device
- Configure the new device
- Get connection string for real device from the application
- Understand how client code maps to the application
- Configure client code for the real device
Now that you have connected a real device to your Azure IoT Central application, here are the suggested next steps:
As an operator, you can learn how to:
As a device developer, you can learn how to: