| title | description | services | author | ms.service | ms.topic | ms.date | ms.author | ms.custom |
|---|---|---|---|---|---|---|---|---|
include file |
include file that contains code for creating a backend ASP .NET WebAPI project. |
notification-hubs |
spelluru |
notification-hubs |
include |
04/04/2018 |
spelluru |
include file |
The following sections discuss the creation of a new ASP.NET WebAPI backend. This process has three main purposes:
- Authenticate clients: You add a message handler to authenticate client requests and associate the user with the request.
- Register for notifications by using the WebAPI backend: You add a controller to handle new registrations for a client device to receive notifications. The authenticated username is automatically added to the registration as a tag.
- Send notifications to clients: You add a controller to provide a way for users to trigger a secure push to devices and clients associated with the tag.
Create the new ASP.NET WebAPI backend by doing the following actions:
Important
If you are using Visual Studio 2015 or earlier, before starting this tutorial, ensure that you have installed the latest version of NuGet Package Manager for Visual Studio.
To check, start Visual Studio. On the Tools menu, select Extensions and Updates. Search for NuGet Package Manager in your version of Visual Studio, and make sure you have the latest version. If your version is not the latest version, uninstall it, and then reinstall the NuGet Package Manager.

Note
Make sure you have installed the Visual Studio Azure SDK for website deployment.>
-
Start Visual Studio or Visual Studio Express.
-
Select Server Explorer, and sign in to your Azure account. To create the web site resources on your account, you must be signed in.
-
In Visual Studio, right-click Visual Studio solution, point to Add, and click New Project.
-
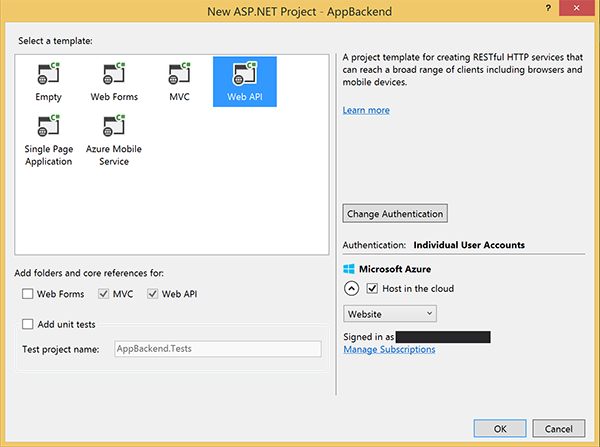
Expand Visual C#, select Web, and click ASP.NET Web Application.
-
In the Name box, type AppBackend, and then select OK.

-
In the New ASP.NET Project window, select the Web API check box, and then select OK.
-
In the Configure Microsoft Azure Web App window, select a subscription and then, in the App Service plan list, do either of the following actions:
- Select an app service plan that you've already created.
- Select Create a new app service plan, and then create one.


You do not need a database for this tutorial. After you have selected your app service plan, select OK to create the project.
![The Configure Microsoft Azure Web App window][B5]
In this section, you create a new message-handler class named AuthenticationTestHandler for the new backend. This class is derived from DelegatingHandler and added as a message handler so that it can process all requests that come into the backend.
-
In Solution Explorer, right-click the AppBackend project, select Add, and then select Class.
-
Name the new class AuthenticationTestHandler.cs, and then select Add to generate the class. This class authenticates users by using Basic Authentication for simplicity. Your app can use any authentication scheme.
-
In AuthenticationTestHandler.cs, add the following
usingstatements:using System.Net.Http; using System.Threading; using System.Security.Principal; using System.Net; using System.Text; using System.Threading.Tasks;
-
In AuthenticationTestHandler.cs, replace the
AuthenticationTestHandlerclass definition with the following code:The handler authorizes the request when the following three conditions are true:
- The request includes an Authorization header.
- The request uses basic authentication.
- The user name string and the password string are the same string.
Otherwise, the request is rejected. This authentication is not a true authentication and authorization approach. It is only a simple example for this tutorial.
If the request message is authenticated and authorized by AuthenticationTestHandler, the basic authentication user is attached to the current request on HttpContext. User information in HttpContext will be used by another controller (RegisterController) later to add a tag to the notification registration request.
```csharp
public class AuthenticationTestHandler : DelegatingHandler
{
    protected override Task<HttpResponseMessage> SendAsync(
    HttpRequestMessage request, CancellationToken cancellationToken)
    {
        var authorizationHeader = request.Headers.GetValues("Authorization").First();

        if (authorizationHeader != null && authorizationHeader
            .StartsWith("Basic ", StringComparison.InvariantCultureIgnoreCase))
        {
            string authorizationUserAndPwdBase64 =
                authorizationHeader.Substring("Basic ".Length);
            string authorizationUserAndPwd = Encoding.Default
                .GetString(Convert.FromBase64String(authorizationUserAndPwdBase64));
            string user = authorizationUserAndPwd.Split(':')[0];
            string password = authorizationUserAndPwd.Split(':')[1];

            if (verifyUserAndPwd(user, password))
            {
                // Attach the new principal object to the current HttpContext object
                HttpContext.Current.User =
                    new GenericPrincipal(new GenericIdentity(user), new string[0]);
                System.Threading.Thread.CurrentPrincipal =
                    System.Web.HttpContext.Current.User;
            }
            else return Unauthorized();
        }
        else return Unauthorized();

        return base.SendAsync(request, cancellationToken);
    }

    private bool verifyUserAndPwd(string user, string password)
    {
        // This is not a real authentication scheme.
        return user == password;
    }

    private Task<HttpResponseMessage> Unauthorized()
    {
        var response = new HttpResponseMessage(HttpStatusCode.Forbidden);
        var tsc = new TaskCompletionSource<HttpResponseMessage>();
        tsc.SetResult(response);
        return tsc.Task;
    }
}
```
> [!NOTE]
> Security note: The `AuthenticationTestHandler` class does not provide true authentication. It is used only to mimic basic authentication and is not secure. You must implement a secure authentication mechanism in your production applications and services.
-
To register the message handler, add the following code at the end of the
Registermethod in the App_Start/WebApiConfig.cs class:config.MessageHandlers.Add(new AuthenticationTestHandler());
-
Save your changes.
In this section, you add a new controller to the WebAPI backend to handle requests to register a user and a device for notifications by using the client library for notification hubs. The controller adds a user tag for the user that was authenticated and attached to HttpContext by AuthenticationTestHandler. The tag has the string format, "username:<actual username>".
-
In Solution Explorer, right-click the AppBackend project and then select Manage NuGet Packages.
-
In the left pane, select Online and then, in the Search box, type Microsoft.Azure.NotificationHubs.
-
In the results list, select Microsoft Azure Notification Hubs, and then select Install. Complete the installation, and then close the NuGet Package Manager window.
This action adds a reference to the Azure Notification Hubs SDK by using the Microsoft.Azure.Notification Hubs NuGet package.
-
Create a new class file that represents the connection with the notification hub that's used to send notifications. In Solution Explorer, right-click the Models folder, select Add, and then select Class. Name the new class Notifications.cs, and then select Add to generate the class.

-
In Notifications.cs, add the following
usingstatement at the top of the file:using Microsoft.Azure.NotificationHubs;
-
Replace the
Notificationsclass definition with the following code, and replace the two placeholders with the connection string (with full access) for your notification hub and the hub name (available at Azure portal):public class Notifications { public static Notifications Instance = new Notifications(); public NotificationHubClient Hub { get; set; } private Notifications() { Hub = NotificationHubClient.CreateClientFromConnectionString("<your hub's DefaultFullSharedAccessSignature>", "<hub name>"); } }
-
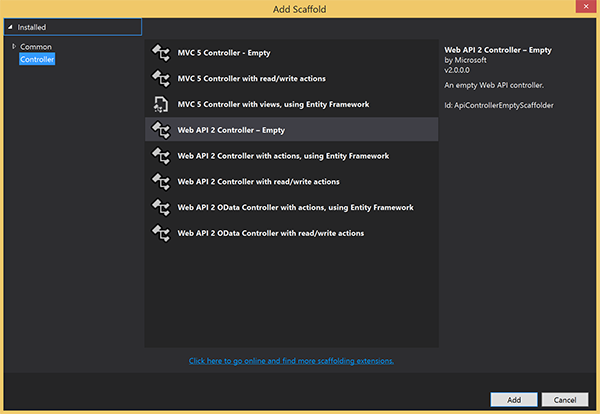
Next, create a new controller named RegisterController. In Solution Explorer, right-click the Controllers folder, select Add, and then select Controller.
-
Select Web API 2 Controller - Empty, and then select Add.
-
In the Controller name box, type RegisterController to name the new class, and then select Add.

-
In RegisterController.cs, add the following
usingstatements:using Microsoft.Azure.NotificationHubs; using Microsoft.Azure.NotificationHubs.Messaging; using AppBackend.Models; using System.Threading.Tasks; using System.Web;
-
Add the following code inside the
RegisterControllerclass definition. In this code, you add a user tag for the user that's attached to HttpContext. The user was authenticated and attached to HttpContext by the message filter that you added,AuthenticationTestHandler. You can also add optional checks to verify that the user has rights to register for the requested tags.private NotificationHubClient hub; public RegisterController() { hub = Notifications.Instance.Hub; } public class DeviceRegistration { public string Platform { get; set; } public string Handle { get; set; } public string[] Tags { get; set; } } // POST api/register // This creates a registration id public async Task<string> Post(string handle = null) { string newRegistrationId = null; // make sure there are no existing registrations for this push handle (used for iOS and Android) if (handle != null) { var registrations = await hub.GetRegistrationsByChannelAsync(handle, 100); foreach (RegistrationDescription registration in registrations) { if (newRegistrationId == null) { newRegistrationId = registration.RegistrationId; } else { await hub.DeleteRegistrationAsync(registration); } } } if (newRegistrationId == null) newRegistrationId = await hub.CreateRegistrationIdAsync(); return newRegistrationId; } // PUT api/register/5 // This creates or updates a registration (with provided channelURI) at the specified id public async Task<HttpResponseMessage> Put(string id, DeviceRegistration deviceUpdate) { RegistrationDescription registration = null; switch (deviceUpdate.Platform) { case "mpns": registration = new MpnsRegistrationDescription(deviceUpdate.Handle); break; case "wns": registration = new WindowsRegistrationDescription(deviceUpdate.Handle); break; case "apns": registration = new AppleRegistrationDescription(deviceUpdate.Handle); break; case "gcm": registration = new GcmRegistrationDescription(deviceUpdate.Handle); break; default: throw new HttpResponseException(HttpStatusCode.BadRequest); } registration.RegistrationId = id; var username = HttpContext.Current.User.Identity.Name; // add check if user is allowed to add these tags registration.Tags = new HashSet<string>(deviceUpdate.Tags); registration.Tags.Add("username:" + username); try { await hub.CreateOrUpdateRegistrationAsync(registration); } catch (MessagingException e) { ReturnGoneIfHubResponseIsGone(e); } return Request.CreateResponse(HttpStatusCode.OK); } // DELETE api/register/5 public async Task<HttpResponseMessage> Delete(string id) { await hub.DeleteRegistrationAsync(id); return Request.CreateResponse(HttpStatusCode.OK); } private static void ReturnGoneIfHubResponseIsGone(MessagingException e) { var webex = e.InnerException as WebException; if (webex.Status == WebExceptionStatus.ProtocolError) { var response = (HttpWebResponse)webex.Response; if (response.StatusCode == HttpStatusCode.Gone) throw new HttpRequestException(HttpStatusCode.Gone.ToString()); } }
-
Save your changes.


In this section, you add a new controller that exposes a way for client devices to send a notification. The notification is based on the username tag that uses Azure Notification Hubs .NET Library in the ASP.NET WebAPI backend.
-
Create another new controller named NotificationsController the same way you created RegisterController in the previous section.
-
In NotificationsController.cs, add the following
usingstatements:using AppBackend.Models; using System.Threading.Tasks; using System.Web;
-
Add the following method to the NotificationsController class:
This code sends a notification type that's based on the Platform Notification Service (PNS)
pnsparameter. The value ofto_tagis used to set the username tag on the message. This tag must match a username tag of an active notification hub registration. The notification message is pulled from the body of the POST request and formatted for the target PNS.Depending on the PNS that your supported devices use to receive notifications, the notifications are supported by a variety of formats. For example, on Windows devices, you might use a toast notification with WNS that isn't directly supported by another PNS. In such an instance, your backend needs to format the notification into a supported notification for the PNS of devices you plan to support. Then use the appropriate send API on the NotificationHubClient class.
public async Task<HttpResponseMessage> Post(string pns, [FromBody]string message, string to_tag)
{
    var user = HttpContext.Current.User.Identity.Name;
    string[] userTag = new string[2];
    userTag[0] = "username:" + to_tag;
    userTag[1] = "from:" + user;

    Microsoft.Azure.NotificationHubs.NotificationOutcome outcome = null;
    HttpStatusCode ret = HttpStatusCode.InternalServerError;

    switch (pns.ToLower())
    {
        case "wns":
            // Windows 8.1 / Windows Phone 8.1
            var toast = @"<toast><visual><binding template=""ToastText01""><text id=""1"">" +
                        "From " + user + ": " + message + "</text></binding></visual></toast>";
            outcome = await Notifications.Instance.Hub.SendWindowsNativeNotificationAsync(toast, userTag);
            break;
        case "apns":
            // iOS
            var alert = "{\"aps\":{\"alert\":\"" + "From " + user + ": " + message + "\"}}";
            outcome = await Notifications.Instance.Hub.SendAppleNativeNotificationAsync(alert, userTag);
            break;
        case "gcm":
            // Android
            var notif = "{ \"data\" : {\"message\":\"" + "From " + user + ": " + message + "\"}}";
            outcome = await Notifications.Instance.Hub.SendGcmNativeNotificationAsync(notif, userTag);
            break;
    }

    if (outcome != null)
    {
        if (!((outcome.State == Microsoft.Azure.NotificationHubs.NotificationOutcomeState.Abandoned) ||
            (outcome.State == Microsoft.Azure.NotificationHubs.NotificationOutcomeState.Unknown)))
        {
            ret = HttpStatusCode.OK;
        }
    }

    return Request.CreateResponse(ret);
}
-
To run the application and ensure the accuracy of your work so far, select the F5 key. The app opens a web browser, and it is displayed on the ASP.NET home page.
Next, you deploy the app to an Azure website to make it accessible from all devices.
-
Right-click the AppBackend project, and then select Publish.
-
Select Microsoft Azure App Service as your publish target, and then select **Publish. The Create App Service window opens. Here you can create all the necessary Azure resources to run the ASP.NET web app in Azure.

-
In the Create App Service window, select your Azure account. Select Change Type > Web App. Keep the default Web App Name, and then select the Subscription, Resource Group, and App Service Plan.
-
Select Create.
-
Make a note of the Site URL property in the Summary section. This URL is your back-end endpoint later in the tutorial.
-
Select Publish.

After you've completed the wizard, it publishes the ASP.NET web app to Azure and then opens the app in the default browser. Your application is viewable in Azure App Services.
The URL uses the web app name that you specified earlier, with the format http://<app_name>.azurewebsites.net.