Python software development kit (SDK) for working with OpenQASM and the IBM Q experience (QX).
The basic concept of our quantum program is an array of quantum circuits. The program workflow consists of three stages: Build, Compile, and Run. Build allows you to make different quantum circuits that represent the problem you are solving; Compile allows you to rewrite them to run on different backends (simulators/real chips of different quantum volumes, sizes, fidelity, etc); and Run launches the jobs. After the jobs have been run, the data is collected. There are methods for putting this data together, depending on the program. This either gives you the answer you wanted or allows you to make a better program for the next instance.
Python example programs can be found in the examples directory, and test scripts are located in test. The qiskit directory is the main module of the SDK.
The qiskit directory is the main Python module and contains the programming interface objects QuantumProgram, QuantumRegister, ClassicalRegister, and QuantumCircuit.
At the highest level, users construct a QuantumProgram to create, modify, compile, and execute a collection of quantum circuits. Each QuantumCircuit has a set of data registers, each of type QuantumRegister or ClassicalRegister. Methods of these objects are used to apply instructions that define the circuit. The QuantumCircuit can then generate OpenQASM code that can flow through other components in the qiskit directory.
The extensions directory extends quantum circuits as needed to support other gate sets and algorithms. Currently there is a standard extension defining some typical quantum gates.
The directory also contains internal modules that are still under development:
- a qasm module for parsing OpenQASM circuits
- an unroll module to interpret and "unroll" OpenQASM to a target gate basis (expanding gate subroutines and loops as needed)
- a circuit module for working with circuits as graphs
- a mapper module for mapping all-to-all circuits to run on devices with fixed couplings
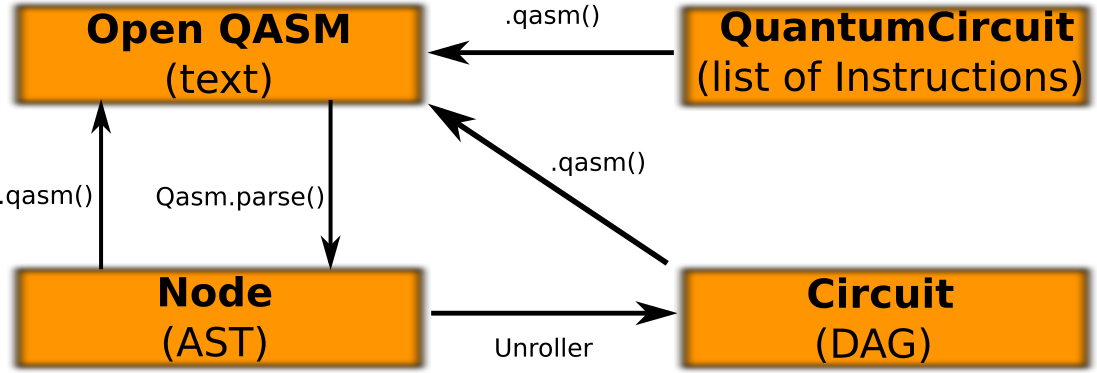
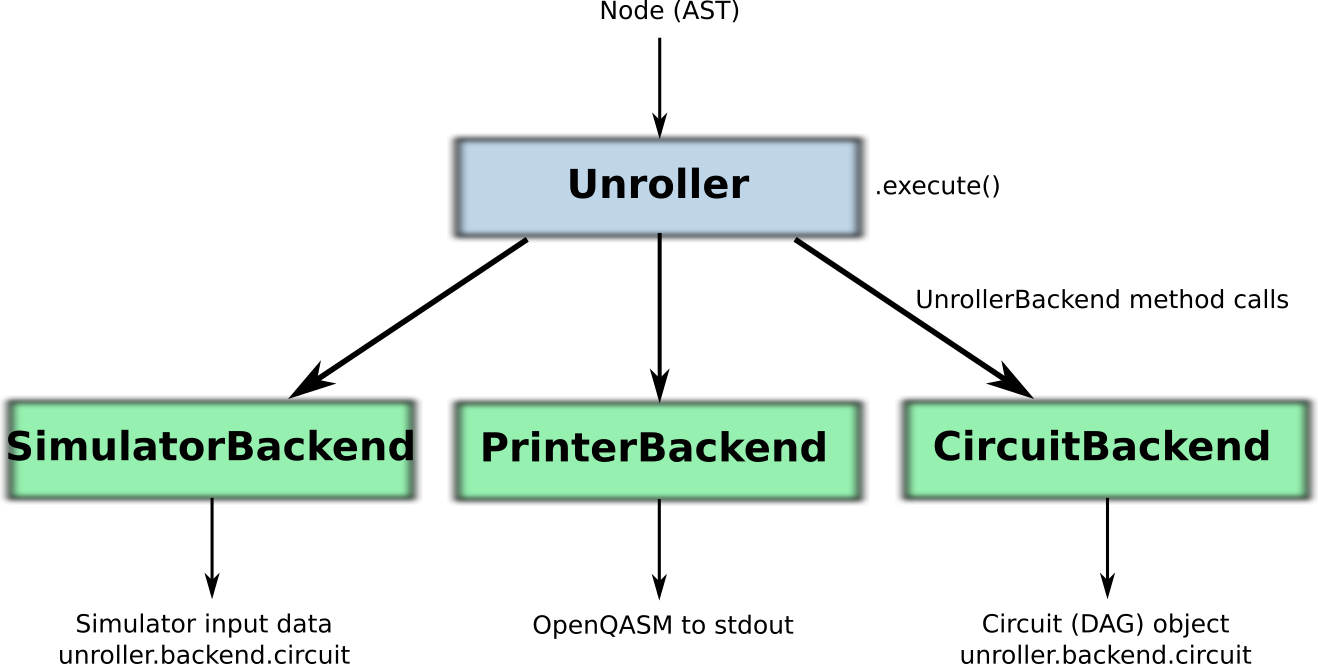
Quantum circuits flow through the components as follows. The programming interface is used to generate OpenQASM circuits. OpenQASM source, as a file or string, is passed into a Qasm object, whose parse method produces an abstract syntax tree (AST). The AST is passed to an Unroller that is attached to an UnrollerBackend. There is a PrinterBackend for outputting text, a SimulatorBackend for outputting simulator input data for the local simulators, and a CircuitBackend for constructing Circuit objects. The Circuit object represents an "unrolled" OpenQASM circuit as a directed acyclic graph (DAG). The Circuit provides methods for representing, transforming, and computing properties of a circuit and outputting the results again as OpenQASM. The whole flow is used by the mapper module to rewrite a circuit to execute on a device with fixed couplings given by a CouplingGraph.
The four circuit representations and how they are currently transformed into each other are summarized in this figure:
Several unroller backends and their outputs are summarized here:
You'll need:
- Install Python 3.
- Jupyter client is needed to run the tutorials, not to use as a library.
- Mac OS X users will find Xcode useful: https://developer.apple.com/xcode/
- For Windows users we highly recommend to install Anaconda 3
- Optionally download Git: https://git-scm.com/download/.
Clone the QISKit SDK repository and navigate to its folder on your local machine:
- If you have Git installed, run the following commands:
git clone https://github.com/QISKit/qiskit-sdk-py
cd qiskit-sdk-py- If you don't have Git installed, click the "Clone or download" button at the URL shown in the git clone command, unzip the file if needed, then navigate to that folder in a terminal window.
To use as a library install the dependencies:
# Depending on the system and setup to append "sudo -H" before could be needed.
pip3 install -r requires.txt
To get the tutorials working set up an Anaconda environment for working with QISKit, and install the required dependencies:
- If running either Linux or Mac OS X with Xcode, simply run the following command:
make env- If running on Mac OS X without Xcode, run the following set of commands:
conda create -y -n QISKitenv python=3 pip scipy
activate QISKitenv
pip install -r requires.txt- If running on Windows, make sure to execute an Anaconda Prompt and run the following command:
.\make env- Create an IBM Quantum Experience account if you haven't already done so
- Get an API token from the Quantum Experience website under “My Account” > “Personal Access Token”
- You will insert your API token in a file called Qconfig.py. First
copy the default version of this file from the tutorial folder to the
main SDK folder (on Windows, replace
cpwithcopy):
cp Qconfig.py.default Qconfig.py- Open your Qconfig.py, remove the
#from the beginning of the API token line, and copy/paste your API token into the space between the quotation marks on that line. Save and close the file.
The SDK includes tutorials in the form of Jupyter notebooks, which are
essentially web pages that contain "cells" of embedded Python code. To
run a cell, click on it and hit Shift+Enter or use the toolbar at
the top of the page. Any output from a cell is displayed immediately
below it on the page. In most cases, the cells on each page must be run
in sequential order from top to bottom in order to avoid errors. To get
started with the tutorials, follow the instructions below.
- If running either Linux or Mac OS X with Xcode, simply run the following command from the QISKit SDK folder:
make run- If running on Mac OS X without Xcode, run the following set of commands from the QISKit SDK folder:
activate QISKitenv
cd tutorial
jupyter notebook index.ipynb- If running on Windows, make sure you are running an Anaconda Prompt, and then run the following commands from the QISKit SDK folder:
.\make runIf you upgrade the dependencies and get the error below, try the fix shown below the error:
# Depending on the system and setup to append "sudo -H" before could be needed.
pip3 install --upgrade IBMQuantumExperience
*Cannot remove entries from nonexistent file [PATH]/easy-install.pth

# Fix: run the command below
curl https://bootstrap.pypa.io/ez_setup.py -o - | python
For additional troubleshooting tips, see the QISKit troubleshooting page on the project's GitHub wiki.
Jim Challenger, Andrew Cross, Ismael Faro, Jay Gambetta, Juan Gomez, Paco Martin, Antonio Mezzacapo, Jesus Perez, and John Smolin, Erick Winston, Chris Wood.
In future releases, anyone who contributes code to this project can include their name here.
- ibmqx backend information Information about the different IBM Q experience backends.
- ibmqx user guide The users guides for the IBM Q experience.
- OpenQasm Examples and tools for the OpenQASM intermediate representation.
- Python API API Client to use IBM Q experience in Python.
- Tutorials Jupyter notebooks for using QISKit.
QISKit is released under the Apache license, version 2.0.
If you'd like to contribute please take a look to our contribution guidelines.

