This README documents the configuration of the MegaDetector API; a notebook that demonstrates the calling of the API is available here.
The most notable prerequisite is nvidia-docker; install according to:
https://docs.nvidia.com/datacenter/cloud-native/container-toolkit/install-guide.html
-
Clone the camera traps repo
git clone "https://github.com/microsoft/CameraTraps/"
cd CameraTraps
-
During this testing phase, switch to the api-flask-redis-v1 branch
git checkout api-flask-redis-v1
-
Download the MegaDetector model file to
api_flask_redis/api_core/animal_detection_api/modelwget "https://lilablobssc.blob.core.windows.net/models/camera_traps/megadetector/md_v4.1.0/md_v4.1.0.pb" -O api_flask_redis/api_core/animal_detection_api/model/md_v4.1.0.pb
- To authenticate the API via a key, create a file with name
allowed_keys.txt, add it to the folderapi_flask_redis/api_core/animal_detection_api, then add a list of keys to the file, with one key per line.
-
Switch to the
api_flask_redis/api_corefolder, from which the Docker image expects to be builtcd api_flask_redis/api_core -
Name the API's Docker image (the name doesn't matter, this is just a convenience if you are experimenting with multiple versions)
export API_DOCKER_IMAGE=camera-trap-api:1.0 -
Set the base TensorFlow image
For GPU environments:
export BASE_IMAGE=tensorflow/tensorflow:1.14.0-gpu-py3Nota bene: we have historically run MegaDetector v4 in a TF 1.1x environment (since that's how it was trained), but TF 1.1x is incompatible with some newer GPUs, and you may find that things hang after loading CuDNN. If you experience that, try a TF2 environment instead:
export BASE_IMAGE=tensorflow/tensorflow:latest-gpuFor non-GPU environments:
export BASE_IMAGE=tensorflow/tensorflow:1.14.0-py3
sudo sh build_docker.sh $BASE_IMAGE $API_DOCKER_IMAGEThe following will run the API locally on port 5050.
-
For GPU environments:
sudo nvidia-docker run -it -p 5050:1212 $API_DOCKER_IMAGE -
For non-GPU environments:
sudo docker run -it -p 5050:1212 $API_DOCKER_IMAGE
-
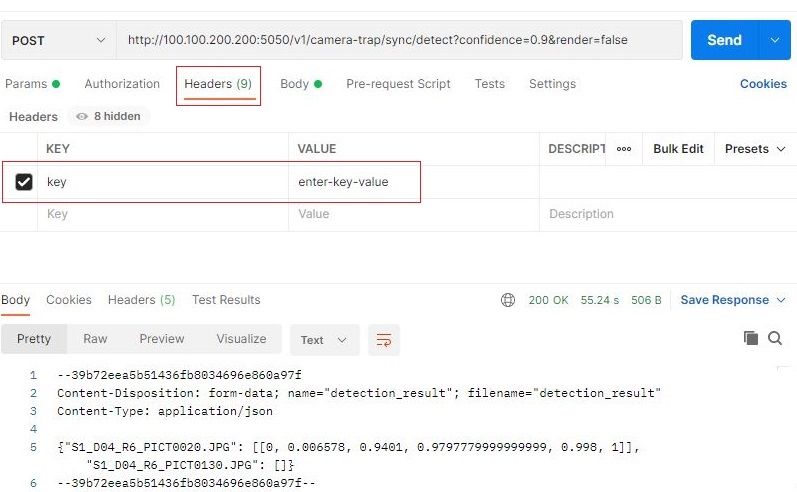
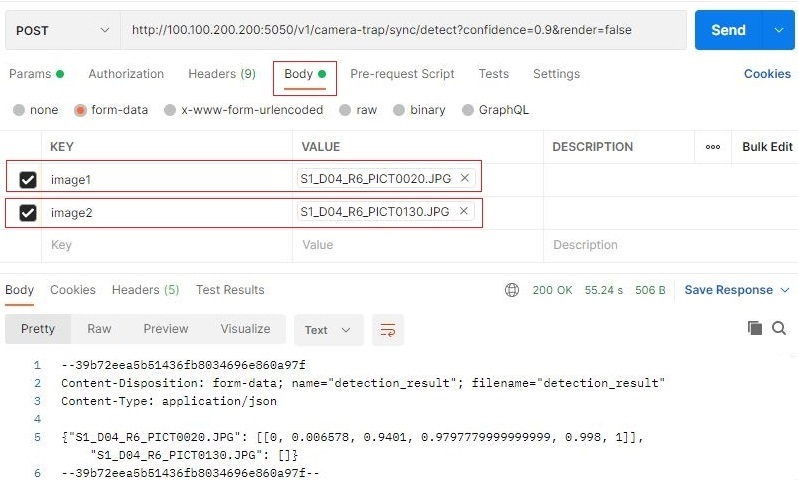
To test in Postman, in a Postman tab enter the URL of the API, e.g.:
http://100.100.200.200:5050/v1/camera-trap/sync/detect -
Select
POST -
Optionally add the
min_confidenceparameter, which sets the minimum detection confidence that's returned to the caller (defaults to 0.1) -
Optionally add the
min_rendering_confidenceparameter, which sets the minimum detection confidence that's rendered to returned images (defaults to 0.8) (not meaningful if "render" is False) -
Optionally add the
renderparameter, set totrueif you would like the images to be rendered with bounding boxes -
If you enabled authentication by adding the file
allowed_keys.txtunderapi_flask_redis/api_core/animal_detection_apithen in the headers tab add thekeyparameter and enter the key value (this would be one of the keys that you saved to the fileallowed_keys.txt) -
Under
Bodyselectform-data, create one key/value pair per image, with values of type "file" (to upload an image file) -
Click
Send


