-
To escalate privileges, run:
sudo -sEnter your password.
-
Run the following command to install MySQL Community Server edition:
# zypper install mysql-community-serverWait while MySQL downloads and installs.
-
To set MySQL to start when the system boots, execute the following command:
# insserv mysql -
Now you can manually start the MySQL daemon (mysqld) with the following command:
# rcmysql startTo check the status of the MySQL daemon, run:
# rcmysql statusIf you want to stop the MySQL daemon, run:
# rcmysql stop -
Warning! After installation, the MySQL root password is empty by default. It's recommended that you run mysql_secure_installation, a script that helps secure MySQL. When running mysql_secure_installation, you will be prompted to change the MySQL root password, remove anonymous user accounts, disable remote root logins, remove test databases, and reload the privileges table. It is recommended that you answer yes to all of these options and change the root password. Run the following command to execute the script:
$ mysql_secure_installation -
After you run, you can login to MySQL:
$ mysql -u root -pEnter the MySQL root password (which you changed in the previous step) and you'll be presented with a prompt where you can issue SQL statements to interact with the database.
-
To create a new MySQL user, run the following at the mysql> prompt:
mysql> CREATE USER 'mysqluser'@'localhost' IDENTIFIED BY 'password';Note, the semi-colons (;) at the end of the lines are crucial for ending the commands.
-
To create a database and grant the
mysqluseruser permissions on it, issue the following commands:mysql> CREATE DATABASE testdatabase; mysql> GRANT ALL ON testdatabase.* TO 'mysqluser'@'localhost' IDENTIFIED BY 'password';Note that database user names and passwords are only used by scripts connecting to the database. Database user account names do not necessarily represent actual user accounts on the system.
-
To login from another computer, execute the following:
mysql> GRANT ALL ON testdatabase.* TO 'mysqluser'@'<ip-address>' IDENTIFIED BY 'password';where
ip-addressis the IP address of the computer from which you will connect to MySQL. -
To exit the MySQL database administration utility, issue the following command:
quit -
After MySQL is installed, you'll need to configure an endpoint so that MySQL can be accessed remotely. Log in to the Azure Management Portal. In the Azure portal, click Virtual Machines, click the name of your new VM, and then click Endpoints.
![Endpoints][Image7]
-
Click Add at the bottom of the page. ![Endpoints][Image8]
-
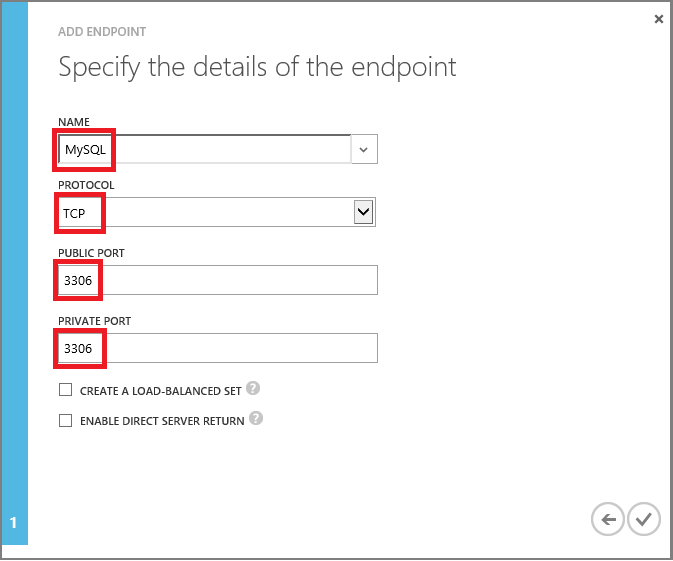
Add an endpoint named "MySQL" with protocol TCP, and Public and Private ports set to "3306". This allows remote access to MySQL.

-
To remotely connect to MySQL running on your OpenSUSE virtual machine in Azure, run the following command on your local computer:
mysql -u mysqluser -p -h <yourservicename>.cloudapp.netFor example, using the virual machine we created in this tutorial, the command would be:
mysql -u mysqluser -p -h testlinuxvm.cloudapp.net -
You've successfully configured MySQL, created a database, and a new user. For more information on MySQL, see the MySQL Documentation.