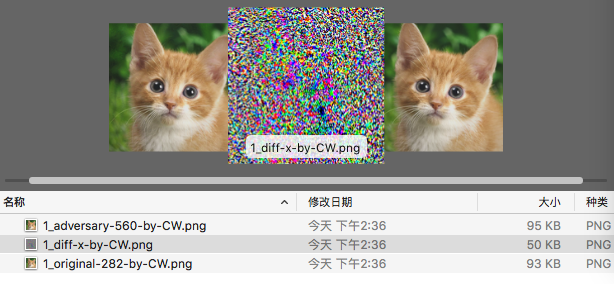
可对任意图片基于白盒模型进行对抗样本生成
该简例提供了resnet、alexnet的模型,以及其对imagenet的训练参数,可放置任意图片进行对抗样本生成。target方式还可指定生成样本的可信度。
提供如下攻击算法的实例:
- FGSM (no target)
- CW (target)
example
├── images
│   ├── cat_example.png
│   └── mytest_list.txt
├── models
│   ├── alexnet.py
│   ├── __init__.py
│   └── resnet.py
├── parameters
│   ├── alexnet
│   └── resnet_50
├── imagenet_example_cw.py
├── imagenet_example_fgsm.py
├── reader.py
└── utility.py
例子中包括几部分:
images目录:放置被攻击的原始图片,可以是多张。mytest_list.txt中记录了需要进行样本生成的该图片名称
models目录:模型文件
parameters目录:需要下载,用于models内模型的训练参数
imagenet_example_cw.py:用例应用主文件,使用CW攻击算法,当前仅支持target方式
imagenet_example_fgsm.py:用例应用主文件,使用FGSM攻击算法,当前仅支持非target方式
reader.py:读取原始图片处理
utility.py:命令行参数及输出处理
本例中已提供resnet、alexnet的模型及其预训练参数下载,也可以另行下载任意模型,但需要按要求进行修改调整(参见:特别提示)
模型文件放入
example/models/
训练参数文件放入
example/parameters/
图片放入
example/images/
更新图片配置文件
example/images/mytest_list.txt
将所有需要攻击的图片名称加入其中
输入命令
python imagenet_example_cw.py  --log_debug=True --target=560
具体参数
--use_gpu:(BOOL) 是否使用GPU
--class_dim:(INT) 输出类别个数
--image_shape:(STR) 输入数据形状
--pretrained_model:(STR) 模型参数路径
--model:(STR) 模型指定
--target:(INT) 指定target的分类,不指定为非target方式
--log_debug:(BOOL) 是否开启调试
--inference:(BOOL) 是否仅做预测,不生成对抗样本
注:可信度没有提供成参数,需要在代码中指定,名称confidence_level,畎认设置为0.9,表示90%可信度
执行输出
root:/AdvBox/example# python imagenet_example_cw.py --use_gpu=True --log_debug=True --target=560
-----------  Configuration Arguments -----------
batch_size: 256
class_dim: 1000
image_shape: 3,224,224
inference: False
log_debug: False
model: ResNet50
pretrained_model: ./parameters/resnet_50/115
target: 560
use_gpu: 1
------------------------------------------------
--------------------inference-------------------
Test-0-score: 0.380188554525, class 282, name=./images/cat_example.png
--------------------adversary-------------------
guess img before preprocess:282  expect:560
Checking if 10.000000 is a successful c.
label:560 softmax:0.980241060257 L2:1338.22021484
Checking if 5.005000 is a successful c.
label:560 softmax:0.990494728088 L2:463.381530762
Checking if 2.507500 is a successful c.
label:560 softmax:0.921321153641 L2:183.302642822
Checking if 1.258750 is a successful c.
label:560 softmax:0.90595304966 L2:90.1555404663
Checking if 0.634375 is a unsuccessful c.
Checking if 0.946562 is a unsuccessful c.
Checking if 1.102656 is a unsuccessful c.
predict label: 560 softmax: 0.90595305
attack success, original_label=282, adversarial_label=560, count=1
--------------------------------------------------
cw attack done
对原图片cat_example.png生成的对抗样本保存在./output目录下
1_adversary-560-by-CW.png 1_diff-x-by-CW.png 1_original-282-by-CW.png
adv字样的为攻击样本,diff为在原图中扰动的部分,orig为原图
验证样本的实际效果,可以先将输出的样本拷贝到images目录下,在mytest_list.txt中增加这个图片名称
cp .output/imagenet/1_adversary-560-by-CW.png ./images/
vi ./images/mytest_list.txt
再次以inference方式运行example
root:/AdvBox/example# python imagenet_example_cw.py --use_gpu=True --inference=True

-----------  Configuration Arguments -----------
batch_size: 256
class_dim: 1000
image_shape: 3,224,224
inference: 1
log_debug: False
model: ResNet50
pretrained_model: ./parameters/resnet_50/115
target: 560
use_gpu: 1
------------------------------------------------
--------------------inference-------------------
Test-0-score: 0.380188554525, class 282, name=./images/cat_example.png
Test-1-score: 0.903945684433, class 560, name=./images/1_adversary-560-by-CW.png
-
关于CW算法的使用:
1、因为该算法需要在IMG数据前进行一系列的计算,当前paddle又无法使用非Data的占位符,所以model要一起被带入CW中执行
2、已经训练好的参数如果只想导入一次,需要在model内对每个conv2d、bn、fc等参数位置指定名称,这样在主进程导入时,可以只导一次,并提供给CW和主框架同时使用
3、应用主进程内,创建攻击类要提前,导入参数要放置在最后 -
原始图片相关
本例中仅生成大小为224*224的攻击样本,会对原始图片进行缩放和裁剪,所以输出并不是原图比例 -
使用GPU运行
如果需要使用GPU,命令行需要加--use_gpu=True ,另外还要提前设置环境变量export WITH_GPU=1
