-
In a new window, sign in to the Azure portal.
-
In the left menu, click New, click Databases, and then under Azure Cosmos DB, click Create.

-
In the New account blade, specify the desired configuration for the Azure Cosmos DB account.
With Azure Cosmos DB, you can choose one of four programming models: Gremlin (graph), MongoDB, SQL (DocumentDB), and Table (key-value).
In this quick start we'll be programming against the MongoDB API so you'll choose MongoDB as you fill out the form. But if you have graph data for a social media app, document data from a catalog app, or key/value (table) data, realize that Azure Cosmos DB can provide a highly available, globally-distributed database service platform for all your mission-critical applications.
Fill out the New account blade using the information in the table as a guide.
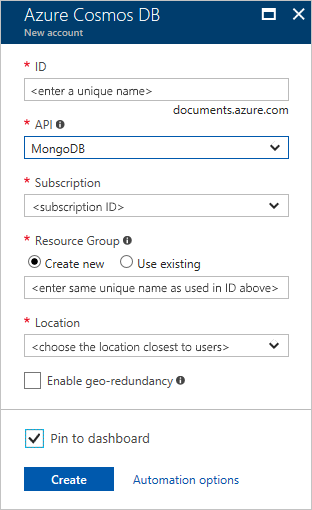
Setting Suggested value Description ID Unique value A unique name you choose to identify the Azure Cosmos DB account. documents.azure.com is appended to the ID you provide to create your URI, so use a unique but identifiable ID. The ID may contain only lowercase letters, numbers, and the '-' character, and must be between 3 and 50 characters. API MongoDB The API determines the type of account to create. Azure Cosmos DB provides five APIs to suits the needs of your application: SQL (document database), Gremlin (graph database), MongoDB (document database), Azure Table, and Cassandra, each which currently require a separate account.
Select MongoDB because in this quickstart you are creating a document database that is queryable using MongoDB.
Learn more about the MongoDB APISubscription Your subscription The Azure subscription that you want to use for the Azure Cosmos DB account. Resource Group The same value as ID The new resource group name for your account. For simplicity, you can use the same name as your ID. Location The region closest to your users The geographic location in which to host your Azure Cosmos DB account. Choose the location closest to your users to give them the fastest access to the data. -
Click Create to create the account.
-
On the toolbar, click Notifications to monitor the deployment process.

-
When the deployment is complete, open the new account from the All Resources tile.


