Although this AMI is not public and is available for Cloudera workhops only, the steps can be reproduced in your own environment
- Launch AWS AMI ami-08820f3fb1e5a37a4 with m5d.4xlarge instance type
- Keep default storage (300GB SSD)
- Set security group with:
- Type: All TCP
- Source: My IP
- Choose an existing or create a new key pair
- Lab 1 - Accessing the sandbox
- Lab 2 - Stream data using NiFi
- Lab 3 - Explore Kafka
- Lab 4 - Integrate with Schema Registry
- Lab 5 - Explore Hive, Druid and Zeppelin
- Lab 6 - Stream enhanced data into Hive using NiFi
- Lab 7 - Create live dashboard with Superset
- Lab 8 - Collect syslog data using MiNiFi and EFM
- Bonus - Process sentiment analysis on tweets
On Mac OS X, open a terminal and vi /etc/hosts
On Windows, open C:\Windows\System32\drivers\etc\hosts
Add a new line to the existing
nn.nnn.nnn.nnn demo.cloudera.com
Replacing the ip (nn.nnn.nnn.nnn) address with the one provided
Open a web browser and go to the following url
http://demo.cloudera.com:8080/
Log in with the following credential
Username: admin Password: admin
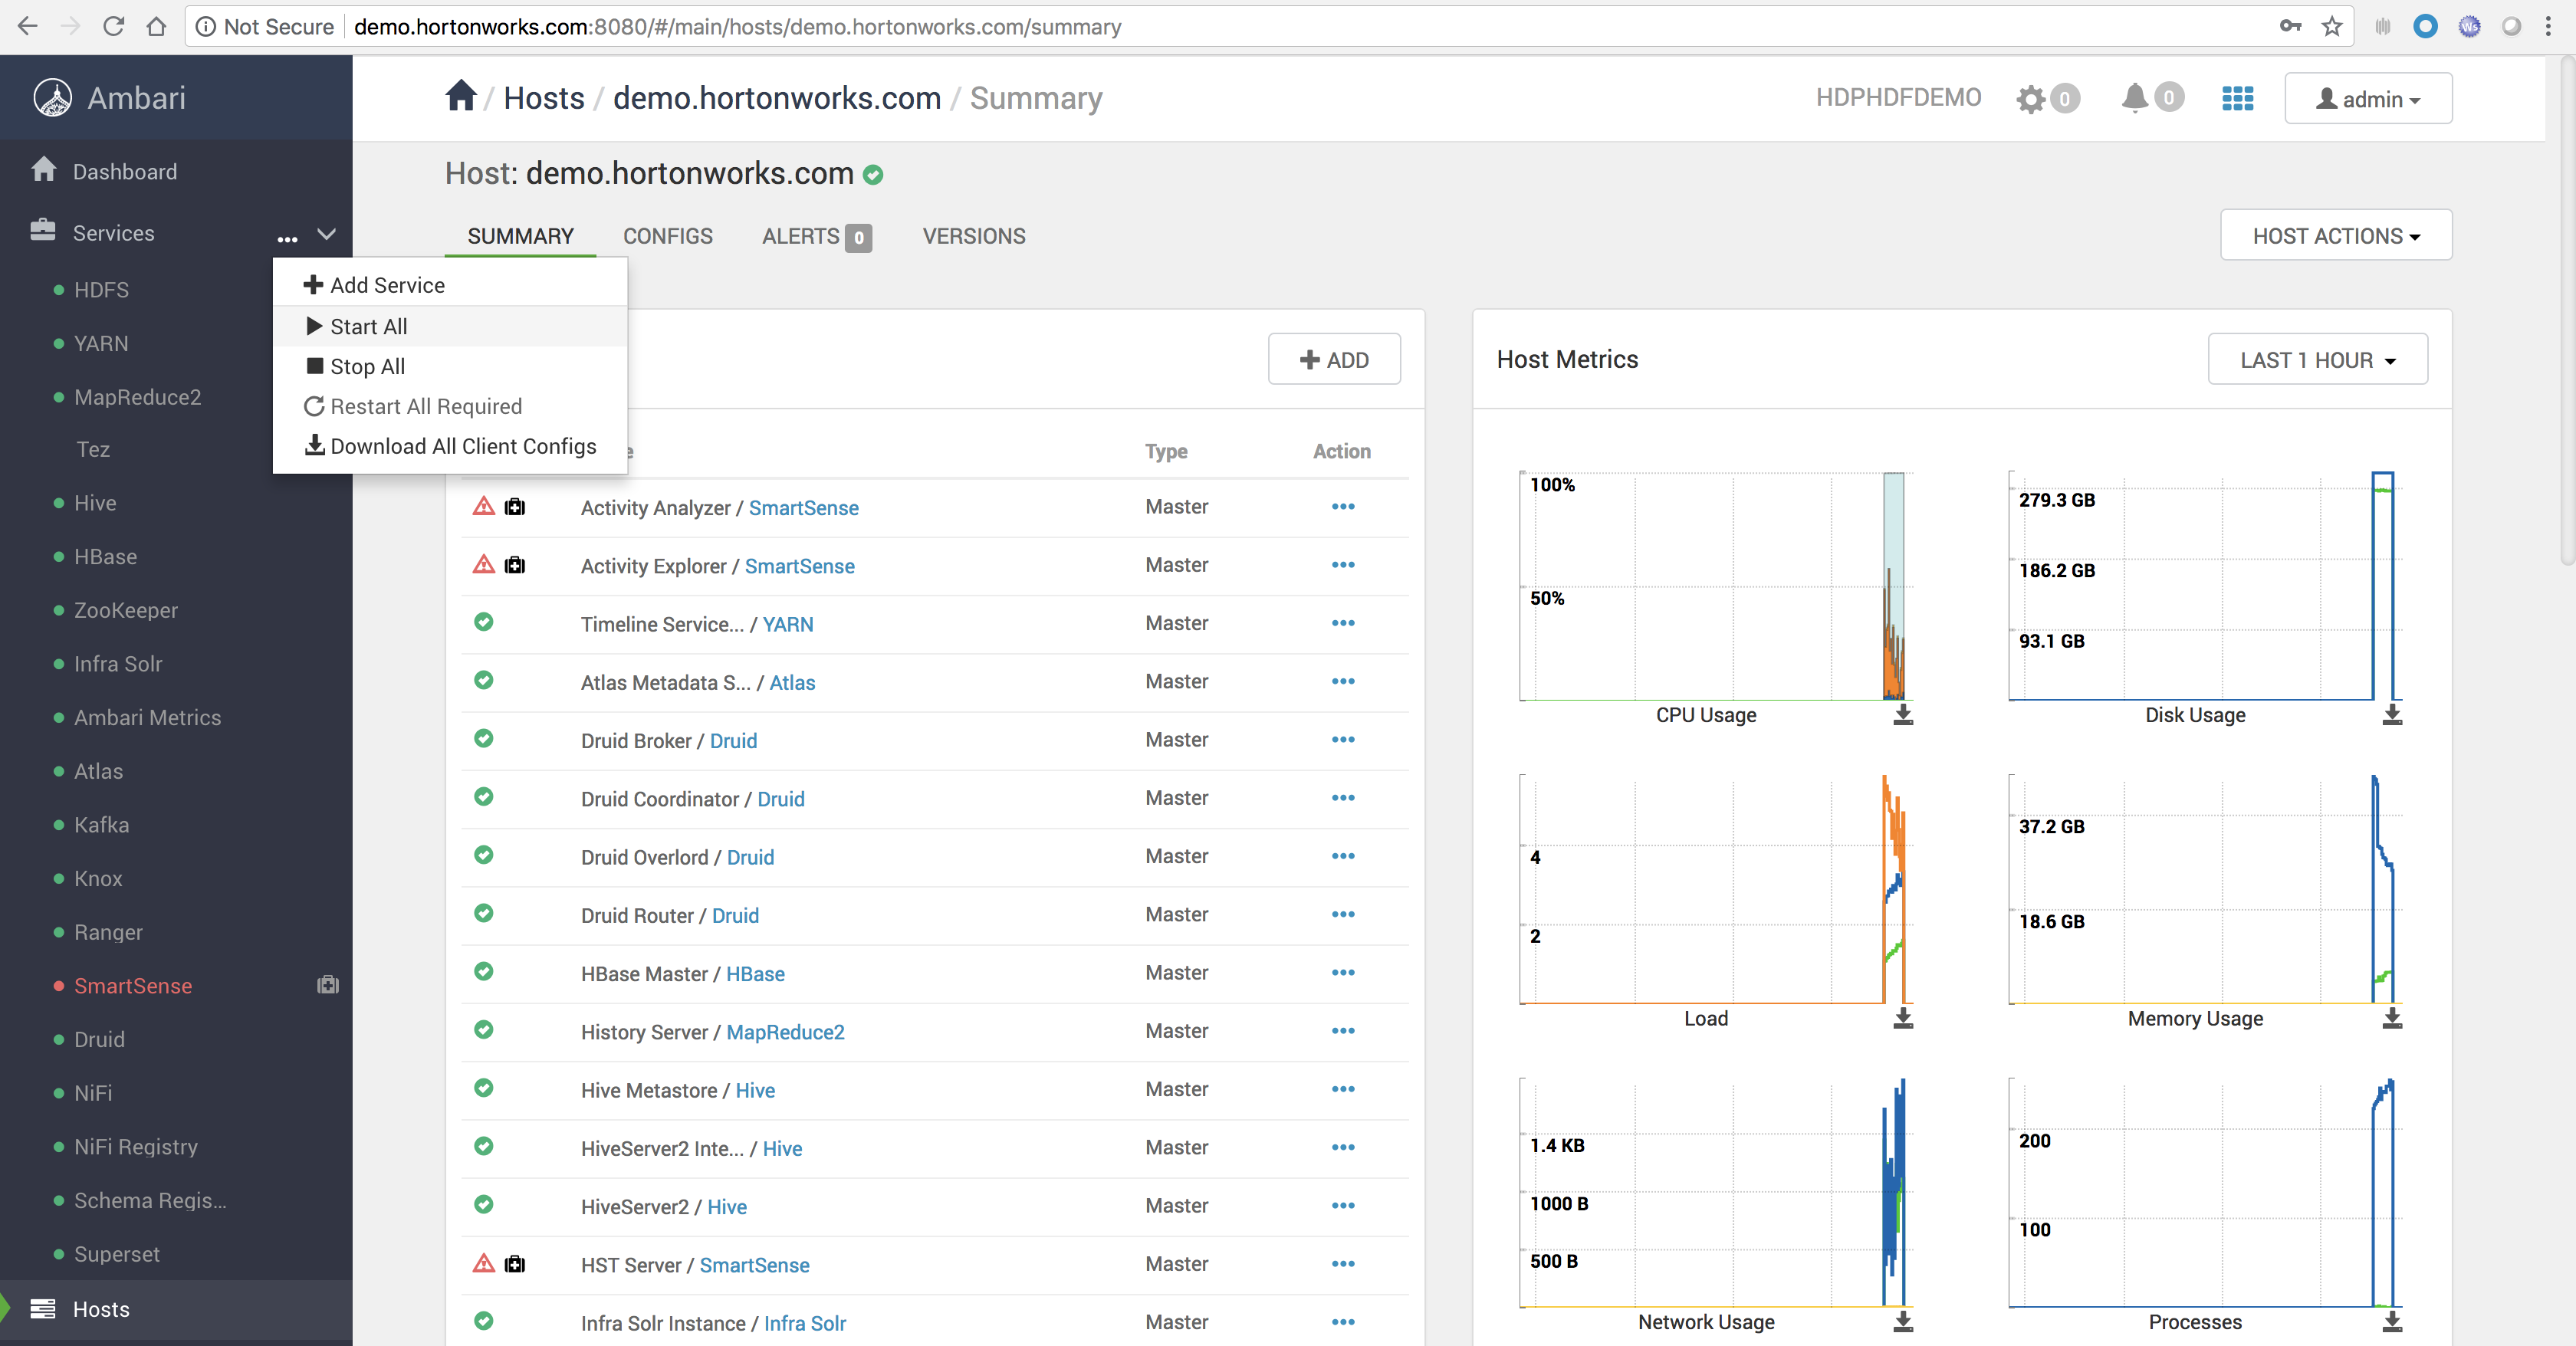
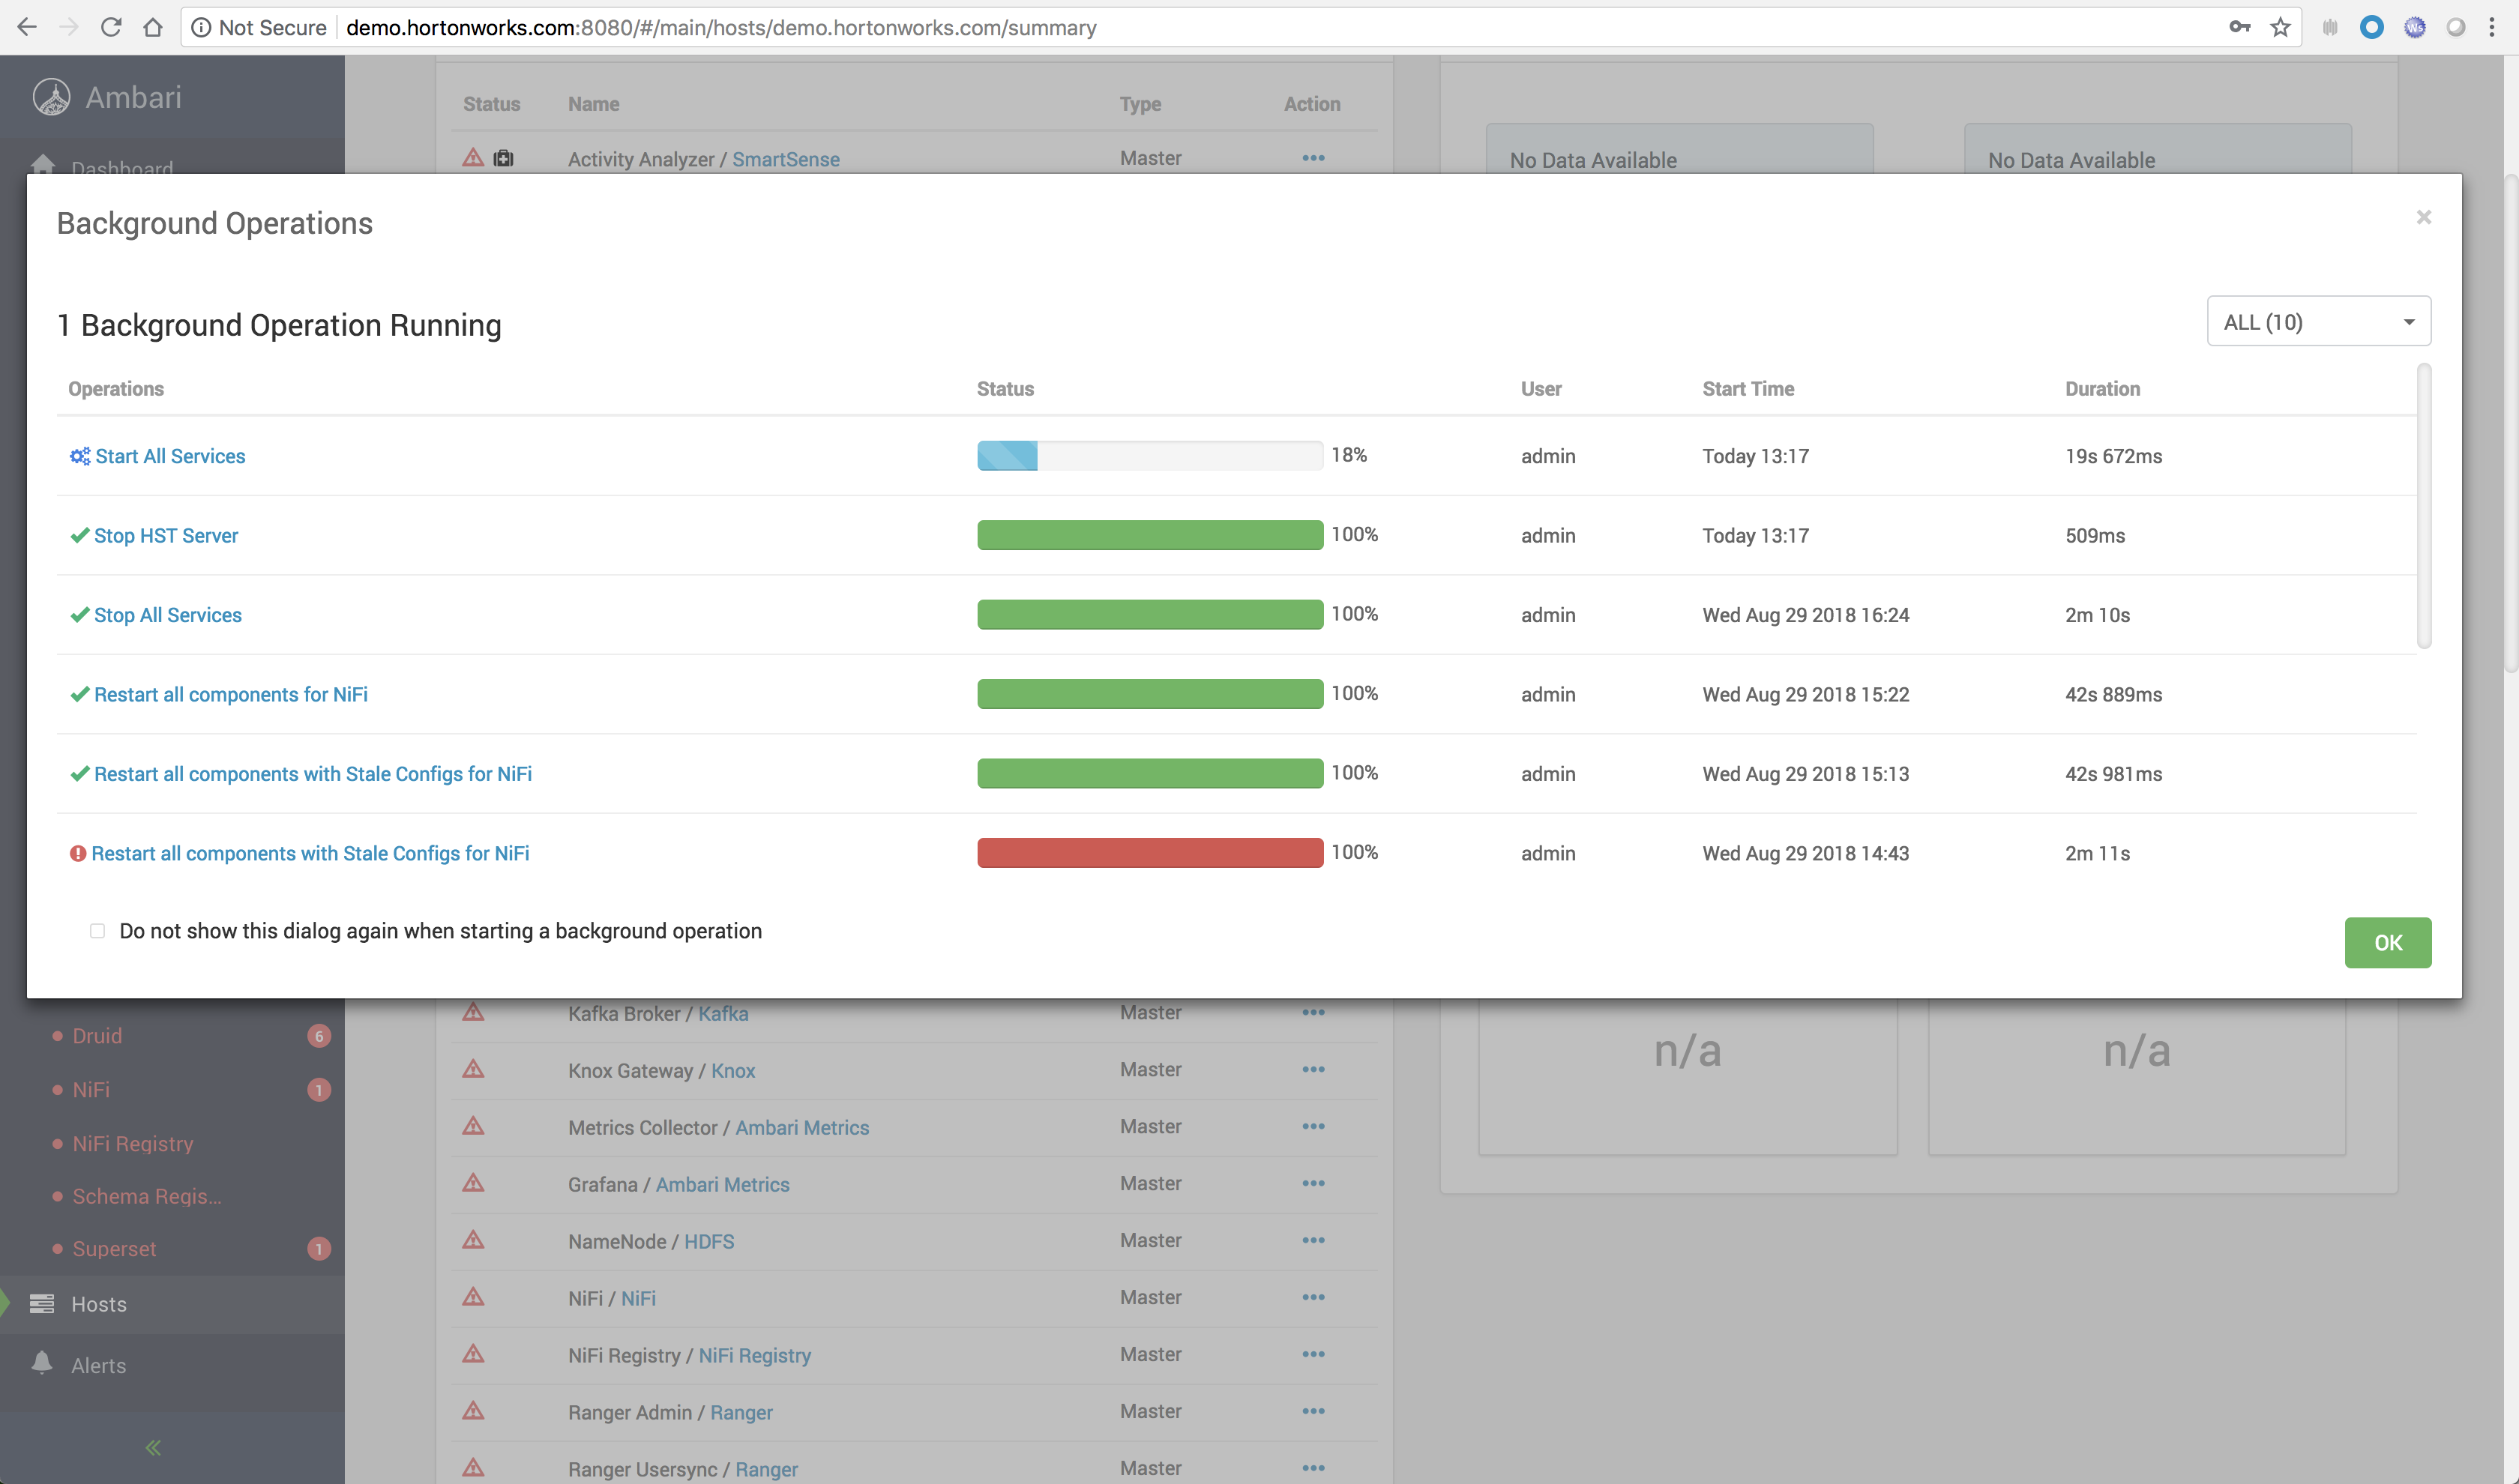
If services are not started already, start all services
It can take up to 20 minutes...
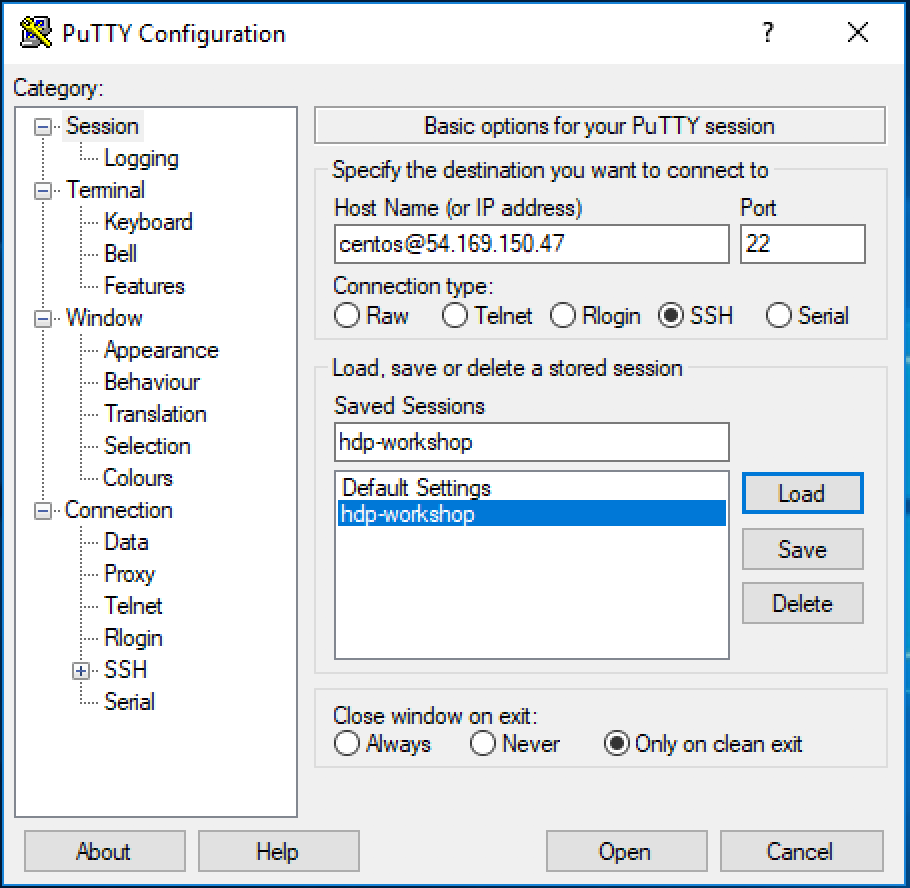
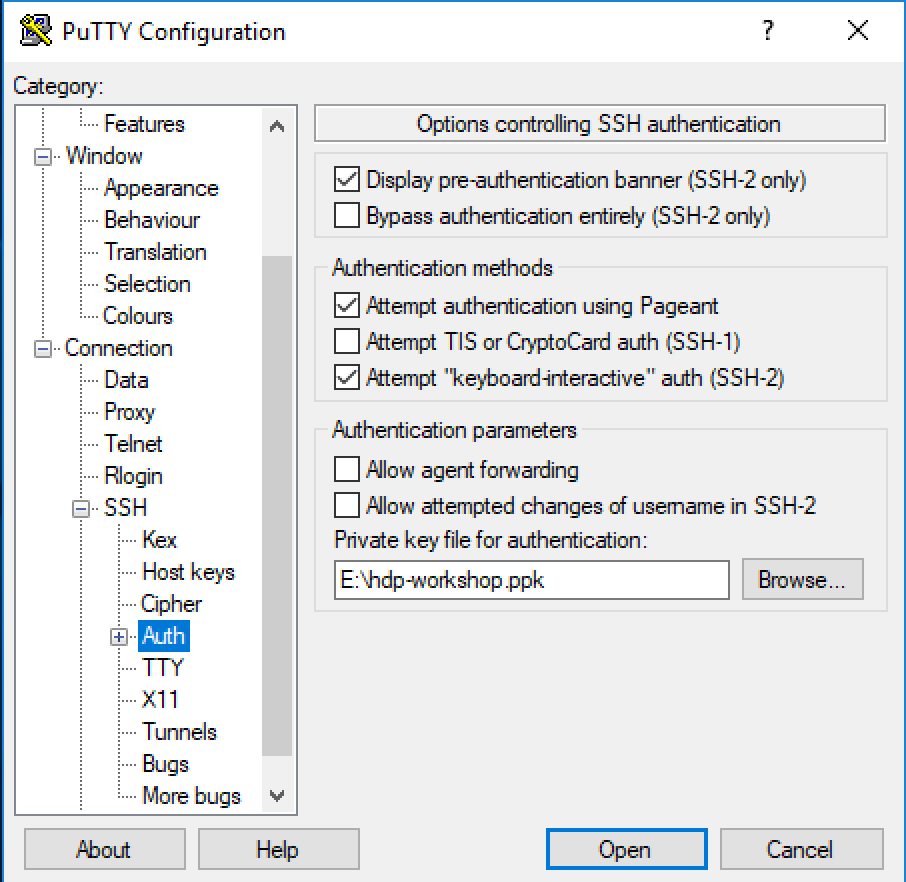
Copy and paste the content of ppk for Windows or pem for Mac OS X
On Mac use the terminal to SSH
For Mac users, don't forget to chmod 400 /path/to/hdp-workshop.pem before ssh'ing
On Windows use putty
In order to have a streaming source available for our workshop, we are going to make use of the publicly available Meetup's API and connect to their WebSocket.
The API documentation is available here: https://www.meetup.com/meetup_api/docs/stream/2/event_comments/#websockets
In this scenario we are going to stream all comments, for all topics, into NiFi and classify each one of them into the 5 categories listed above.
To do that we need to score each comment's content against the Stanford CoreNLP's sentiment model.
In real-world use case we would probably filter by event of our interest but for the sake of this workshop we won't and assume all comments are given for the same event: the famous CDF workshop!
Let's get started... Open NiFi UI and follow the steps below:
-
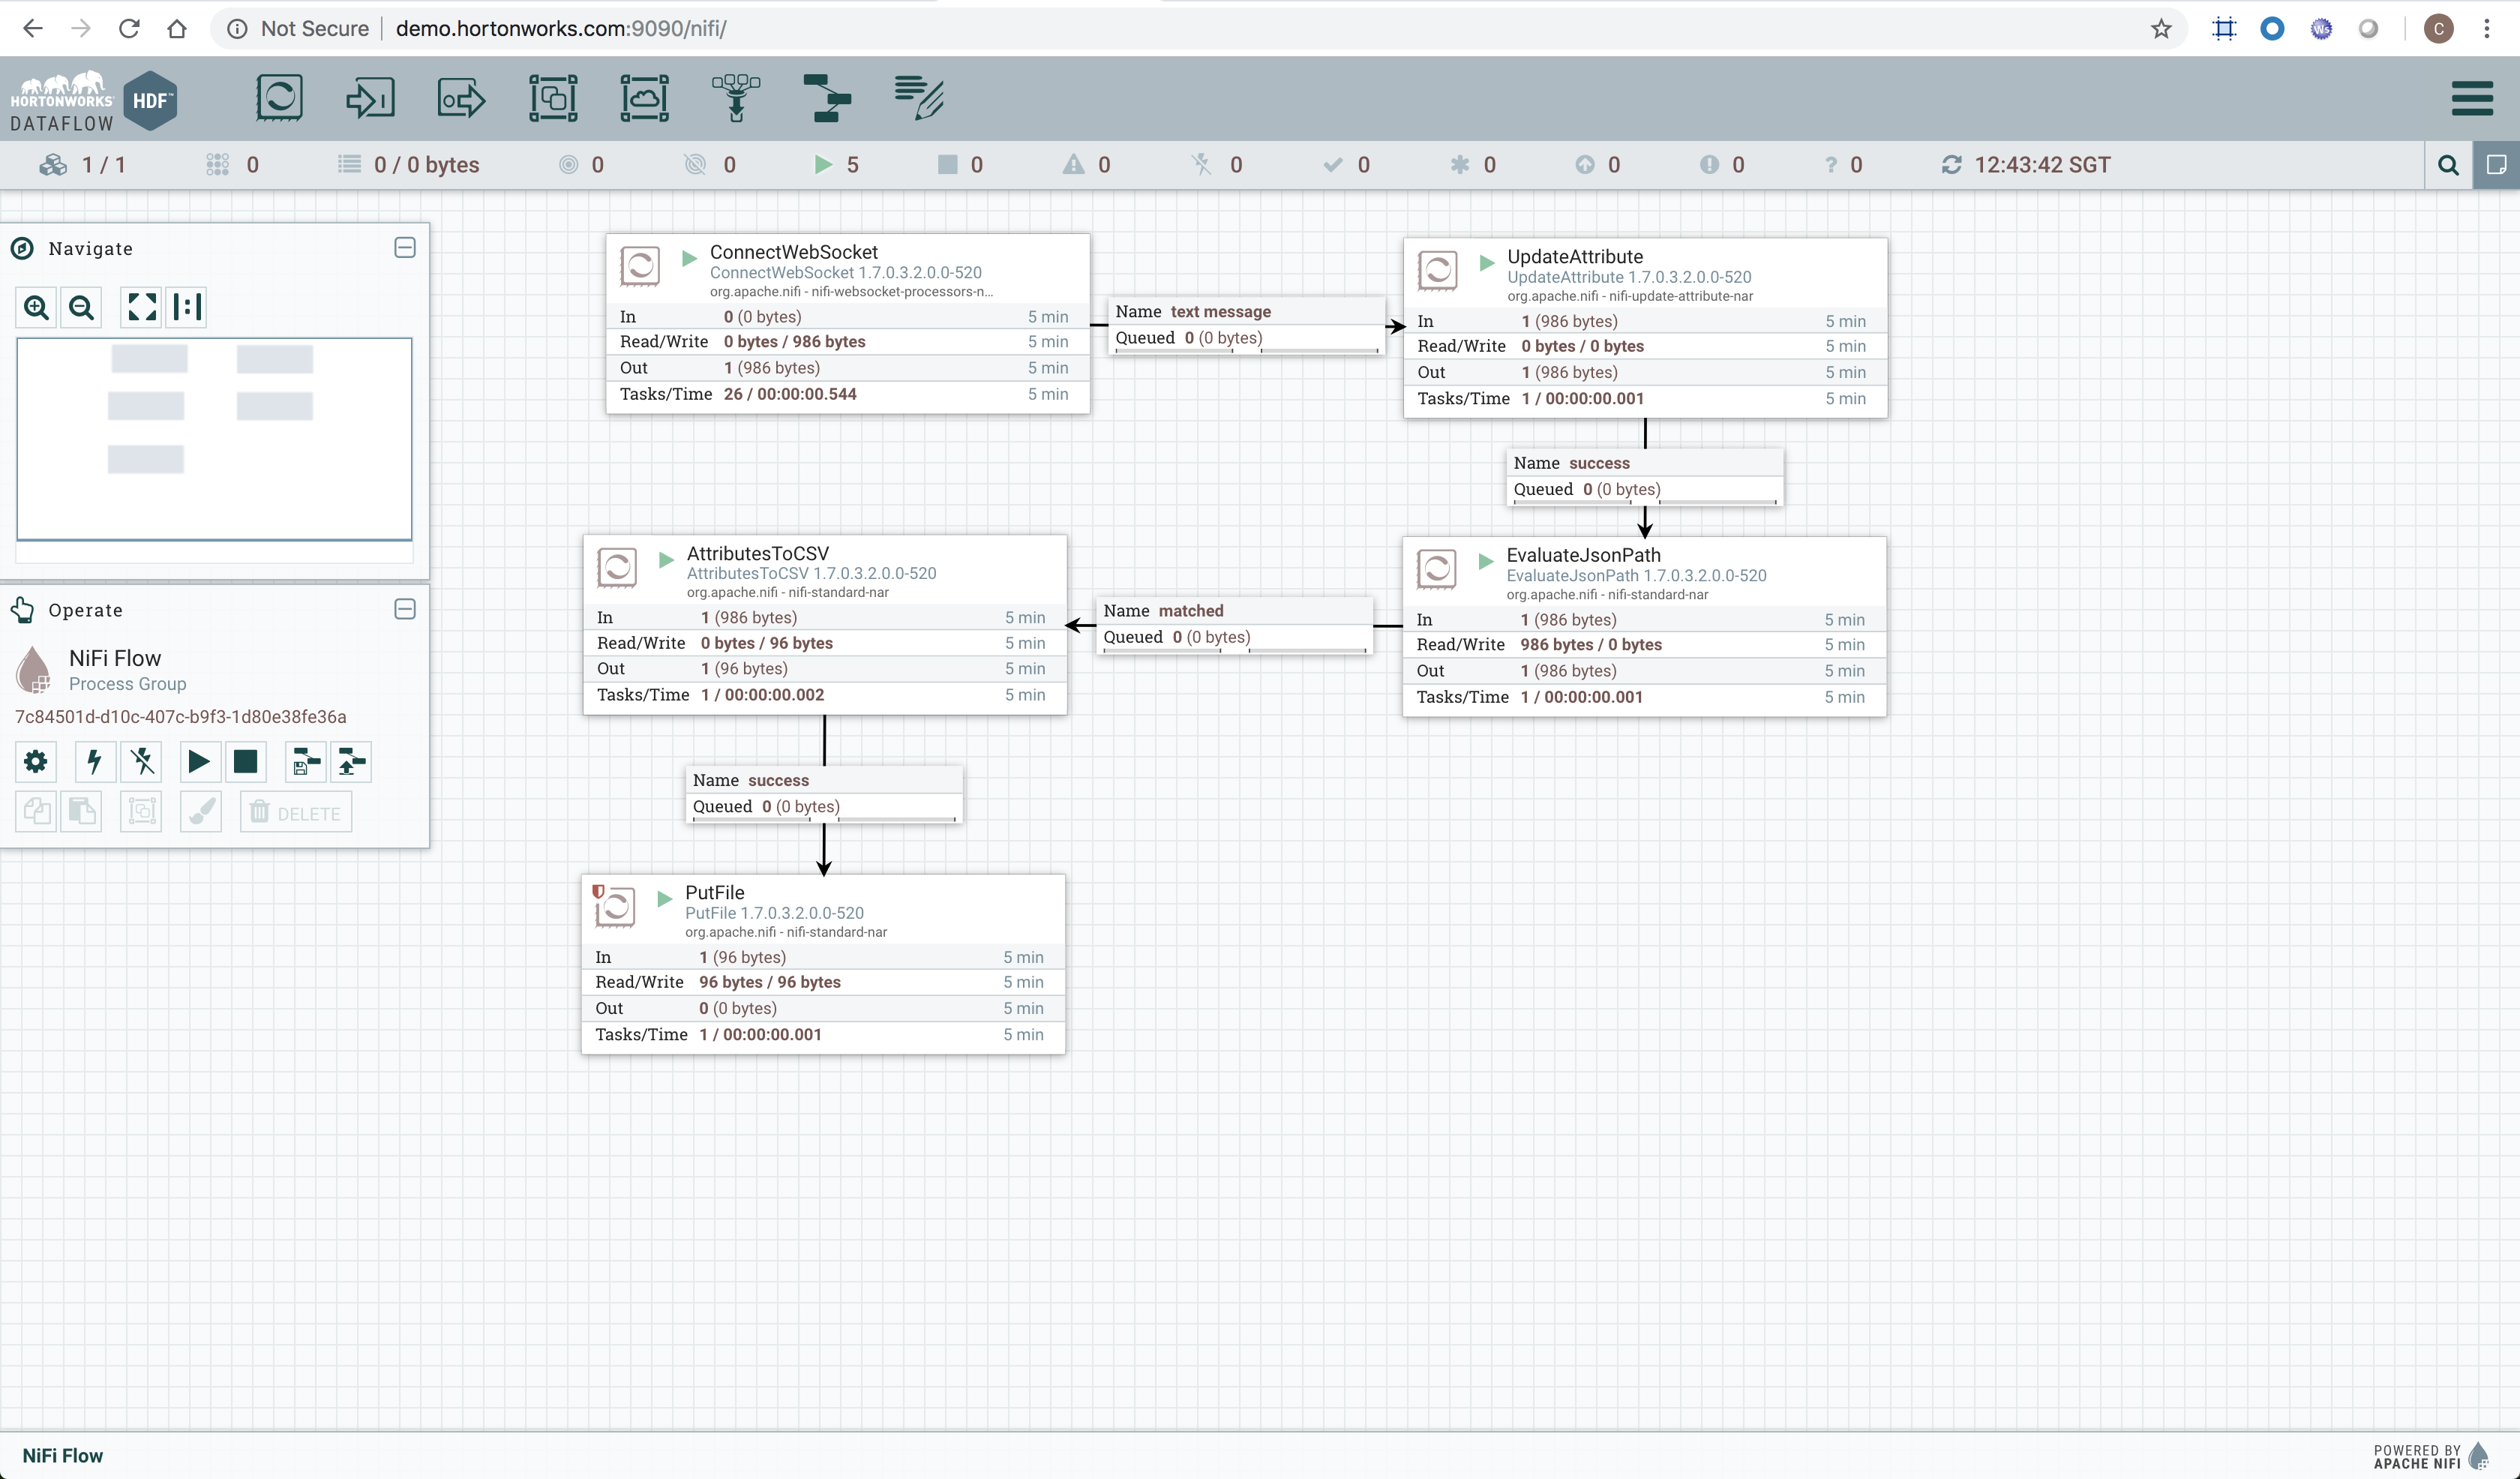
Step 1: Add a ConnectWebSocket processor to the canvas
- Double click on the processor
- On settings tab, check all relationships except text message
- Got to properties tab and select or create JettyWebSocketClient as the WebSocket Client ControllerService
- Then configure the service (click on the arrow on the right)
- Go to properties tab and add this value:
ws://stream.meetup.com/2/event_commentsto property WebSocket URI - Apply the change
- Enable the controller service (click on the thunder icon) and close the window
- Go to properties tab and add this value:
- Go to properties tab and give a value to WebSocket Client Id such as demo for example
- Apply changes
-
Step 2: Add an UpdateAttribute connector to the canvas and link from ConnectWebSocket on text message relationship
- Double click on the processor
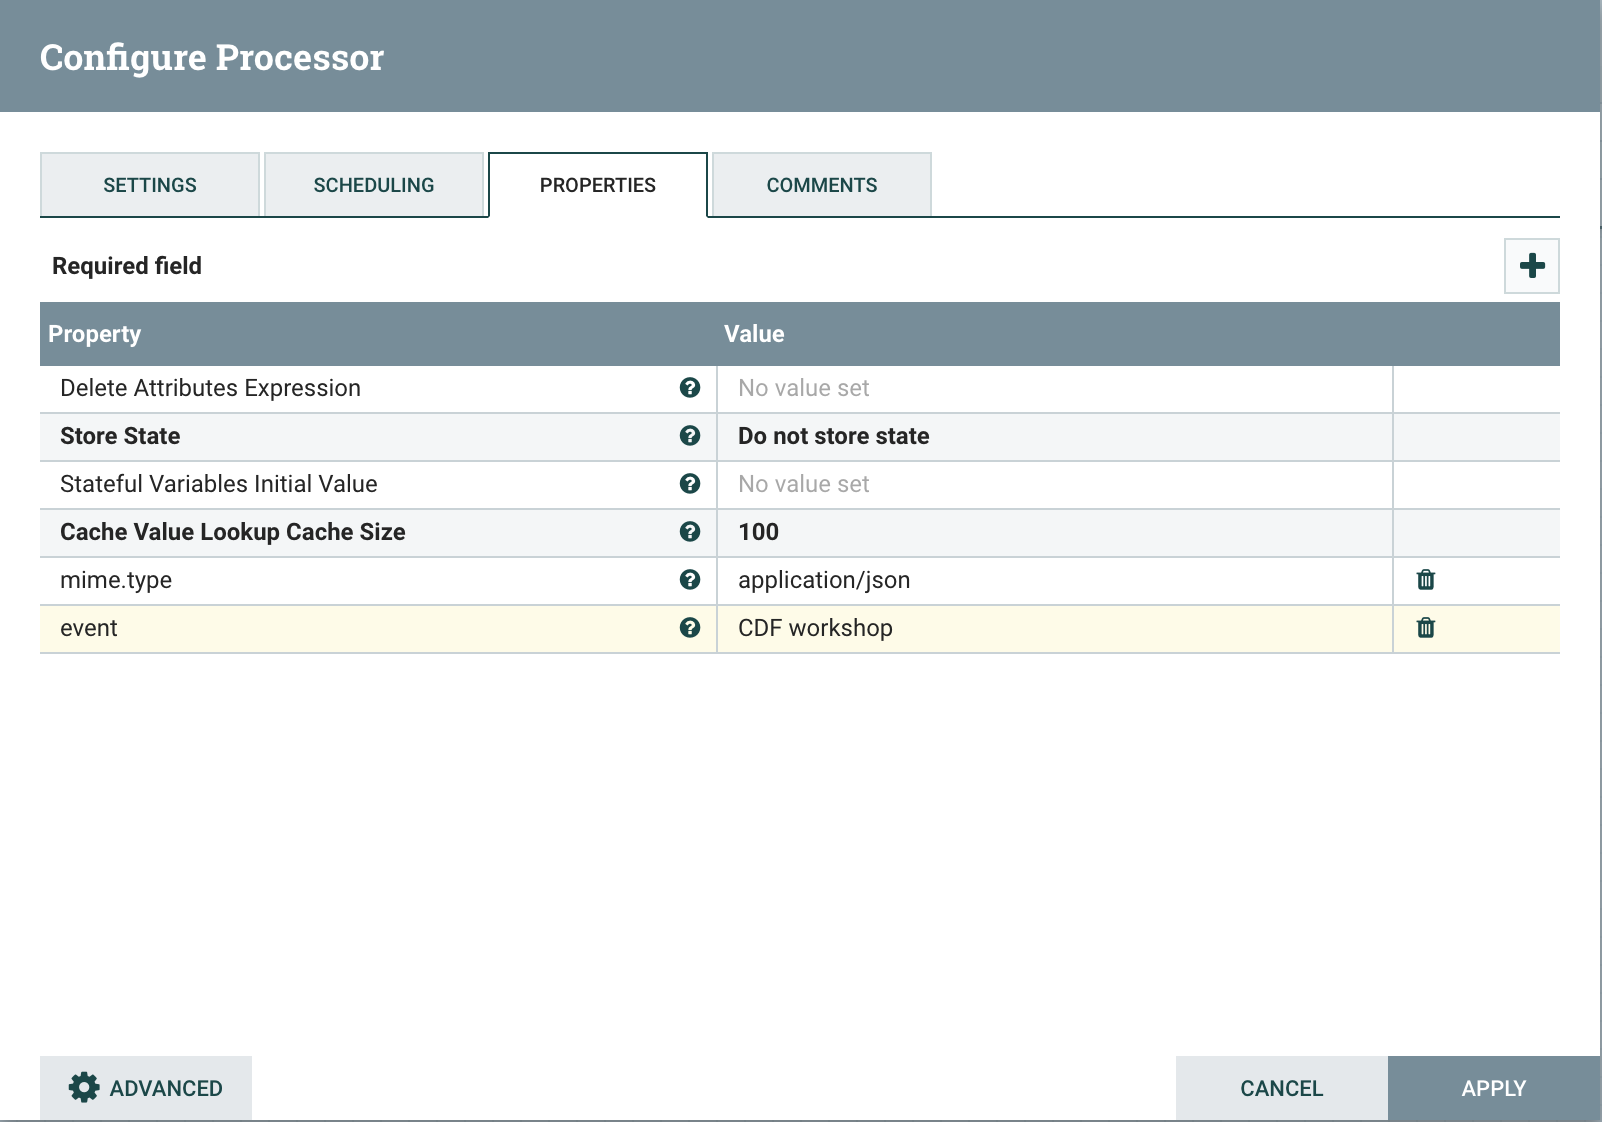
- On properties tab add new property mime.type clicking on + icon and give the value application/json. This will tell the next processor that the messages sent by the Meetup WebSocket is in JSON format.
- Add another property event to set an event name CDF workshop for the purpose of this exercise as explained before
- Apply changes
-
Step 3: Add EvaluateJsonPath to the canvas and link from UpdateAttribute on success relationship
-
Double click on the processor
-
On settings tab, check both failure and unmatched relationships
-
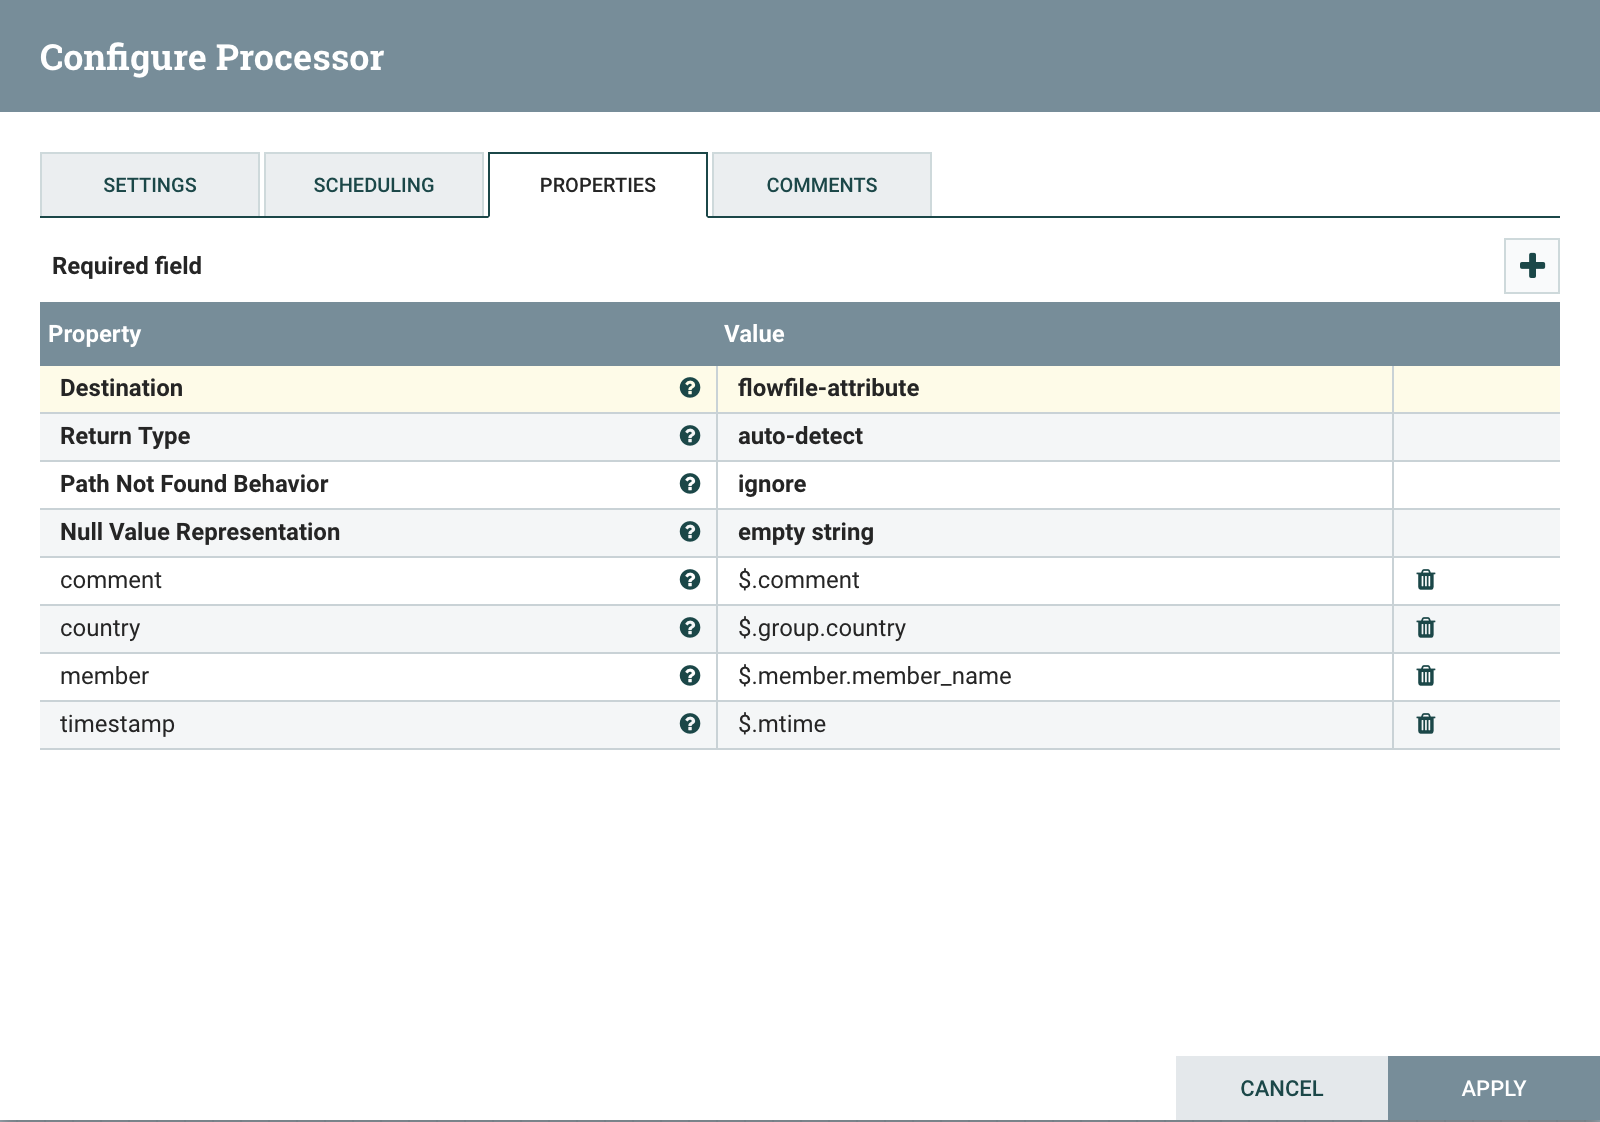
On properties tab, change Destination value to flowfile-attribute
-
And add properties as follow
- comment: $.comment
- member: $.member.member_name
- timestamp: $.mtime
- country: $.group.country
The messages coming out of the web sockets look like this:
{"visibility":"public","member":{"member_id":11643711,"photo":"https:\/\/secure.meetupstatic.com\/photos\/member\/3\/1\/6\/8\/thumb_273072648.jpeg","member_name":"Loka Murphy"},"comment":"I didn’t when I registered but now thinking I want to try and get one since it’s only taking place once.","id":-259414201,"mtime":1541557753087,"event":{"event_name":"Tunnel to Viaduct 8k Run","event_id":"256109695"},"table_name":"event_comment","group":{"join_mode":"open","country":"us","city":"Seattle","name":"Seattle Green Lake Running Group","group_lon":-122.34,"id":1608555,"state":"WA","urlname":"Seattle-Greenlake-Running-Group","category":{"name":"fitness","id":9,"shortname":"fitness"},"group_photo":{"highres_link":"https:\/\/secure.meetupstatic.com\/photos\/event\/9\/e\/f\/4\/highres_465640692.jpeg","photo_link":"https:\/\/secure.meetupstatic.com\/photos\/event\/9\/e\/f\/4\/600_465640692.jpeg","photo_id":465640692,"thumb_link":"https:\/\/secure.meetupstatic.com\/photos\/event\/9\/e\/f\/4\/thumb_465640692.jpeg"},"group_lat":47.61},"in_reply_to":496130460,"status":"active"}
-
-
Step 4: Add an AttributesToCSV processor to the canvas and link from EvaluateJsonPath on matched relationship
- Double click on the processor
- On settings tab, check failure relationship
- Change Destination value to flowfile-content
- Change Attribute List value to write only the above parsed attributes: timestamp,event,member,comment,country
- Set Include Schema to true
- Apply changes
-
Step 5: Add a PutFile processor to the canvas and link from AttributesToCSV on success relationship
- Double click on the processor
- On settings tab, check all relationships
- Change Directory value to /tmp/workshop
- Apply changes
-
Step 6: Start the entire flow
SSH to the sandbox and explore the files created under /tmp/workshop.
On the NiFi UI, explore the FlowFiles' attributes and content looking at Data provenance.
Once done, stop the flow and delete all files sudo rm -rf /tmp/workshop/*
ssh to the AWS instance as explained above then become root
sudo su -
Navigate to Kafka
cd /usr/hdp/current/kafka-broker
Create a topic named meetup_comment_ws
./bin/kafka-topics.sh --create --zookeeper demo.cloudera.com:2181 --replication-factor 1 --partitions 1 --topic meetup_comment_ws
List topics to check that it's been created
./bin/kafka-topics.sh --list --zookeeper demo.cloudera.com:2181
Open a consumer so later we can monitor and verify that JSON records will stream through this topic:
./bin/kafka-console-consumer.sh --bootstrap-server demo.cloudera.com:6667 --topic meetup_comment_ws
Keep this terminal open.
We will now open a new terminal to publish some messages...
Follow the same steps as above except for the last step where we are going to open a producer instead of a consumer:
./bin/kafka-console-producer.sh --broker-list demo.cloudera.com:6667 --topic meetup_comment_ws
Type anything and click enter. Then go back to the first terminal with the consumer running. You should see the same message get displayed!
Explore Schema Registry UI
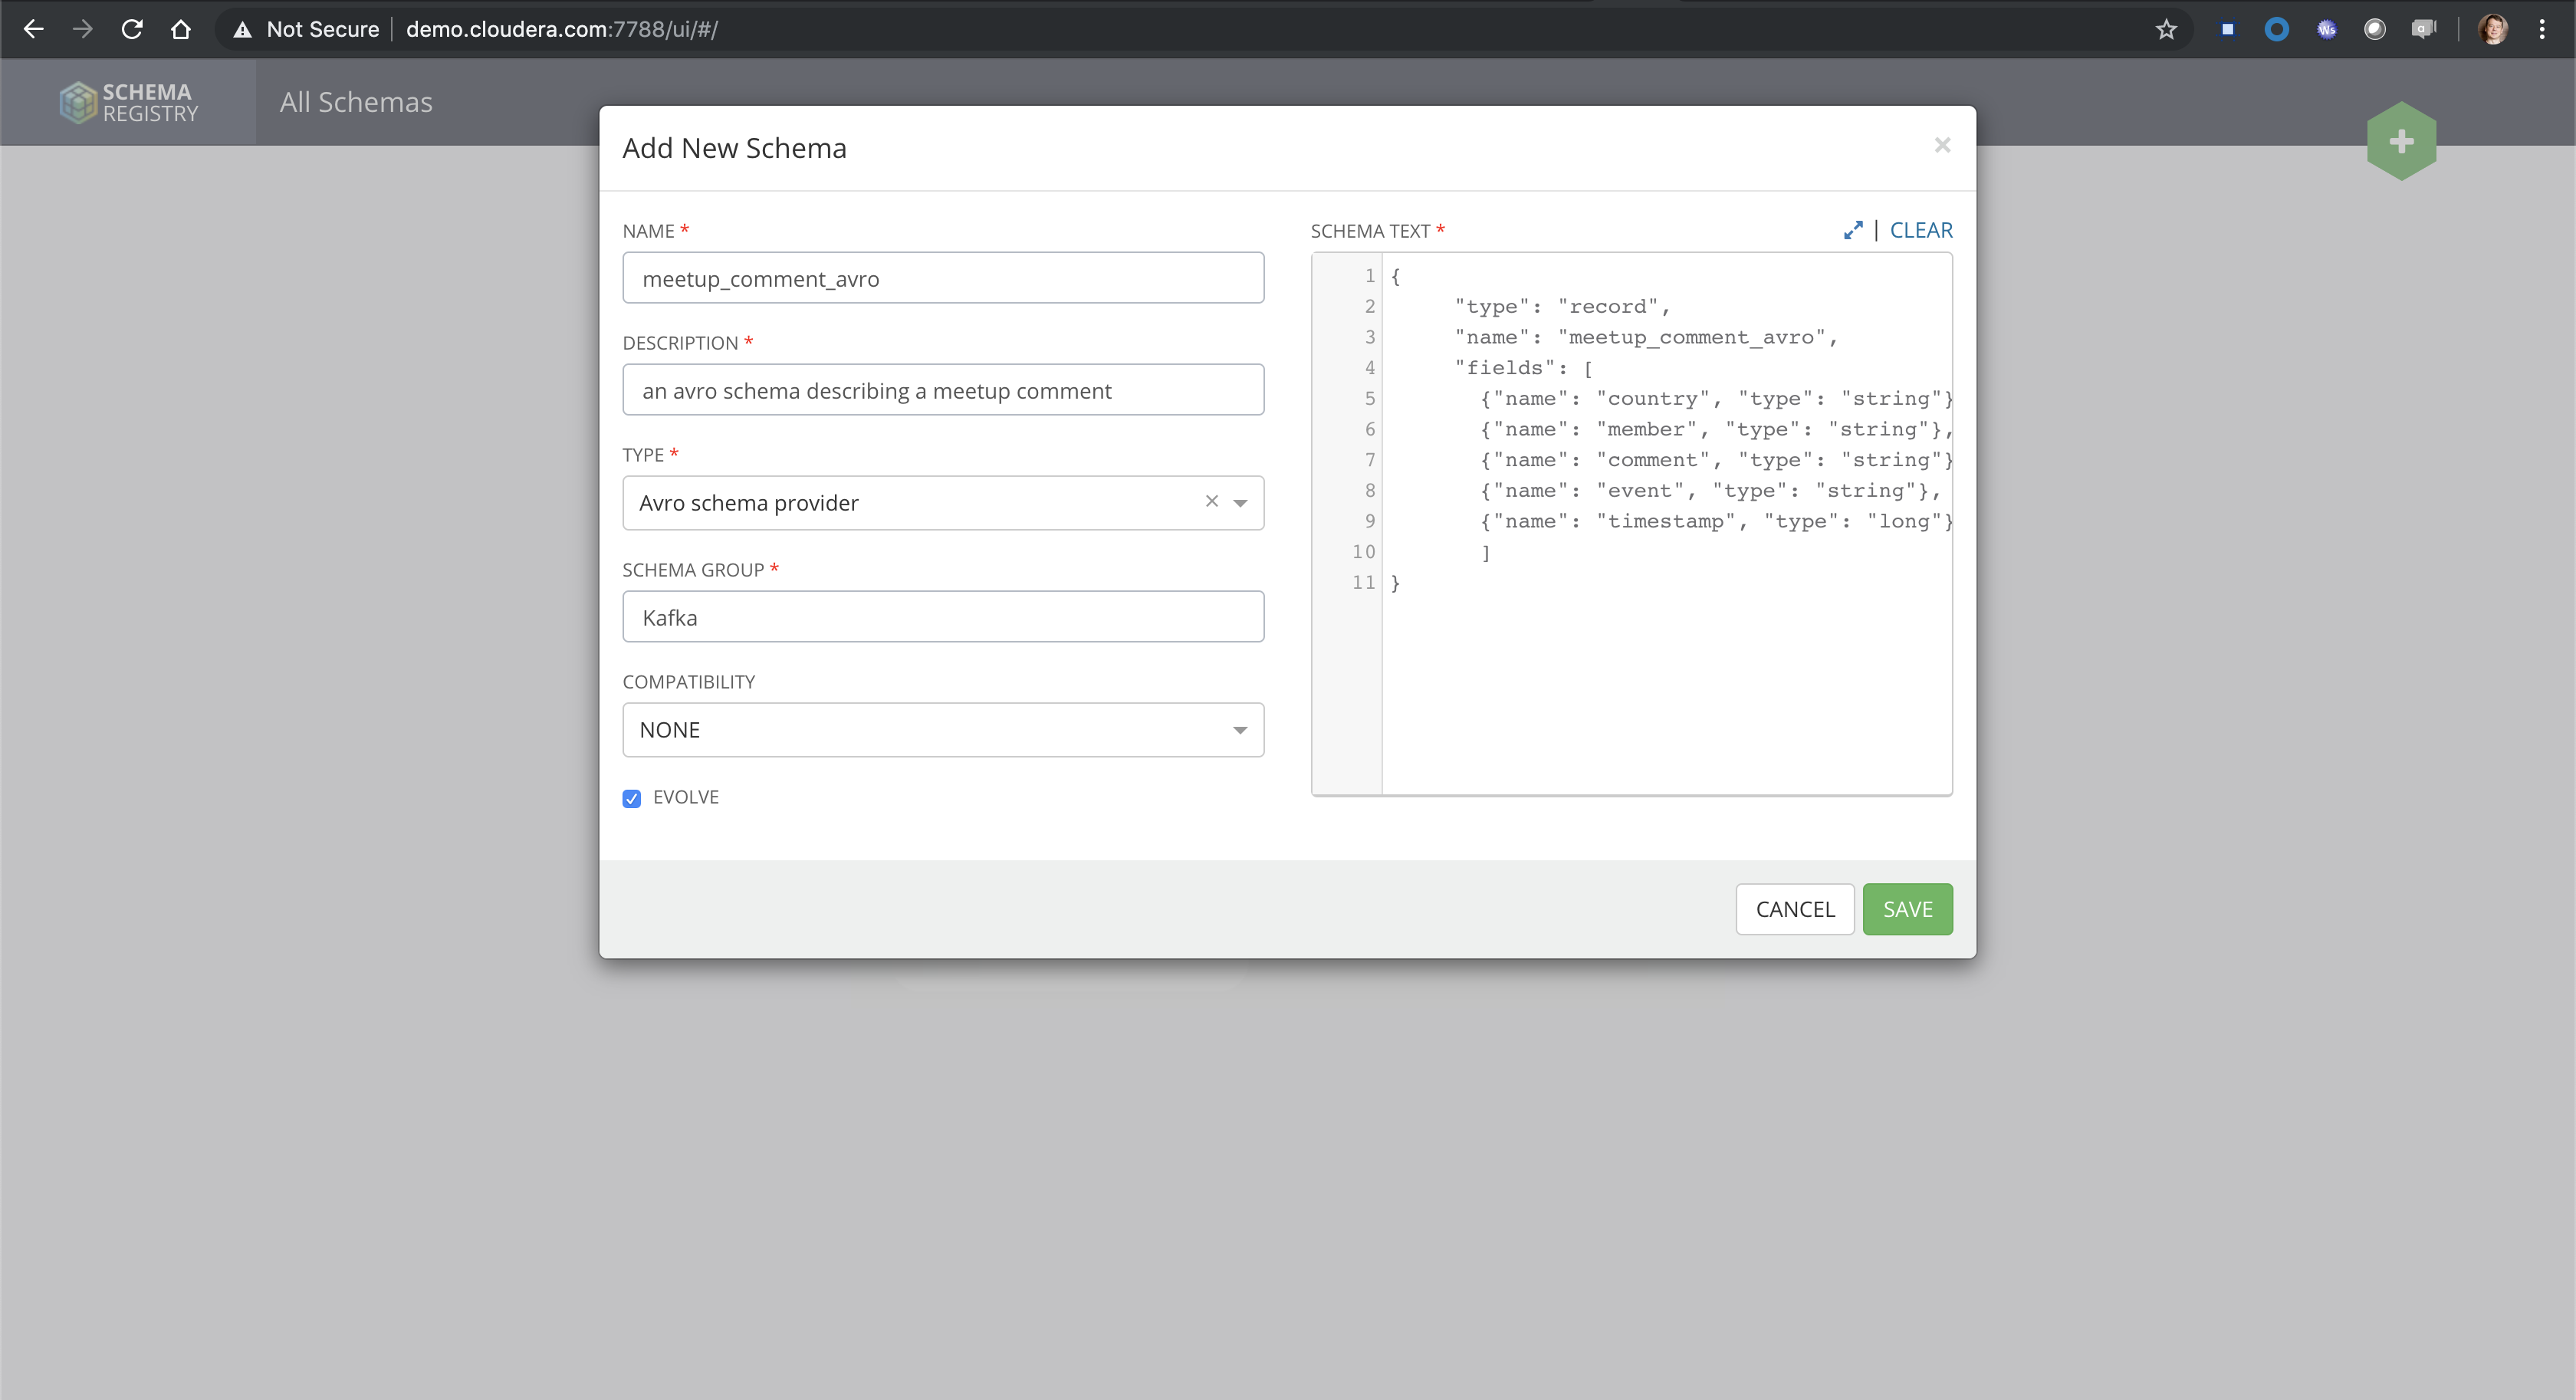
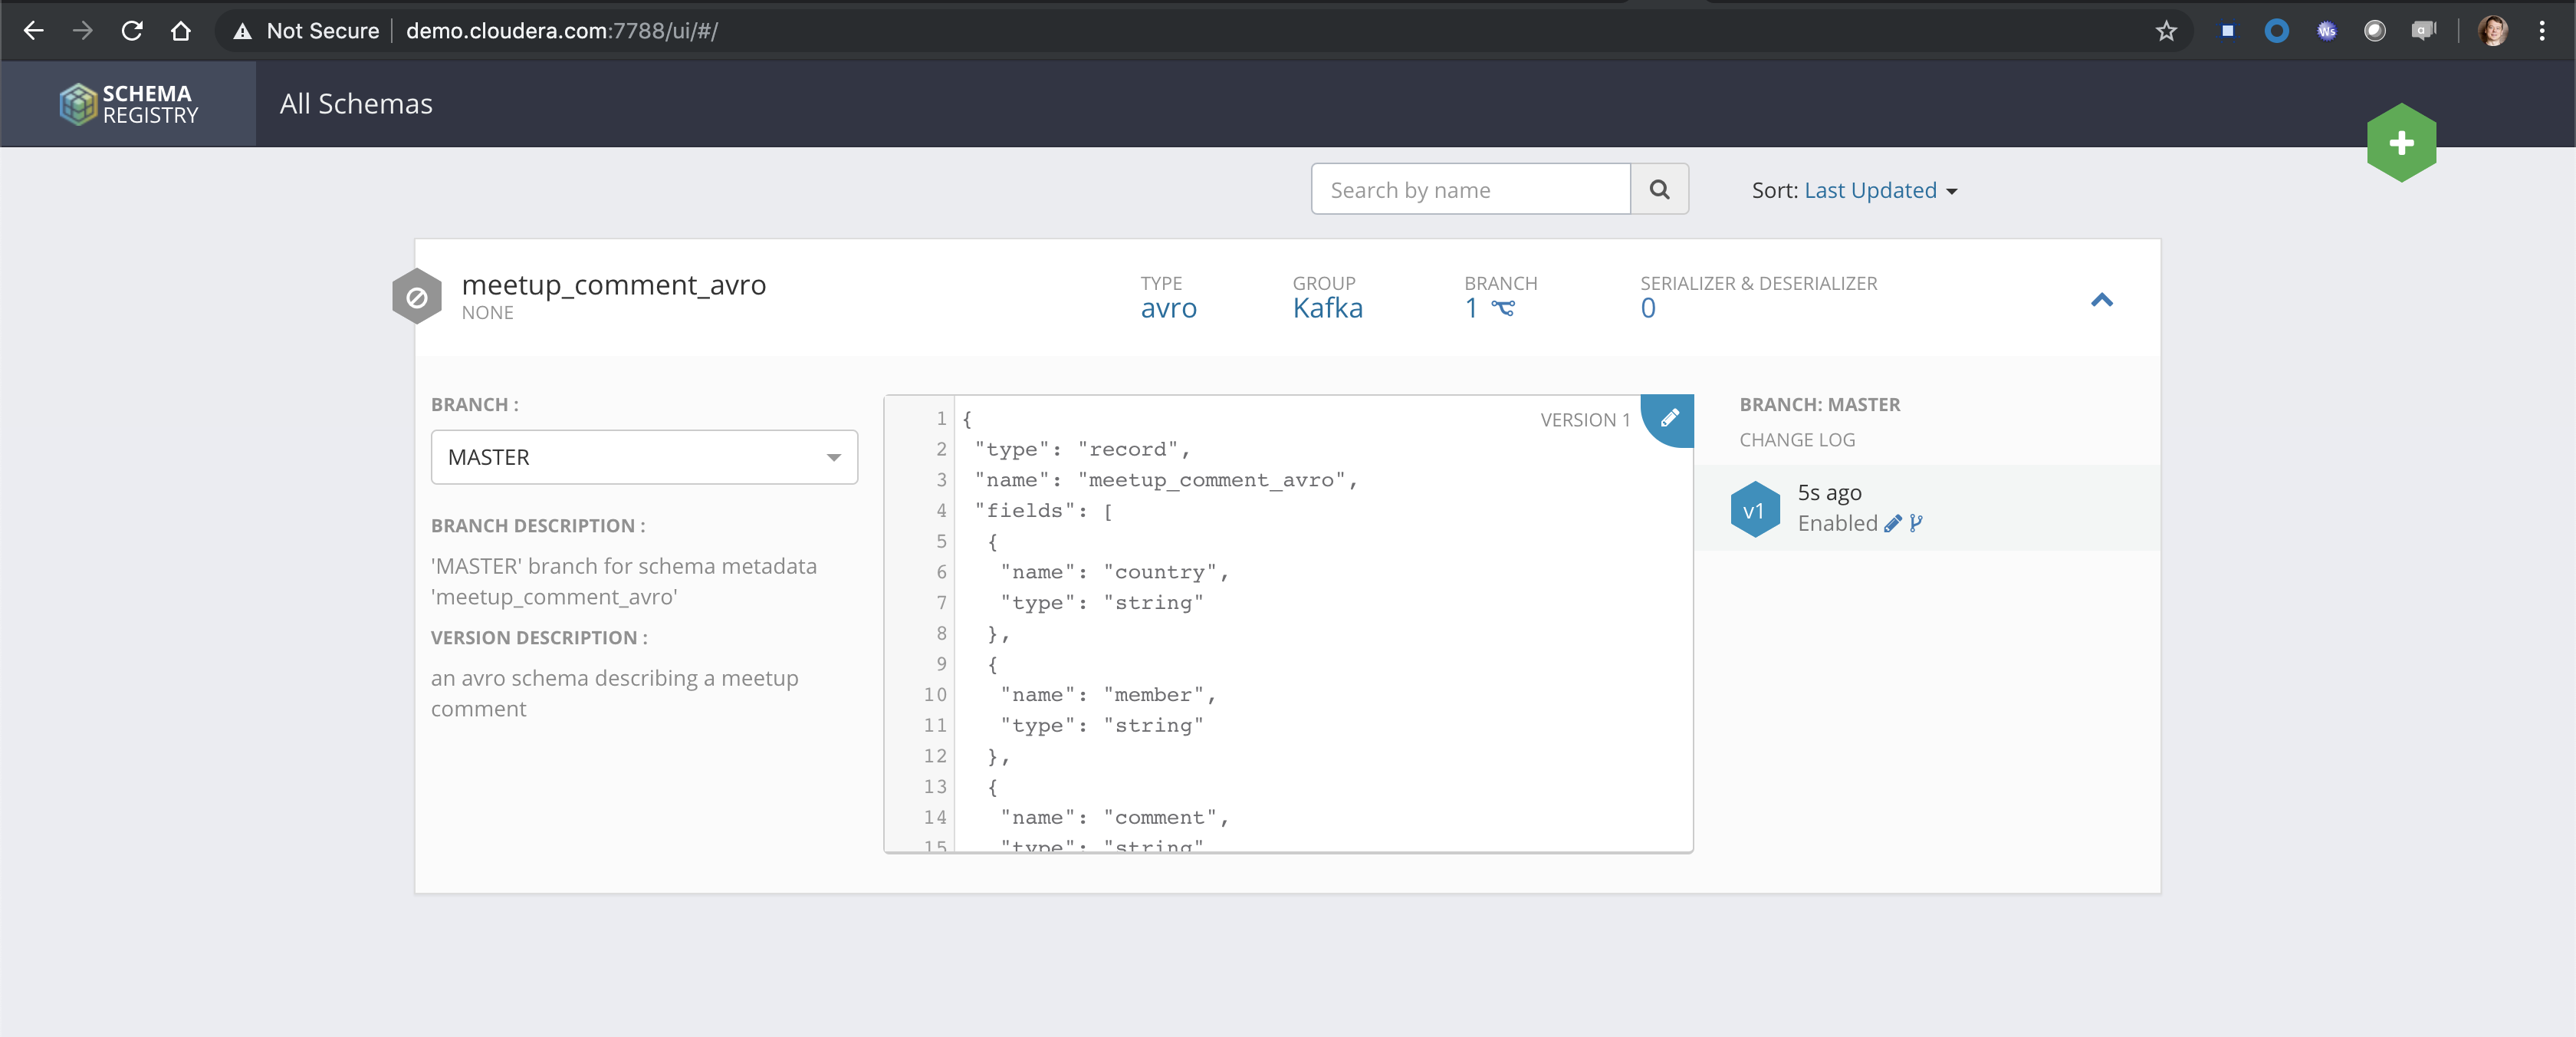
Create a new Avro Schema, hitting the plus button, named meetup_comment_avro with the following Avro Schema:
{
     "type": "record",
     "name": "meetup_comment_avro",
     "fields": [
       {"name": "country", "type": "string"},
       {"name": "member", "type": "string"},
       {"name": "comment", "type": "string"},
       {"name": "event", "type": "string"},
       {"name": "timestamp", "type": "long"}
       ]
}
You should end up with a newly versioned schema as follow:
Explore the REST API as well.
Remove the last processor PutFile as we are going to stream the avro record to some Kafka topic.
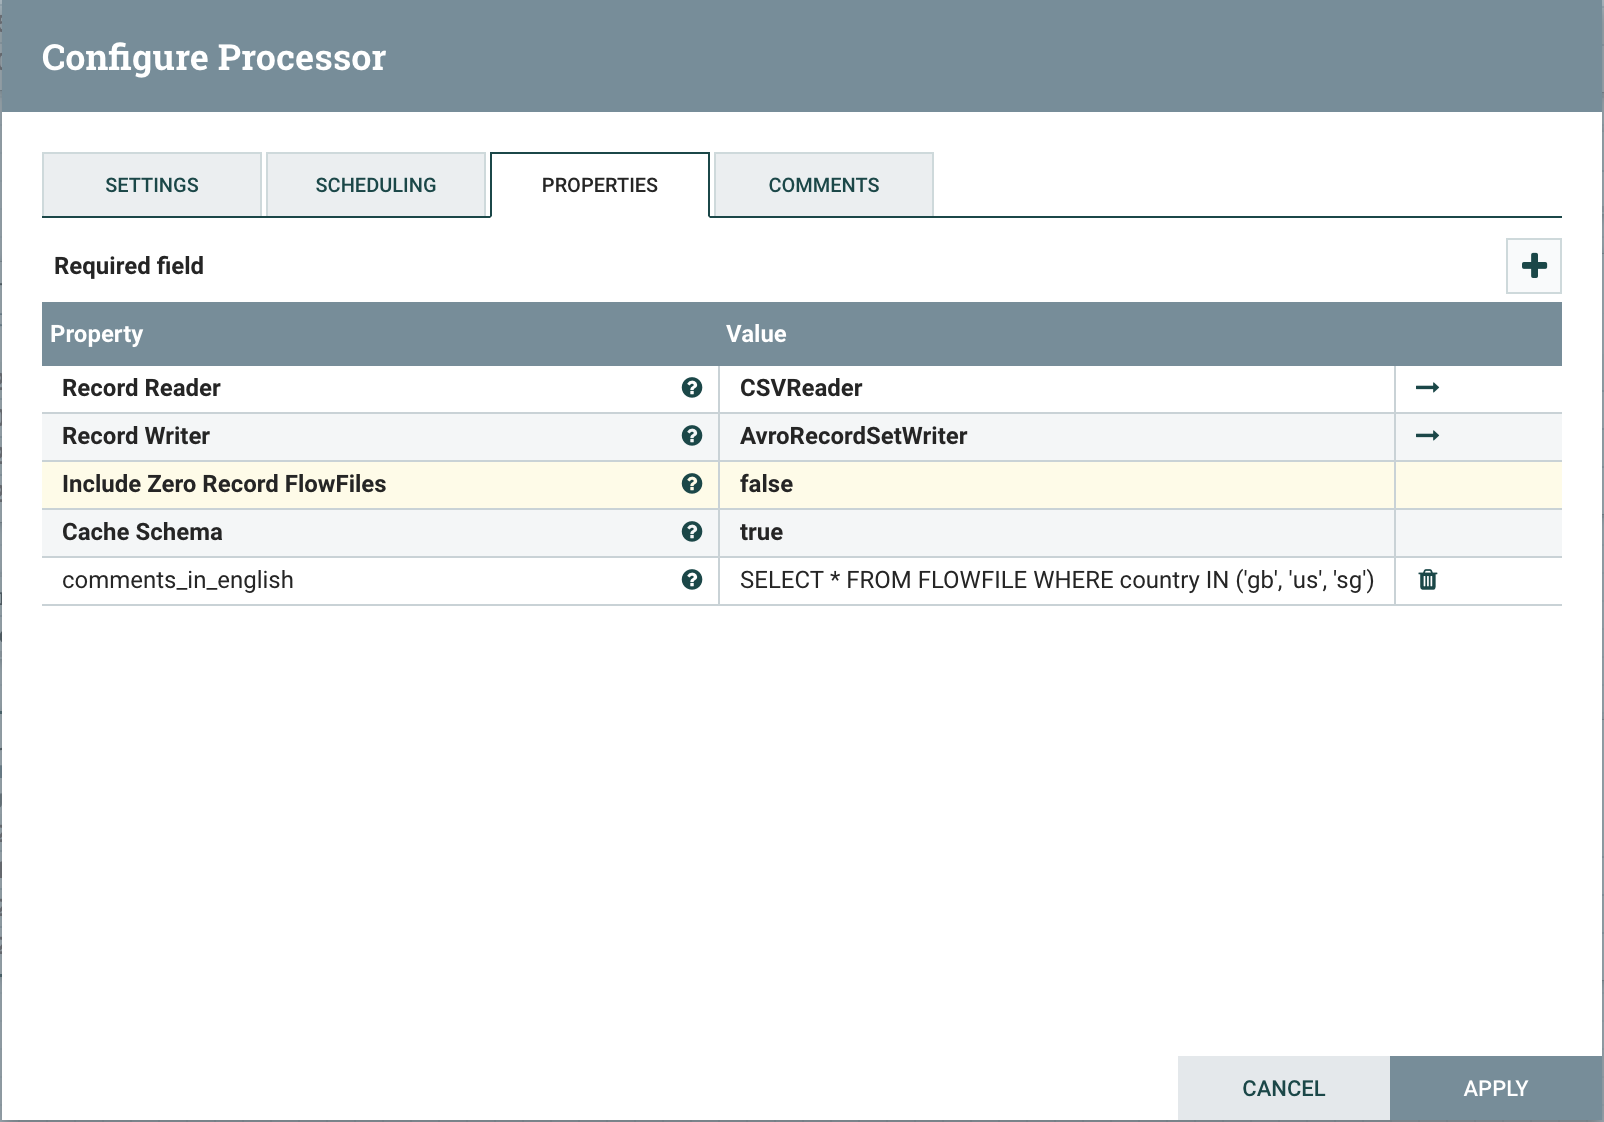
Now we are going to filter the records we are interested in and convert them from CSV to Avro in the process.
- Step 1: Add a QueryRecord processor to the canvas and link from AttributesToCSV on success relationship
- Double click on the processor
- On properties tab
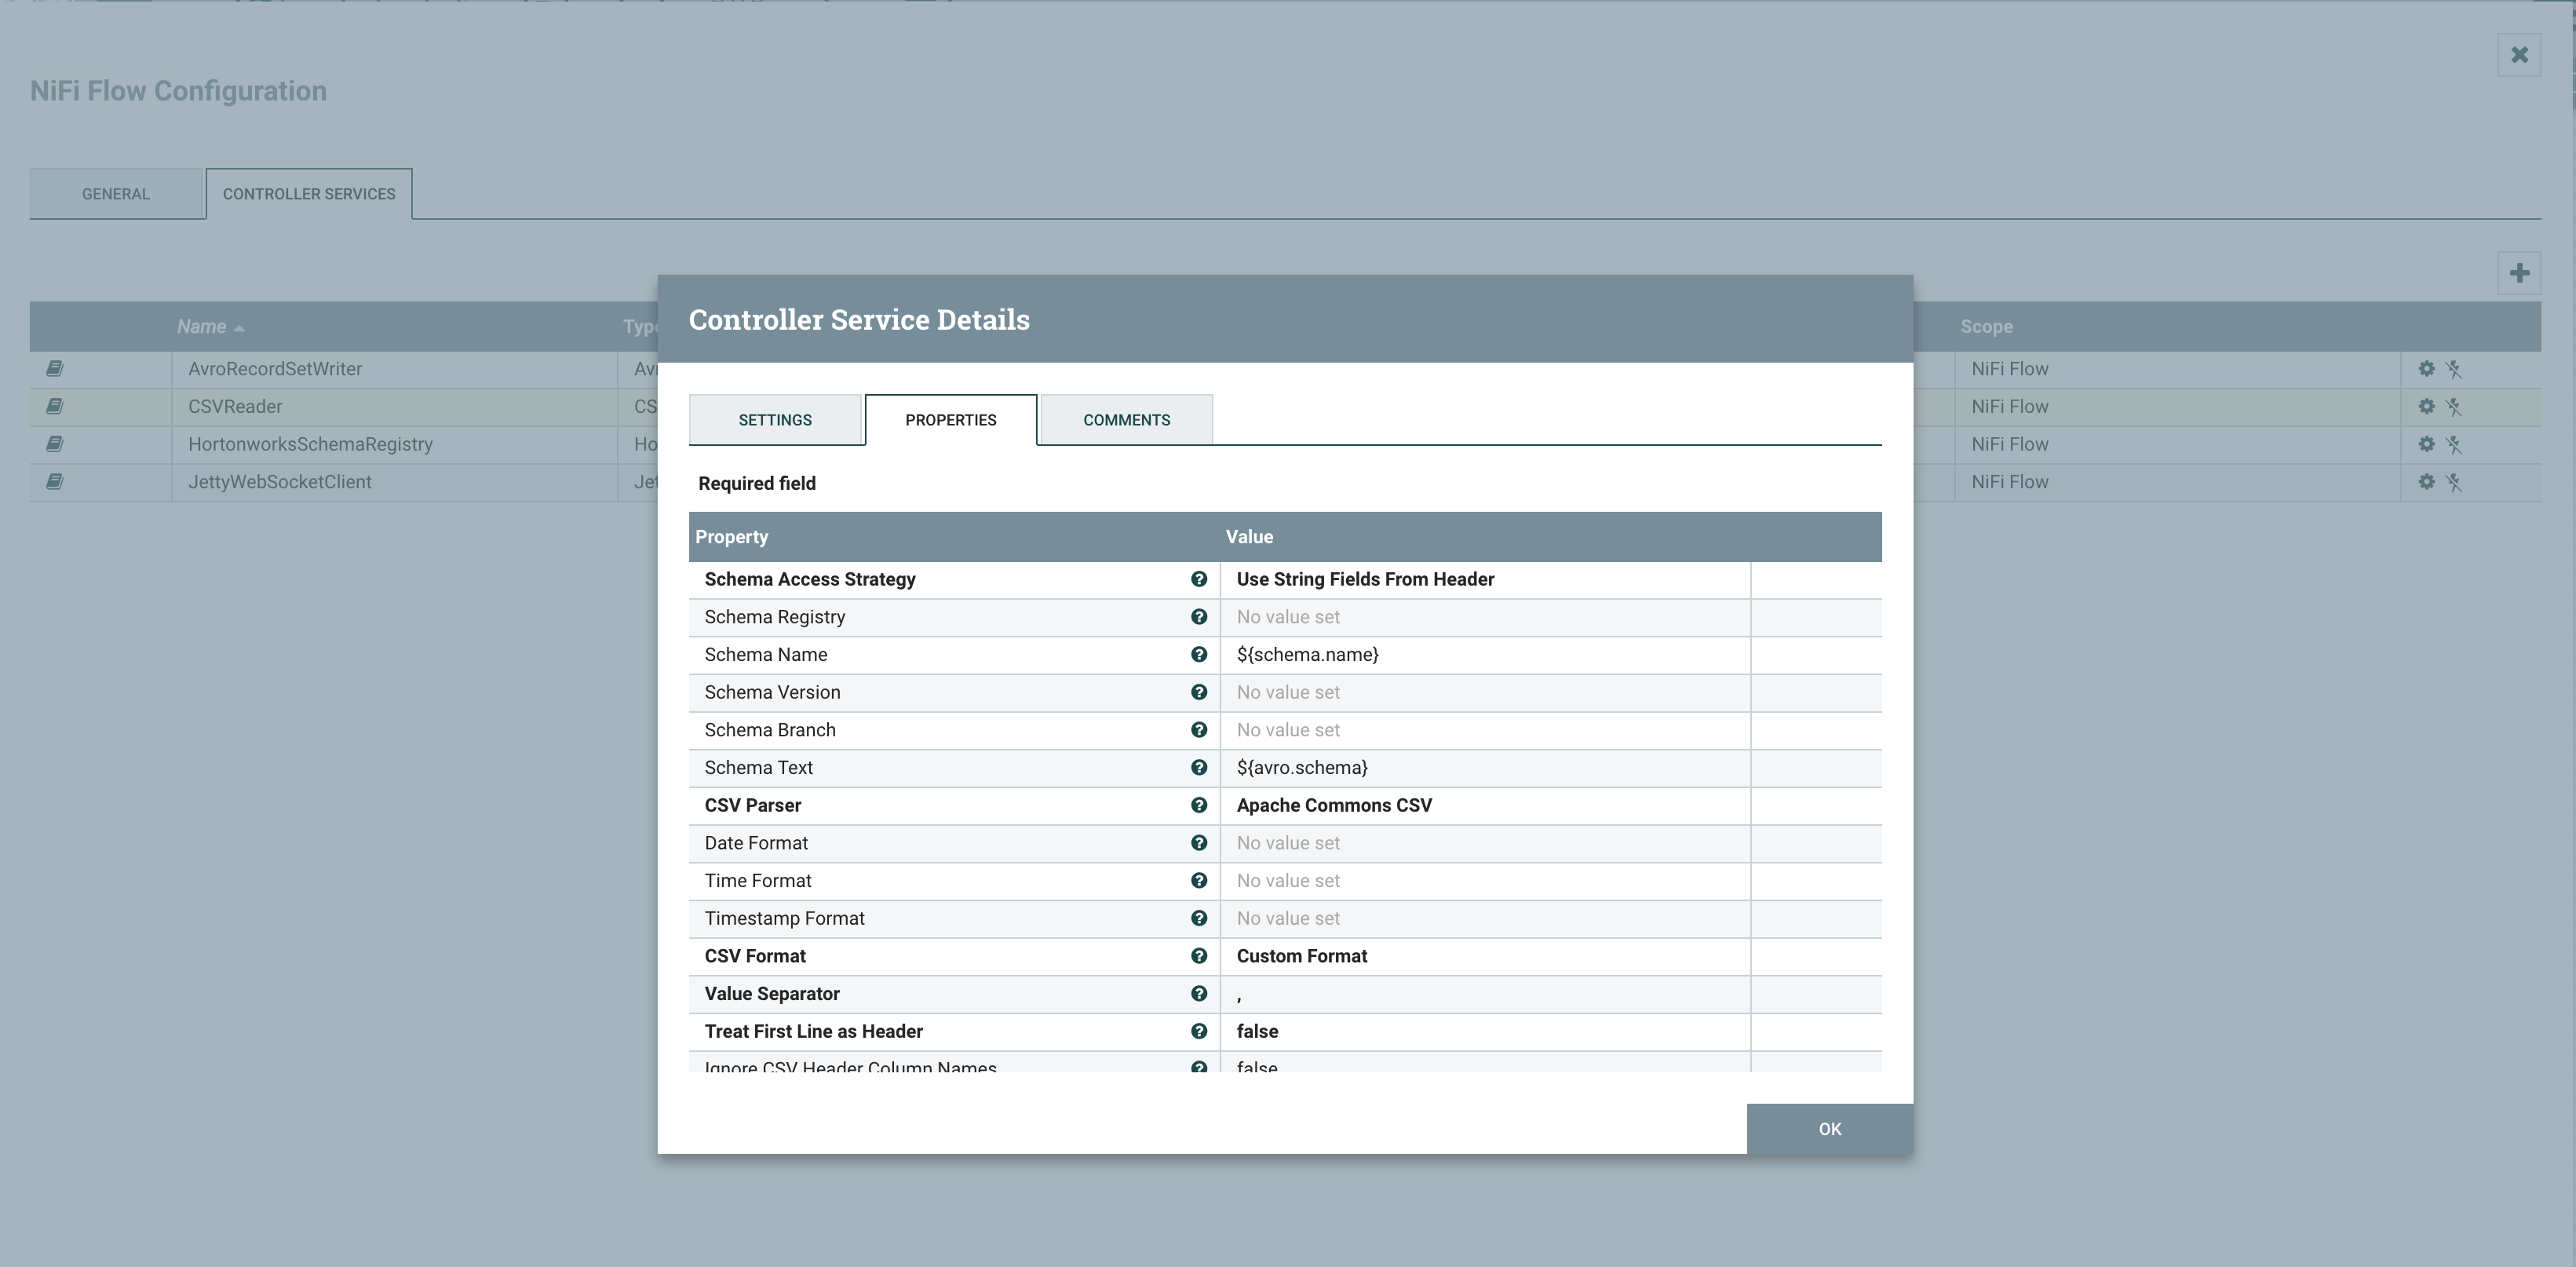
- For RecordReader, create a CSVReader service
- For RecordWrite, create a AvroRecordSetWriter service
- Configure both services
- For CSVReader, use String Fields From Header for the Schema Access Strategy
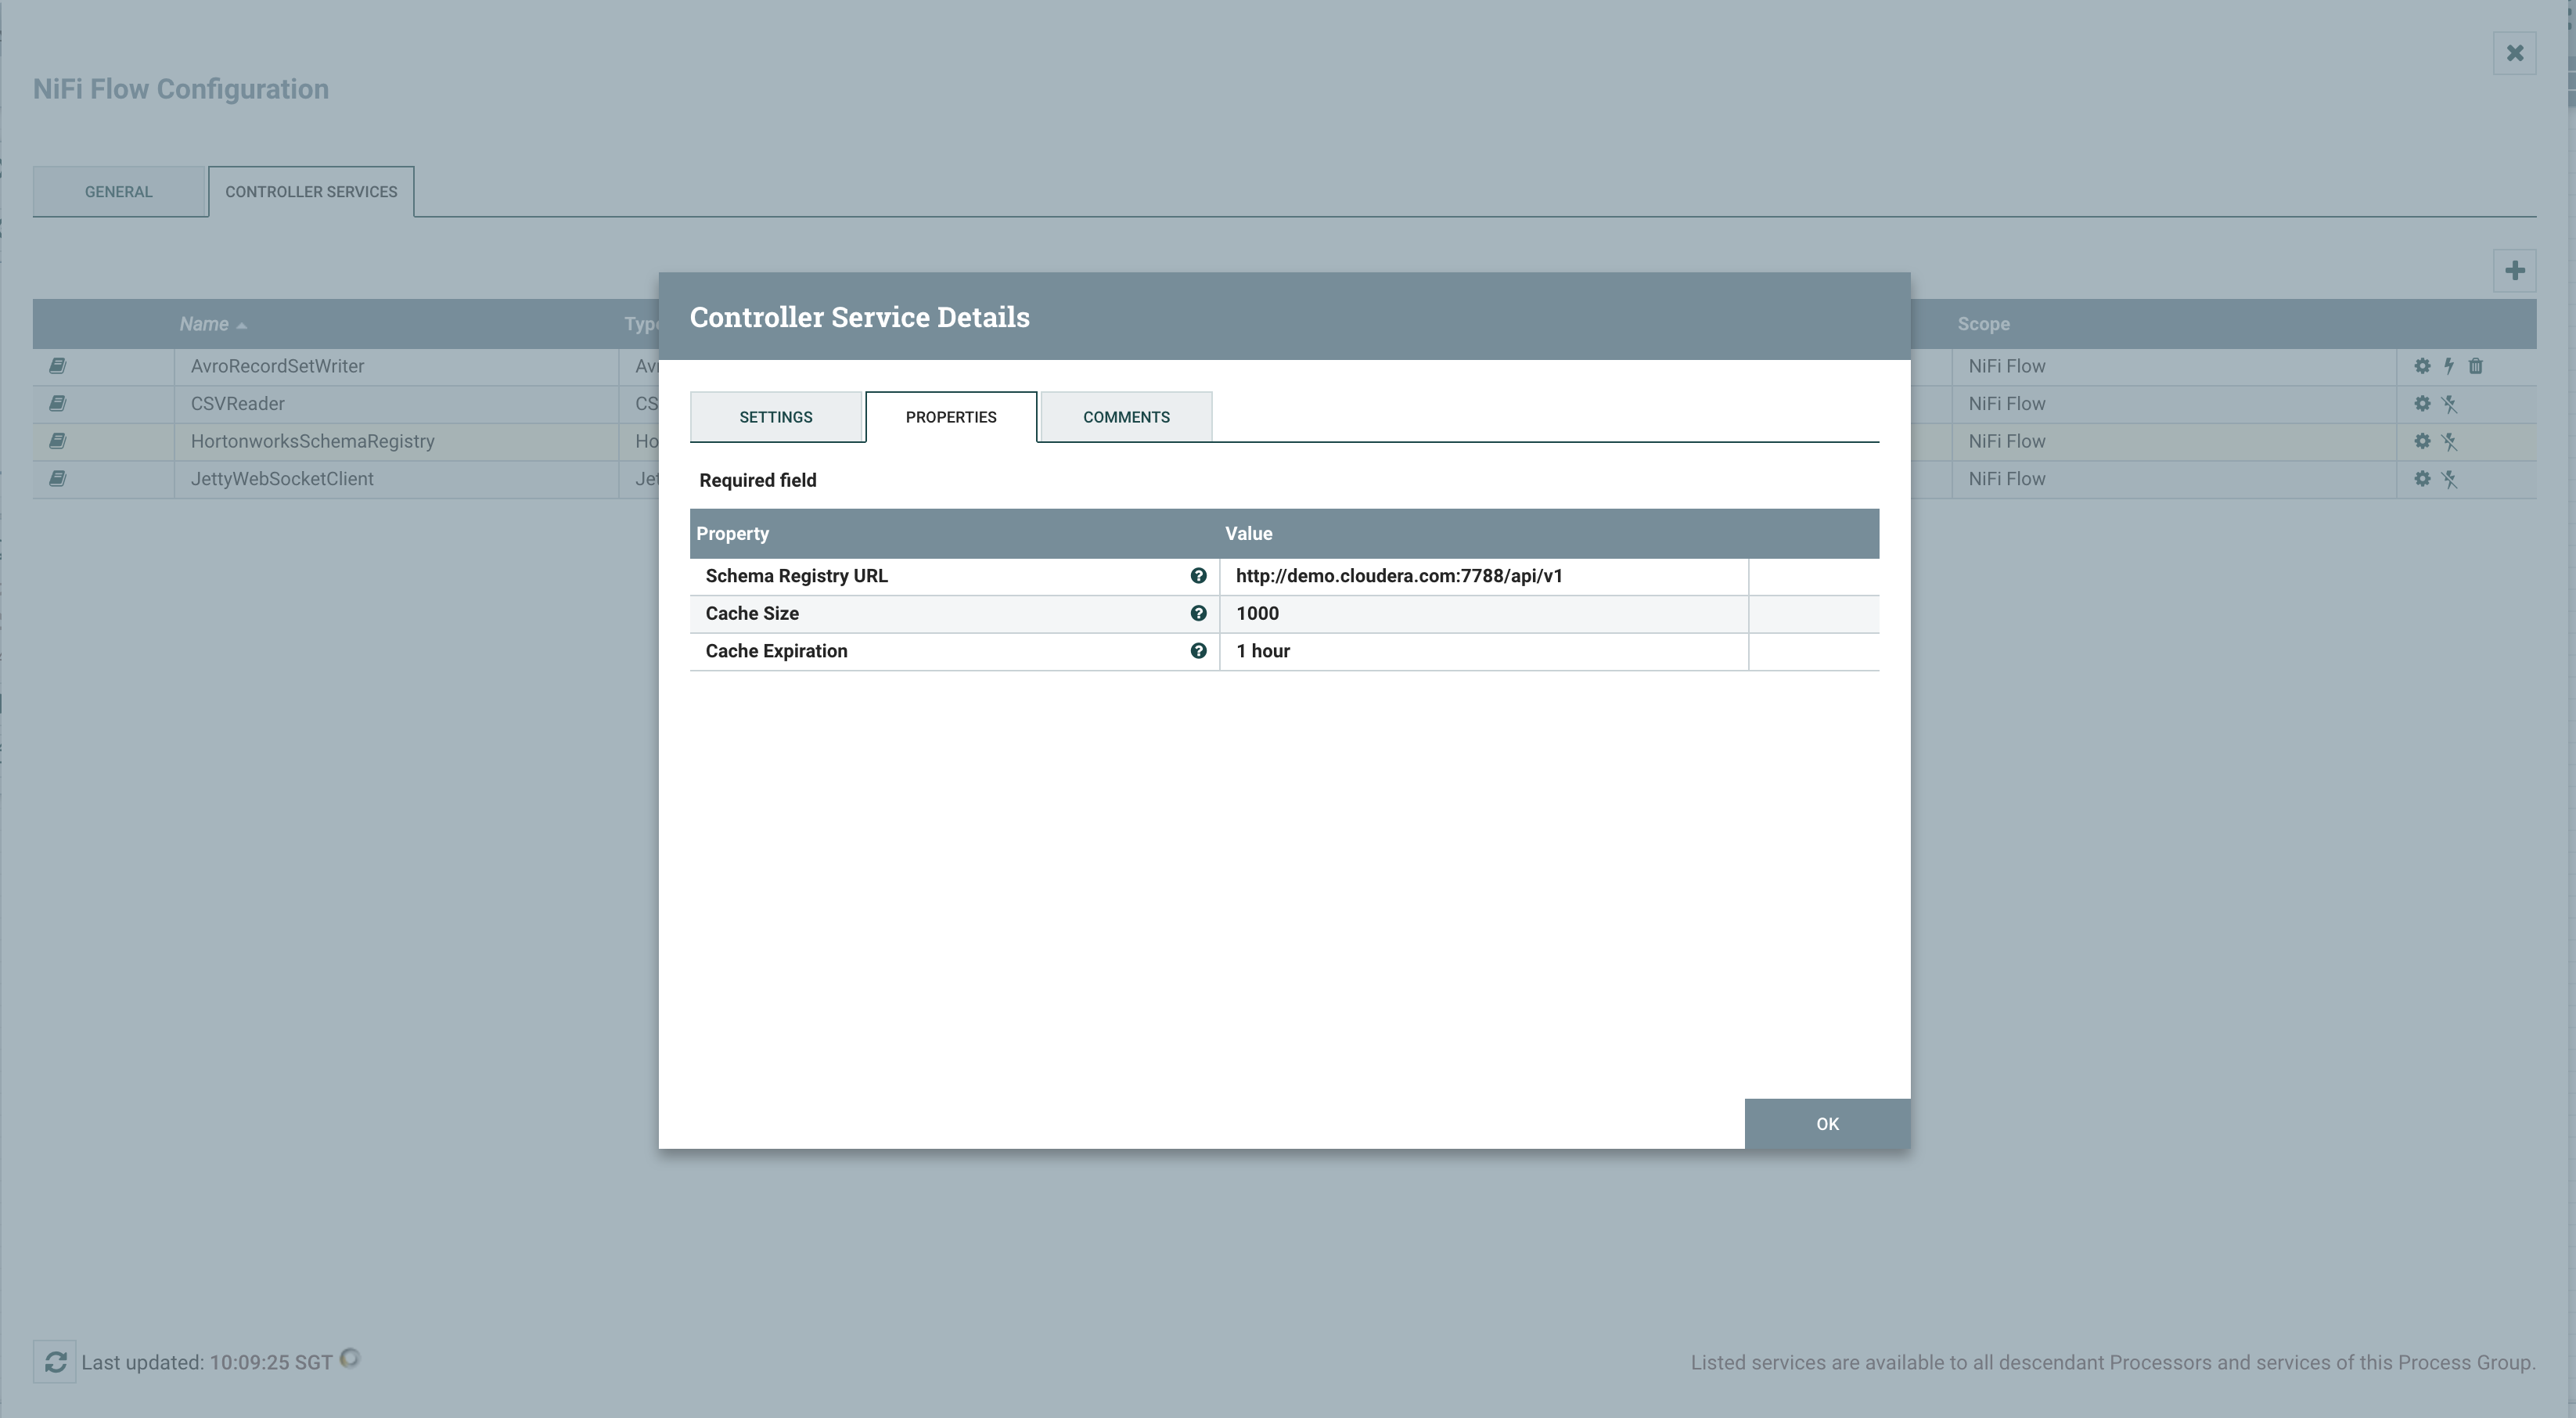
- For AvroRecordSetWriter, we are going to connect to the Schema Registry API (http://demo.cloudera.com:7788/api/v1) and use the avro schema created before
- Filter comments per country as our sentiment analysis model supports English only
- Add a property comments_in_english with value
SELECT * FROM FLOWFILE WHERE country IN ('gb', 'us', 'sg')
- Add a property comments_in_english with value
- Set Include Zero Record FlowFiles to false
- On settings tab, check failure and original relationships
- Apply changes
Set the HortonworksSchemaRegistry controller service as follow
Enable all controller services.
- Step 2: Add a PublishKafka_2_0 connector to the canvas and link from AttributesToJSON on comments_in_english relationship
- Double click on the processor
- On settings tab, check all relationships
- On properties tab
- Change Kafka Brokers value to demo.cloudera.com:6667
- Change Topic Name value to meetup_comment_ws
- Change Use Transactions value to false
- Apply changes
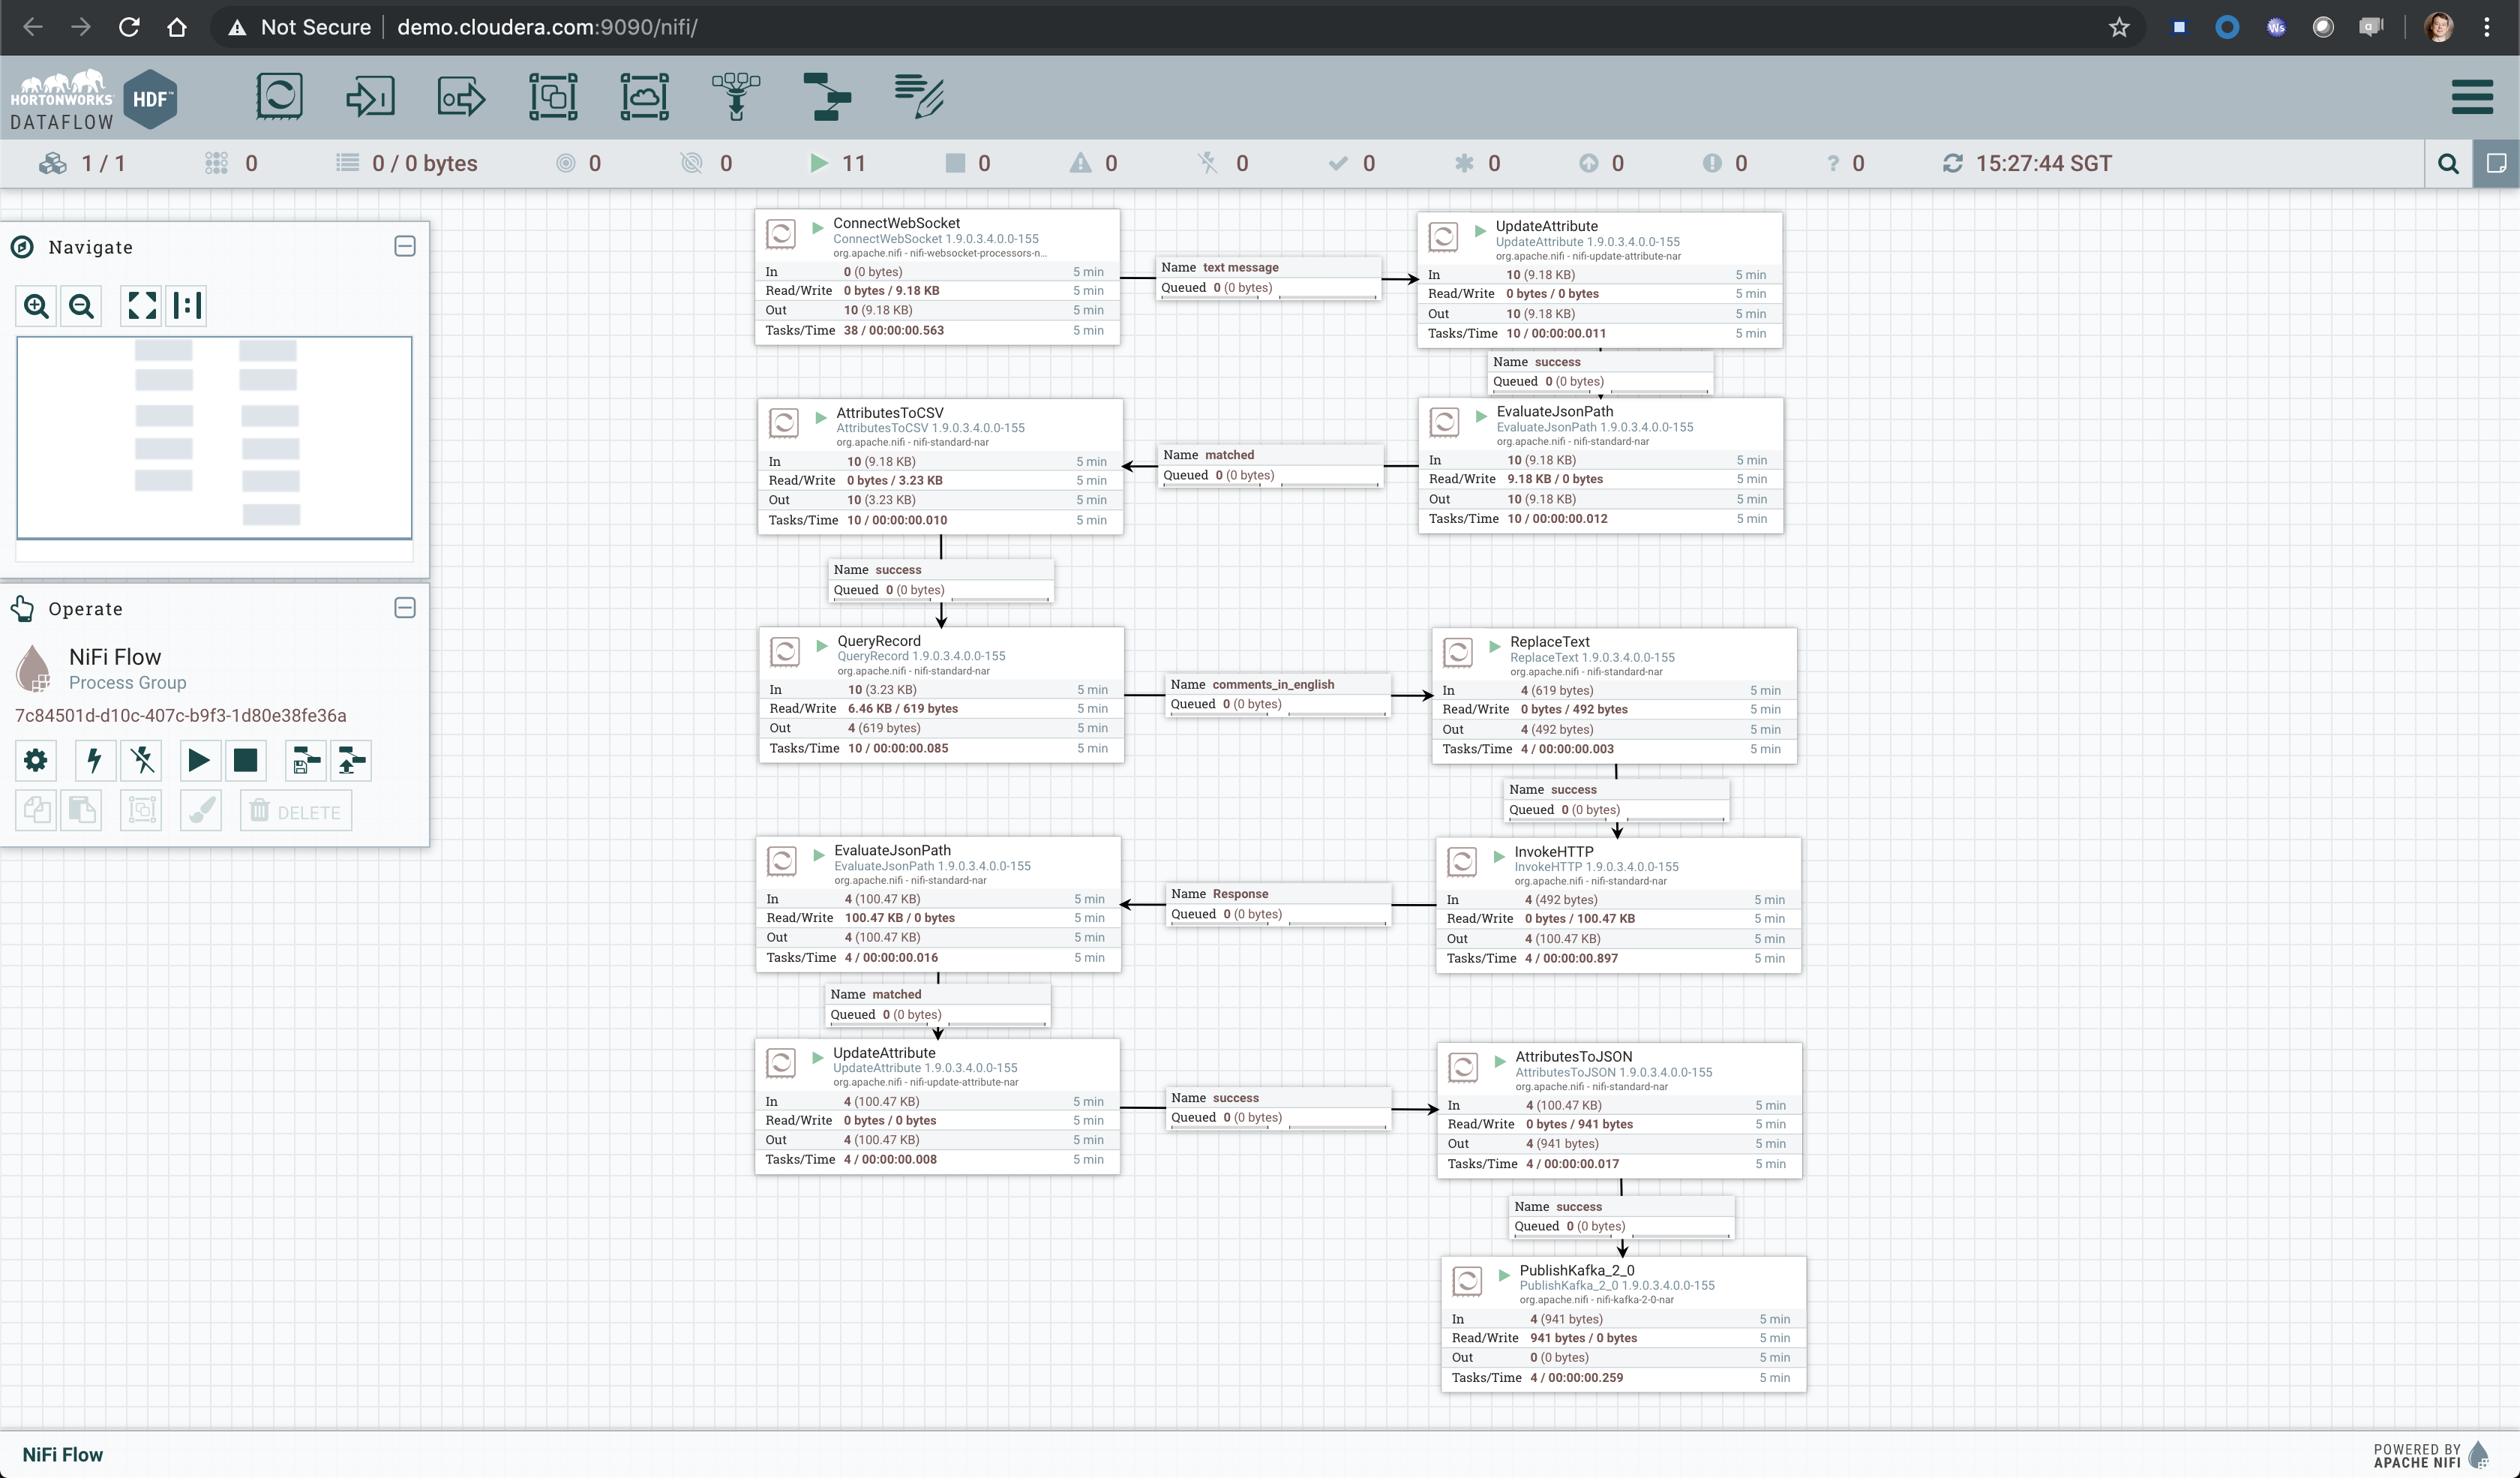
The flow should look like this:
You should be able to see records streaming through Kafka looking at the terminal with Kafka consumer opened earlier
When you are happy with the outcome stop the flow and purge the Kafka topic as we are going to use it later:
./bin/kafka-configs.sh --zookeeper demo.cloudera.com:2181 --entity-type topics --alter --entity-name meetup_comment_ws --add-config retention.ms=1000
Wait for few second and set the retention back to one hour:
./bin/kafka-configs.sh --zookeeper demo.cloudera.com:2181 --entity-type topics --alter --entity-name meetup_comment_ws --add-config retention.ms=3600000
You can check if the retention was set properly:
./bin/kafka-configs.sh --zookeeper demo.cloudera.com:2181 --describe --entity-type topics --entity-name meetup_comment_ws
Visit Zeppelin and log in as admin (password: admin)
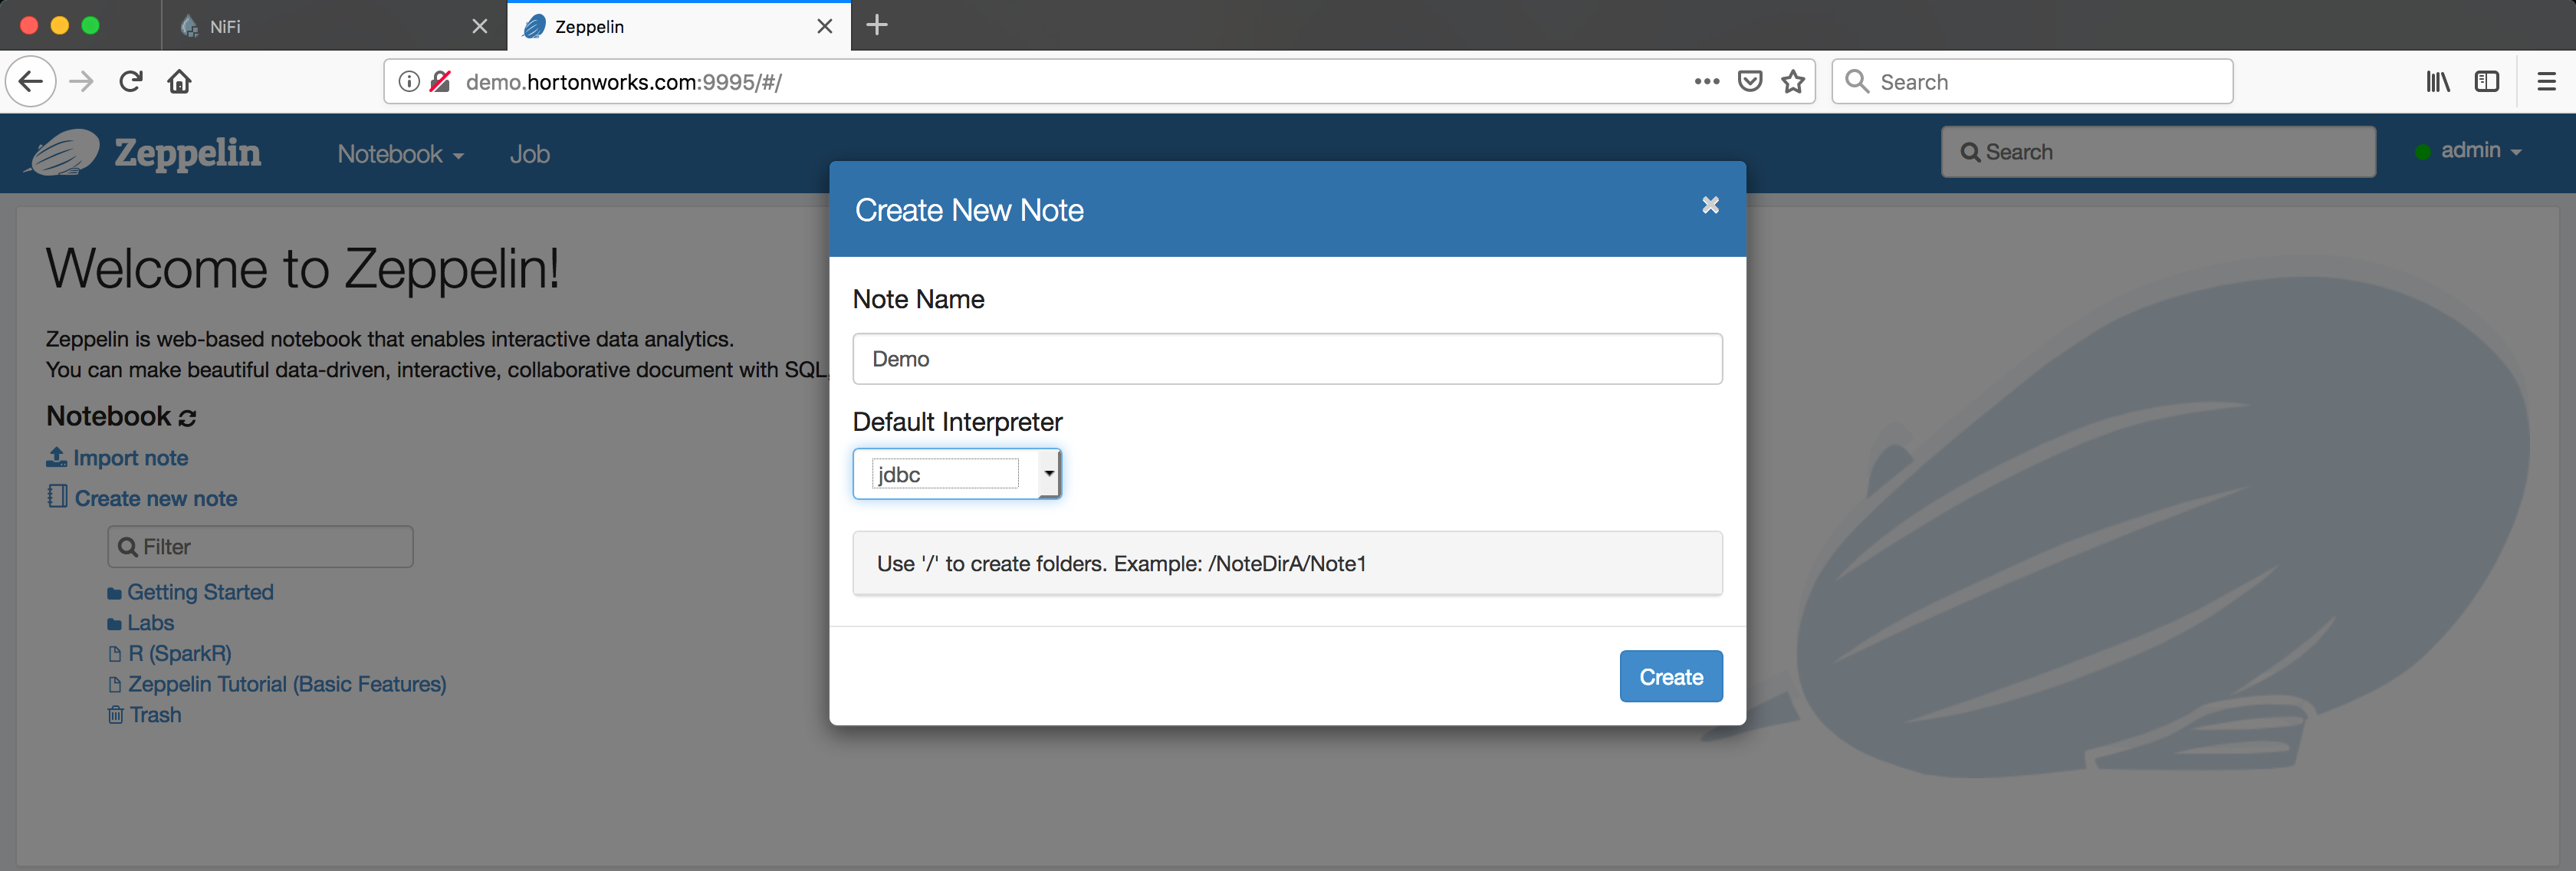
Create a new note(book) called Demo (use jdbc as default interpreter)
Add the interpreter to connect to Hive LLAP
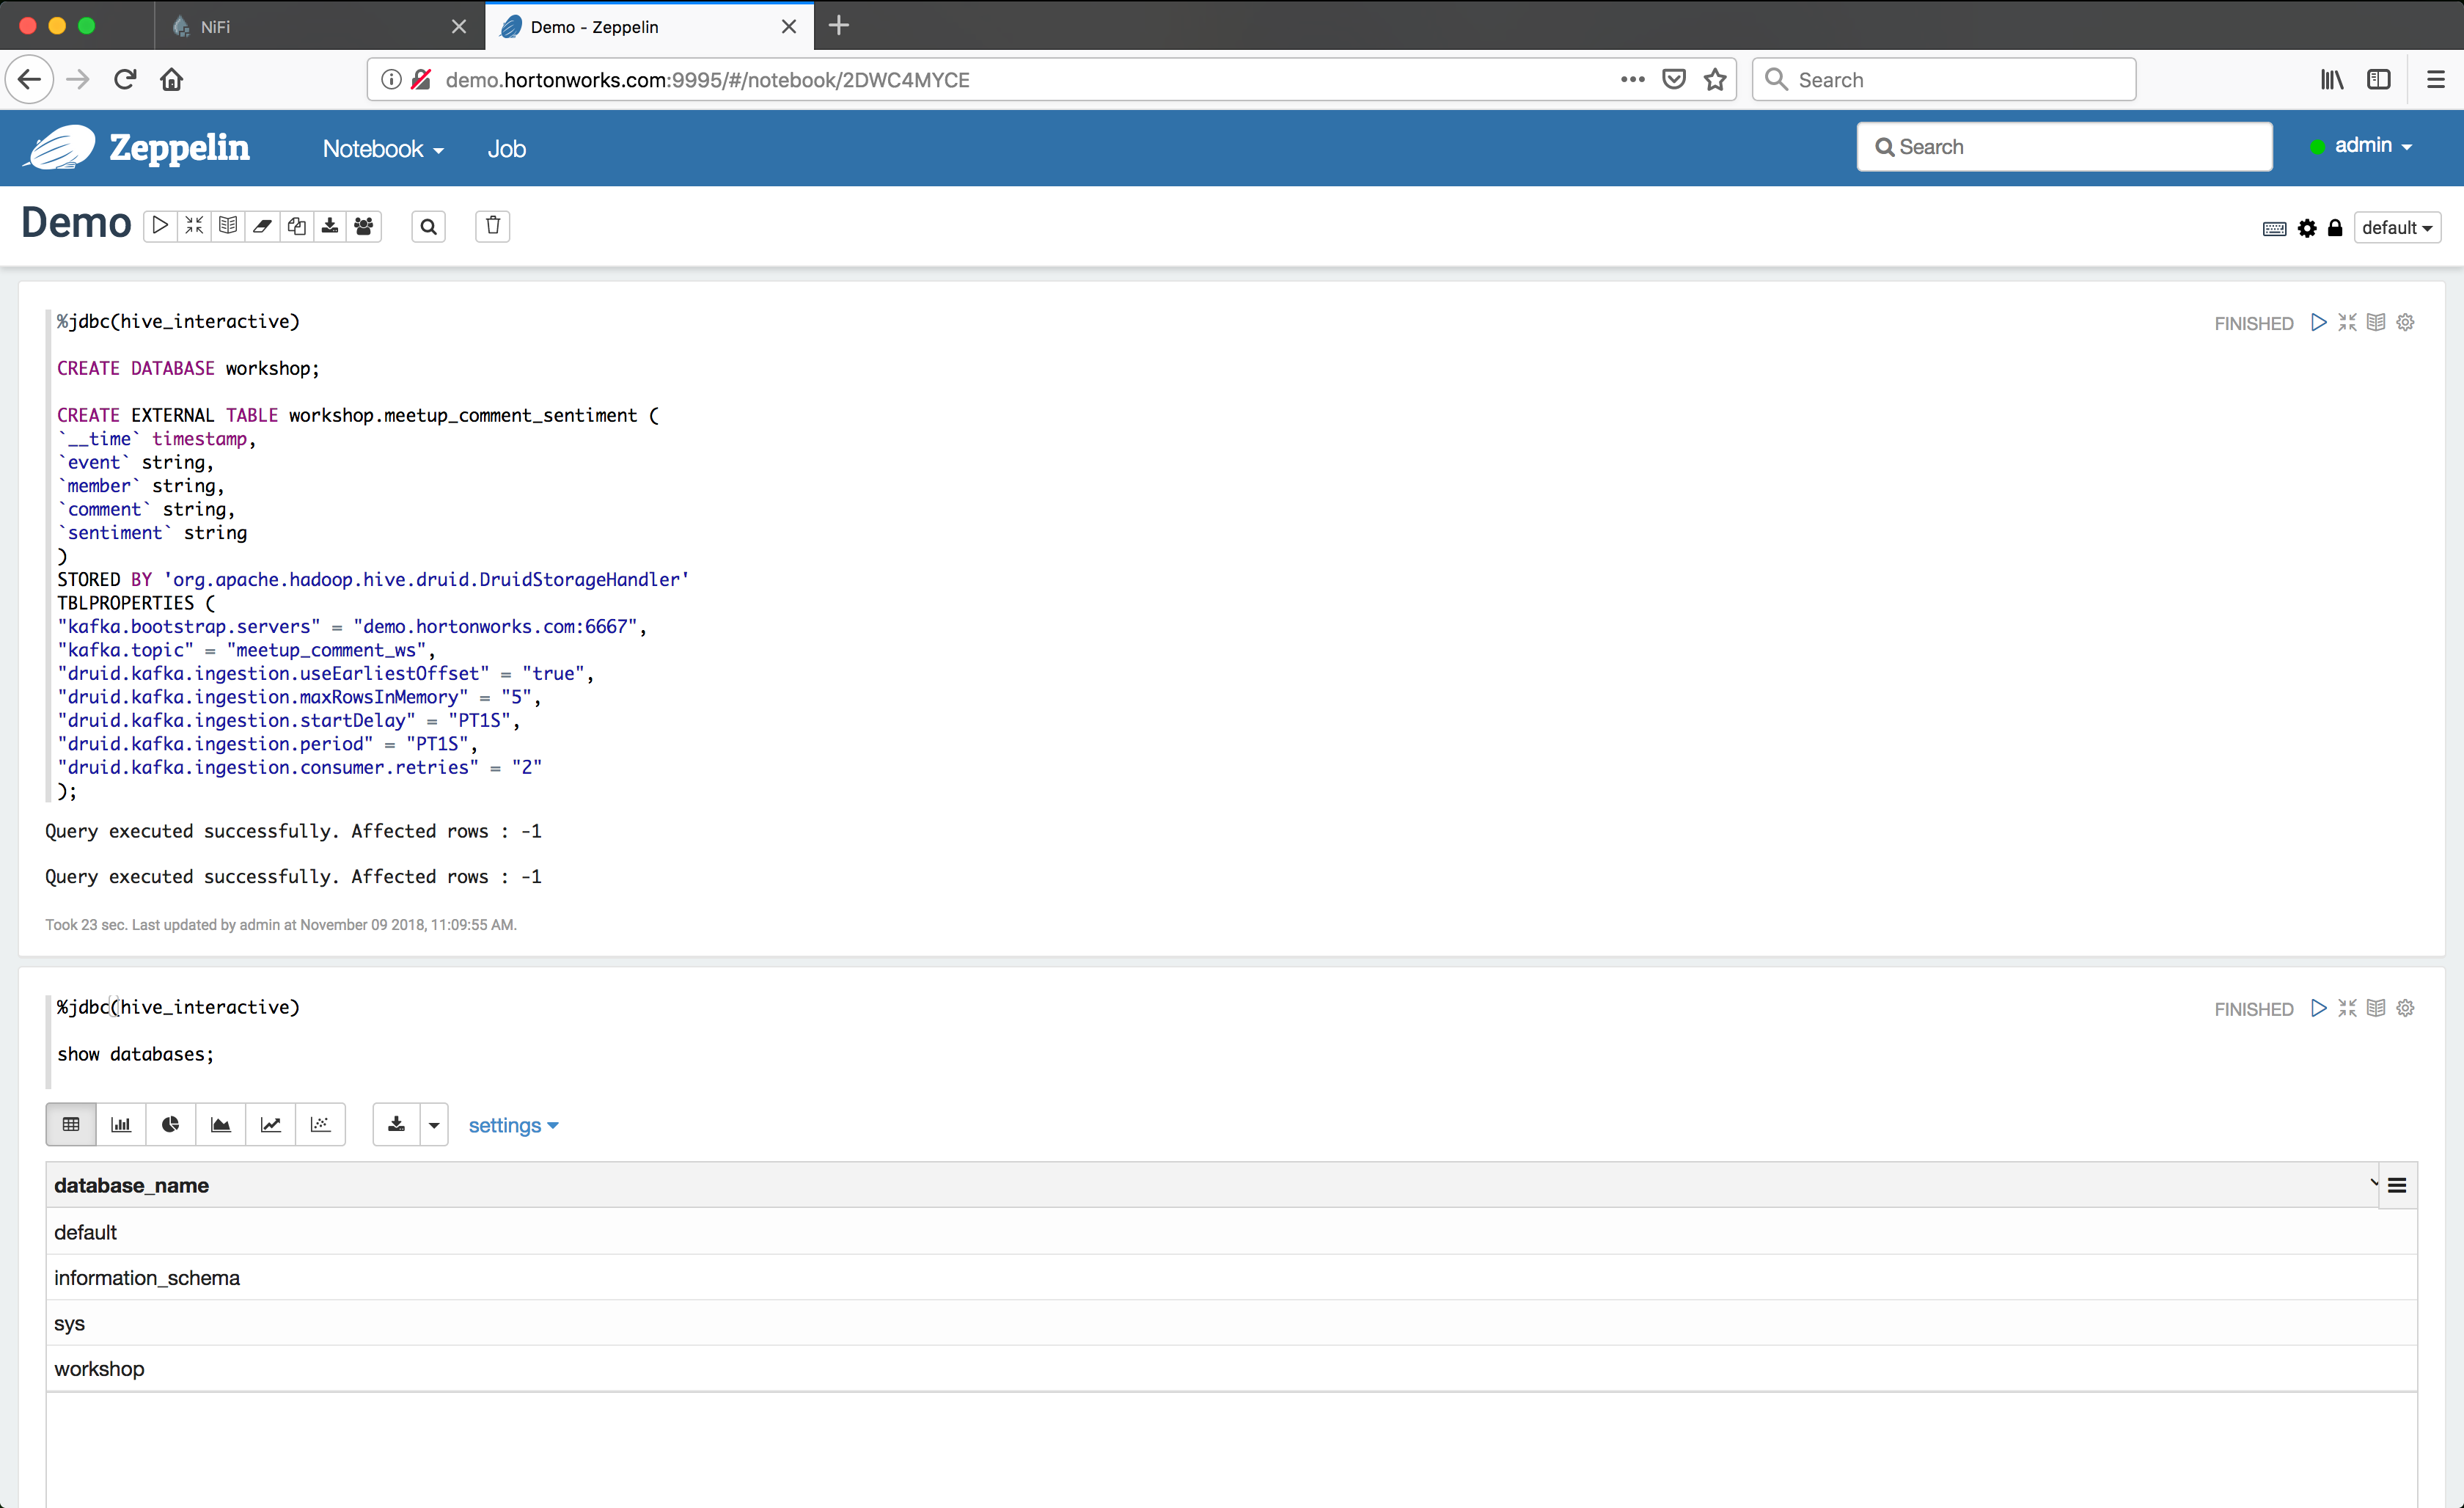
%jdbc(hive_interactive)
Create a database named workshop and run the SQL
CREATE DATABASE workshop;Create the Hive table backed by Druid storage where the social medias sentiment analysis will be streamed into
CREATE EXTERNAL TABLE workshop.meetup_comment_sentiment (
`__time` timestamp,
`event` string,
`member` string,
`comment` string,
`sentiment` string
)
STORED BY 'org.apache.hadoop.hive.druid.DruidStorageHandler'
TBLPROPERTIES (
"kafka.bootstrap.servers" = "demo.cloudera.com:6667",
"kafka.topic" = "meetup_comment_ws",
"druid.kafka.ingestion.useEarliestOffset" = "true",
"druid.kafka.ingestion.maxRowsInMemory" = "5",
"druid.kafka.ingestion.startDelay" = "PT1S",
"druid.kafka.ingestion.period" = "PT1S",
"druid.kafka.ingestion.consumer.retries" = "2"
);
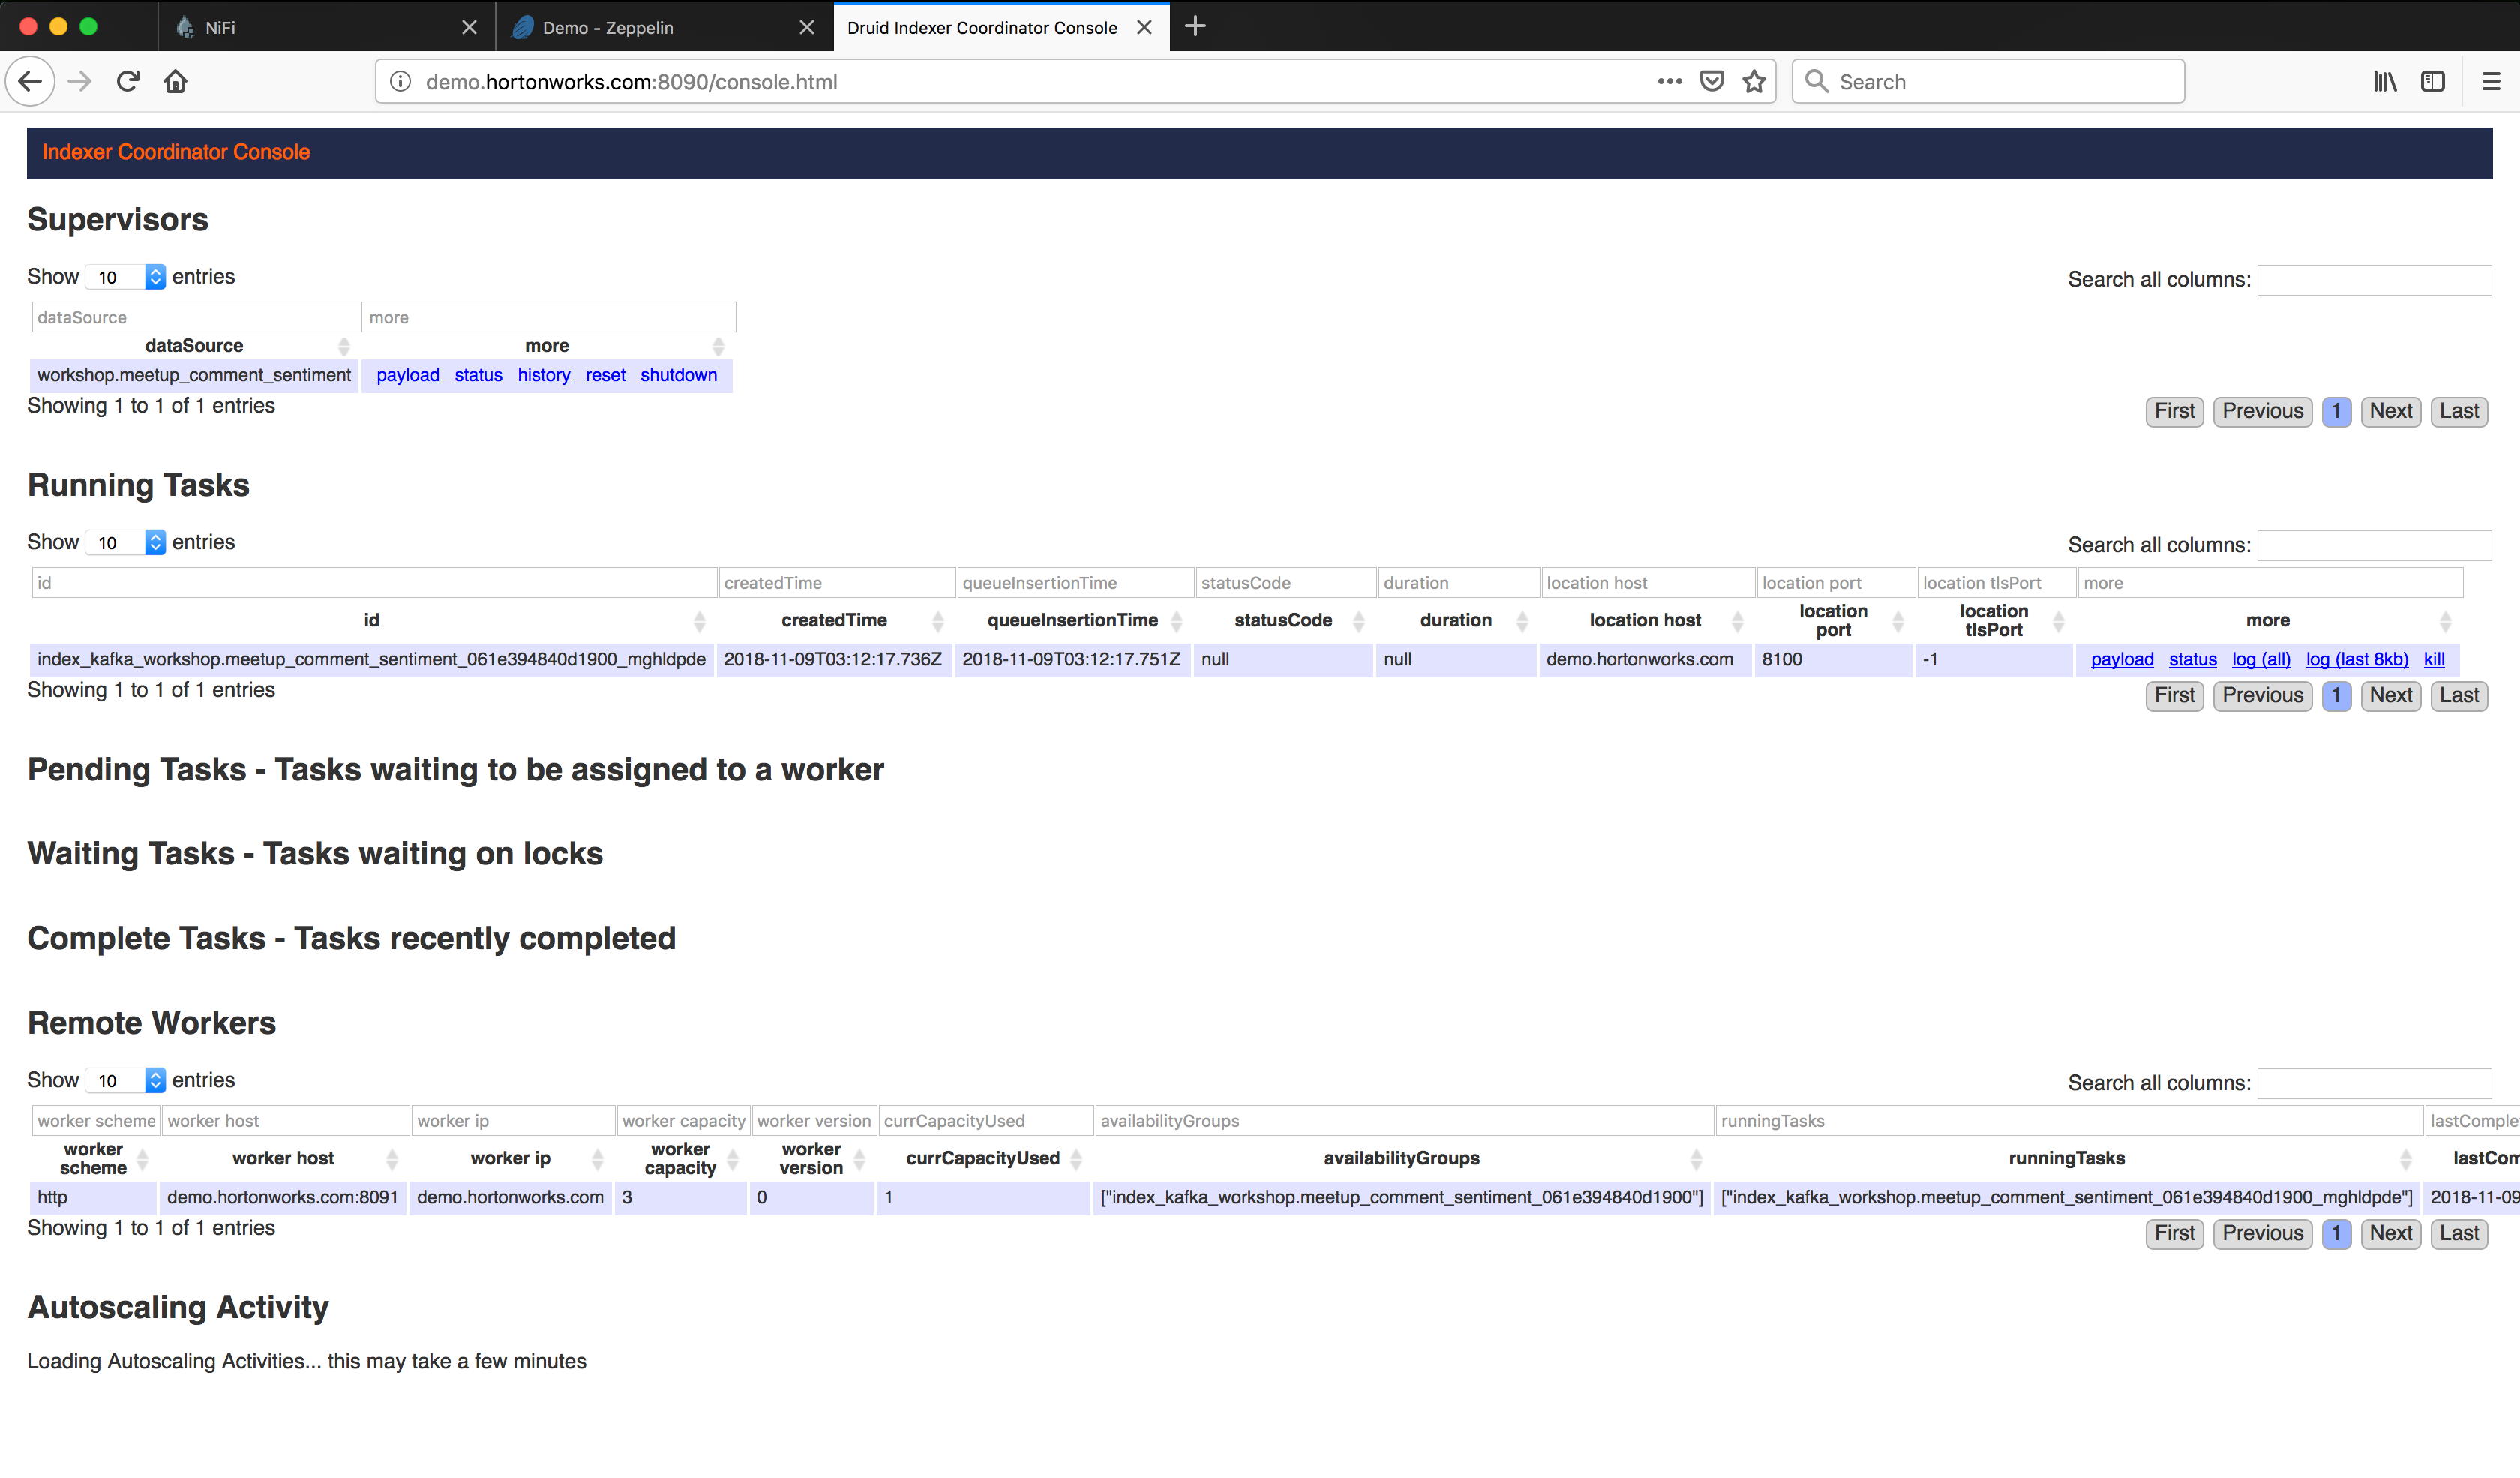
Start Druid indexing
ALTER TABLE workshop.meetup_comment_sentiment SET TBLPROPERTIES('druid.kafka.ingestion' = 'START');Verify that supervisor and indexing task are running from the Druid overload console
For the purpose of this exercise we are not going to train, test and implement a classification model but re-use an existing sentiment analysis model, provided by the Stanford University as part of their CoreNLP - Natural language software
First, after ssh'ing to the sandbox, download and unzip the CoreNLP using the wget as below:
wget http://nlp.stanford.edu/software/stanford-corenlp-full-2018-10-05.zip
unzip stanford-corenlp-full-2018-10-05.zip
Then, in order to start the web service, run the CoreNLP jar file, with the following commands:
cd /path/to/stanford-corenlp-full-2018-10-05
java -mx1g -cp "*" edu.stanford.nlp.pipeline.StanfordCoreNLPServer -port 9999 -timeout 15000 </dev/null &>/dev/null &
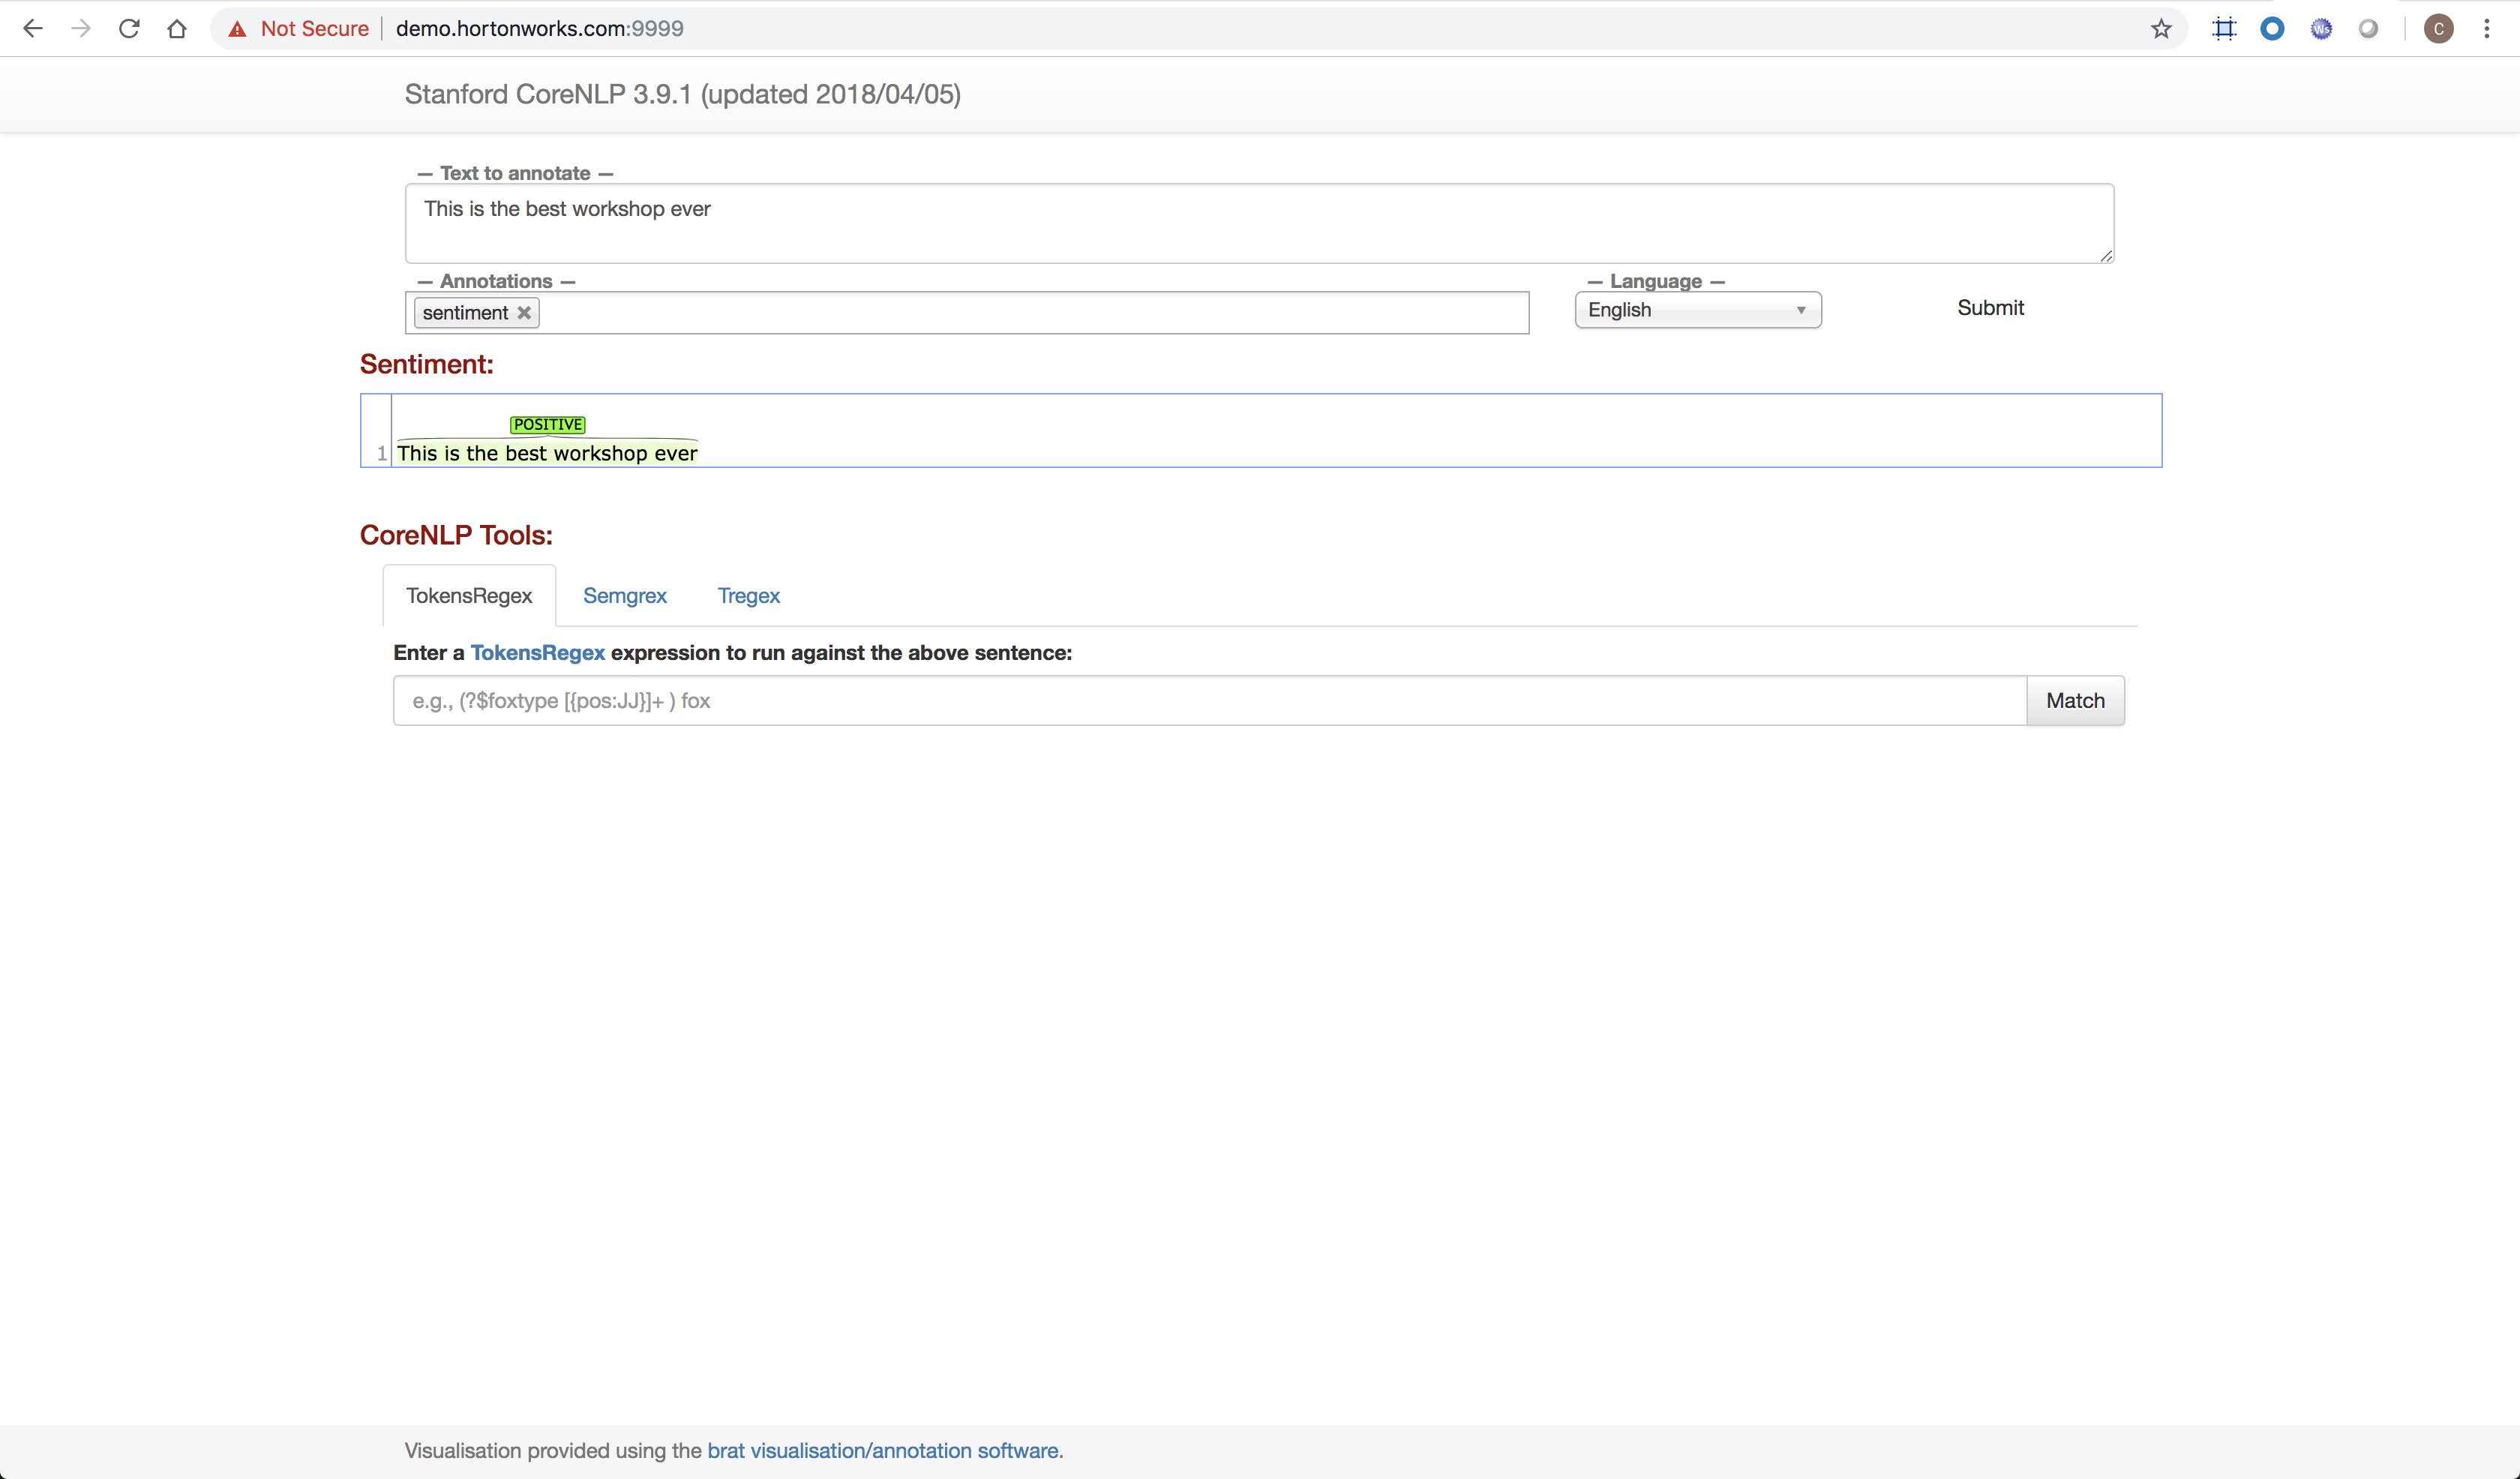
This will run in the background on port 9999 and you can visit the web page to make sure it's running.
If you want to play with it, remove all annotations and use Sentiment only
The model will classify the given text into 5 categories:
- very negative
- negative
- neutral
- positive
- very positive
Go back to NiFi UI and follow the steps below. Between the QueryRecord and PublishKafka_2_0 processors we are going to enhance the Meetup comment with NLP.
-
Step 1: Prepare the content to be posted to the sentiment analysis service
- Add ReplaceText processor and link from QueryRecord on comments_in_english relationship
- Keep the PublishKafka_2_0 processor on the canvas unlinked from/to other processors for now
- Double click on processor and check failure on settings tab
- Go to properties tab and remove value for Search Value and set it to empty string
- Set Replacement Value with value: ${comment:replaceAll('\.', ';')}. We want to make sure the entire comment is evaluated as one sentence instead of one evaluation per sentence within the same comment.
- Set Replacement Strategy to Always Replace
- Apply changes
-
Step 2: Call the web service started earlier on incoming message
- Add InvokeHTTP processor and link from ReplaceText on success relationship
- Double click on processor and check all relationships except Response on settings tab
- Go to properties tab and set value for HTTP Method to POST
- Set Remote URL with value:
http://demo.cloudera.com:9999/?properties=%7B%22annotators%22%3A%22sentiment%22%2C%22outputFormat%22%3A%22json%22%7Dwhich is the url encoded value for http://demo.cloudera.com:9999/?properties={"annotators":"sentiment","outputFormat":"json"} - Set Content-Type to application/x-www-form-urlencoded
- Apply changes
-
Step 3: Add EvaluateJsonPath to the canvas and link from InvokeHTTP on Response relationship
- Double click on the processor
- On settings tab, check both failure and unmatched relationships
- On properties tab
- Change Destination value to flowfile-attribute
- Add on the property sentiment with value $.sentences[0].sentiment
- Apply changes
-
Step 4: Format post time to comply with ISO format (Druid requirement)
- Add UpdateAttribute processor and link from EvaluateJsonPath on matched relationship
- Using handy NiFi's language expression, add a new attribue
__timewith value:${timestamp:format("yyyy-MM-dd'T'HH:mm:ss'Z'", "Asia/Singapore")}to properties tab
-
Step 5: Add AttributesToJSON processor to prepare the message to be published to the Kafka topic created before. Link from UpdateAttribute.
- Double click on processor
- On settings tab, check failure relationship
- Go to properties tab
- In the Attributes List value set
__time, event, comment, member, sentimentto match the previously created Hive table - Change Destination to flowfile-content
- Set Include Core Attributes to false
- Apply changes
-
Step 6: Last step, link existing PublishKafka_2_0 connector to the canvas from AttributesToJSON on success relationship
Before starting the NiFi flow make sure that the sentiment analysis Web service is running
The overall flow should look like this
You should be able to see records streaming through Kafka looking at the terminal with Kafka consumer opened earlier
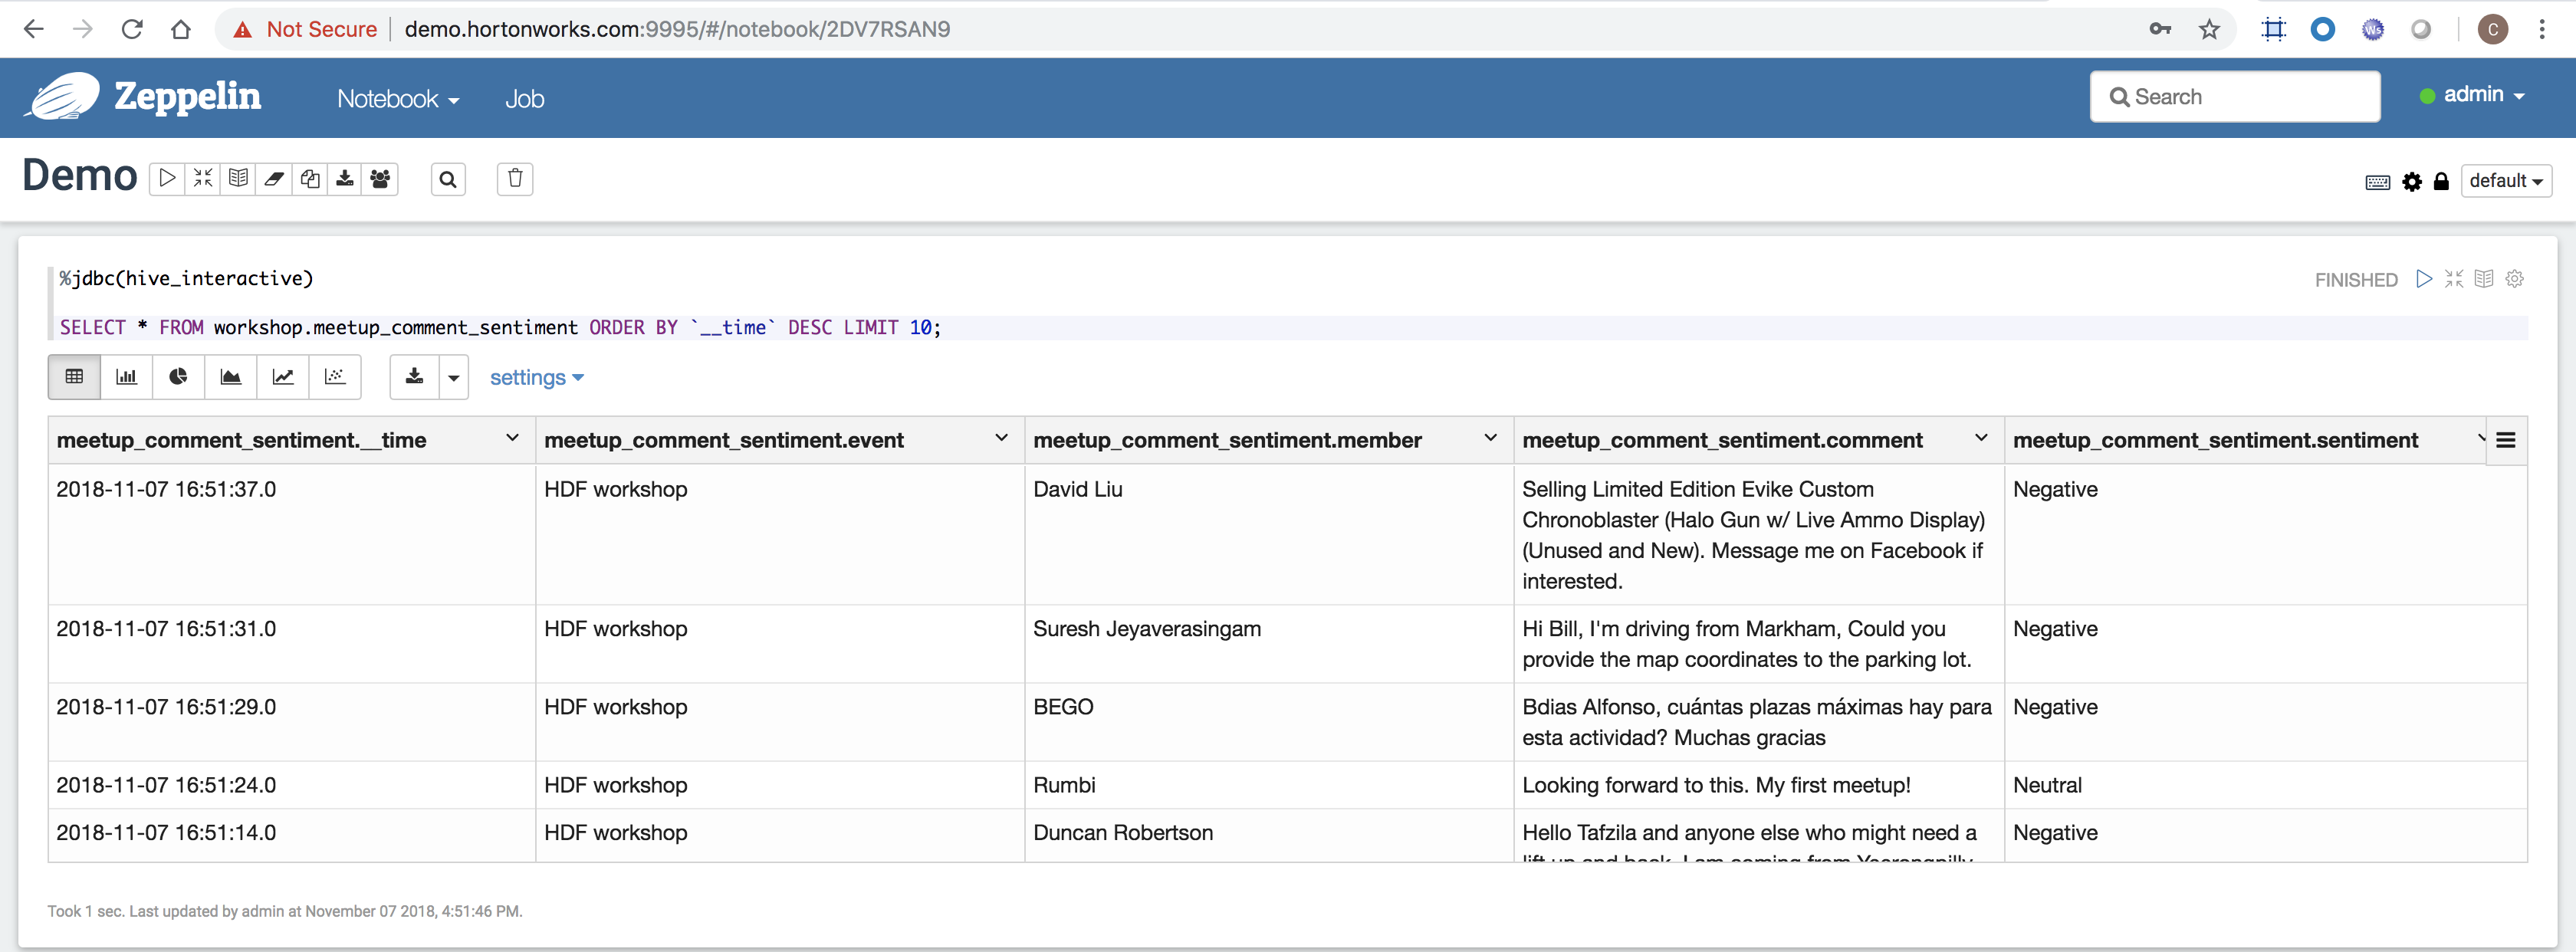
Going back to Zeppelin, we can query the data streamed in real-time
Go to Superset UI
Log in with user admin and password admin
Refresh Druid metadata
Edit the meetup_comment_sentiment datasource record and verify that the columns are listed, same for the metric (you might need to scroll down)
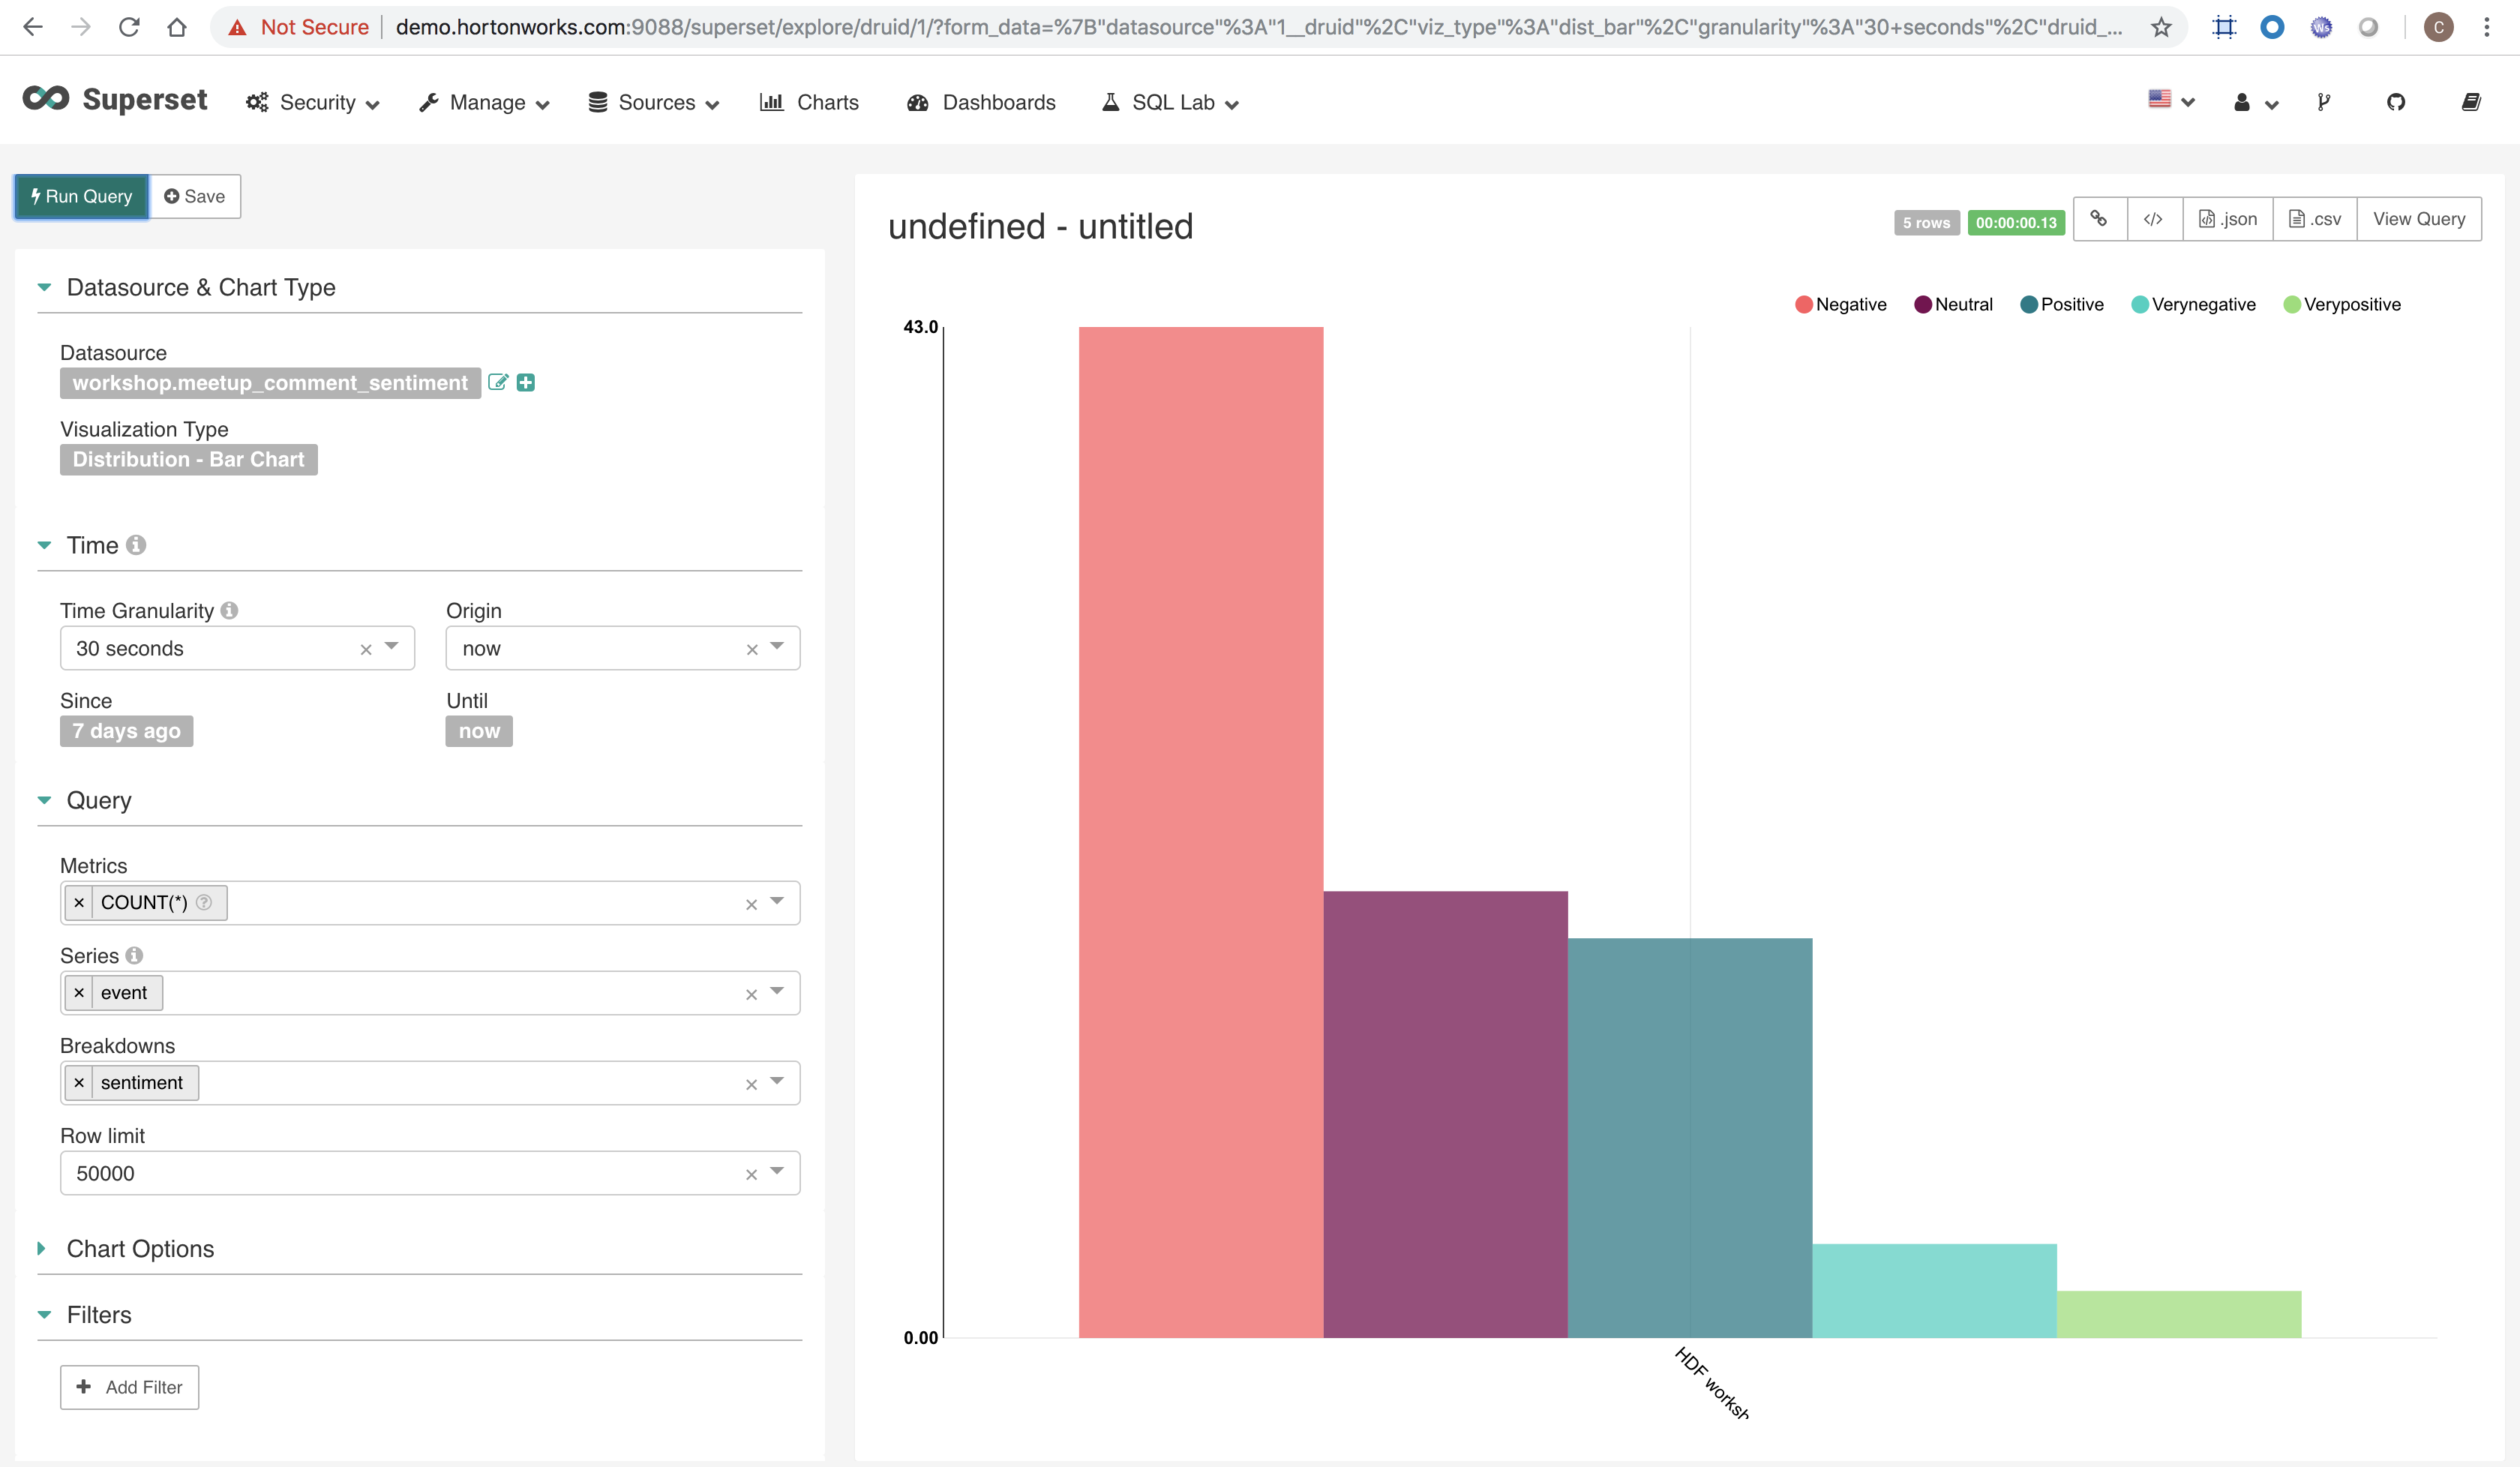
Click on the datasource and create the following query
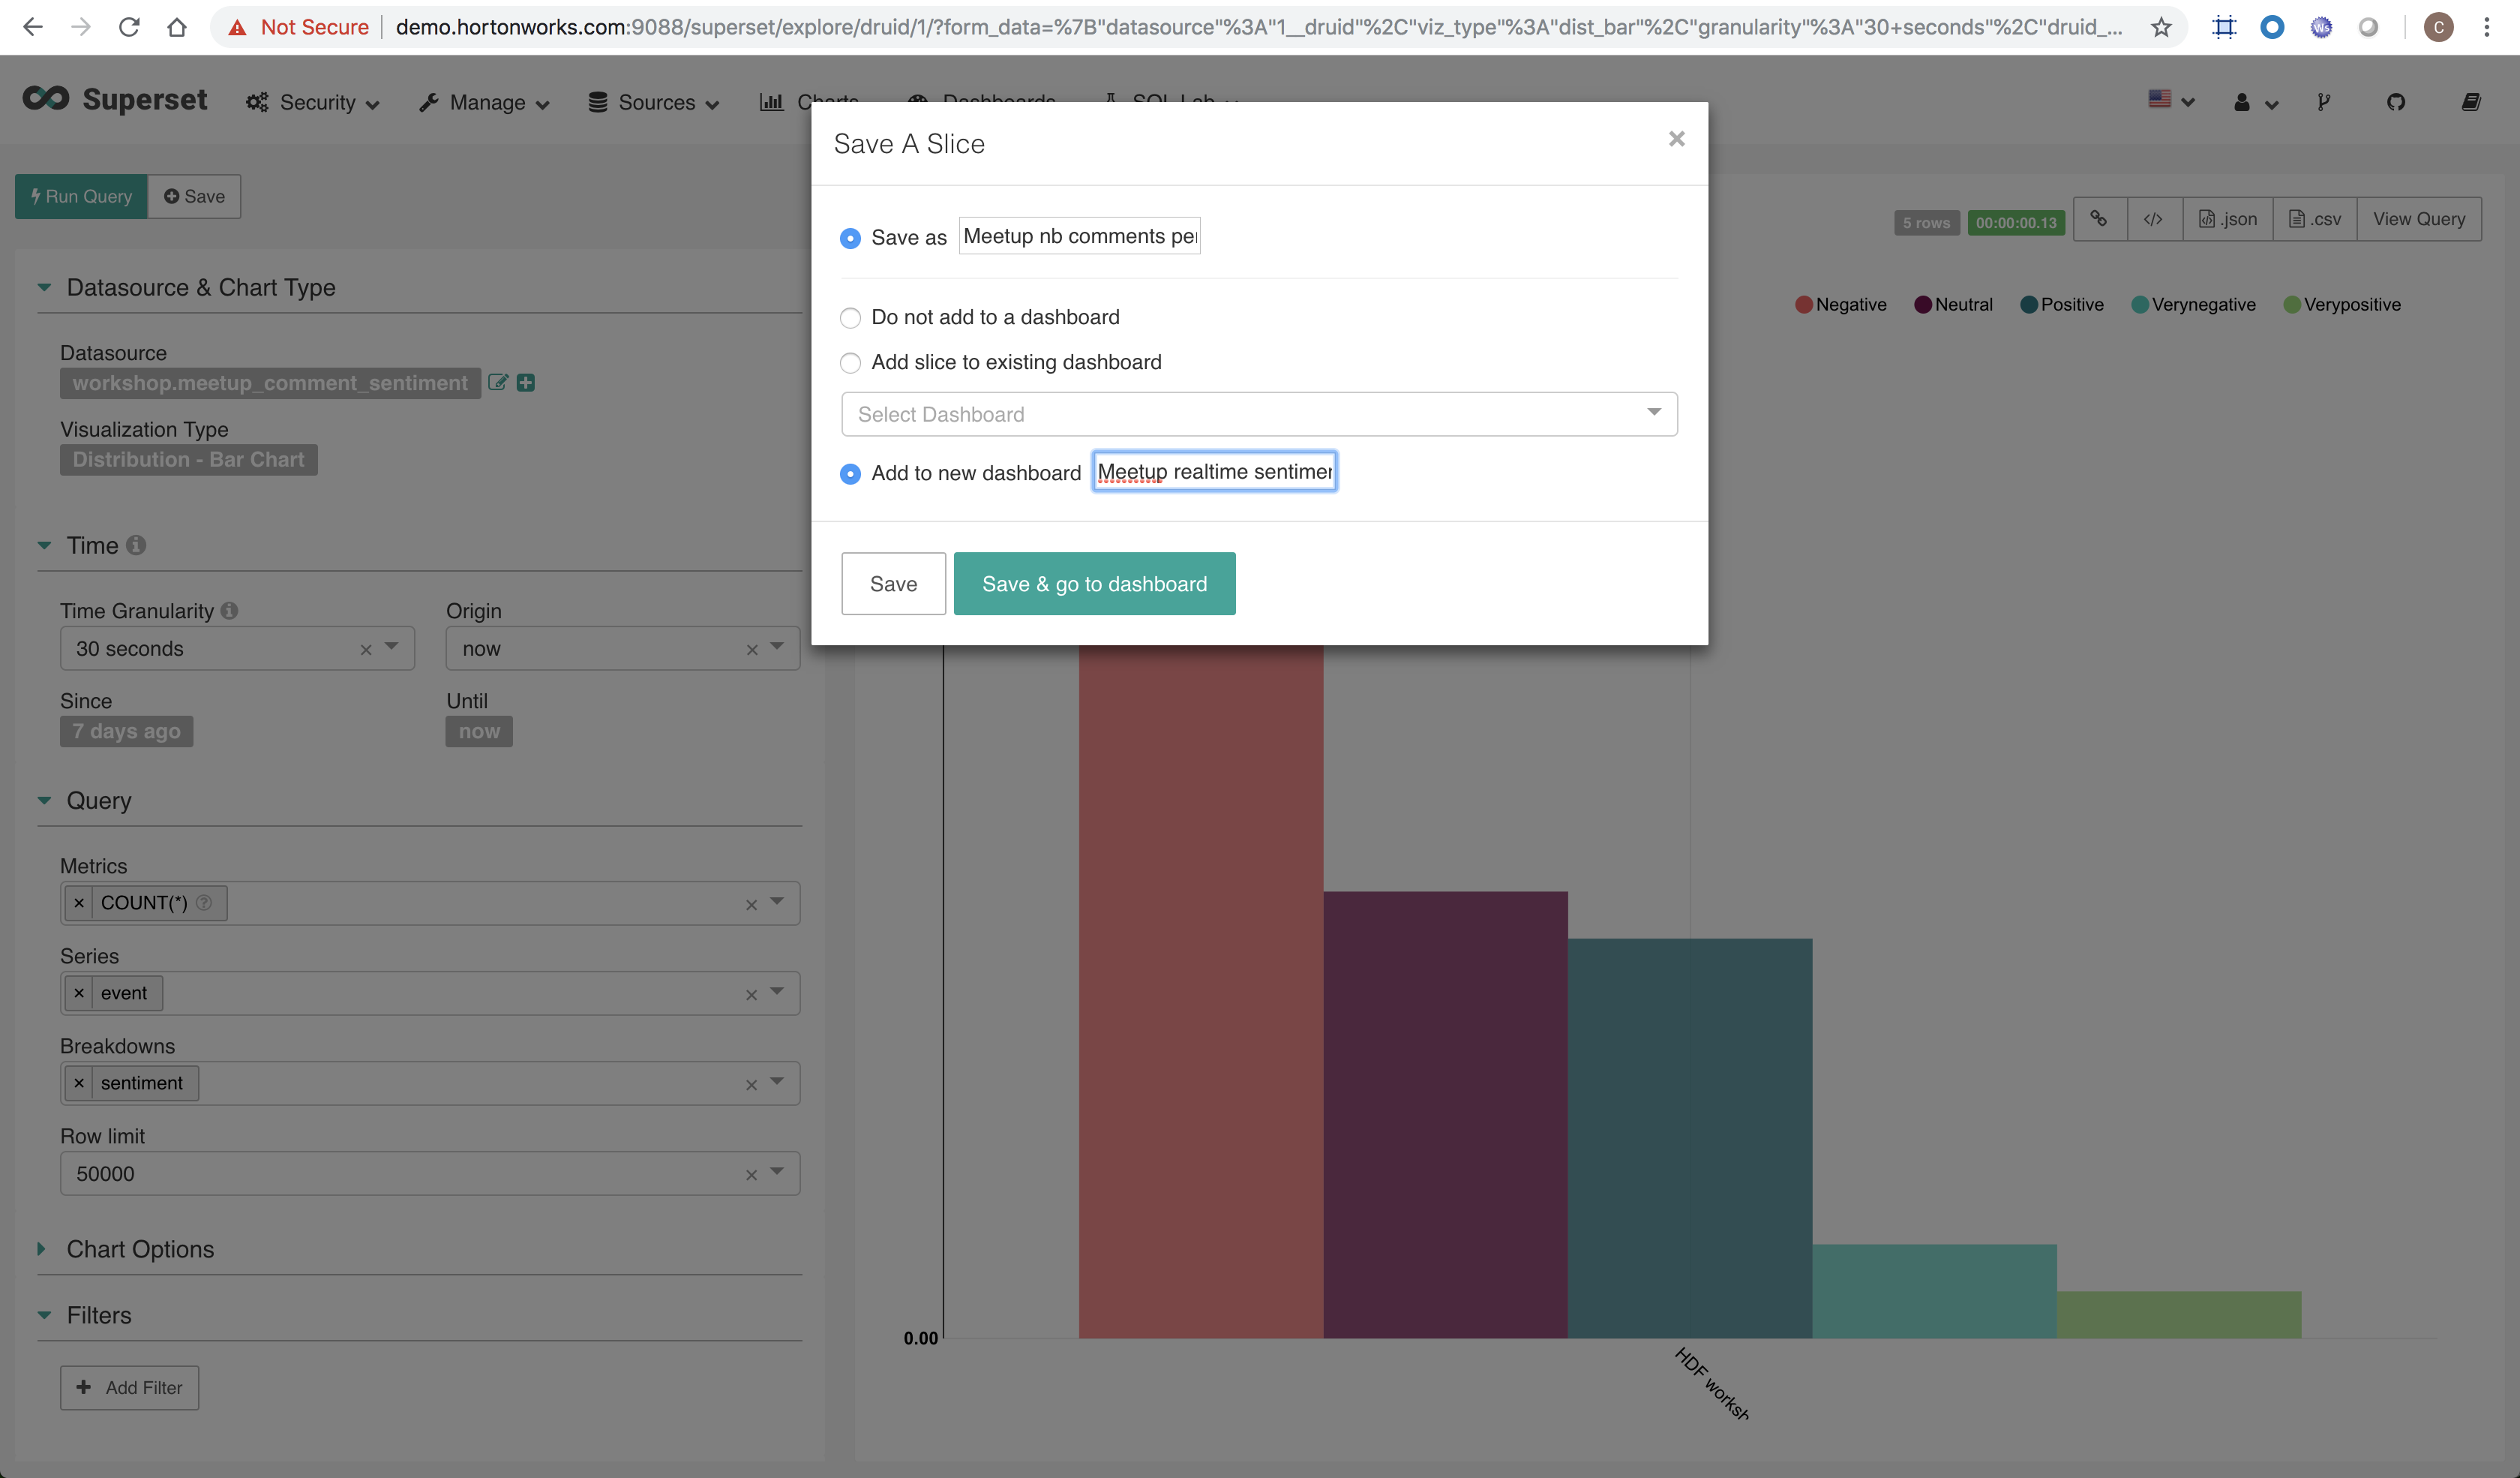
From this query, create a dashboard that will refresh automatically
Go to NiFi Registry and create a bucket named demo
As root (sudo su -) start EFM and MiNiFi
service efm start
service minifi start
Visit EFM UI
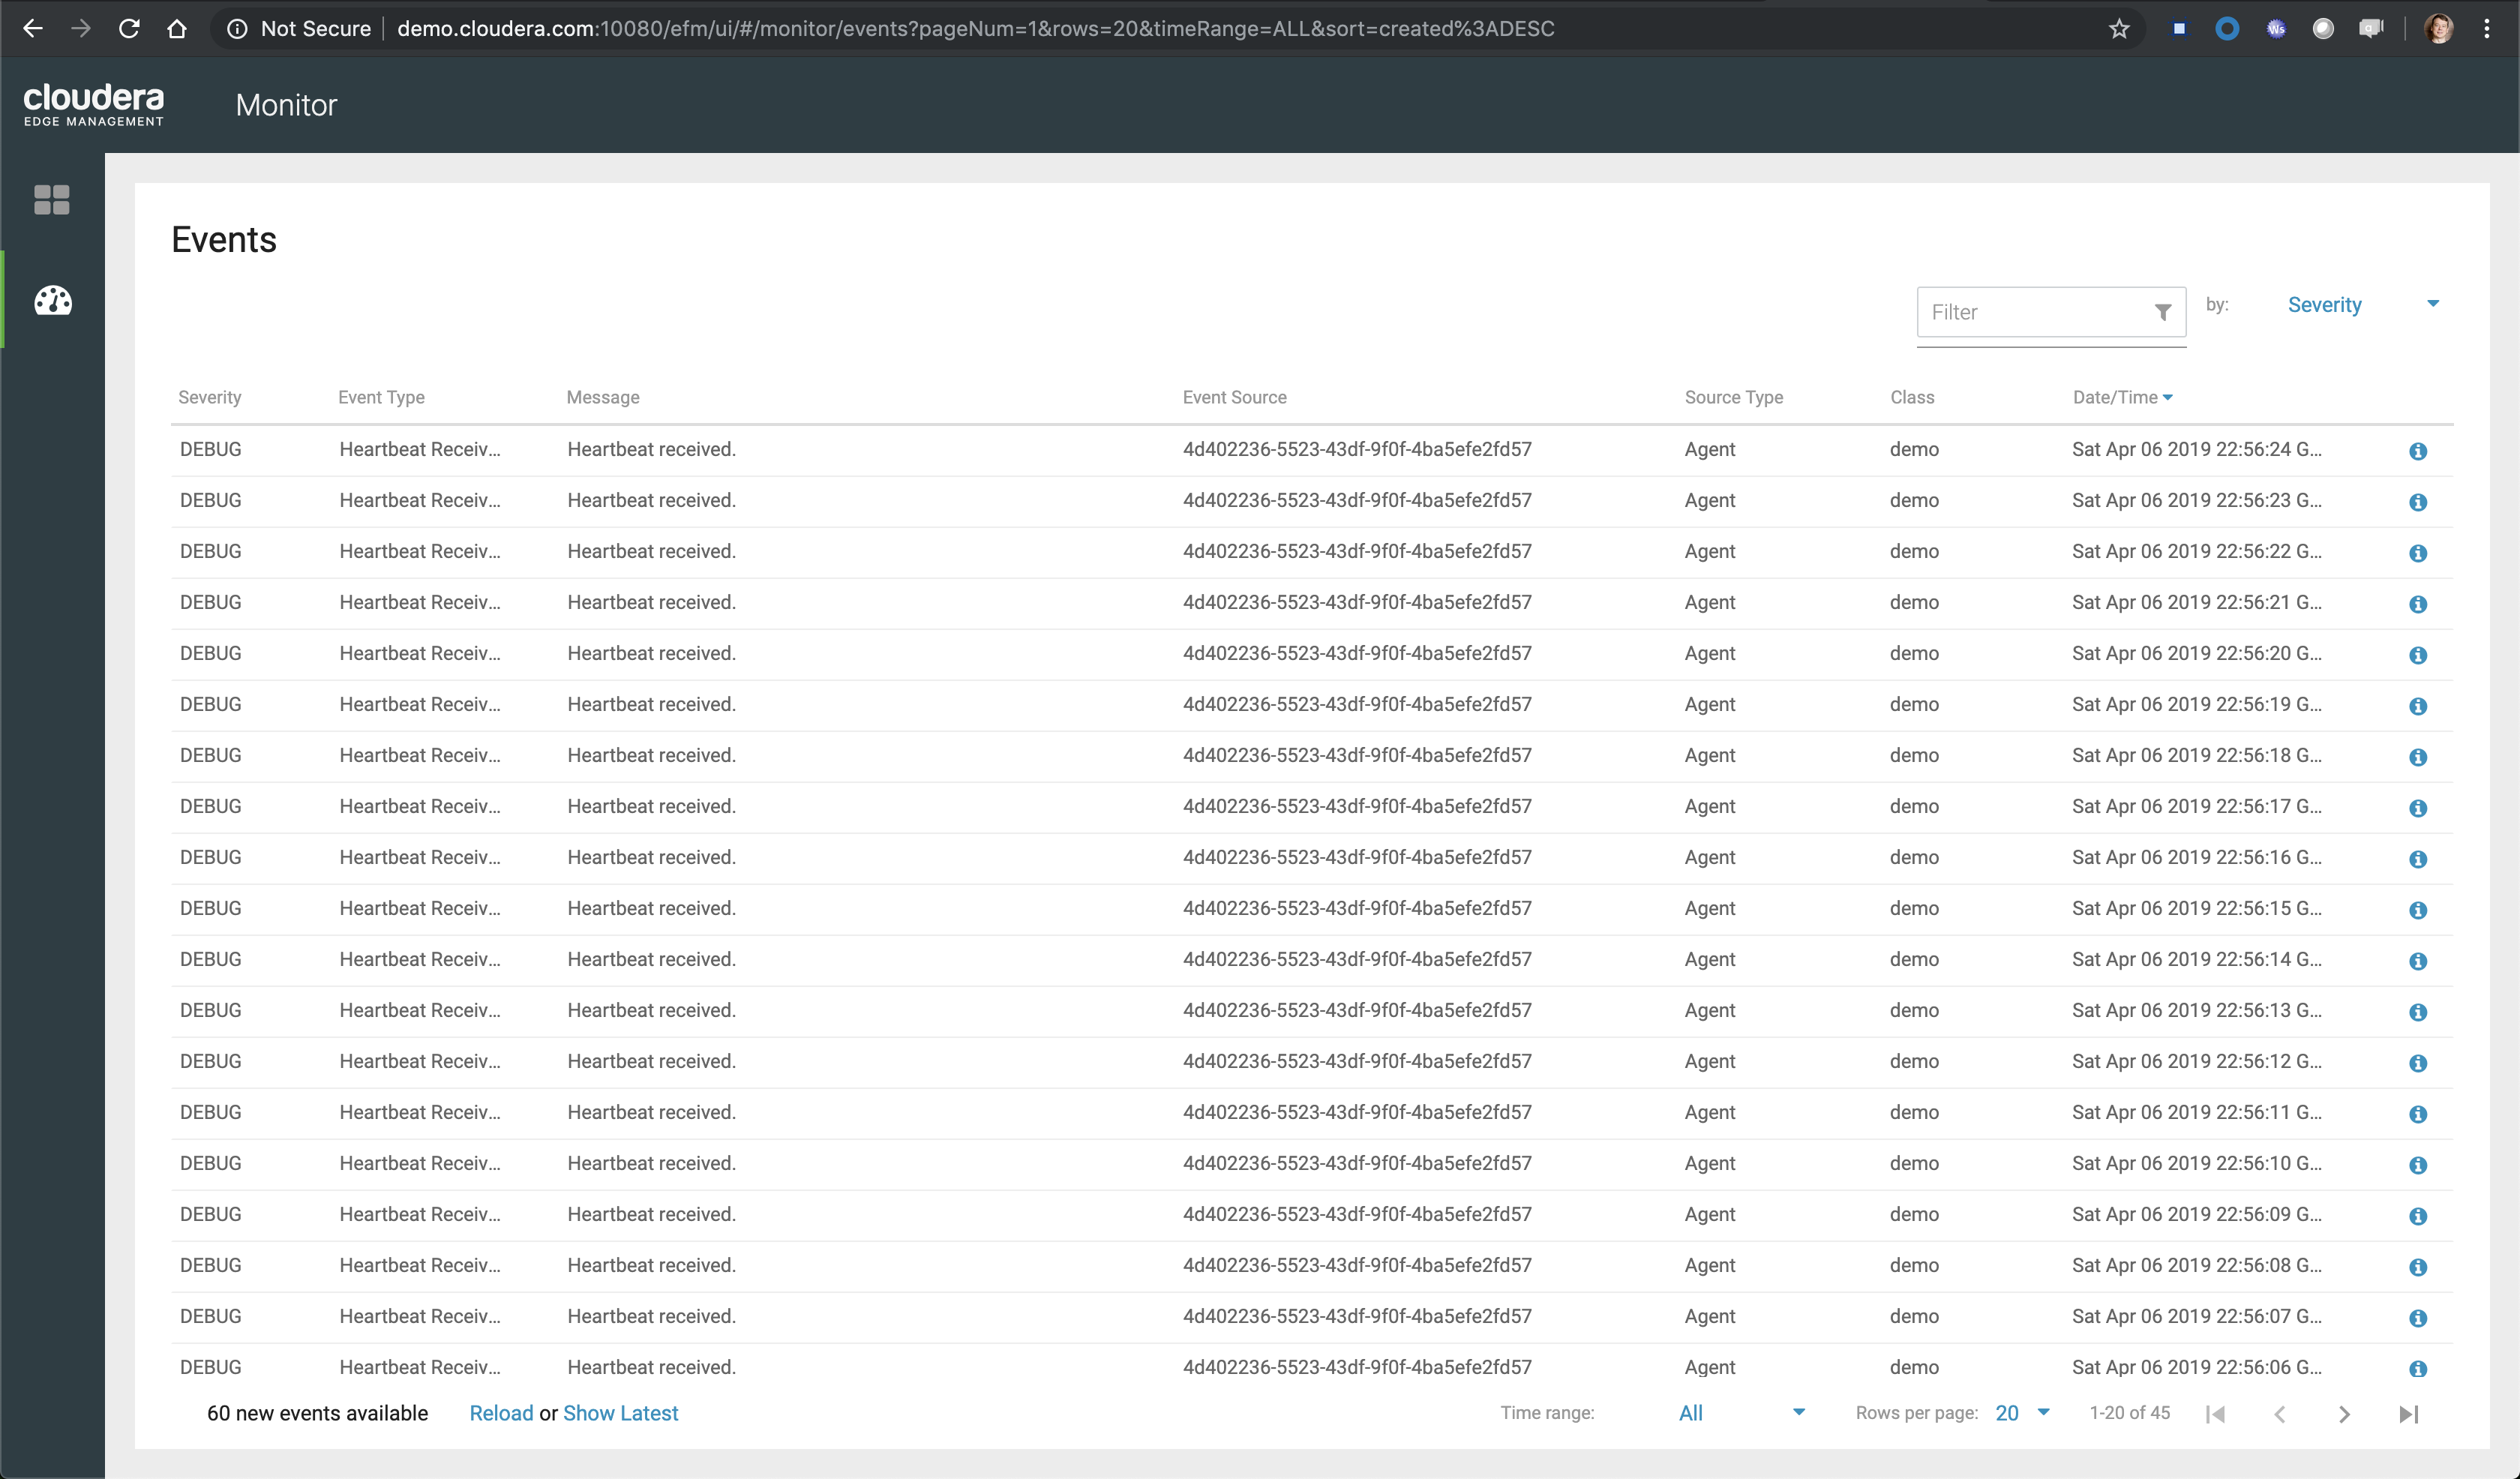
You should see heartbeats coming from the agent
Now create a simple flow to collect local syslog messages and forward them to NiFi, where the logs will be parsed, transformed into another format and pushed to a Kafka topic.
Our agent has been tagged with the class 'demo' (check nifi.c2.agent.class property in /usr/minifi/conf/bootstrap.conf) so we are going to create a template under this specific class
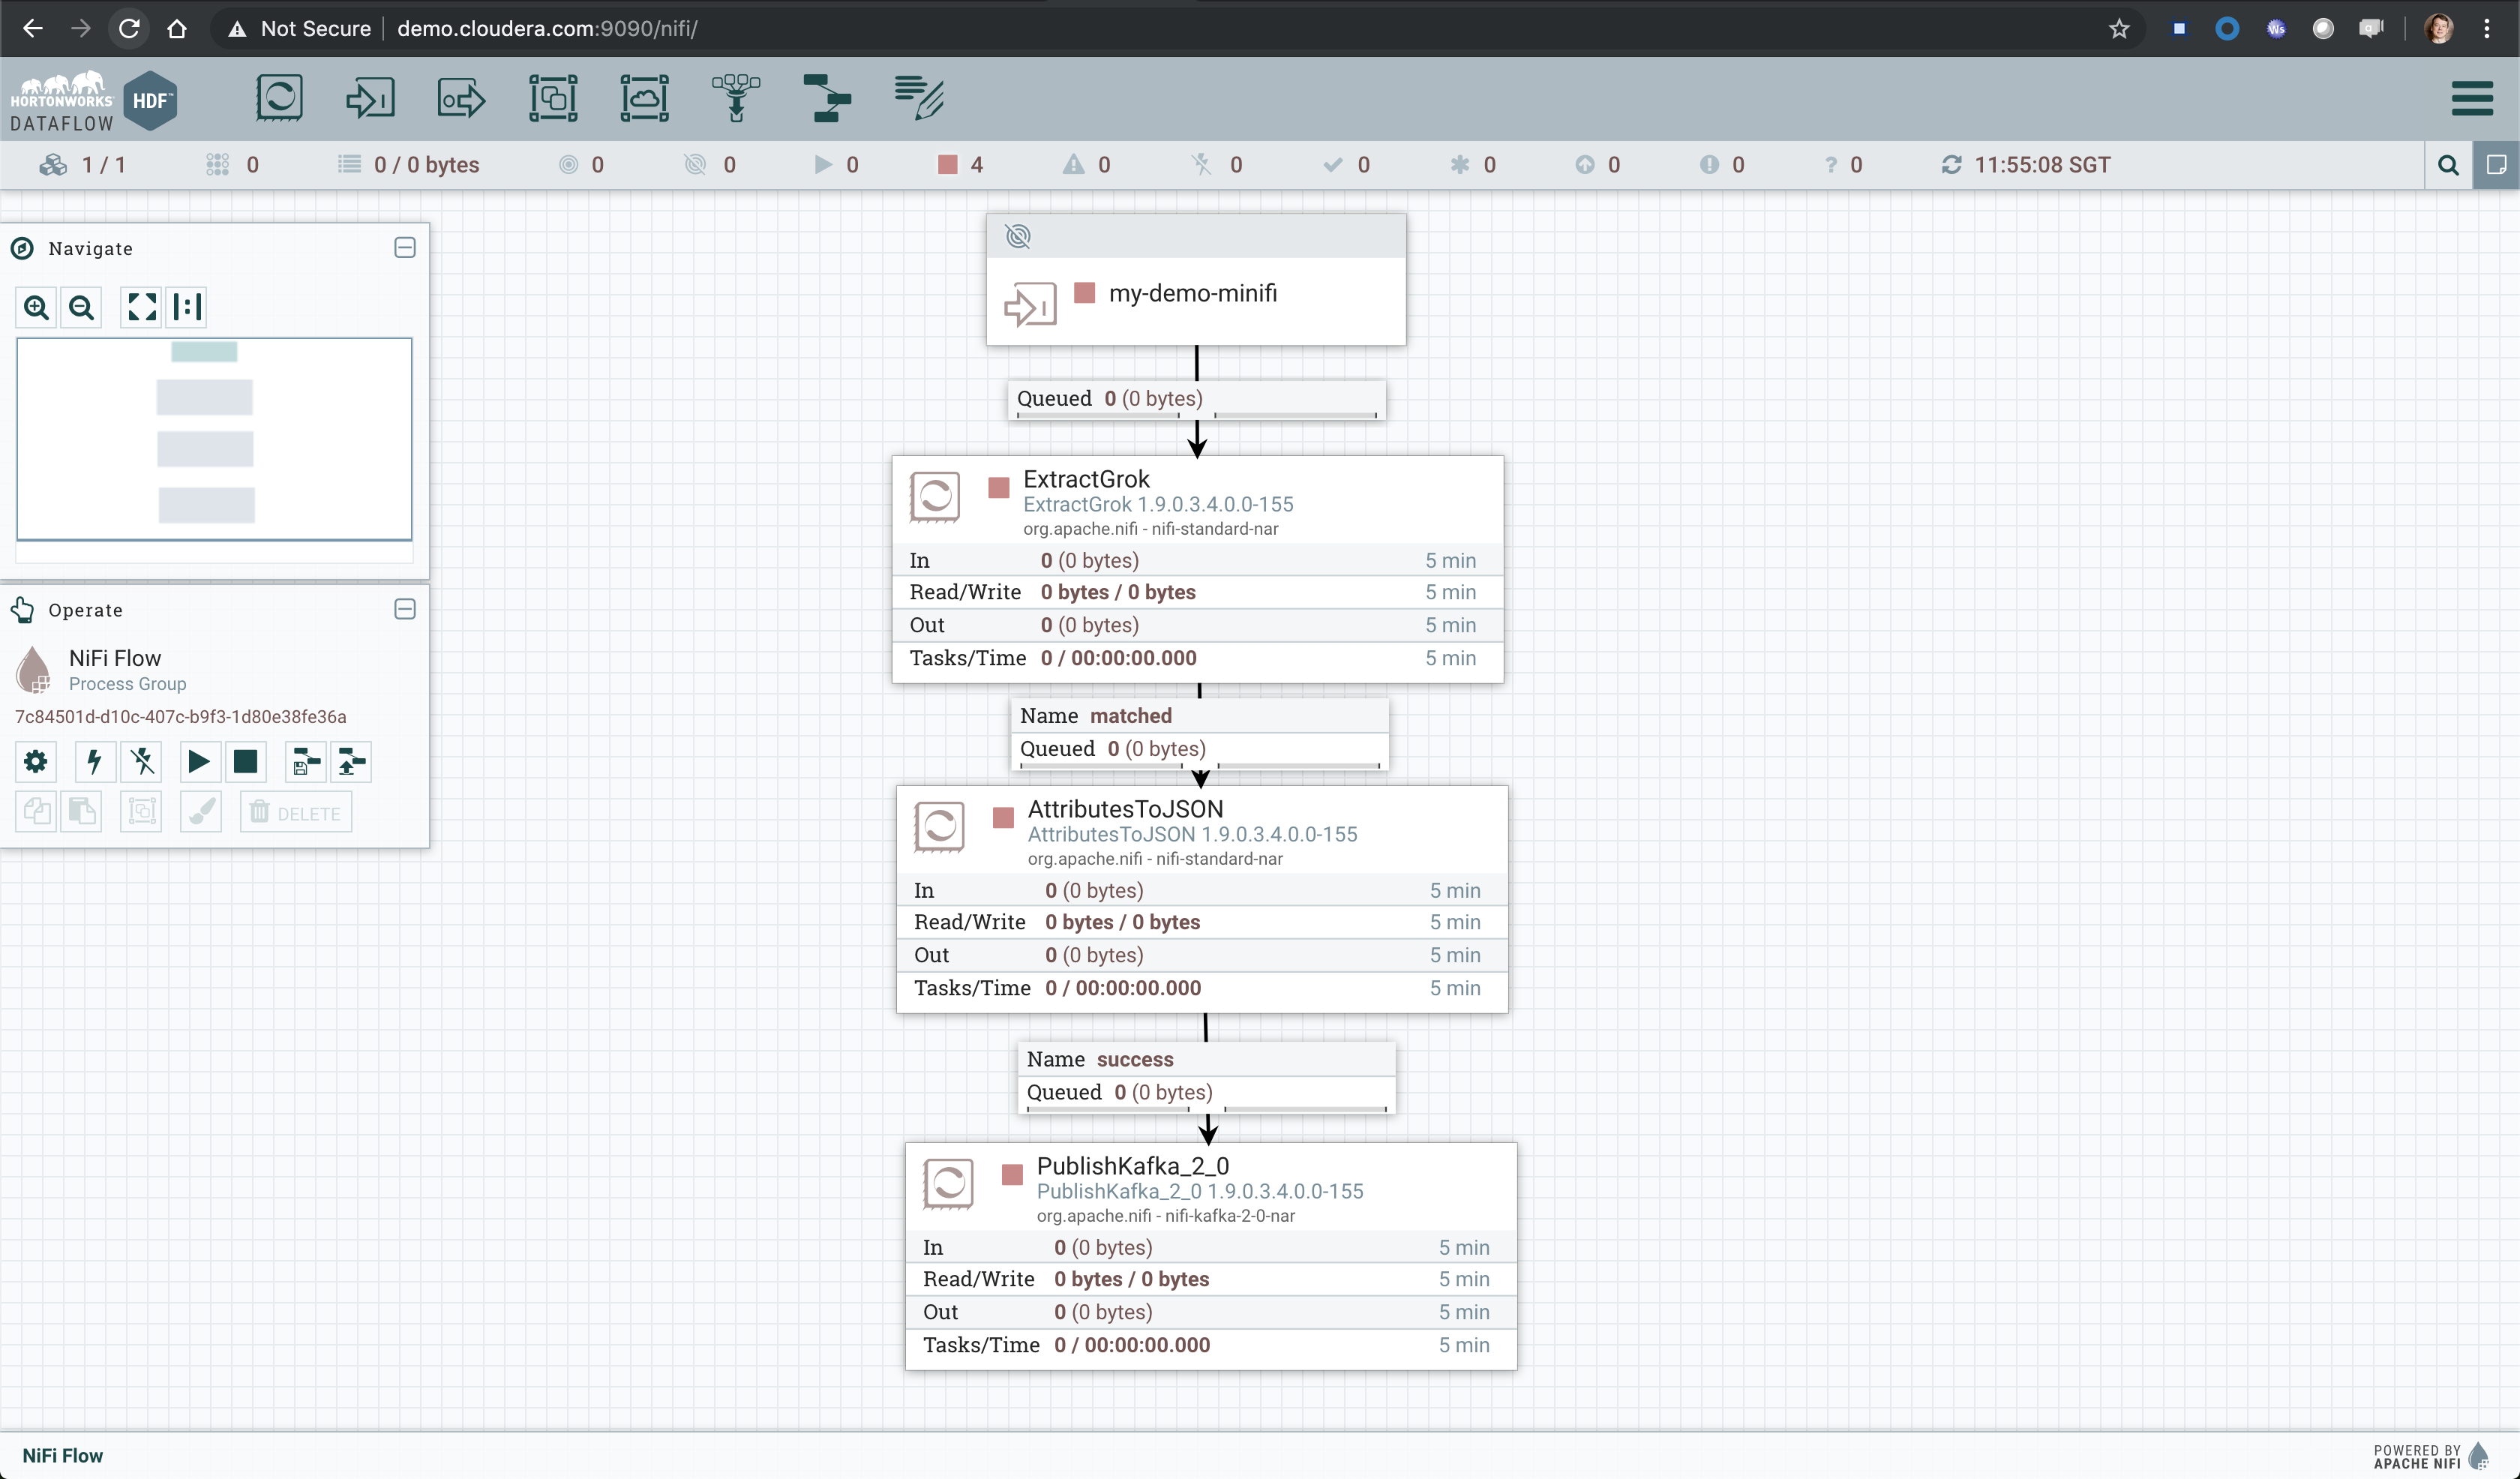
But first we need to add an Input Port to the root canvas of NiFi and build a flow as described before. Input Port are used to receive flow files from remote MiNiFi agents or other NiFi instances.
Don't forget to create a new Kafka topic as explained in Lab 3 above.
We are going to use a Grok parser to parse the syslog messages. Here is a Grok expression that can be used to parse such logs format:
%{SYSLOGTIMESTAMP:syslog_timestamp} %{SYSLOGHOST:syslog_hostname} %{DATA:syslog_program}(?:\[%{POSINT:syslog_pid}\])?: %{GREEDYDATA:syslog_message}
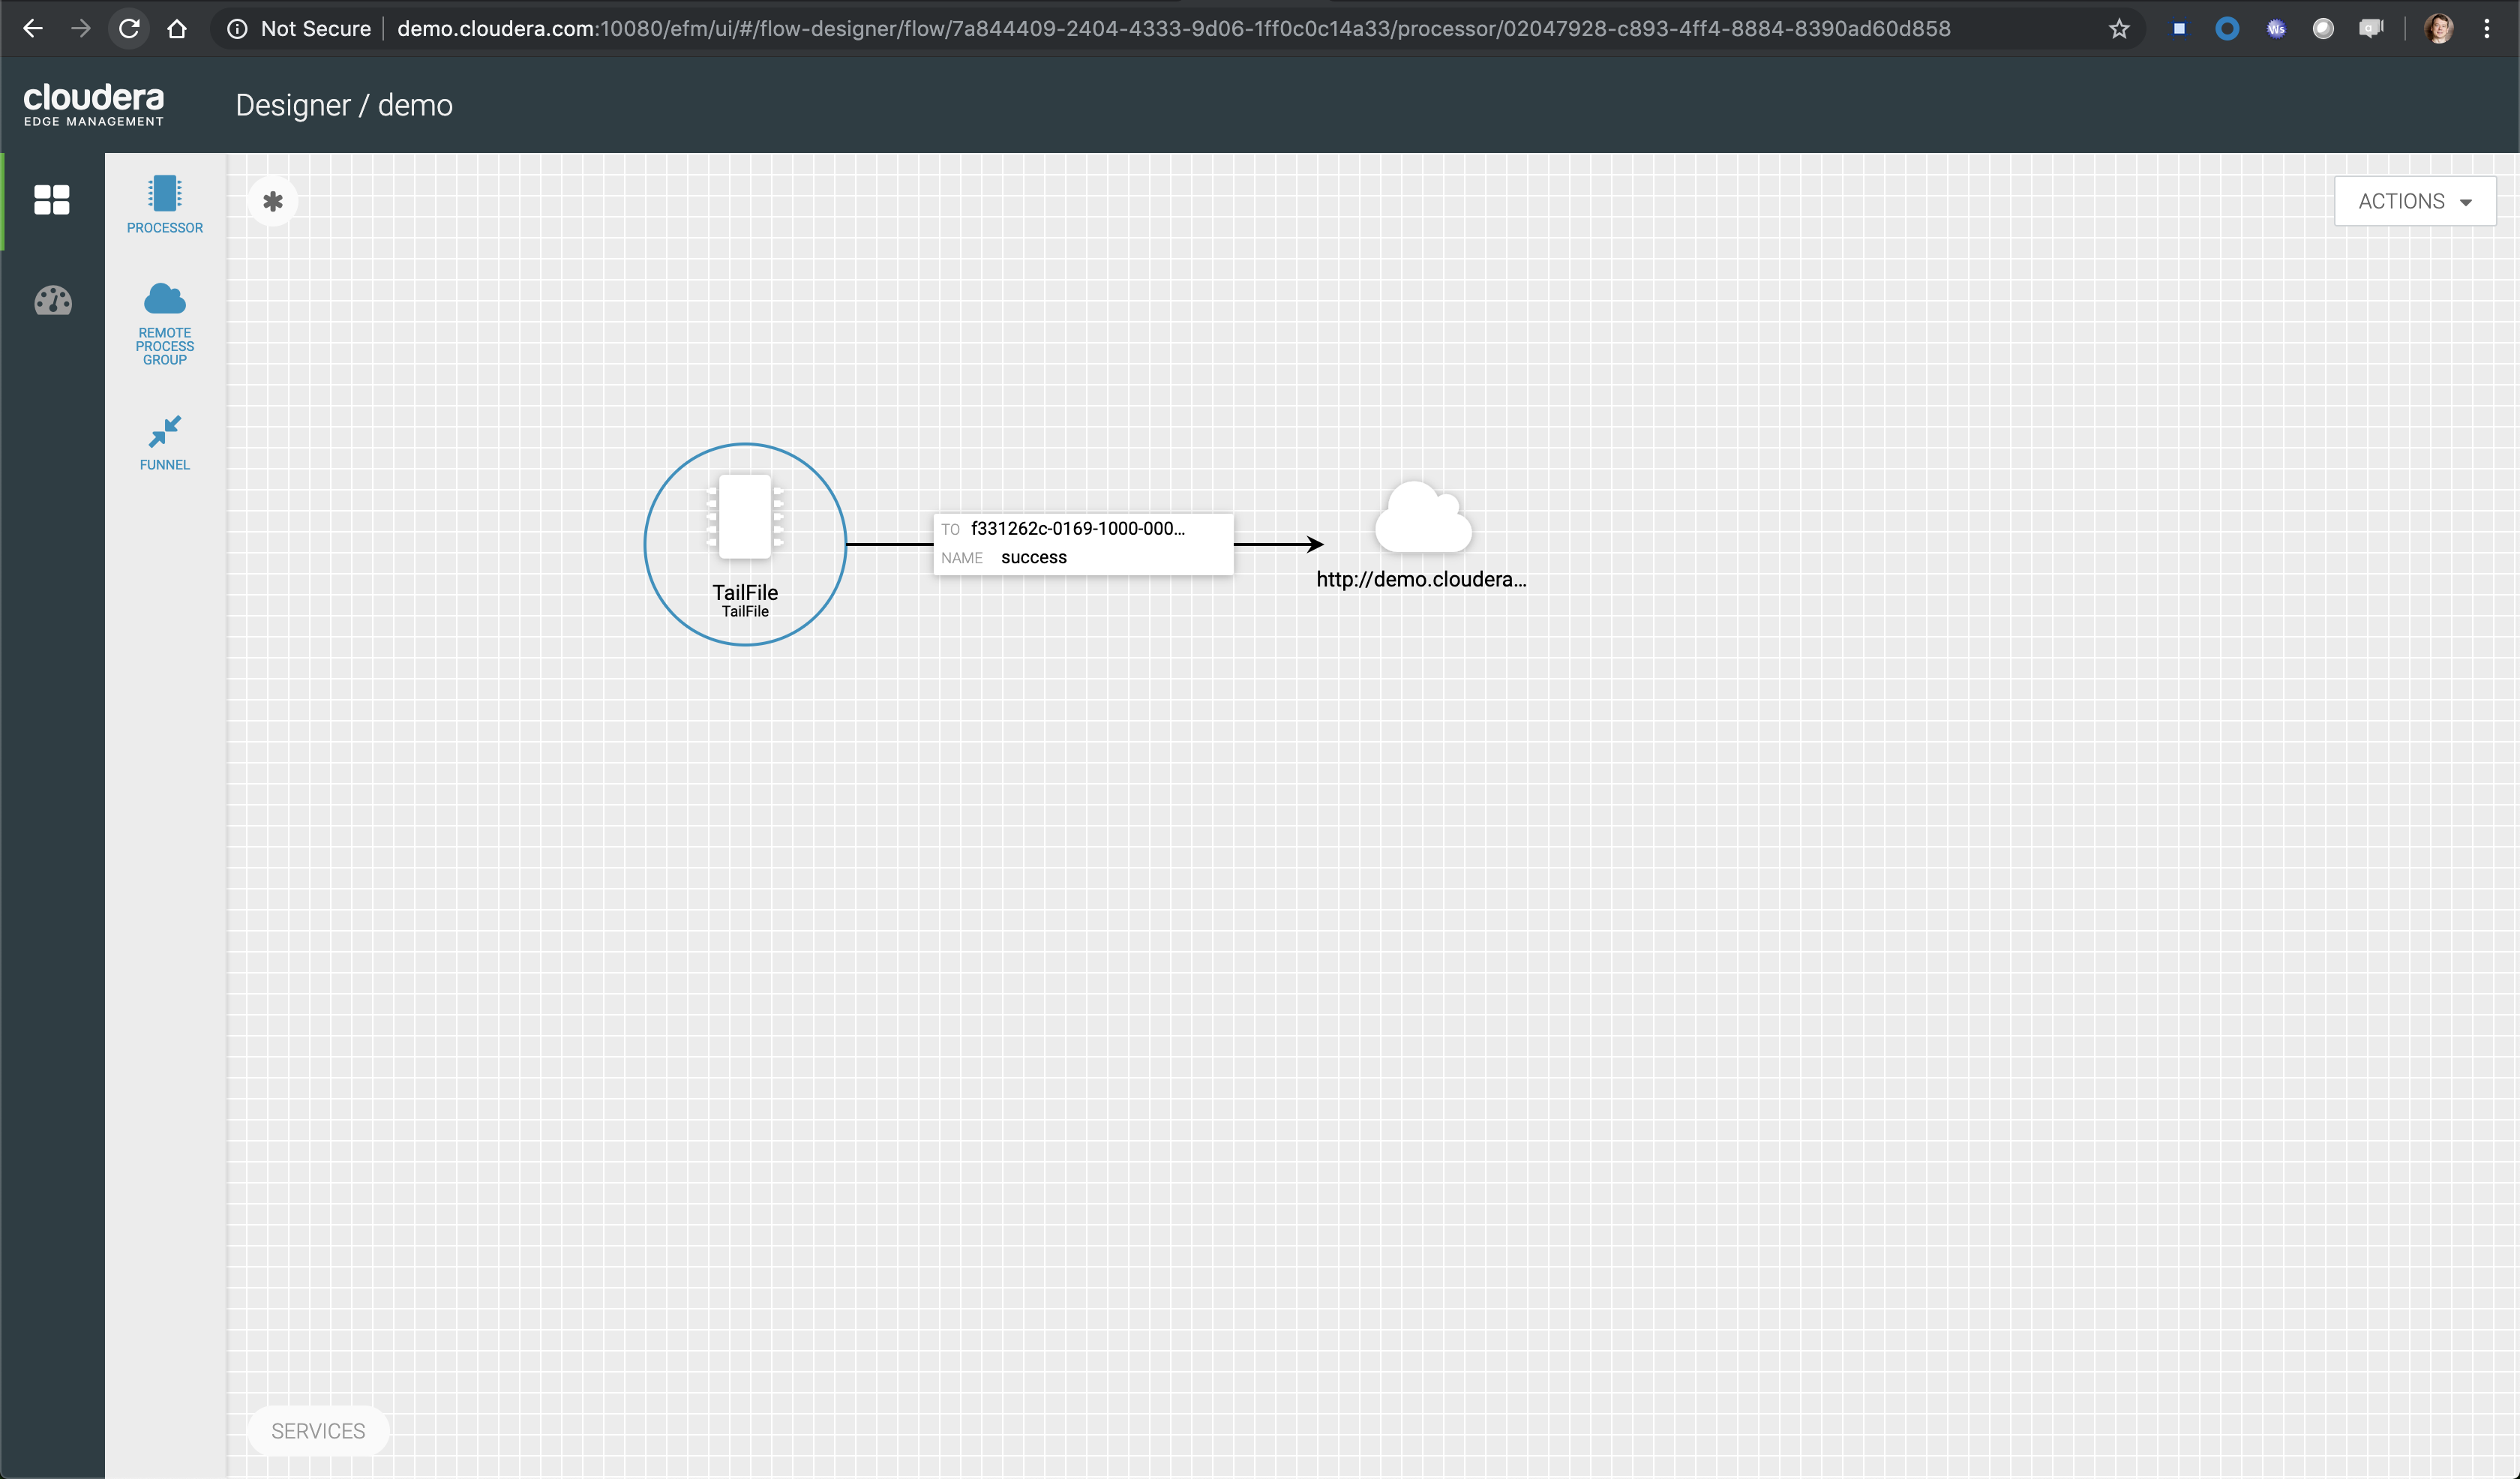
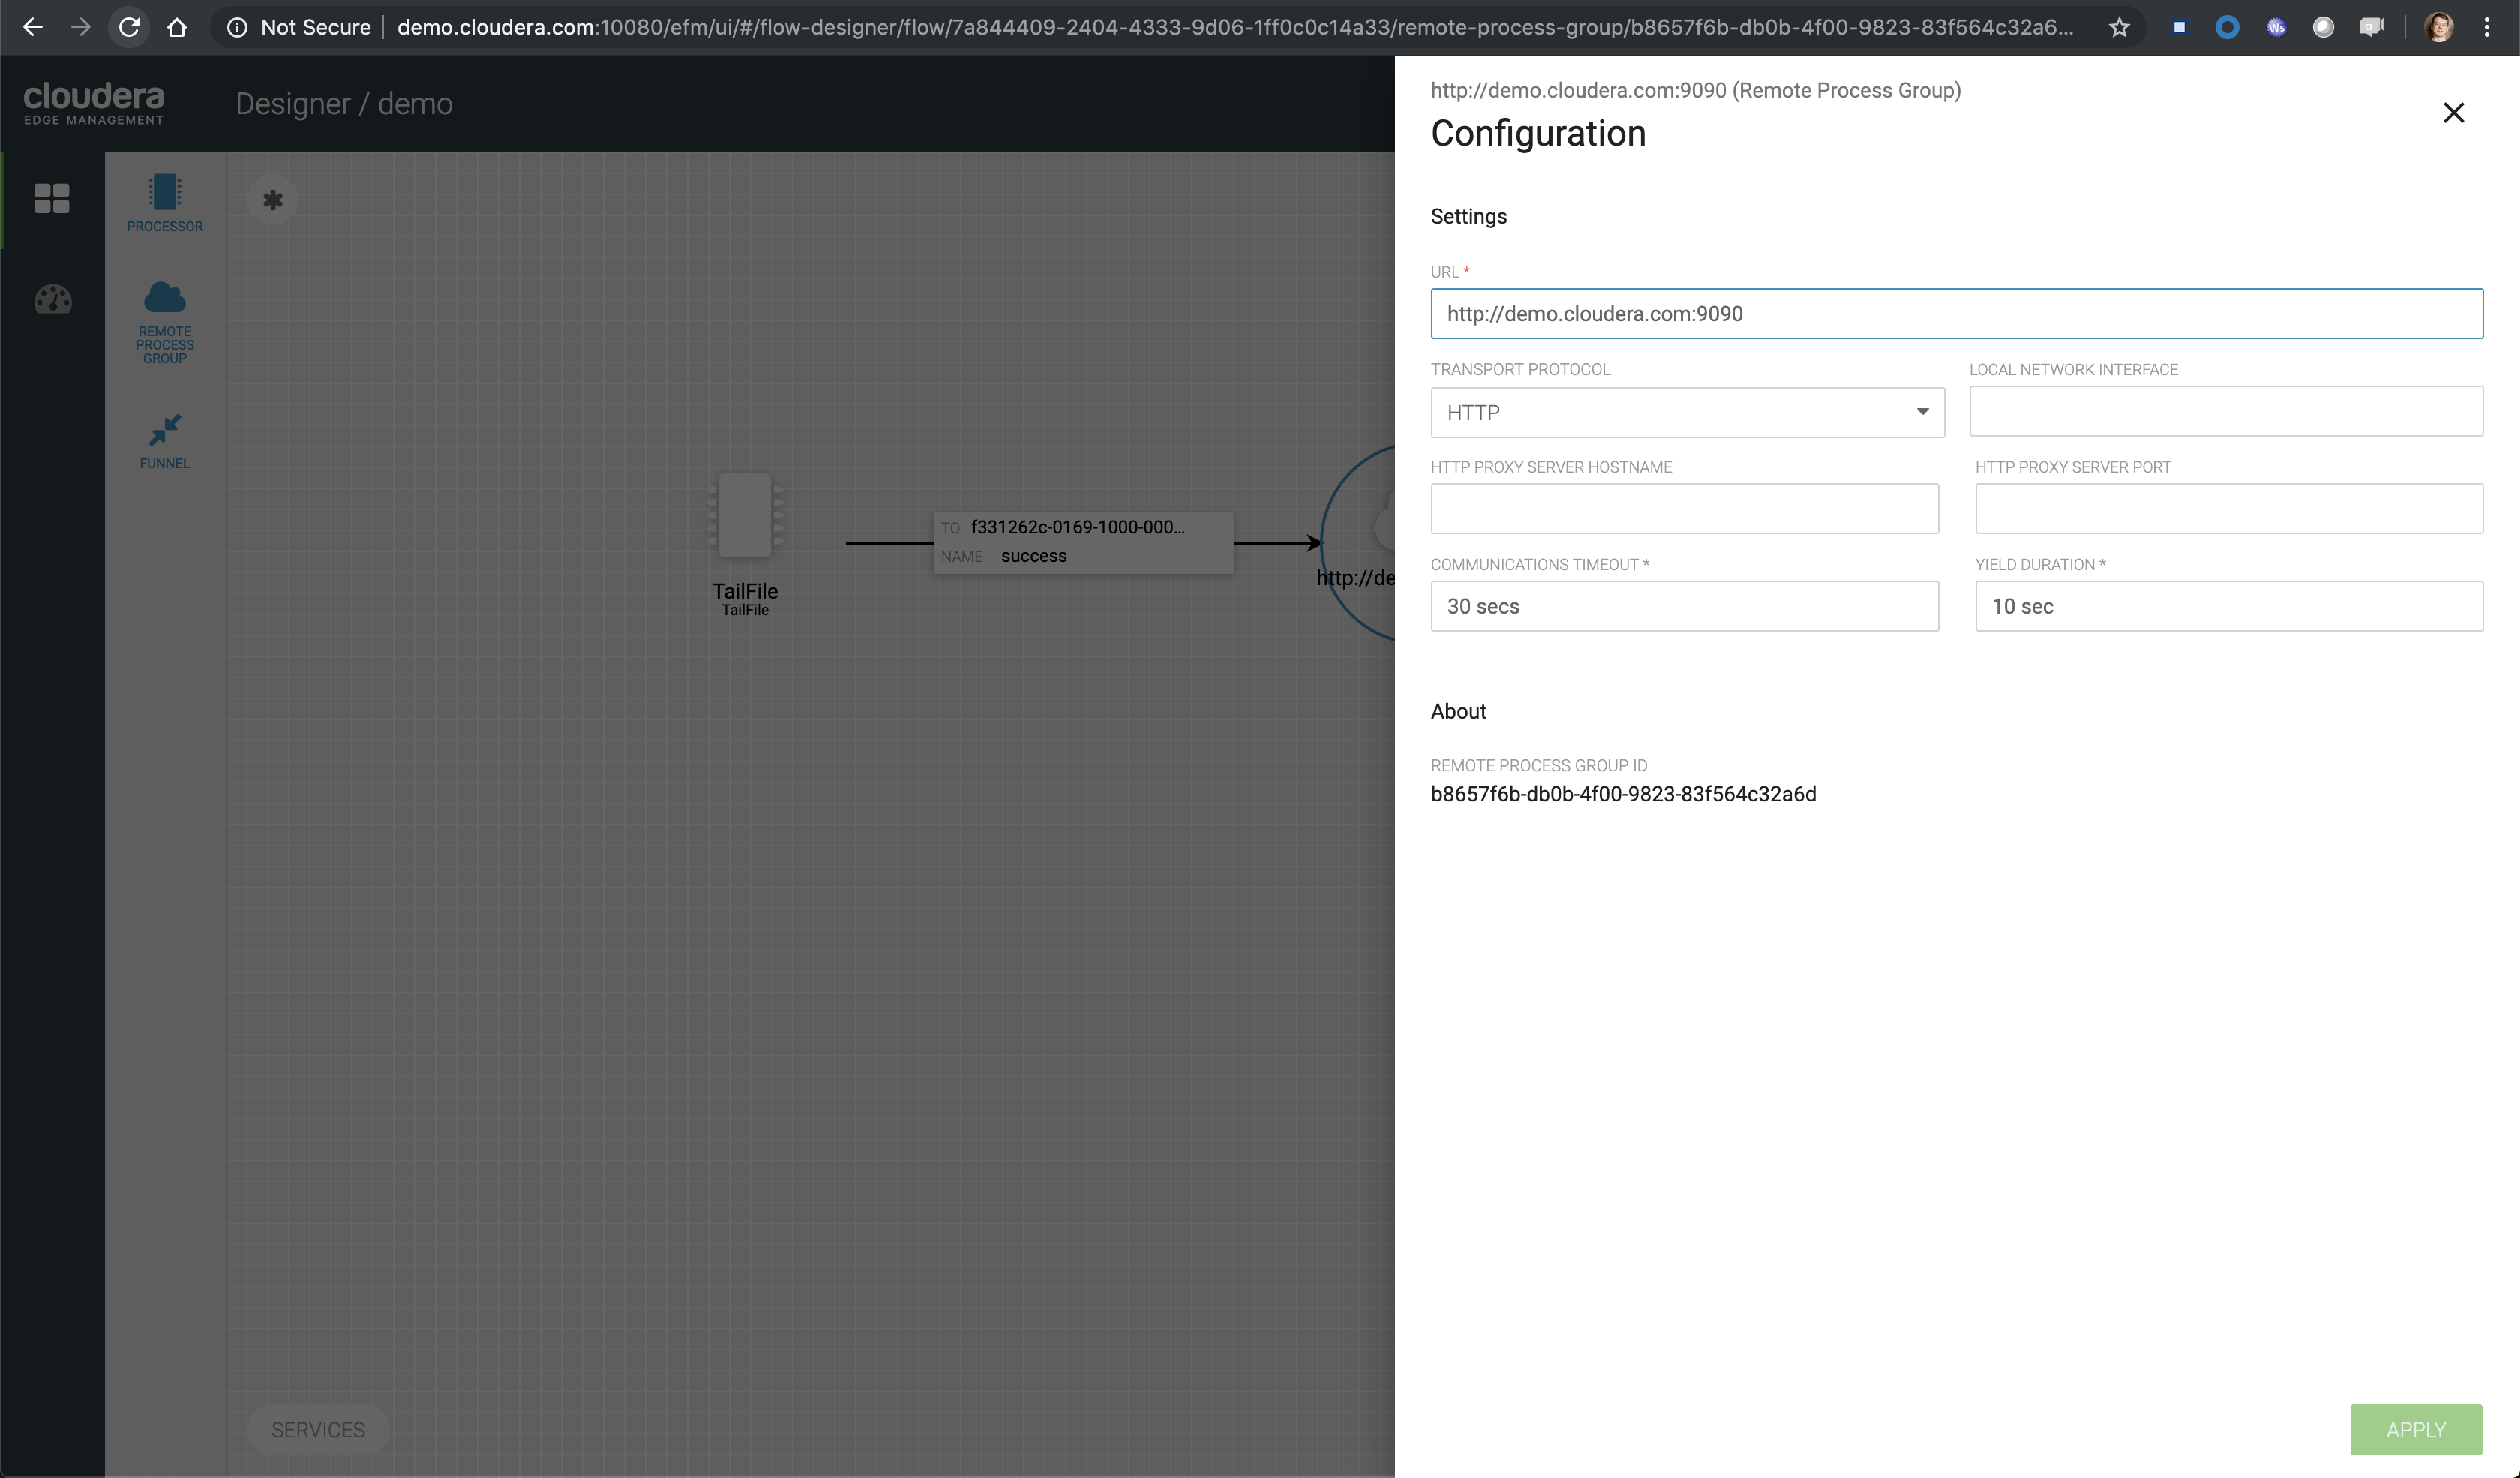
Now that we have built the NiFi flow that will receive the logs, let's go back to the EFM UI and build the MiNiFi flow as below:
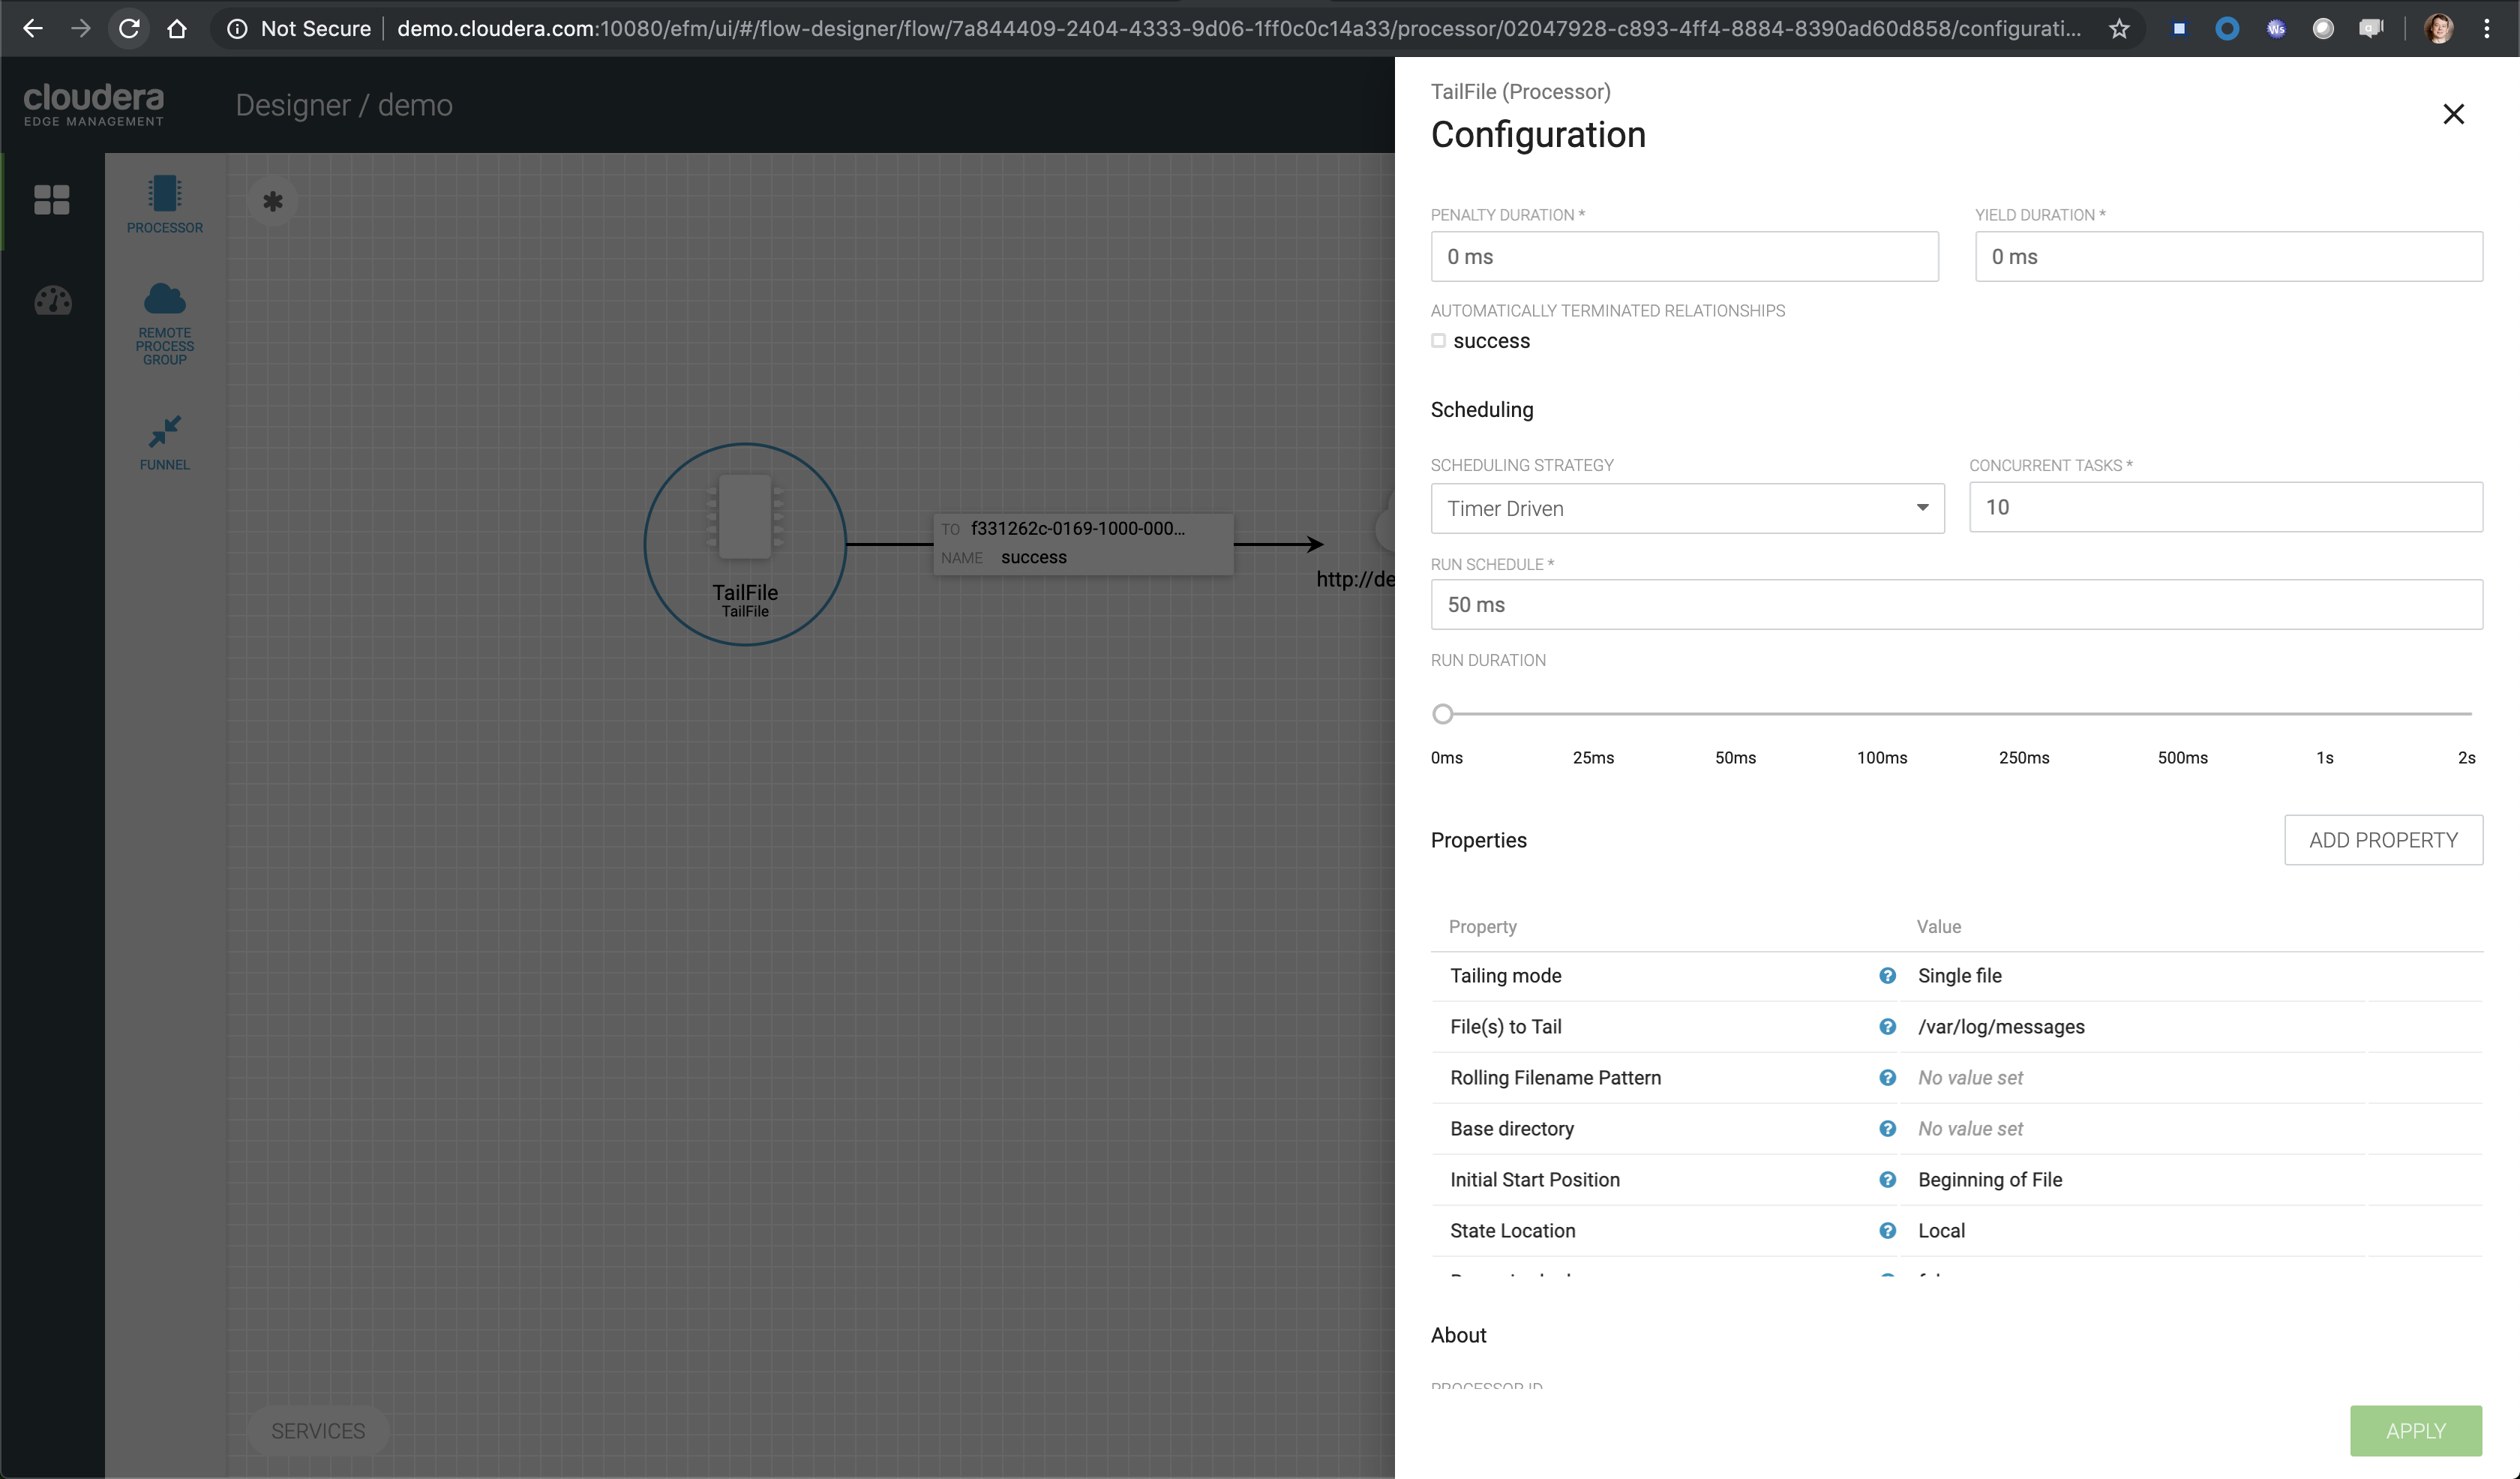
This MiNiFi agent will tail /var/log/messages and send the logs to a remote process group (our NiFi instance) using the Input Port.
Don't forget to increase the scheduler!
Please note that the NiFi instance has been configured to receive data over HTTP only, not RAW
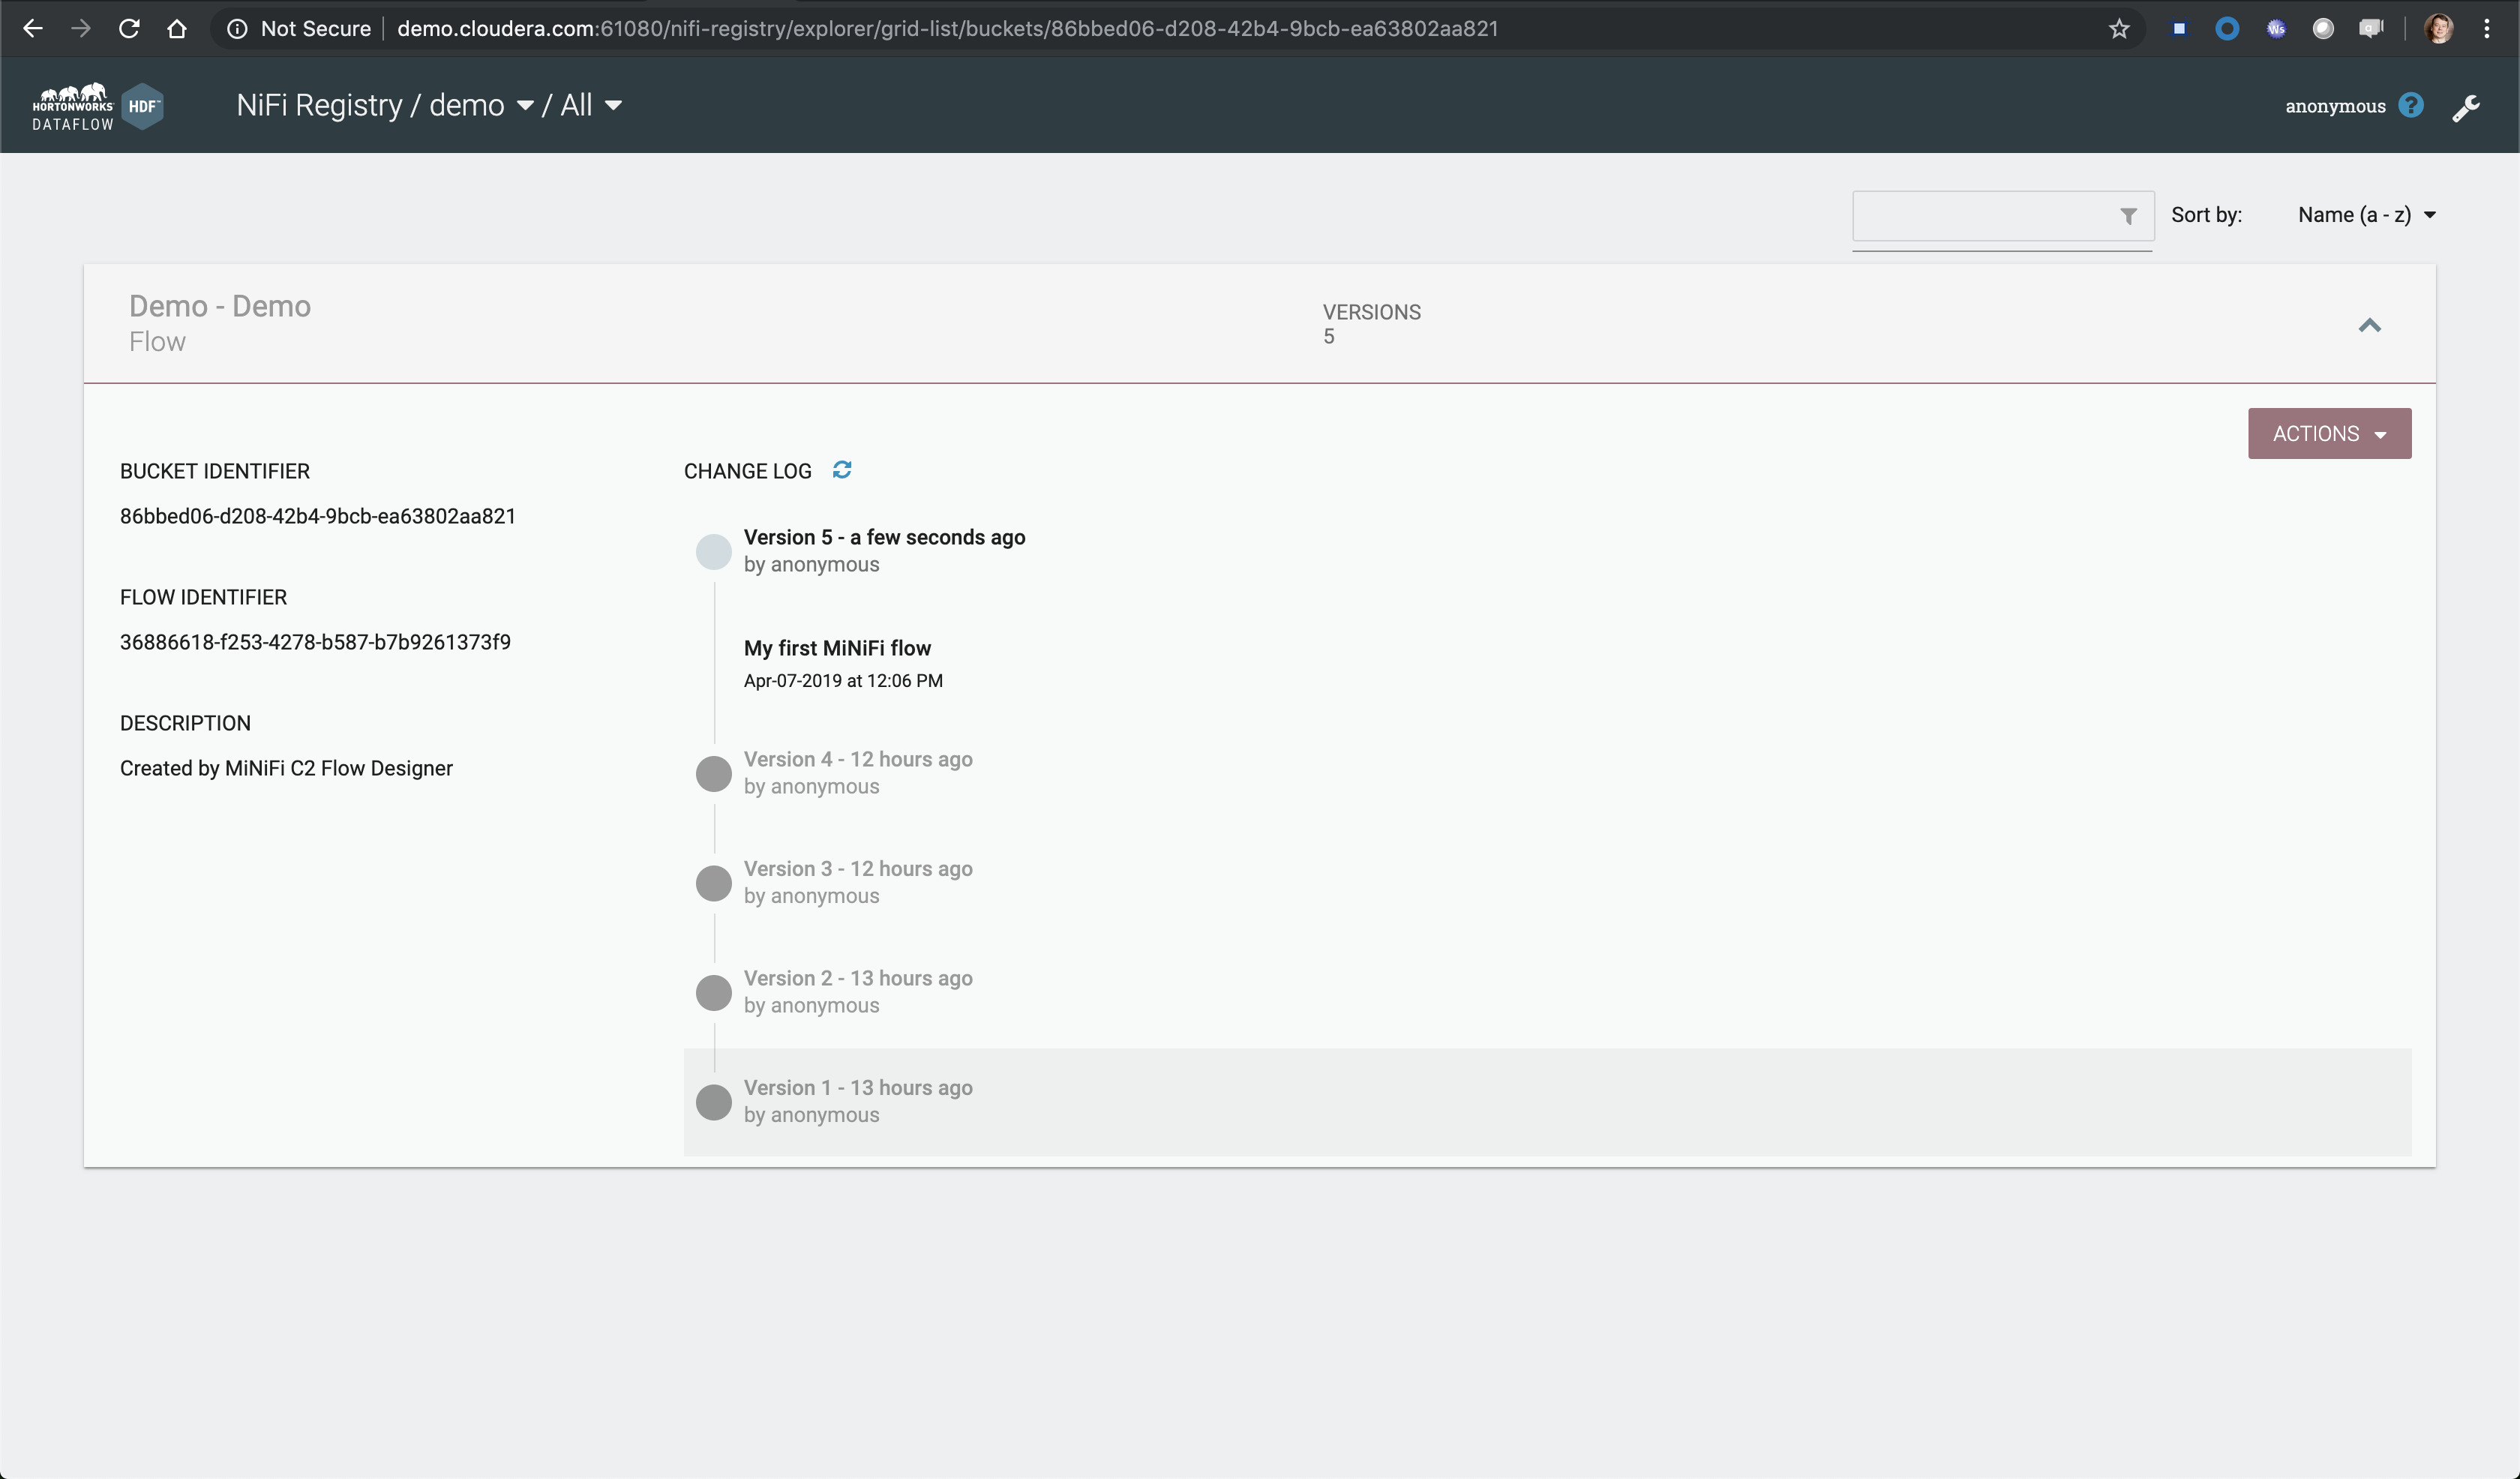
Now we can start the NiFi flow and publish the MiNiFi flow to NiFi registry (Actions > Publish...)
Visit NiFi Registry UI to make sure your flow has been published successfully.
Within few seconds, you should be able to see syslog messages streaming through your NiFi flow and be published to the Kafka topic you have created.
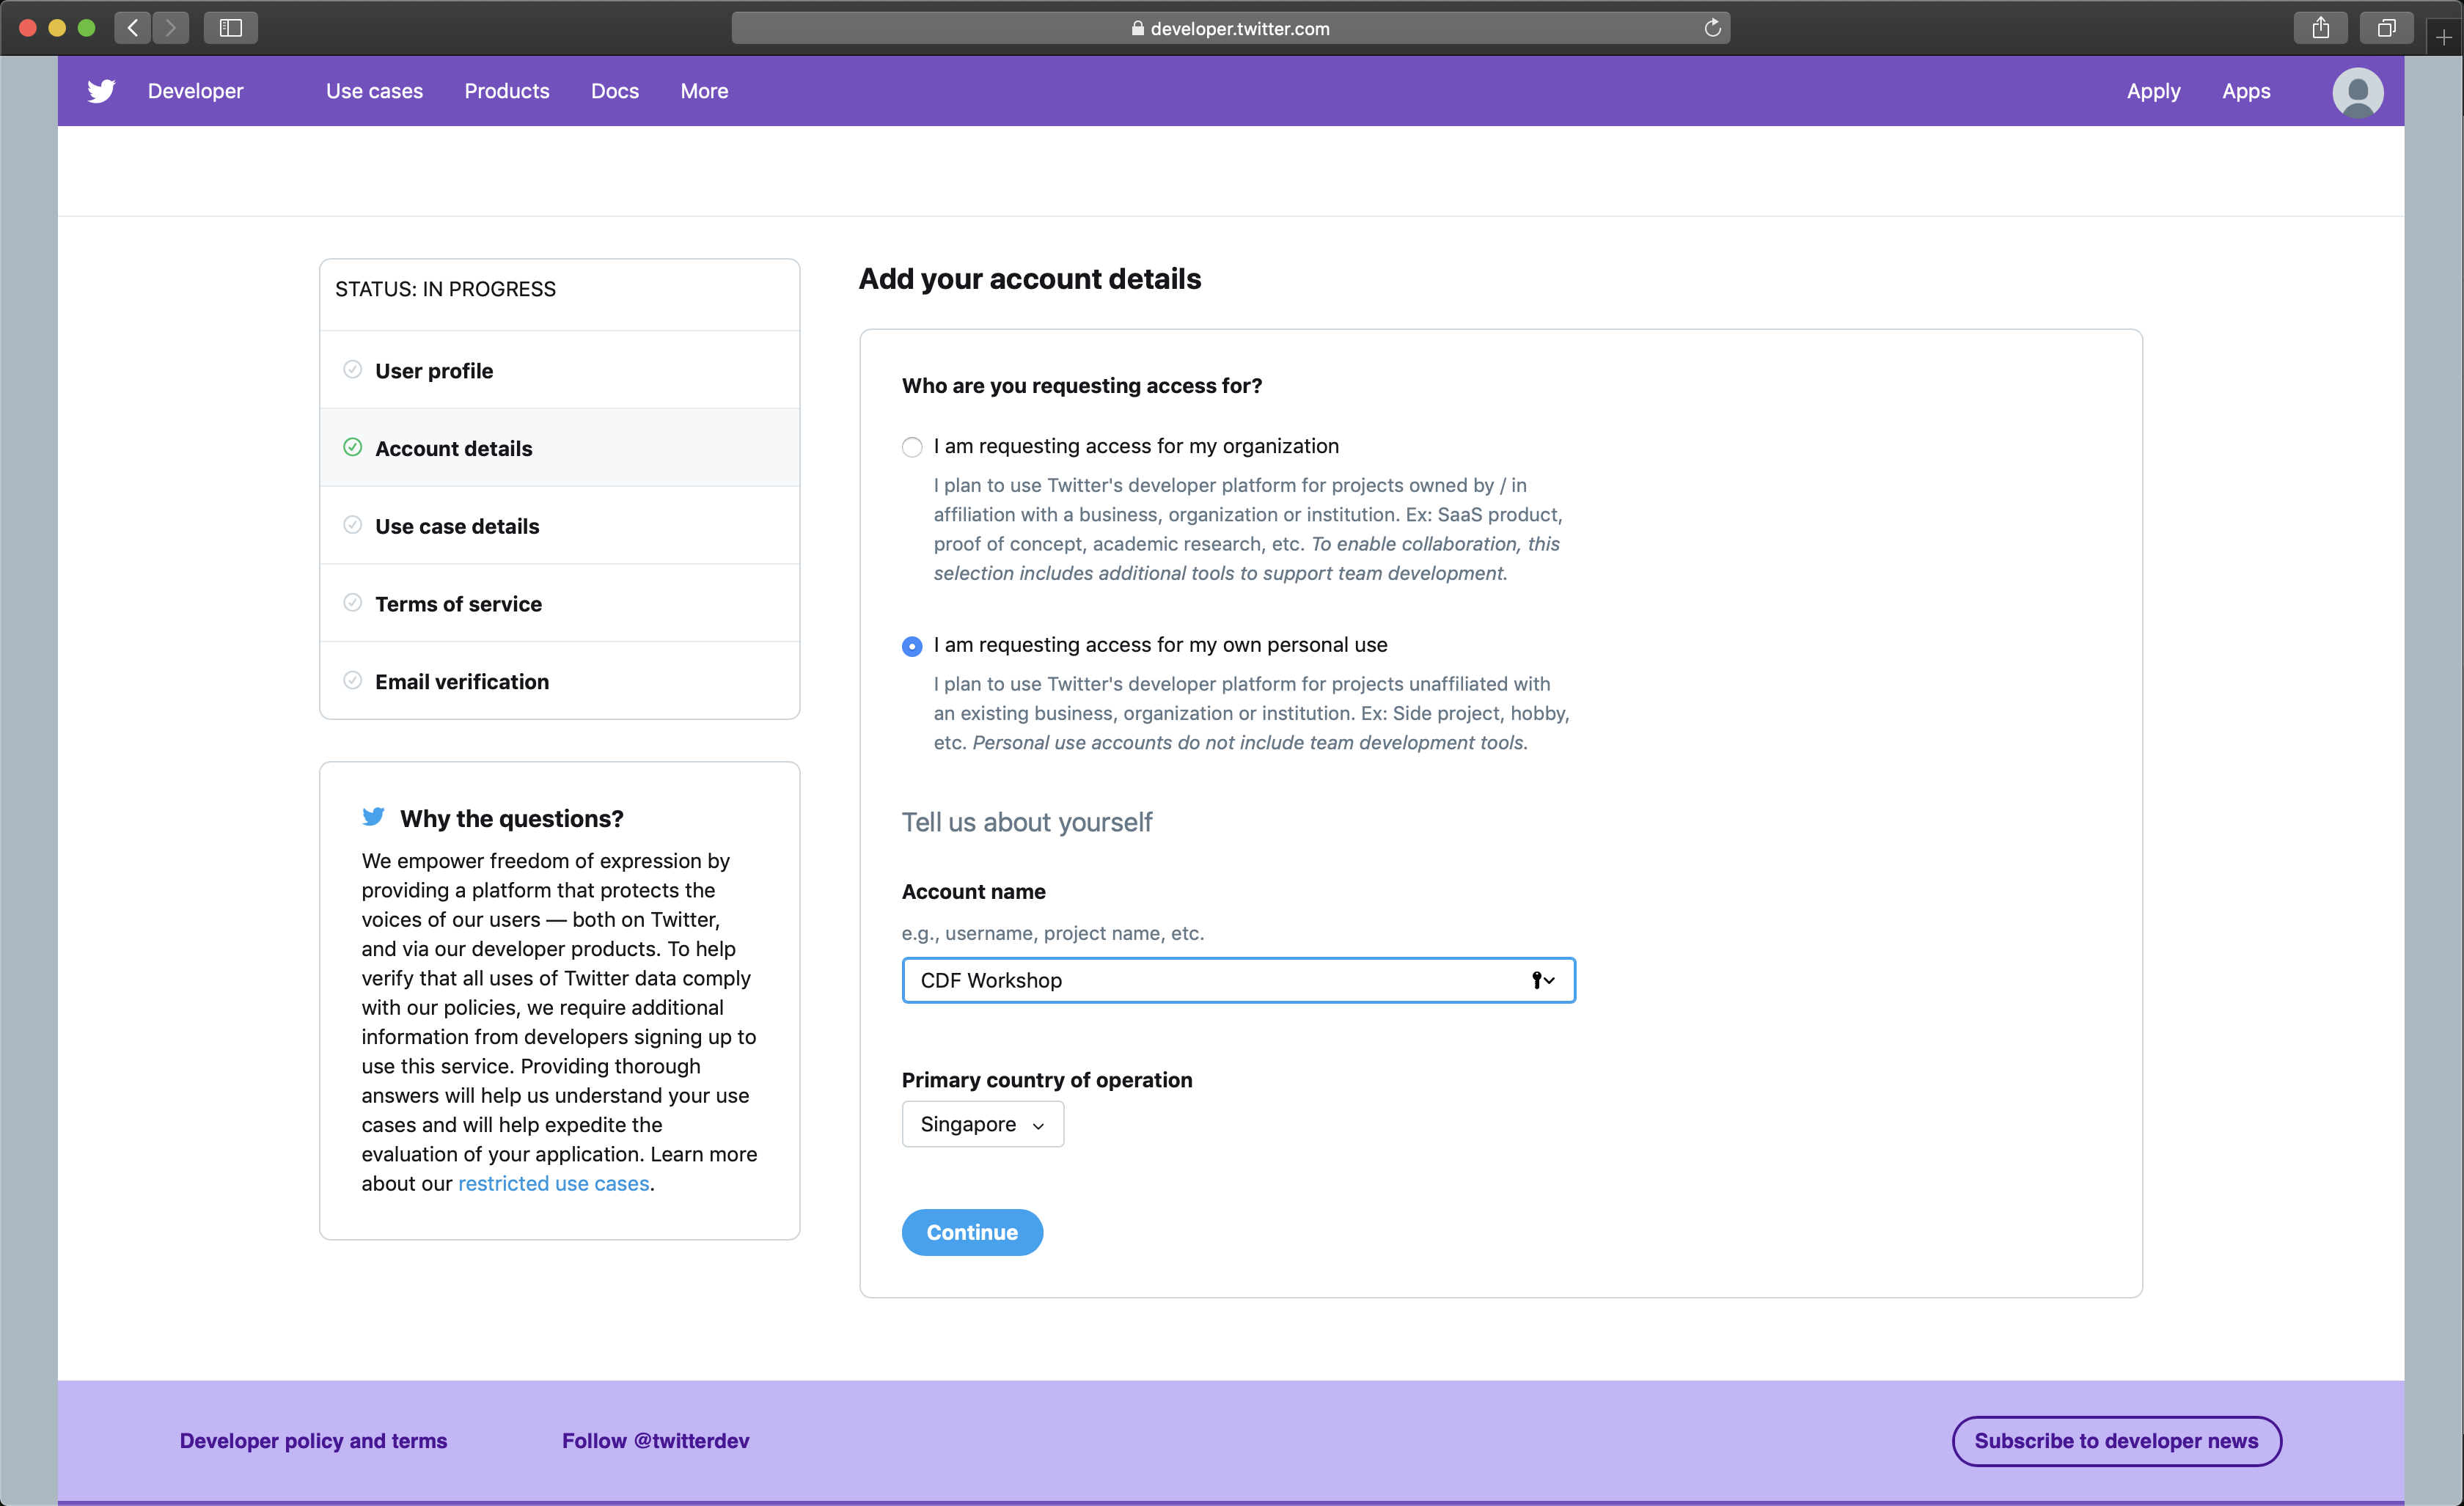
Visit Twitter developer page and click on Apply for a developer account. If you don't have a Twitter account, sign up.
After you have added a valid email address, follow the different account creation steps
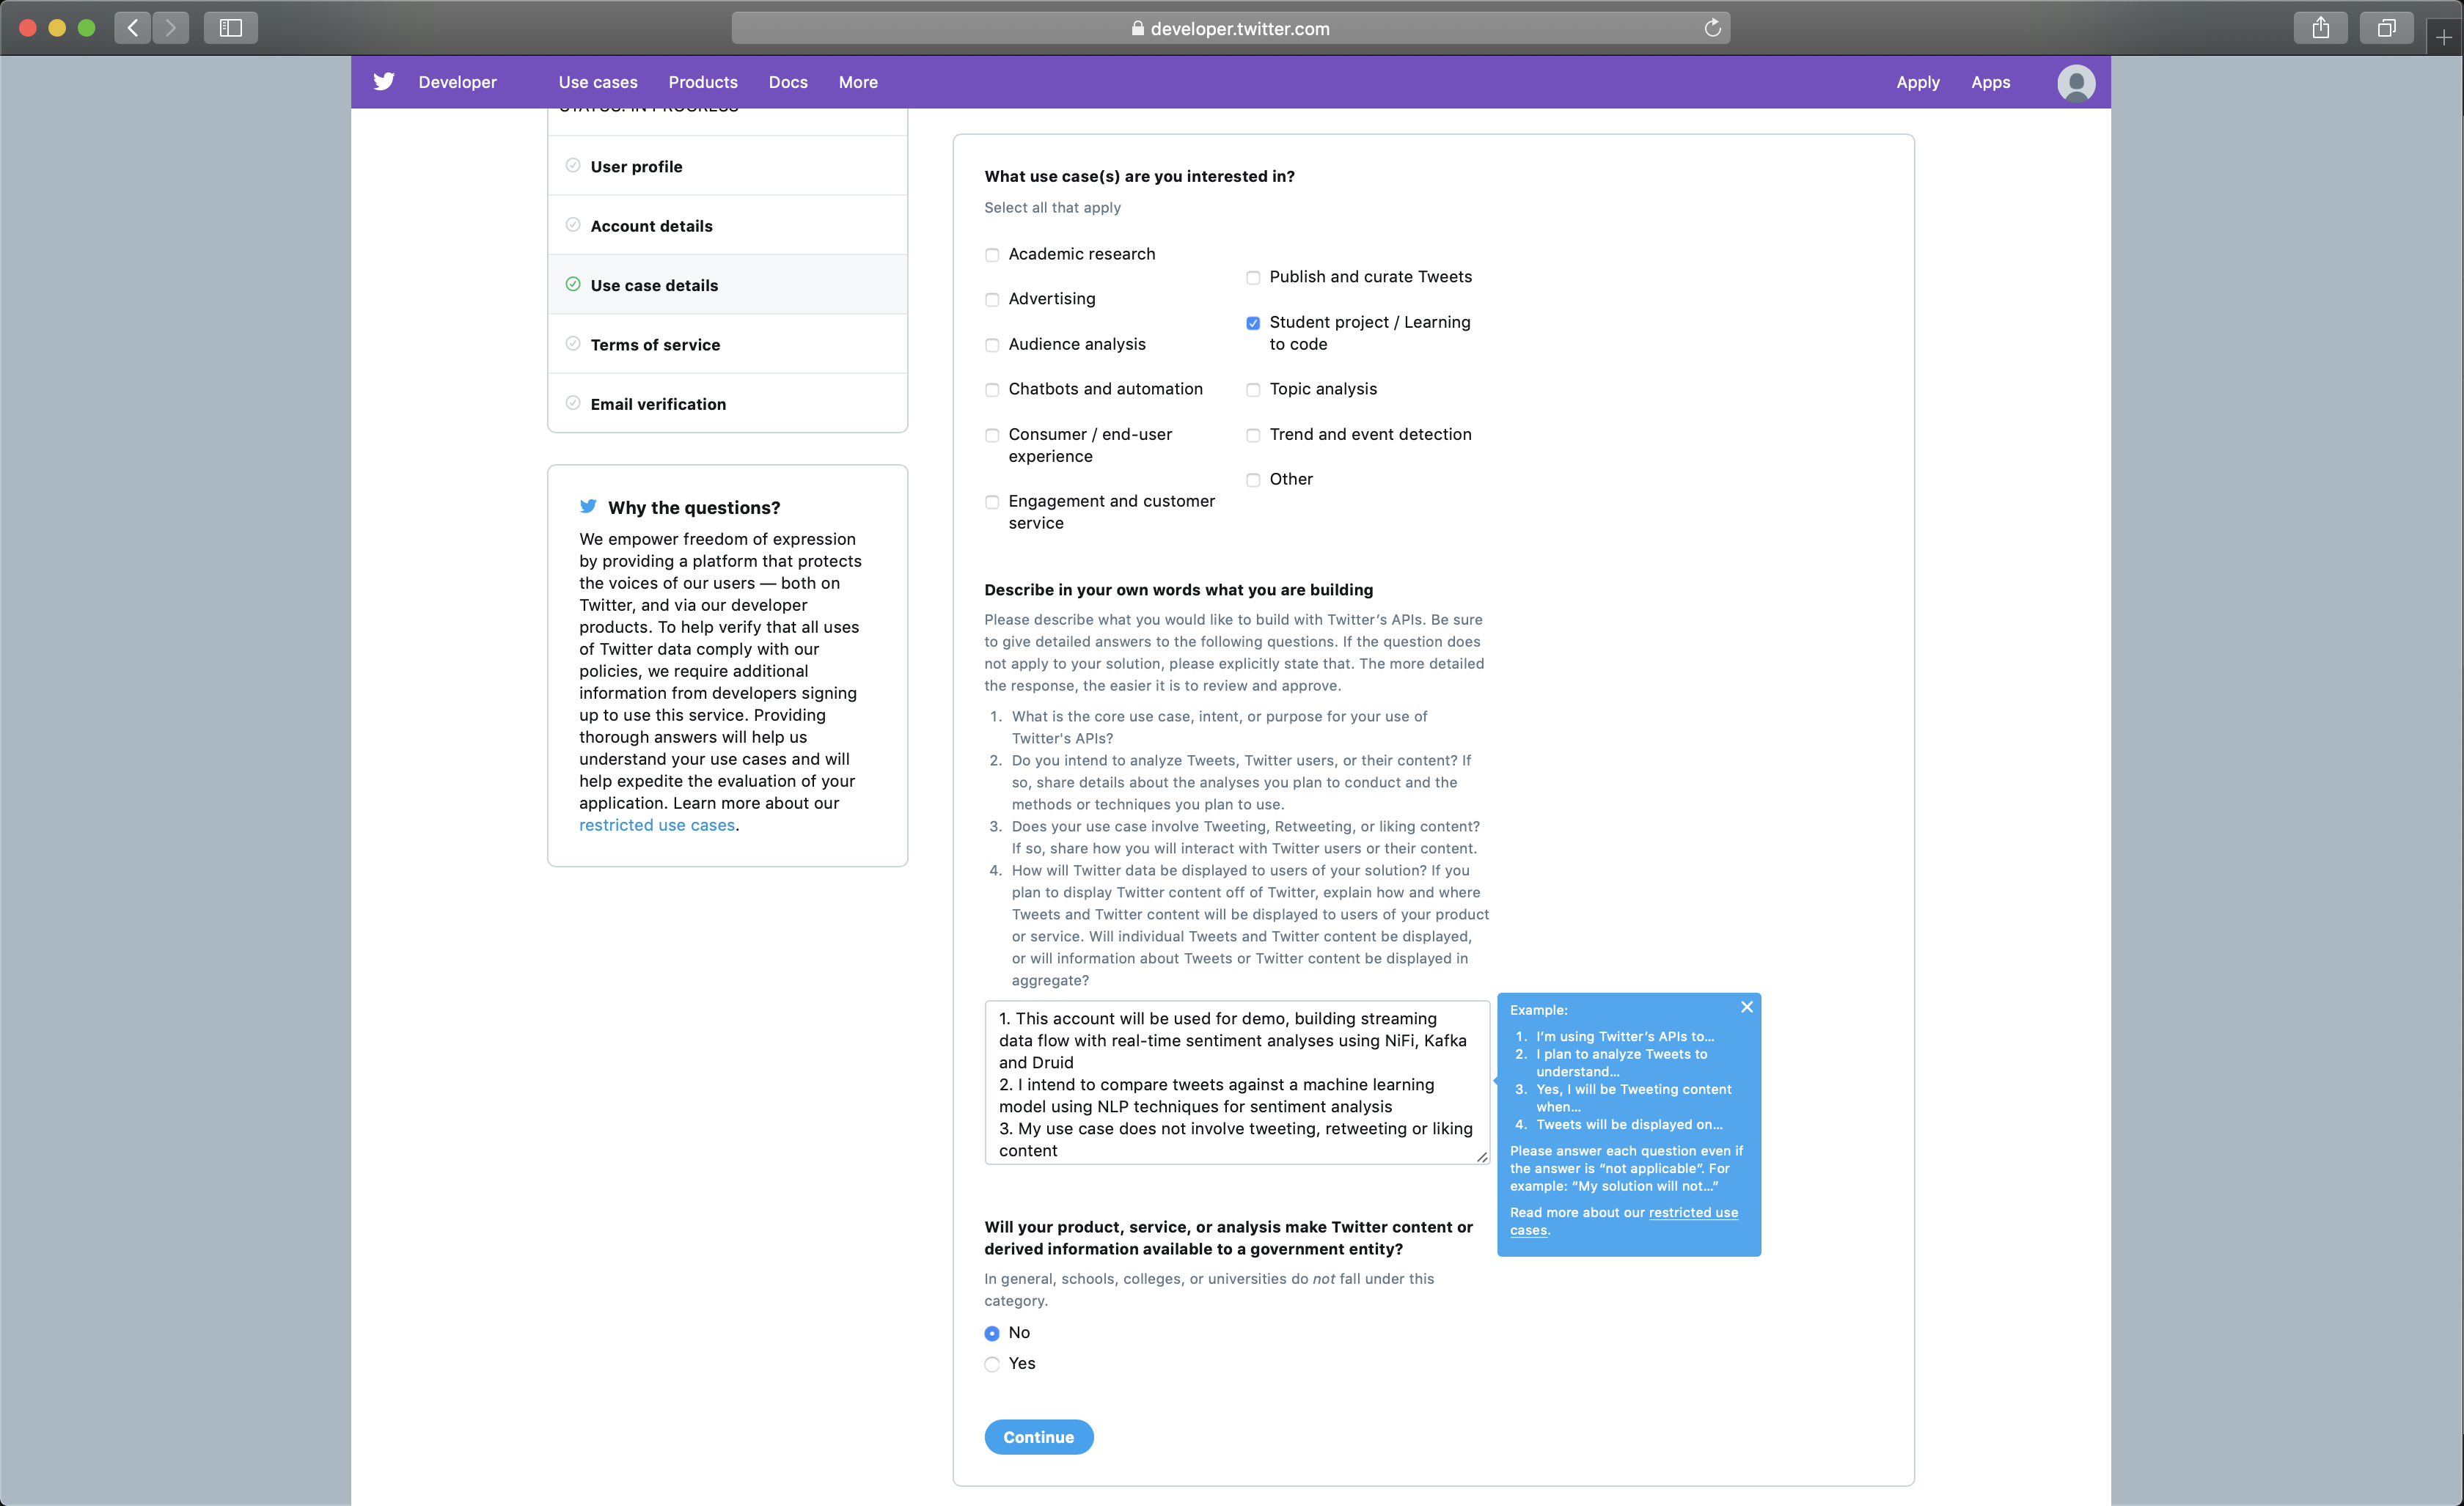
For the use case details, you can reuse the text below:
1. This account will be used for demo, building streaming data flow with real-time sentiment analyses using NiFi, Kafka and Druid
2. I intend to compare tweets against a machine learning model using NLP techniques for sentiment analysis
3. My use case does not involve tweeting, retweeting or liking content
4. Individual tweets will not be displayed, data will be aggregated per sentiment: very negative, negative, neutral, positive and very positive
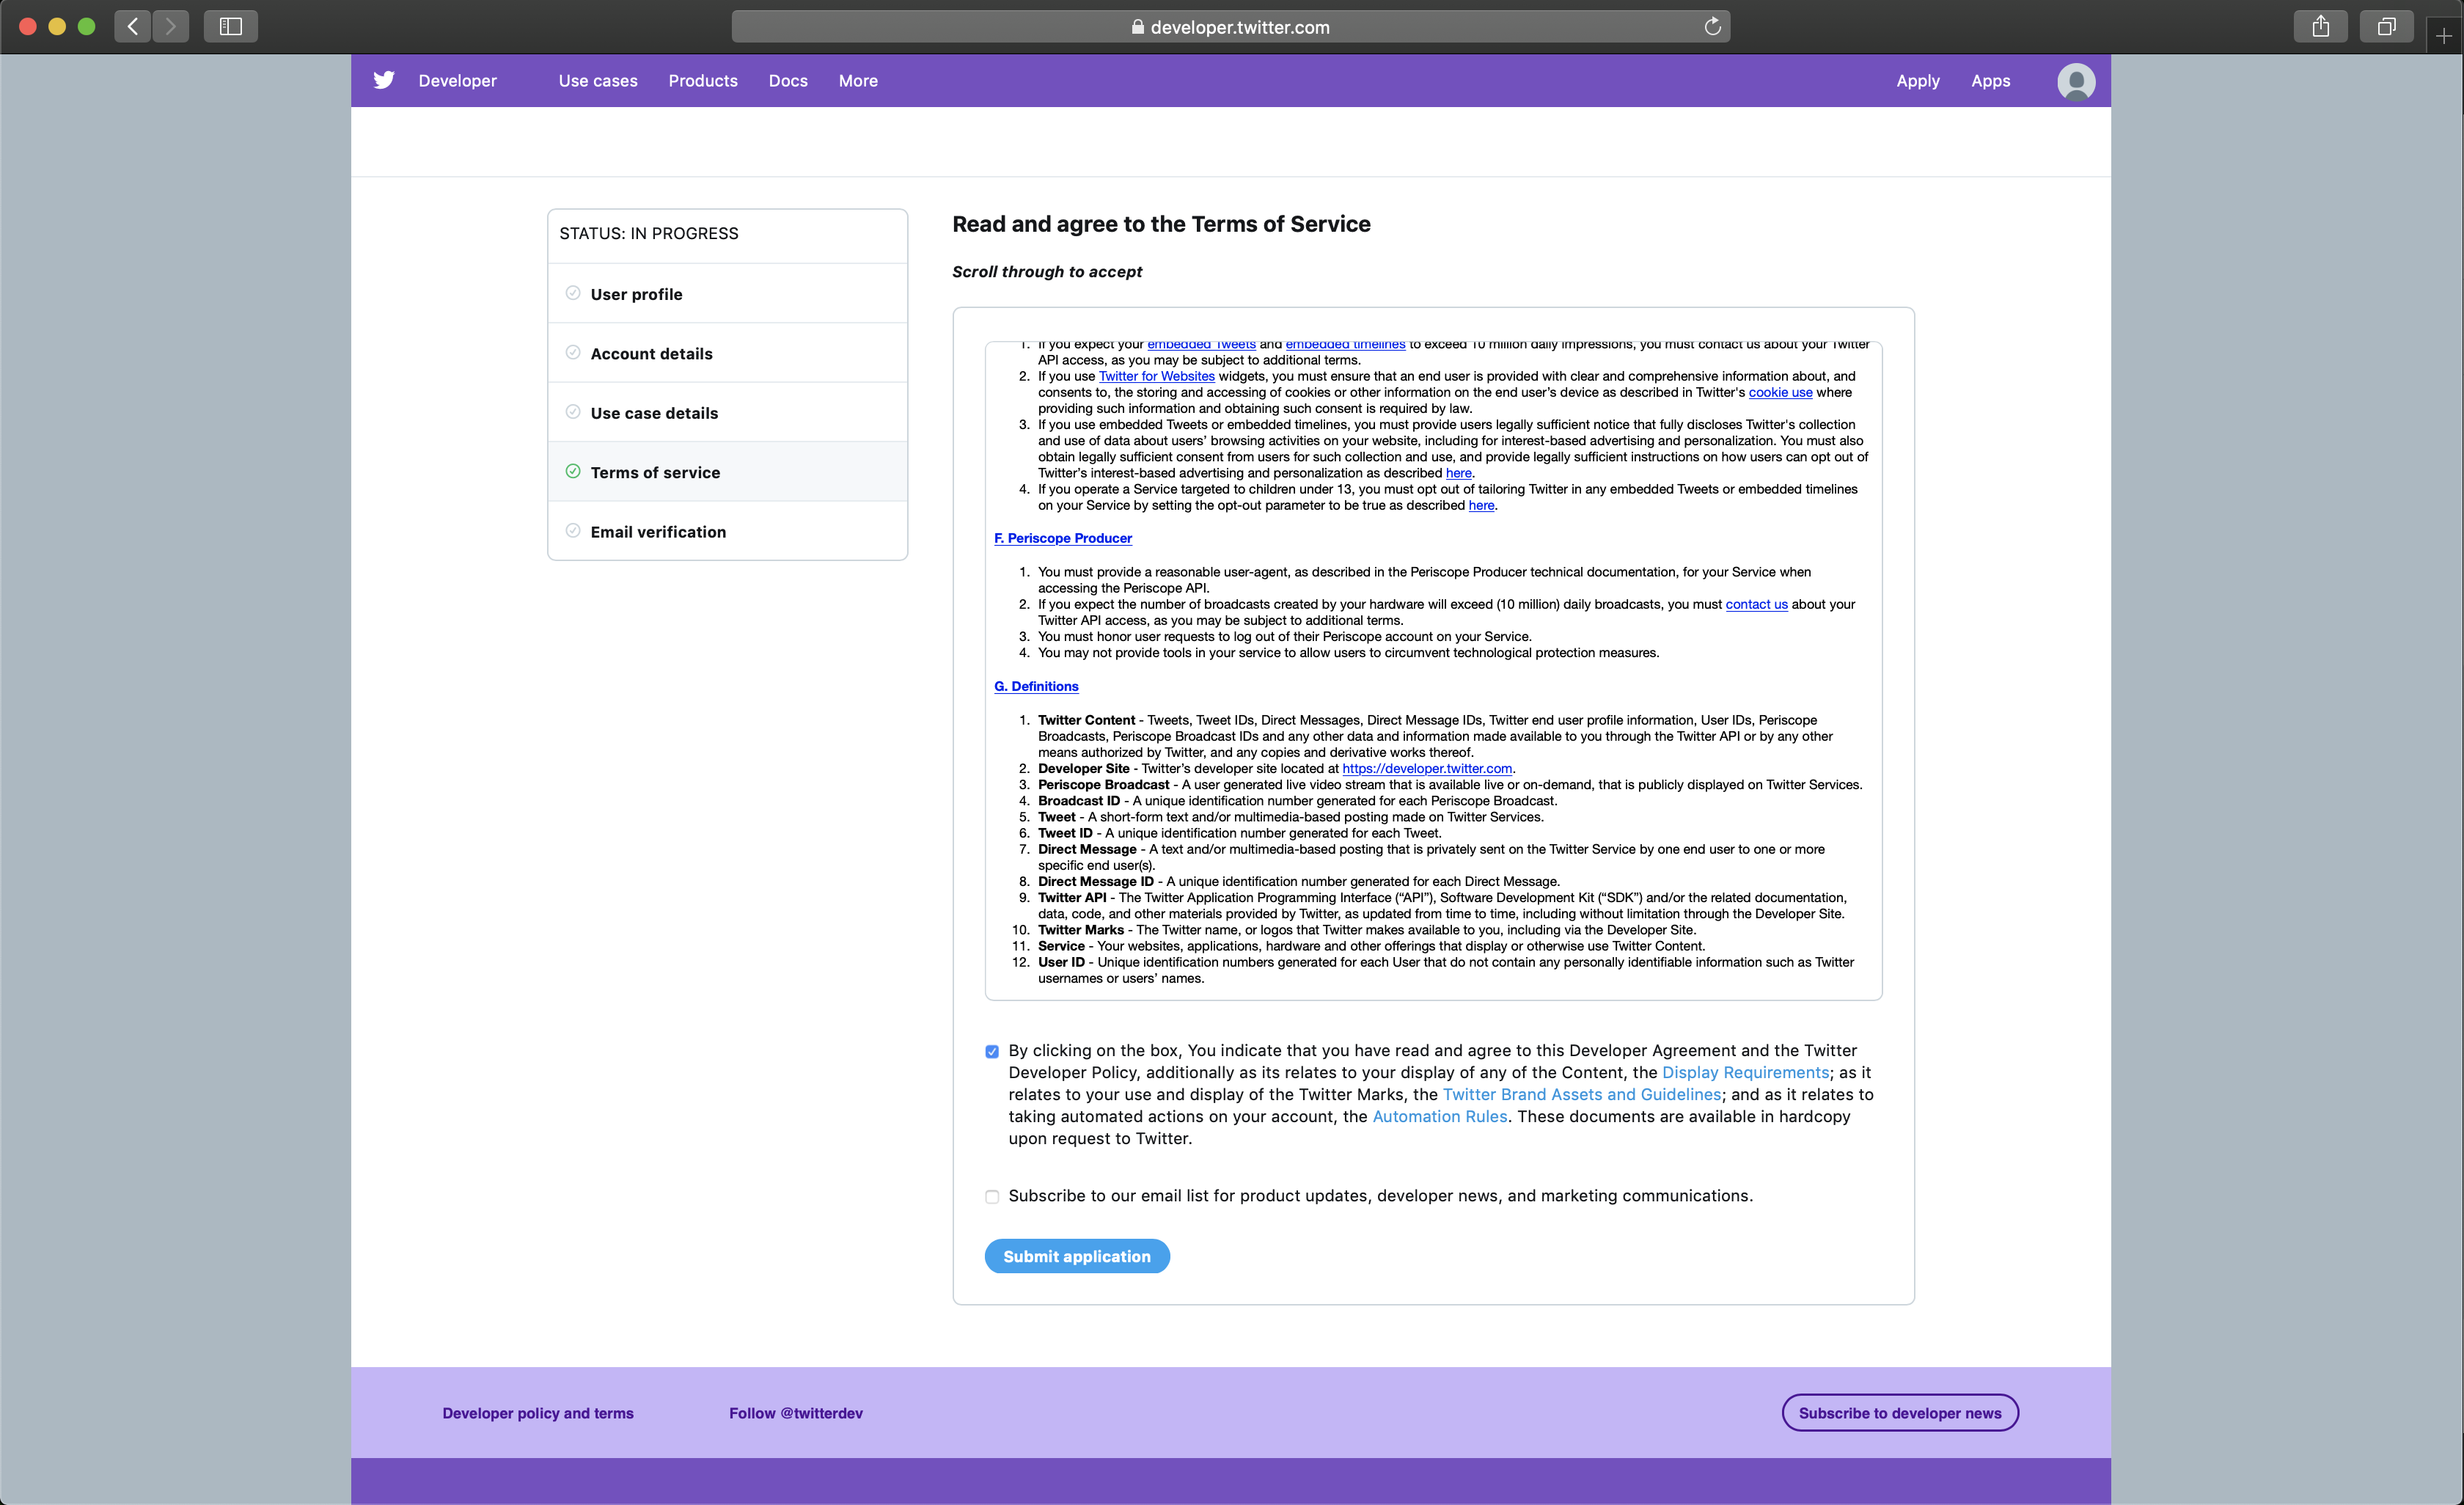
Agree to the Terms of Services
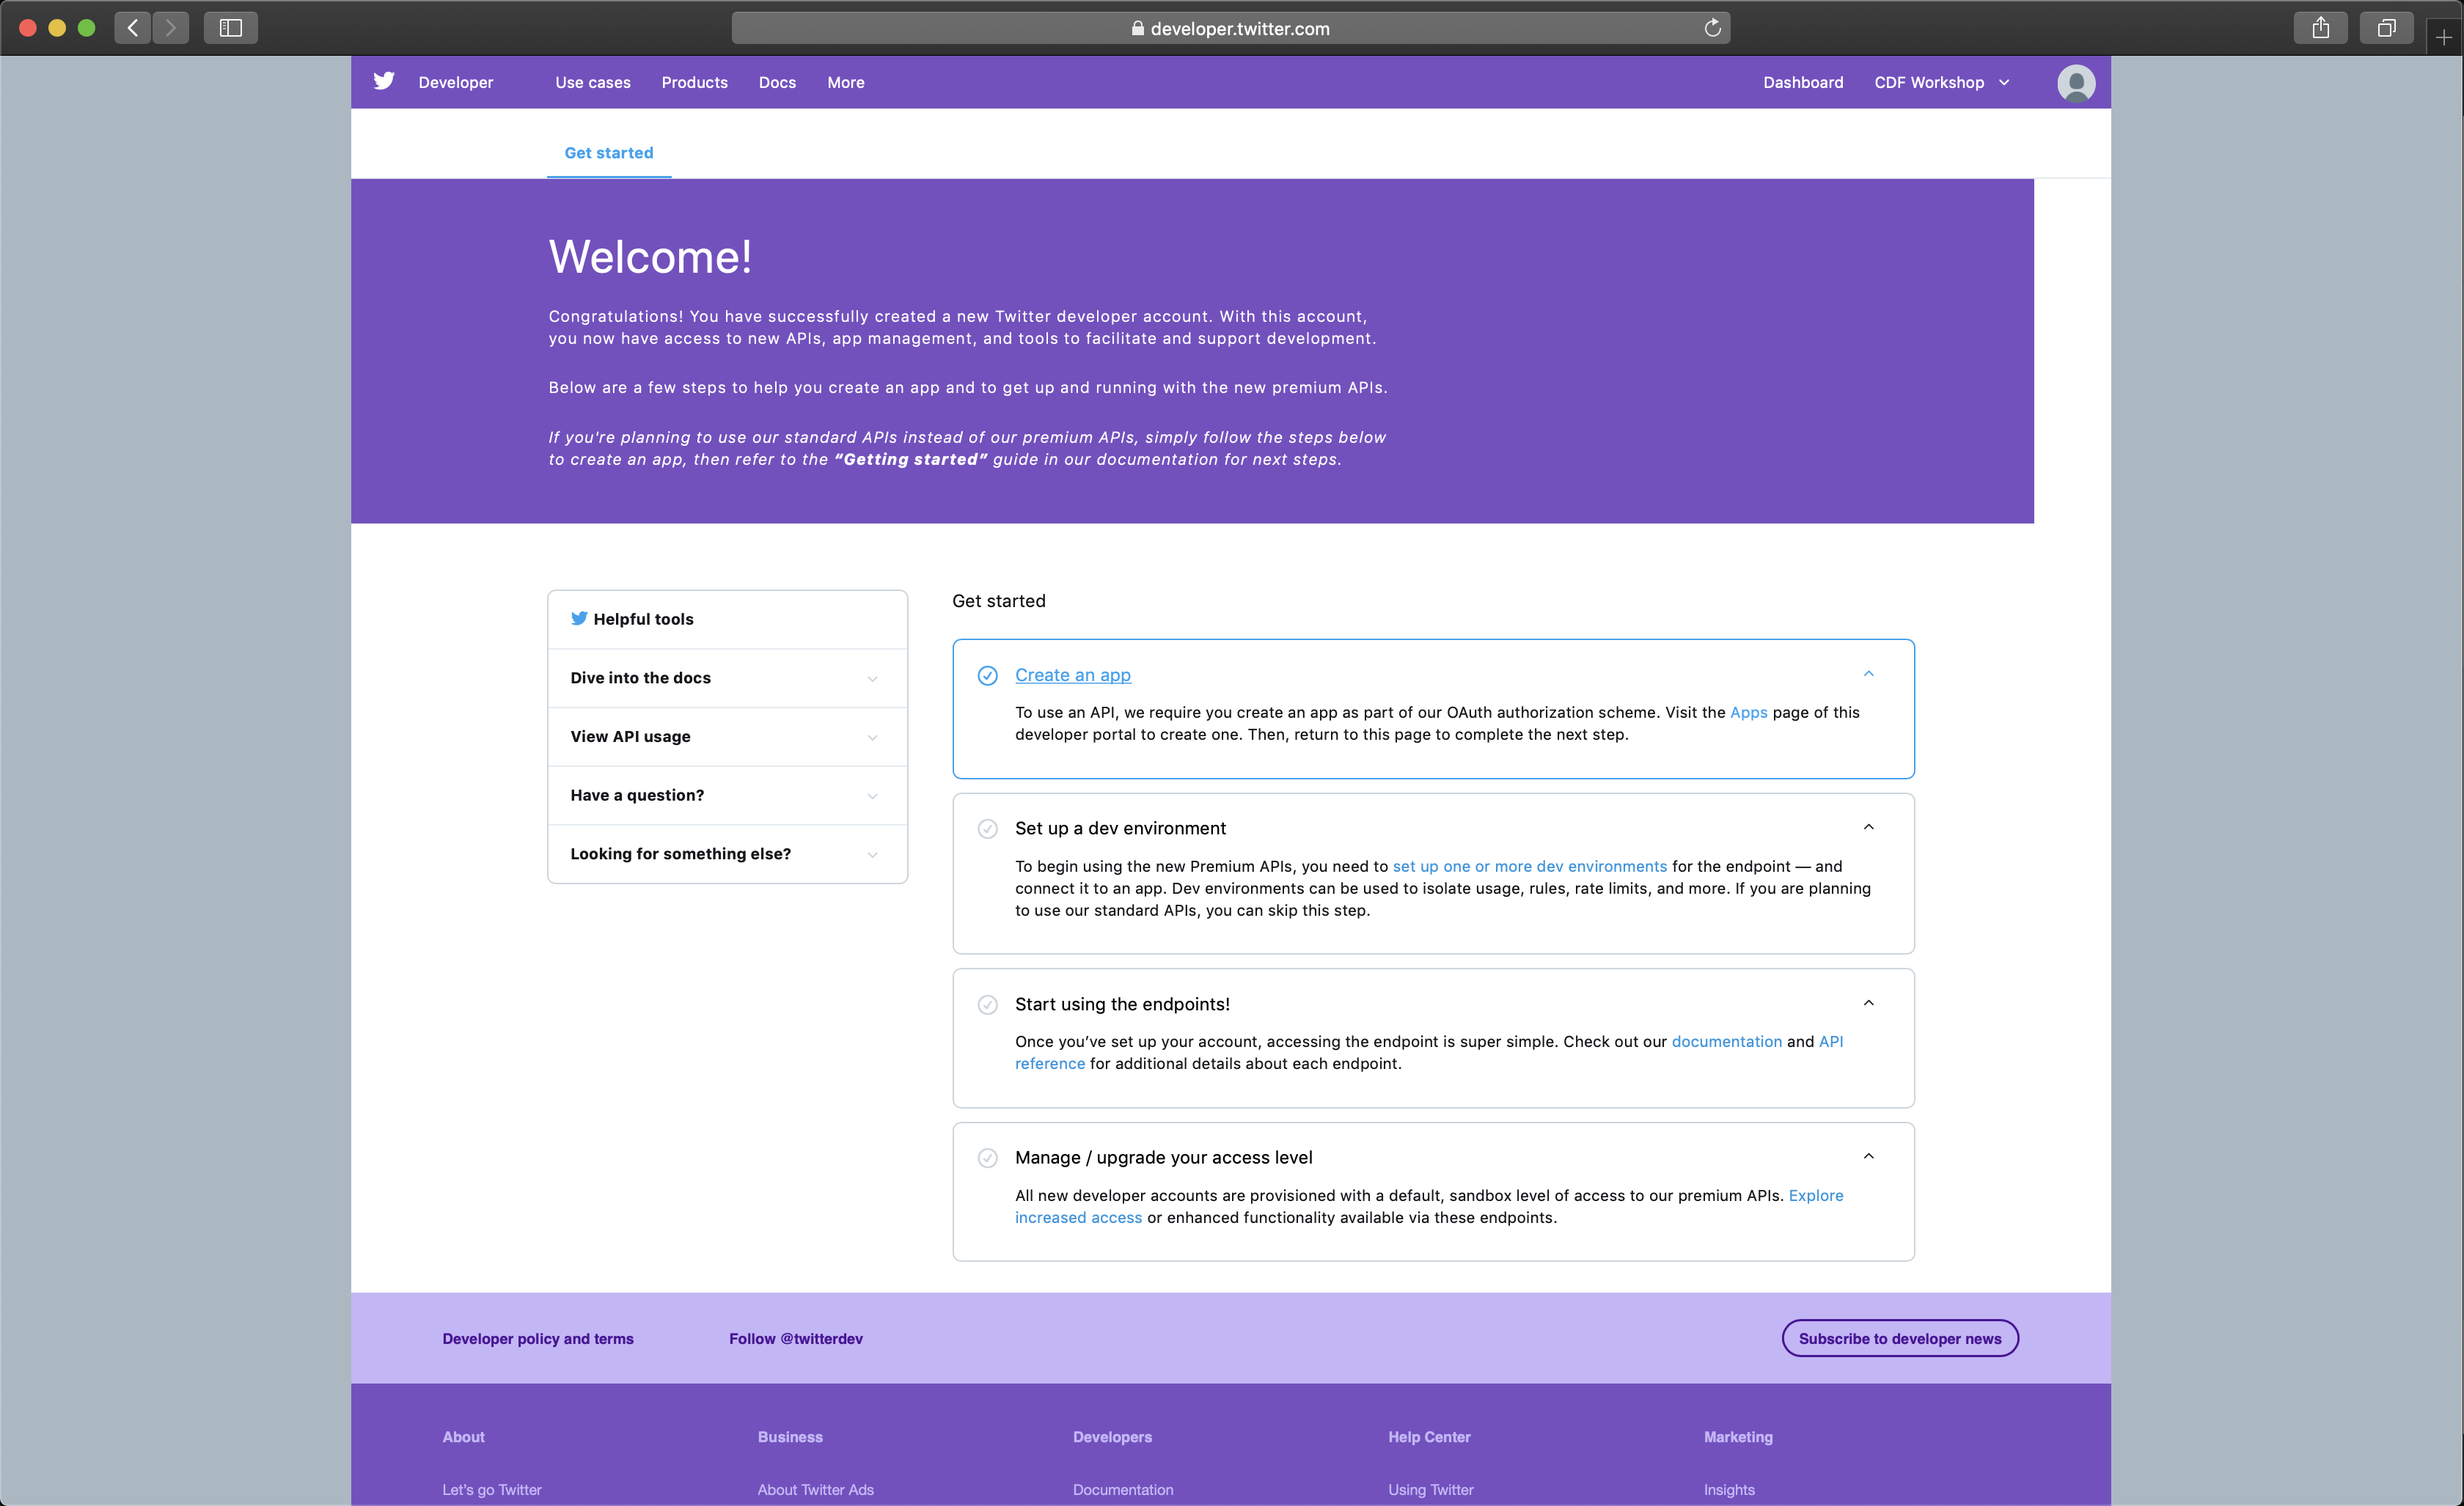
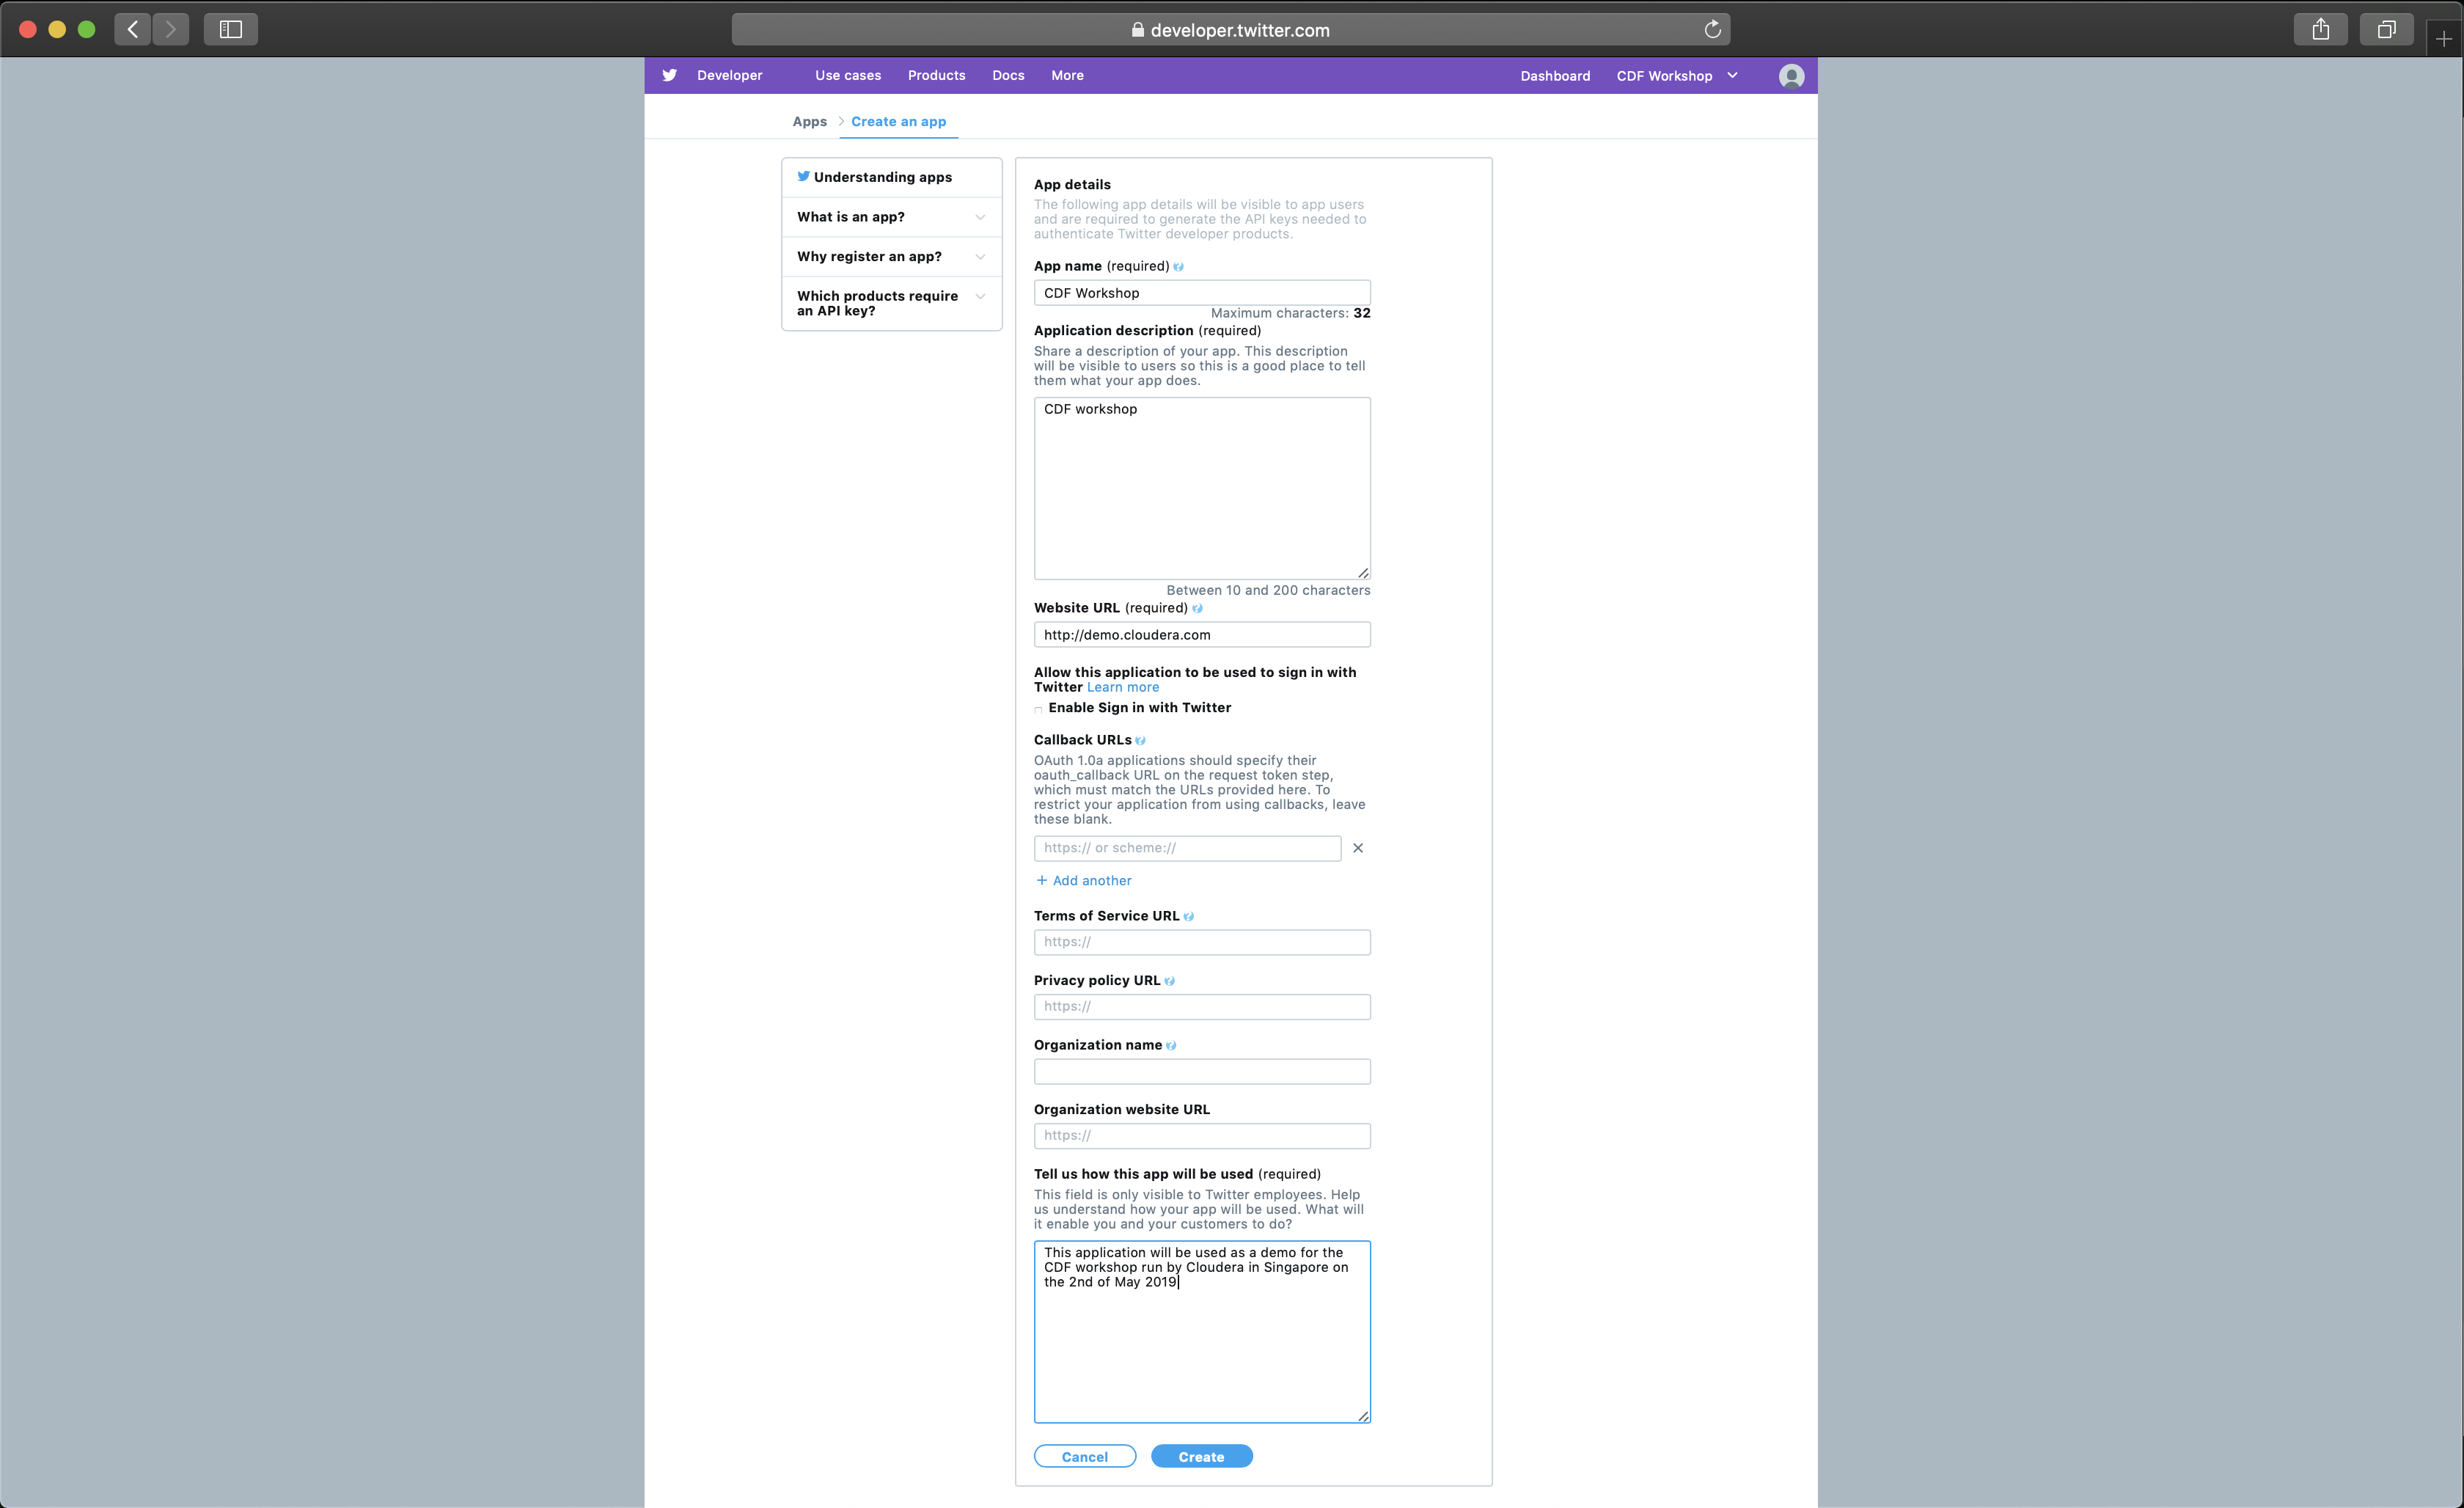
Finally click on the link from the email you have received and create an app
Finally create the Keys and Tokens that will be needed by the NiFi processor to pull Tweets using the Twitter API
