Here you can learn the basics principles behind Aseprite.
In Aseprite, a sprite consists of a sequence of frames and a stack of layers. The intersection of frames and layers creates an array of editable graphic cels, which are represented in this way on the timeline.
Your timeline will look something like this:
A frame is a single still image in a sprite. Adding and altering frames creates a sequence of images called an animation. The details of how Aseprite cycles through frames is described in greater detail in the animation section. Frames are represented horizontally in the timeline, from left to right.
Each frame's image is produced from a stack of one or more layers, represented in order from bottom to top on the timeline. Layers at the top of the timeline are drawn first, and every subsequent layer is added over top of it. Layers assist you by divide a single complex image into separate graphic component parts.
Each frame-layer intersection is called a cel. The contents of any specific cel may be moved, edited, and deleted without effecting the contents of other cels, which make them ideal for isolating and editing specific elements of a graphic while preserving parts that do not change.
The basic workflow is:
- Create a new sprite from File > New menu.
- Draw with pencil tool
 using
using
Left clickorRight click, and pick colors from the color bar using those same buttons. - Save your work from File > Save menu as an
.asefile to preserve all your image information (layers, frames, etc.. Also stores certain workspace preferences.). - Export your sprite as a
.giffile to publish your image on a website, as a numbered sequence of individual.pngfiles (one file per frame), or as a single.pngfile with all frames arranged in a single row or column, or as a 2-D sprite sheet.
You may choose from any of several other file formats during Save As and _Export _as well, depending on your colour depth choices and personal preferences!)
See the workspace to know more about the elements in the window. See workflow section for more details.
You should put your left hand on the keyboard (or your right hand if you are left-handed). As there are some handy keyboard shortcuts, you can use them from the very beginning to make a better use of Aseprite:
- Keys
1,2,3,4,5, and6can be used to change the zoom (you can use the Mouse Wheel to change zoom too). Bkey is the Pencil tool, andMthe rectangular marquee, maybe the most common tools that you will use.Alt+clickallows you to pick colours from the active image using the Eyedropper tool :
:
Alt+Left clicksamples the Foreground Color,Alt+Right clicksamples the Background Color.- The
Ctrlkey (or⌘on Mac OS X) can be used to select the Move tool .
With it you can easily select or move layers.
 - The
Tabkey hides and reveals the timeline. If your timeline is ever missing, this is the fastest way to reveal it! - Holding
Spacebaras youLeft click+Dragwill pan your view of the sprite you are currently editing. Useful when you're working on large graphics or are zoomed-in.
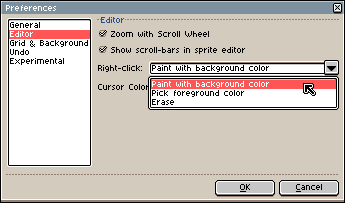
By default, Right click paints with the Background Color,
but you can change this configuration from Edit > Preferences > Editor:
SEE ALSO
