- Demo | Paper
- Updates
- Introduction to MarkLLM
- Repo contents
- How to use the toolkit in your own code
- More user examples
- Demo jupyter notebooks
- Citations
- Demo: We utilize Google Colab as our platform to fully publicly demonstrate the capabilities of MarkLLM through a Jupyter Notebook.
- Website Demo: We have also developed a website to facilitate interaction. Due to resource limitations, we cannot offer live access to everyone. Instead, we provide a demonstration video.
- Paper:''MarkLLM: An Open-source toolkit for LLM Watermarking'' by Leyi Pan, Aiwei Liu, Zhiwei He, Zitian Gao, Xuandong Zhao, Yijian Lu, Binglin Zhou, Shuliang Liu, Xuming Hu, Lijie Wen, Irwin King
- 🎉 (2024.07.03) Updated Back-Translation Attack. Thanks to Zihan Tang for his PR!
- 🎉 (2024.06.19) Updated Random Walk Attack from the impossibility results of strong watermarking paper at ICML, 2024. (Blog). Thanks to Hanlin Zhang for his PR!
- 🎉 (2024.05.23) We're thrilled to announce the release of our website demo!
MarkLLM is an open-source toolkit developed to facilitate the research and application of watermarking technologies within large language models (LLMs). As the use of large language models (LLMs) expands, ensuring the authenticity and origin of machine-generated text becomes critical. MarkLLM simplifies the access, understanding, and assessment of watermarking technologies, making it accessible to both researchers and the broader community.
-
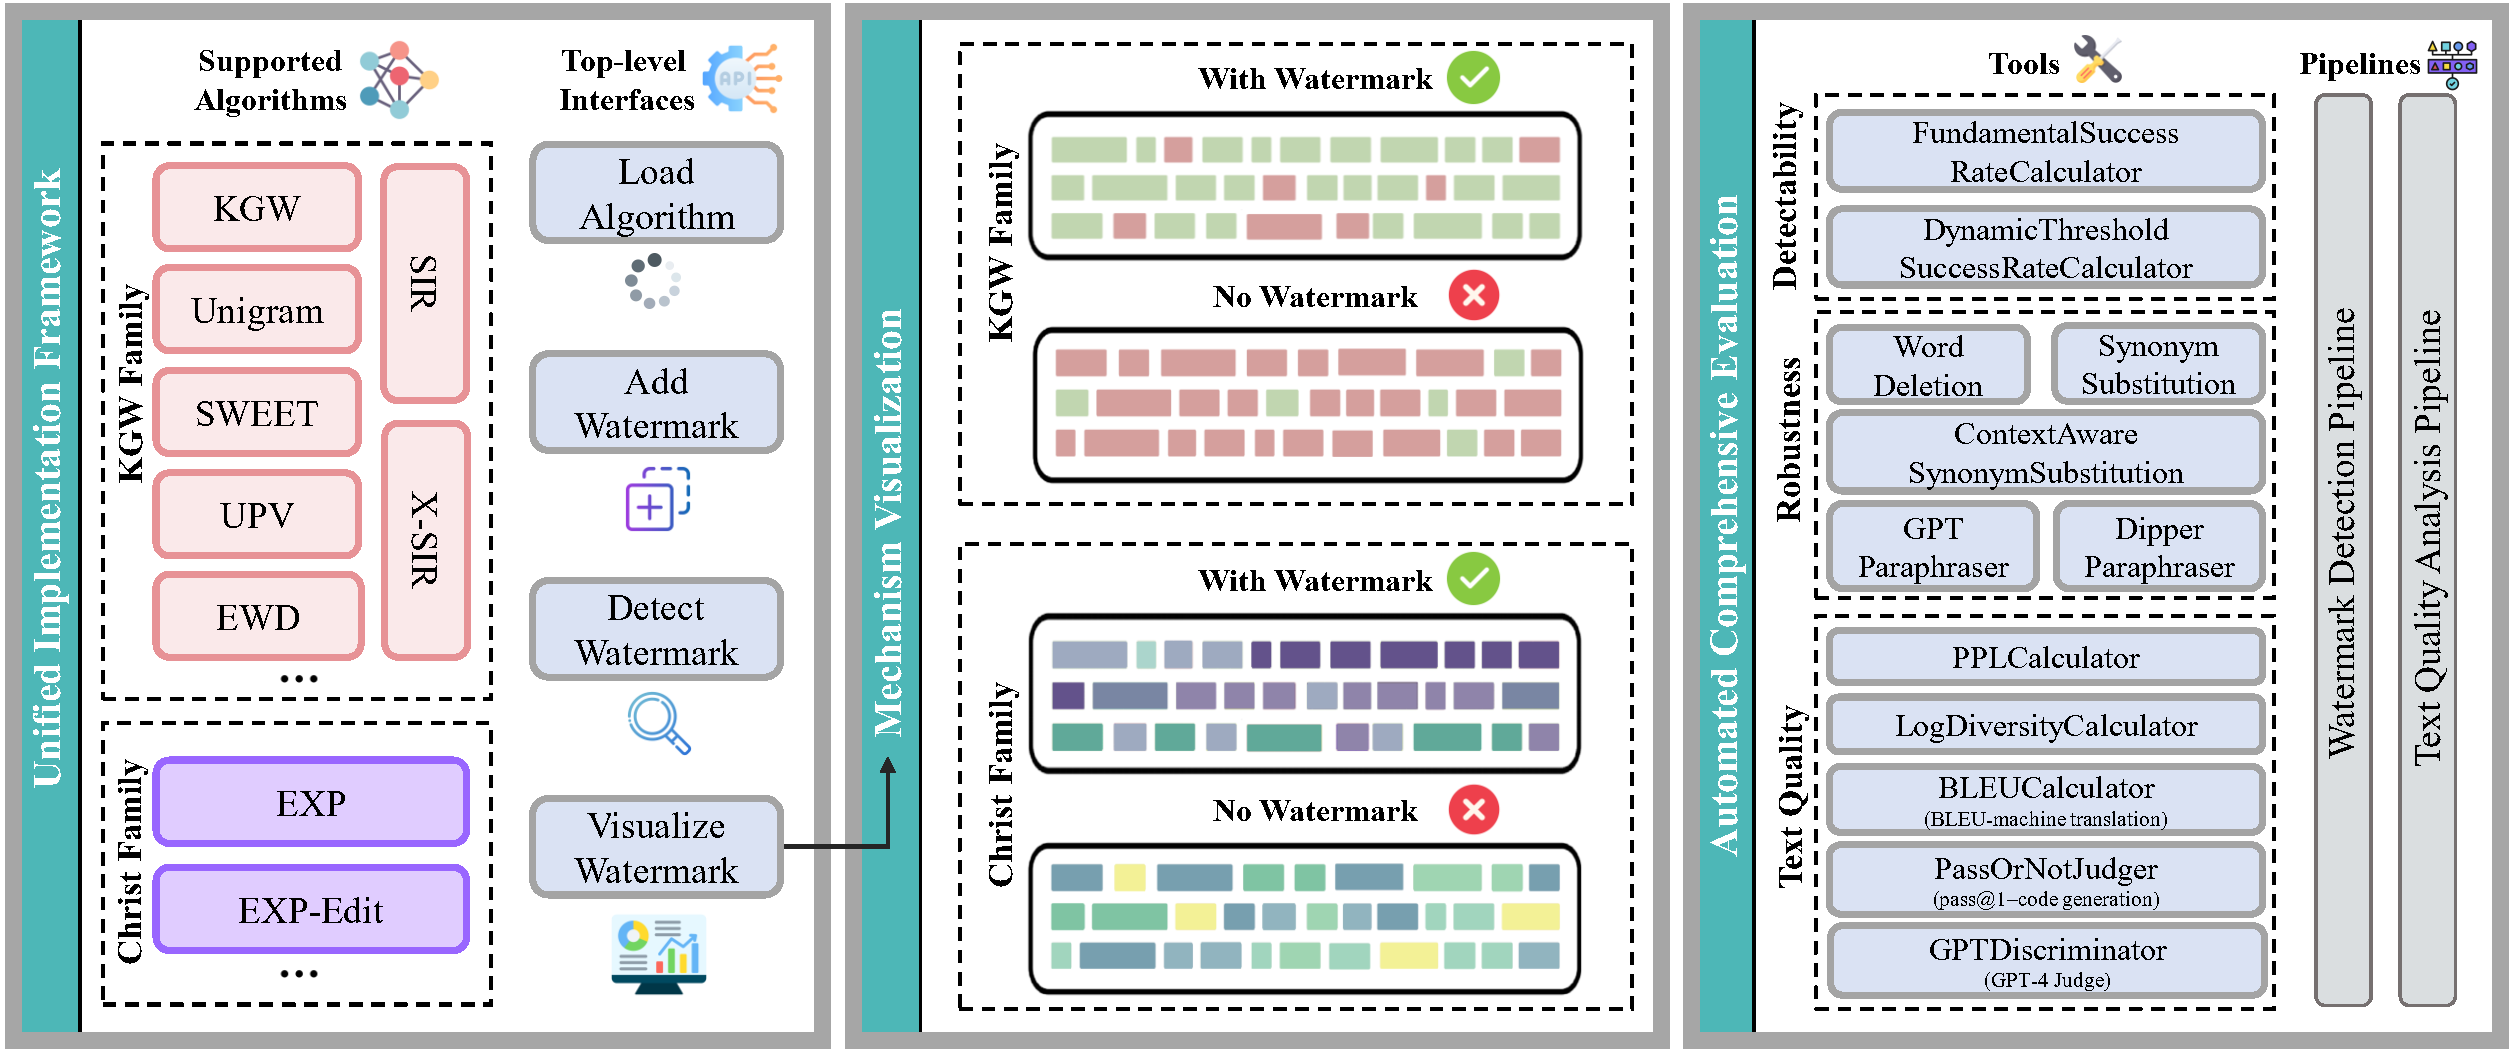
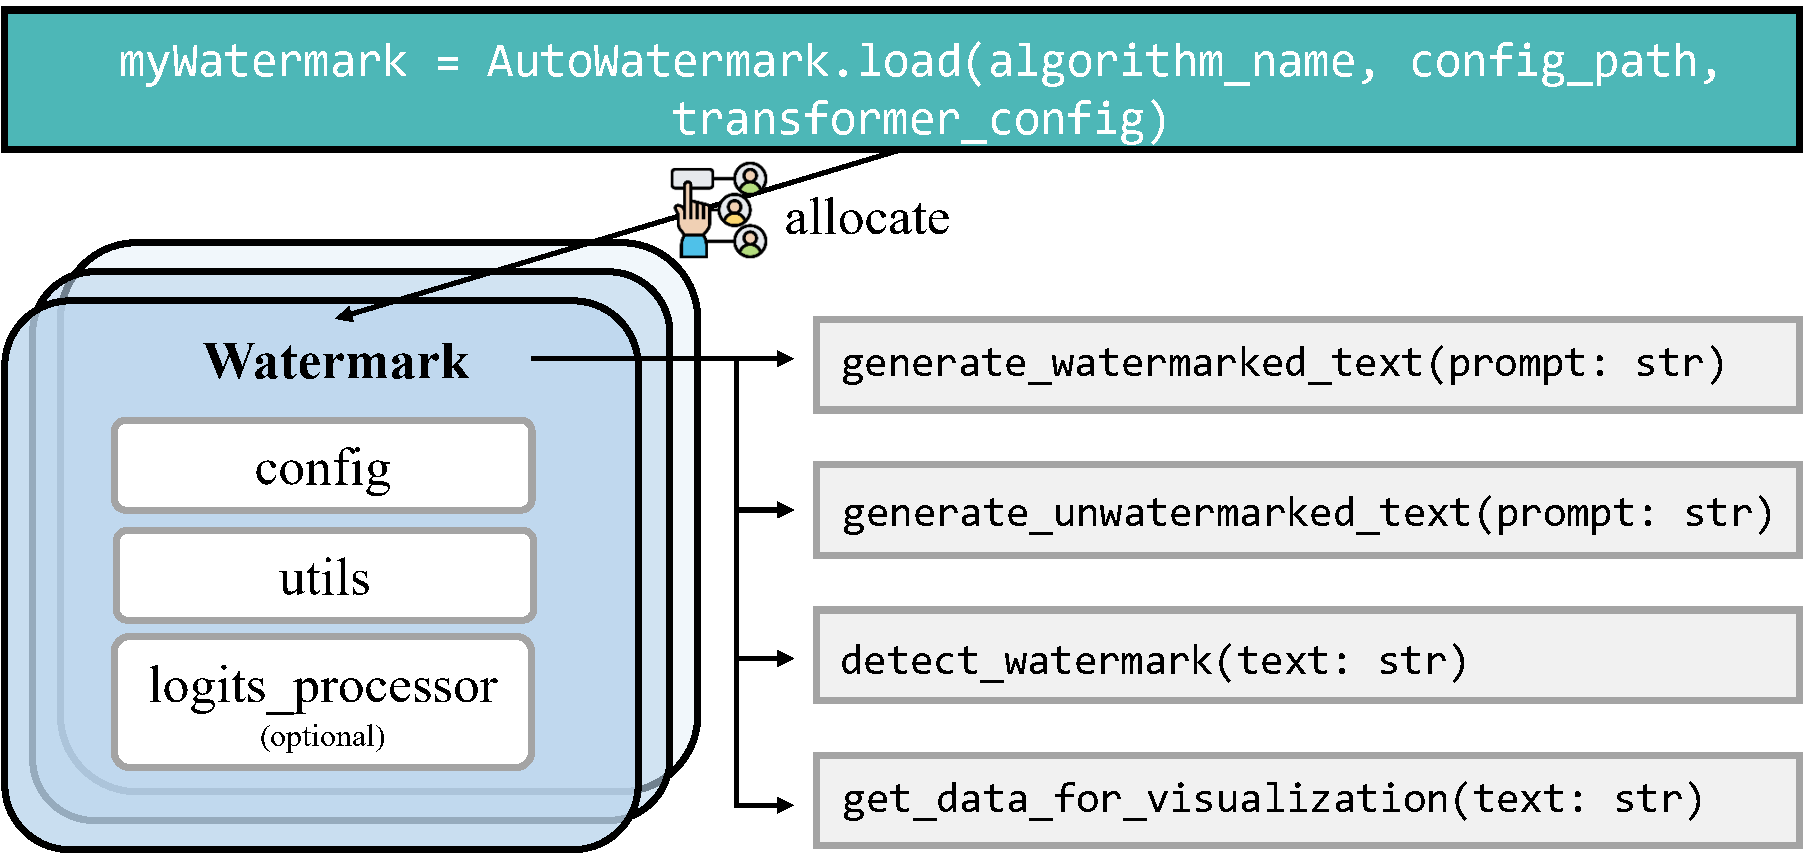
Implementation Framework: MarkLLM provides a unified and extensible platform for the implementation of various LLM watermarking algorithms. It currently supports nine specific algorithms from two prominent families, facilitating the integration and expansion of watermarking techniques.
Framework Design:
Currently Supported Algorithms:
Algorithm Name Family Link KGW KGW Family [2301.10226] A Watermark for Large Language Models (arxiv.org) Unigram KGW Family [2306.17439] Provable Robust Watermarking for AI-Generated Text (arxiv.org) SWEET KGW Family [2305.15060] Who Wrote this Code? Watermarking for Code Generation (arxiv.org) UPV KGW Family [2307.16230] An Unforgeable Publicly Verifiable Watermark for Large Language Models (arxiv.org) EWD KGW Family [2403.13485] An Entropy-based Text Watermarking Detection Method (arxiv.org) SIR KGW Family [2310.06356] A Semantic Invariant Robust Watermark for Large Language Models (arxiv.org) X-SIR KGW Family [2402.14007] Can Watermarks Survive Translation? On the Cross-lingual Consistency of Text Watermark for Large Language Models (arxiv.org) EXP Christ Family https://www.scottaaronson.com/talks/watermark.ppt EXP-Edit Christ Family [2307.15593] Robust Distortion-free Watermarks for Language Models (arxiv.org) -
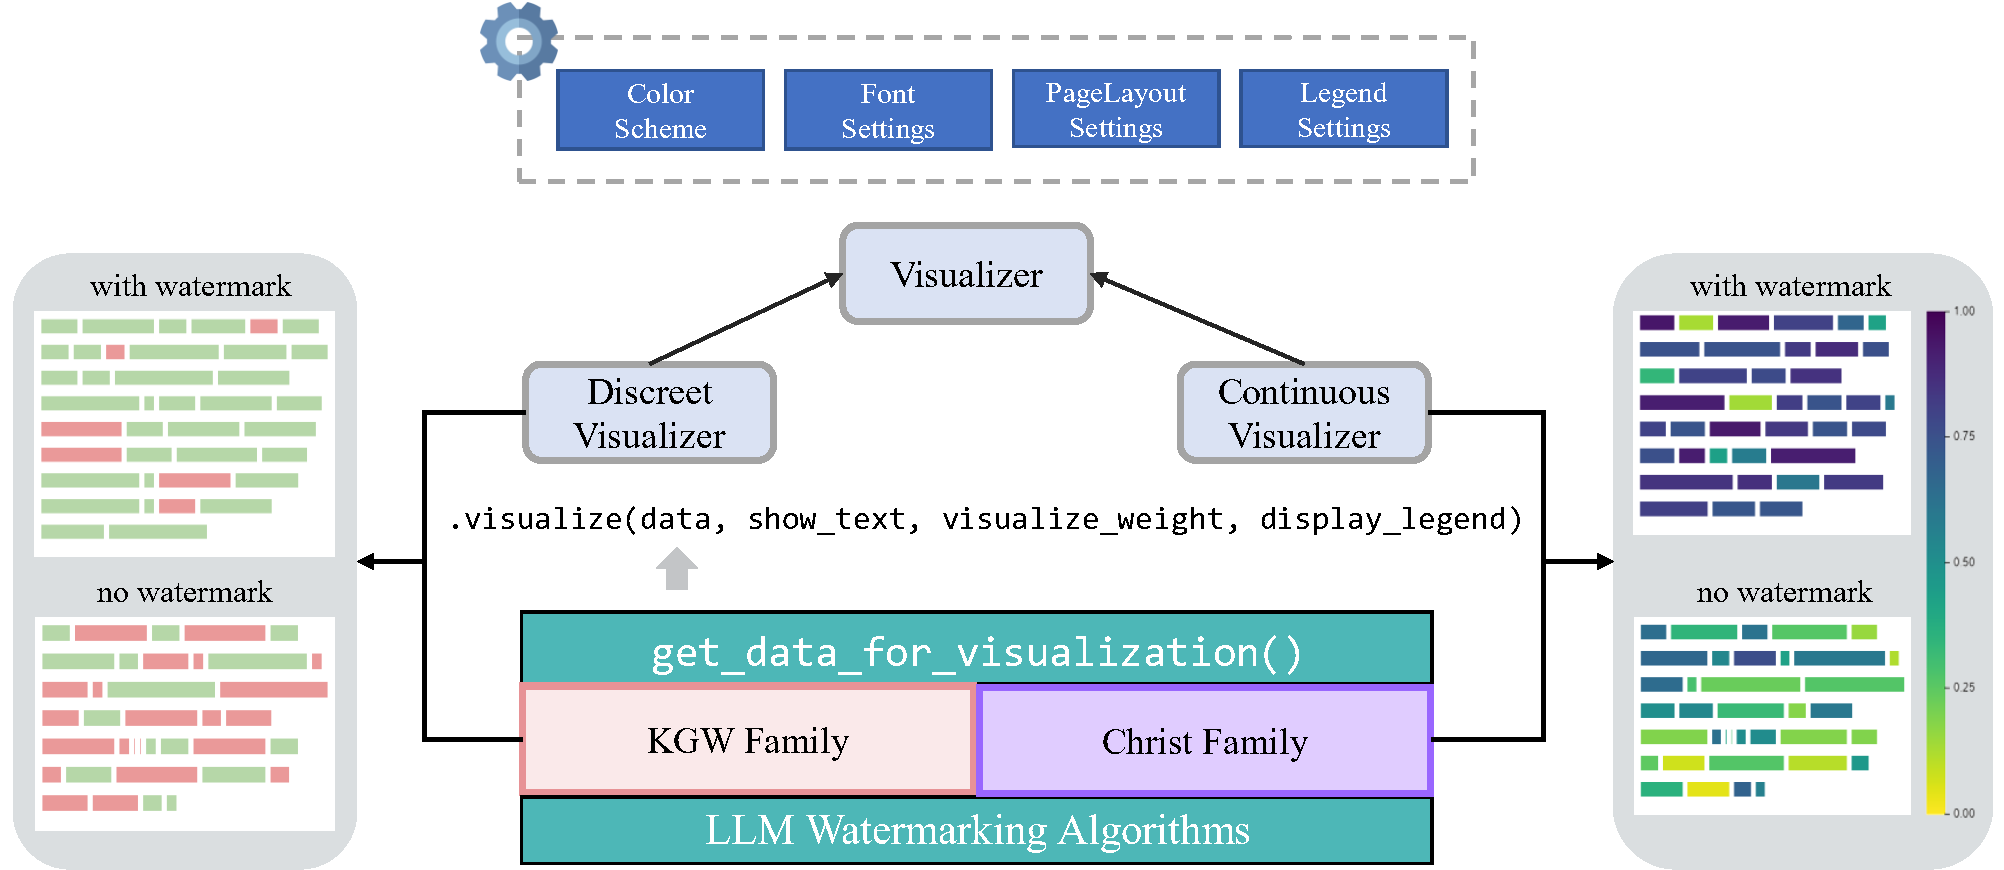
Visualization Solutions: The toolkit includes custom visualization tools that enable clear and insightful views into how different watermarking algorithms operate under various scenarios. These visualizations help demystify the algorithms' mechanisms, making them more understandable for users.

-
Evaluation Module: With 12 evaluation tools that cover detectability, robustness, and impact on text quality, MarkLLM stands out in its comprehensive approach to assessing watermarking technologies. It also features customizable automated evaluation pipelines that cater to diverse needs and scenarios, enhancing the toolkit's practical utility.
Tools:
- Success Rate Calculator of Watermark Detection: FundamentalSuccessRateCalculator, DynamicThresholdSuccessRateCalculator
- Text Editor: WordDeletion, SynonymSubstitution, ContextAwareSynonymSubstitution, GPTParaphraser, DipperParaphraser
- Text Quality Analyzer: PPLCalculator, LogDiversityAnalyzer, BLEUCalculator, PassOrNotJudger, GPTDiscriminator
Pipelines:
- Watermark Detection Pipeline: WatermarkedTextDetectionPipeline, UnwatermarkedTextDetectionPipeline
- Text Quality Pipeline: DirectTextQualityAnalysisPipeline, ReferencedTextQualityAnalysisPipeline, ExternalDiscriminatorTextQualityAnalysisPipeline
Below is the directory structure of the MarkLLM project, which encapsulates its three core functionalities within the watermark/, visualize/, and evaluation/ directories. To facilitate user understanding and demonstrate the toolkit's ease of use, we provide a variety of test cases. The test code can be found in the test/ directory.
MarkLLM/
├── config/                     # Configuration files for various watermark algorithms
│   ├── EWD.json
│   ├── EXPEdit.json
│   ├── EXP.json
│   ├── KGW.json
│   ├── SIR.json
│   ├── SWEET.json
│   ├── Unigram.json
│   ├── UPV.json
│   └── XSIR.json
├── dataset/                    # Datasets used in the project
│   ├── c4/
│   ├── human_eval/
│   └── wmt16_de_en/
├── evaluation/                 # Evaluation module of MarkLLM, including tools and pipelines
│   ├── dataset.py              # Script for handling dataset operations within evaluations
│   ├── examples/               # Scripts for automated evaluations using pipelines
│   │   ├── assess_detectability.py
│   │   ├── assess_quality.py
│   │   └── assess_robustness.py
│   ├── pipelines/              # Pipelines for structured evaluation processes
│   │   ├── detection.py
│   │   └── quality_analysis.py
│   └── tools/                  # Evaluation tools
│       ├── success_rate_calculator.py
│       ├── text_editor.py
│       └── text_quality_analyzer.py
├── exceptions/                 # Custom exception definitions for error handling
│   └── exceptions.py
├── font/                       # Fonts needed for visualization purposes
├── MarkLLM_demo.ipynb          # Jupyter Notebook
├── test/                       # Test cases and examples for user testing
│   ├── test_method.py
│   ├── test_pipeline.py
│   └── test_visualize.py
├── utils/                      # Helper classes and functions supporting various operations
│   ├── openai_utils.py
│   ├── transformers_config.py
│   └── utils.py
├── visualize/                  # Visualization Solutions module of MarkLLM
│   ├── color_scheme.py
│   ├── data_for_visualization.py
│   ├── font_settings.py
│   ├── legend_settings.py
│   ├── page_layout_settings.py
│   └── visualizer.py
├── watermark/                  # Implementation framework for watermark algorithms
│   ├── auto_watermark.py       # AutoWatermark class
│   ├── base.py                 # Base classes and functions for watermarking
│   ├── ewd/
│   ├── exp/
│   ├── exp_edit/
│   ├── kgw/
│   ├── sir/
│   ├── sweet/
│   ├── unigram/
│   ├── upv/
│   └── xsir/
├── README.md                   # Main project documentation
└── requirements.txt            # Dependencies required for the project
- python 3.9
- pytorch
- pip install -r requirements.txt
Tips: If you wish to utilize the EXPEdit algorithm, you will need to import for .pyx file,
-
run
python watermark/exp_edit/cython_files/setup.py build_ext --inplace -
move the generated
.sofile intowatermark/exp_edit/cython_files/
import torch
from watermark.auto_watermark import AutoWatermark
from utils.transformers_config import TransformersConfig
from transformers import AutoModelForCausalLM, AutoTokenizer

# Device
device = "cuda" if torch.cuda.is_available() else "cpu"

# Transformers config
transformers_config = TransformersConfig(model=AutoModelForCausalLM.from_pretrained('facebook/opt-1.3b').to(device),
                                         tokenizer=AutoTokenizer.from_pretrained('facebook/opt-1.3b'),
                                         vocab_size=50272,
                                         device=device,
                                         max_new_tokens=200,
                                         min_length=230,
                                         do_sample=True,
                                         no_repeat_ngram_size=4)

# Load watermark algorithm
myWatermark = AutoWatermark.load('KGW',
                                 algorithm_config='config/KGW.json',
                                 transformers_config=transformers_config)

# Prompt
prompt = 'Good Morning.'

# Generate and detect
watermarked_text = myWatermark.generate_watermarked_text(prompt)
detect_result = myWatermark.detect_watermark(watermarked_text)
unwatermarked_text = myWatermark.generate_unwatermarked_text(prompt)
detect_result = myWatermark.detect_watermark(unwatermarked_text)Assuming you already have a pair of watermarked_text and unwatermarked_text, and you wish to visualize the differences and specifically highlight the watermark within the watermarked text using a watermarking algorithm, you can utilize the visualization tools available in the visualize/ directory.
KGW Family
import torch
from visualize.font_settings import FontSettings
from watermark.auto_watermark import AutoWatermark
from utils.transformers_config import TransformersConfig
from transformers import AutoModelForCausalLM, AutoTokenizer
from visualize.visualizer import DiscreteVisualizer
from visualize.legend_settings import DiscreteLegendSettings
from visualize.page_layout_settings import PageLayoutSettings
from visualize.color_scheme import ColorSchemeForDiscreteVisualization

# Load watermark algorithm
device = "cuda" if torch.cuda.is_available() else "cpu"
transformers_config = TransformersConfig(
    						model=AutoModelForCausalLM.from_pretrained('facebook/opt-1.3b').to(device),
                            tokenizer=AutoTokenizer.from_pretrained('facebook/opt-1.3b'),
                            vocab_size=50272,
                            device=device,
                            max_new_tokens=200,
                            min_length=230,
                            do_sample=True,
                            no_repeat_ngram_size=4)
myWatermark = AutoWatermark.load('KGW',
                                 algorithm_config='config/KGW.json',
                                 transformers_config=transformers_config)
# Get data for visualization
watermarked_data = myWatermark.get_data_for_visualization(watermarked_text)
unwatermarked_data = myWatermark.get_data_for_visualization(unwatermarked_text)

# Init visualizer
visualizer = DiscreteVisualizer(color_scheme=ColorSchemeForDiscreteVisualization(),
                                font_settings=FontSettings(),
                                page_layout_settings=PageLayoutSettings(),
                                legend_settings=DiscreteLegendSettings())
# Visualize
watermarked_img = visualizer.visualize(data=watermarked_data,
                                       show_text=True,
                                       visualize_weight=True,
                                       display_legend=True)

unwatermarked_img = visualizer.visualize(data=unwatermarked_data,
                                         show_text=True,
                                         visualize_weight=True,
                                         display_legend=True)
# Save
watermarked_img.save("KGW_watermarked.png")
unwatermarked_img.save("KGW_unwatermarked.png")
Christ Family
import torch
from visualize.font_settings import FontSettings
from watermark.auto_watermark import AutoWatermark
from utils.transformers_config import TransformersConfig
from transformers import AutoModelForCausalLM, AutoTokenizer
from visualize.visualizer import ContinuousVisualizer
from visualize.legend_settings import ContinuousLegendSettings
from visualize.page_layout_settings import PageLayoutSettings
from visualize.color_scheme import ColorSchemeForContinuousVisualization

# Load watermark algorithm
device = "cuda" if torch.cuda.is_available() else "cpu"
transformers_config = TransformersConfig(
    						model=AutoModelForCausalLM.from_pretrained('facebook/opt-1.3b').to(device),
                            tokenizer=AutoTokenizer.from_pretrained('facebook/opt-1.3b'),
                            vocab_size=50272,
                            device=device,
                            max_new_tokens=200,
                            min_length=230,
                            do_sample=True,
                            no_repeat_ngram_size=4)
myWatermark = AutoWatermark.load('EXP',
                                 algorithm_config='config/EXP.json',
                                 transformers_config=transformers_config)
# Get data for visualization
watermarked_data = myWatermark.get_data_for_visualization(watermarked_text)
unwatermarked_data = myWatermark.get_data_for_visualization(unwatermarked_text)

# Init visualizer
visualizer = ContinuousVisualizer(color_scheme=ColorSchemeForContinuousVisualization(),
                                  font_settings=FontSettings(),
                                  page_layout_settings=PageLayoutSettings(),
                                  legend_settings=ContinuousLegendSettings())
# Visualize
watermarked_img = visualizer.visualize(data=watermarked_data,
                                       show_text=True,
                                       visualize_weight=True,
                                       display_legend=True)

unwatermarked_img = visualizer.visualize(data=unwatermarked_data,
                                         show_text=True,
                                         visualize_weight=True,
                                         display_legend=True)
# Save
watermarked_img.save("EXP_watermarked.png")
unwatermarked_img.save("EXP_unwatermarked.png")
For more examples on how to use the visualization tools, please refer to the test/test_visualize.py script in the project directory.
Using Watermark Detection Pipelines
import torch
from evaluation.dataset import C4Dataset
from watermark.auto_watermark import AutoWatermark
from utils.transformers_config import TransformersConfig
from transformers import AutoModelForCausalLM, AutoTokenizer
from evaluation.tools.text_editor import TruncatePromptTextEditor, WordDeletion
from evaluation.tools.success_rate_calculator import DynamicThresholdSuccessRateCalculator
from evaluation.pipelines.detection import WatermarkedTextDetectionPipeline, UnWatermarkedTextDetectionPipeline, DetectionPipelineReturnType

# Load dataset
my_dataset = C4Dataset('dataset/c4/processed_c4.json')

# Device
device = 'cuda' if torch.cuda.is_available() else 'cpu'

# Transformers config
transformers_config = TransformersConfig(
    model=AutoModelForCausalLM.from_pretrained('facebook/opt-1.3b').to(device),
    tokenizer=AutoTokenizer.from_pretrained('facebook/opt-1.3b'),
    vocab_size=50272,
    device=device,
    max_new_tokens=200,
    do_sample=True,
    min_length=230,
    no_repeat_ngram_size=4)

# Load watermark algorithm
my_watermark = AutoWatermark.load('KGW',
                                  algorithm_config='config/KGW.json',
                                  transformers_config=transformers_config)

# Init pipelines
pipeline1 = WatermarkedTextDetectionPipeline(
    dataset=my_dataset,
    text_editor_list=[TruncatePromptTextEditor(), WordDeletion(ratio=0.3)],
    show_progress=True,
    return_type=DetectionPipelineReturnType.SCORES)

pipeline2 = UnWatermarkedTextDetectionPipeline(dataset=my_dataset,
                                               text_editor_list=[],
                                               show_progress=True,
                                               return_type=DetectionPipelineReturnType.SCORES)

# Evaluate
calculator = DynamicThresholdSuccessRateCalculator(labels=['TPR', 'F1'], rule='best')
print(calculator.calculate(pipeline1.evaluate(my_watermark), pipeline2.evaluate(my_watermark)))
Using Text Quality Analysis Pipeline
import torch
from evaluation.dataset import C4Dataset
from watermark.auto_watermark import AutoWatermark
from utils.transformers_config import TransformersConfig
from transformers import AutoModelForCausalLM, AutoTokenizer
from evaluation.tools.text_editor import TruncatePromptTextEditor
from evaluation.tools.text_quality_analyzer import PPLCalculator
from evaluation.pipelines.quality_analysis import DirectTextQualityAnalysisPipeline, QualityPipelineReturnType

# Load dataset
my_dataset = C4Dataset('dataset/c4/processed_c4.json')

# Device
device = 'cuda' if torch.cuda.is_available() else 'cpu'

# Transformer config
transformers_config = TransformersConfig(
    model=AutoModelForCausalLM.from_pretrained('facebook/opt-1.3b').to(device),                             	tokenizer=AutoTokenizer.from_pretrained('facebook/opt-1.3b'),
    vocab_size=50272,
    device=device,
    max_new_tokens=200,
    min_length=230,
    do_sample=True,
    no_repeat_ngram_size=4)

# Load watermark algorithm
my_watermark = AutoWatermark.load('KGW',
                                  algorithm_config='config/KGW.json',
                                  transformers_config=transformers_config)

# Init pipeline
quality_pipeline = DirectTextQualityAnalysisPipeline(
    dataset=my_dataset,
    watermarked_text_editor_list=[TruncatePromptTextEditor()],
    unwatermarked_text_editor_list=[],
    analyzer=PPLCalculator(
        model=AutoModelForCausalLM.from_pretrained('..model/llama-7b/', device_map='auto'),                 		tokenizer=LlamaTokenizer.from_pretrained('..model/llama-7b/'),
        device=device),
    unwatermarked_text_source='natural',
    show_progress=True,
    return_type=QualityPipelineReturnType.MEAN_SCORES)

# Evaluate
print(quality_pipeline.evaluate(my_watermark))
For more examples on how to use the pipelines, please refer to the test/test_pipeline.py script in the project directory.
Leveraging example scripts for evaluation
In the evaluation/examples/ directory of our repository, you will find a collection of Python scripts specifically designed for systematic and automated evaluation of various algorithms. By using these examples, you can quickly and effectively gauge the d etectability, robustness and impact on text quality of each algorithm implemented within our toolkit.
Note: To execute the scripts in evaluation/examples/, first run the following command to set the environment variables.
export PYTHONPATH="path_to_the_MarkLLM_project:$PYTHONPATH"Additional user examples are available in test/. To execute the scripts contained within, first run the following command to set the environment variables.
export PYTHONPATH="path_to_the_MarkLLM_project:$PYTHONPATH"In addition to the Colab Jupyter notebook we provide (some models cannot be downloaded due to storage limits), you can also easily deploy using MarkLLM_demo.ipynb on your local machine.
@article{pan2024markllm,
  title={MarkLLM: An Open-Source Toolkit for LLM Watermarking},
  author={Pan, Leyi and Liu, Aiwei and He, Zhiwei and Gao, Zitian and Zhao, Xuandong and Lu, Yijian and Zhou, Binglin and Liu, Shuliang and Hu, Xuming and Wen, Lijie and others},
  journal={arXiv preprint arXiv:2405.10051},
  year={2024}
}


