Contents
- Demo setup: Realize Integrated Analytical Solutions with Azure Synapse Analytics
-
An Azure Account with the ability to create an Azure Synapse Workspace
-
Make sure the following resource providers are registered for your Azure Subscription.
- Microsoft.Sql
- Microsoft.Synapse
- Microsoft.StreamAnalytics
- Microsoft.EventHub
See further documentation for more information on registering resource providers on the Azure Portal.
-
A Power BI Pro or Premium account to host Power BI reports, dashboards, and configuration of streaming datasets.
Note:
The entire setup process will take from 1.5 to 2 hours to complete.
-
Log into the Azure Portal using your Azure credentials.
-
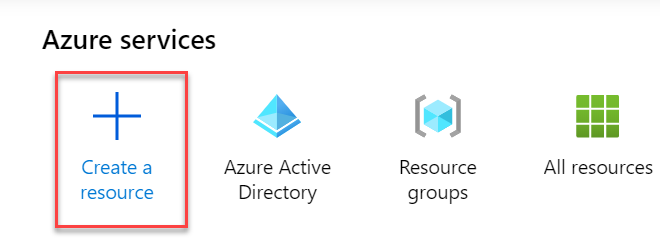
On the Azure Portal home screen, select the + Create a resource tile.
-
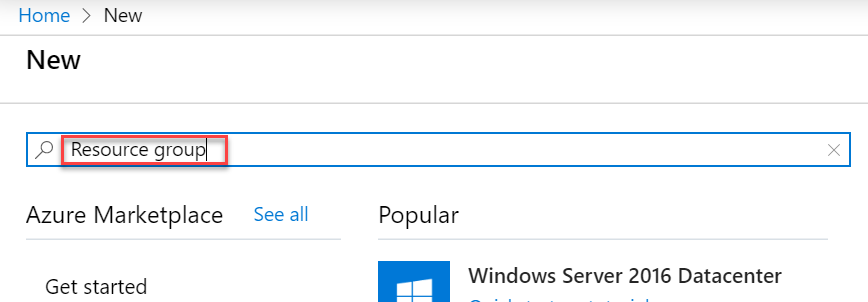
In the Search the Marketplace text box, type Resource group and press the Enter key.
-
Select the Create button on the Resource group overview page.
-
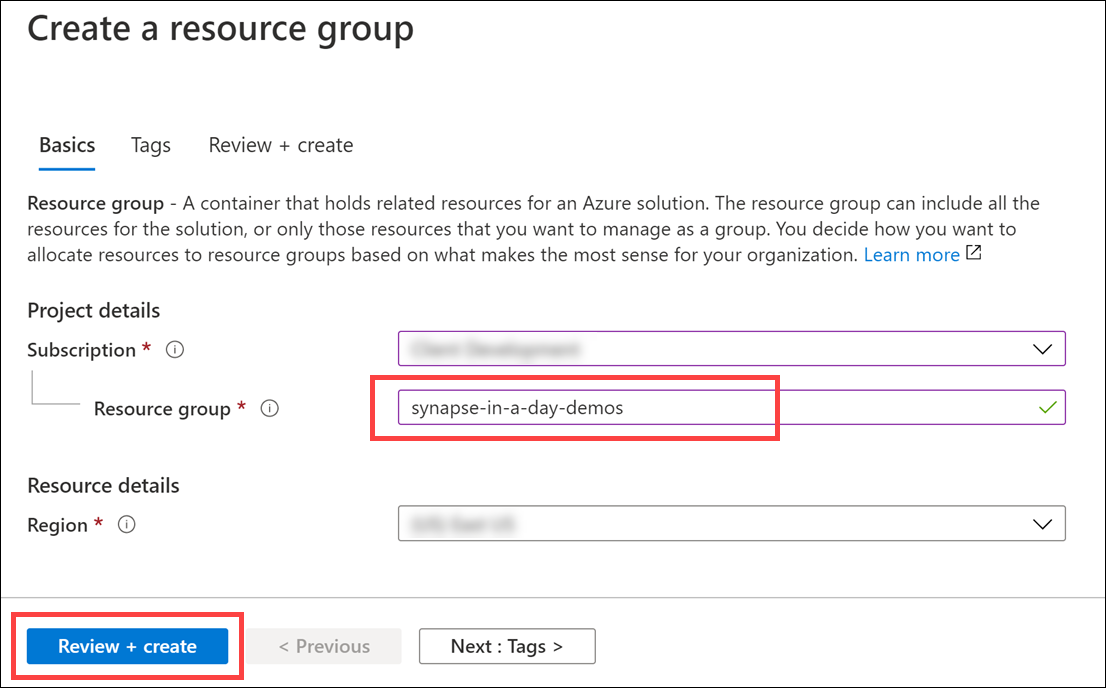
On the Create a resource group screen, select your desired Subscription and Region. For Resource group, enter synapse-in-a-day-demos, then select the Review + Create button.
-
Select the Create button once validation has passed.


We highly recommend executing the PowerShell scripts on an Azure Virtual Machine instead of from your local machine. Doing so eliminates issues due to pre-existing dependencies and more importantly, network/bandwidth-related issues while executing the scripts.
-
In the Azure portal, type in "virtual machines" in the top search menu and then select Virtual machines from the results.

-
Select + Add on the Virtual machines page and then select the Virtual machine option.
-
In the Basics tab, complete the following:
Field Value Subscription select the appropriate subscription Resource group select synapse-in-a-day-demosVirtual machine name synapse-lab-setup-vm(or unique name if not available)Region select the resource group's location Availability options select No infrastructure redundancy requiredImage select Windows 10 Pro, Version 1809 - Gen1Azure Spot instance select NoSize select Standard_DS3_v2Username select labuserPassword enter a password you will remember Public inbound ports select Allow selected portsSelect inbound ports select RDP (3389)Licensing select the option to confirm that you have an eligible Windows 10 license with multi-tenant hosting rights. 
-
Select Review + create. On the review screen, select Create. After the deployment completes, select Go to resource to go to the virtual machine.

-
Select Connect from the actions menu and choose RDP.

-
On the Connect tab, select Download RDP File.

-
Open the RDP file and select Connect to access the virtual machine. When prompted for credentials, enter
labuserfor the username and the password you chose. Select the option to allow the security certificate when prompted.


-
Deploy the workspace through the following Azure ARM template (press the button below):
-
On the Custom deployment form fill in the fields described below.
- Subscription: Select your desired subscription for the deployment.
- Resource group: Select the resource group you previously created.
- Unique Suffix: This unique suffix will be used naming resources that will created as part of your deployment. Make sure you follow correct Azure Resource naming conventions.
- SQL Administrator Login Password: Provide a strong password for the SQLPool that will be created as part of your deployment. Visit here to read about password rules in place. Your password will be needed during the next steps. Make sure you have your password noted and secured.
- Location: The datacenter where your Azure Synapse environment will be created.
Important: The
locationfield under 'Settings' will list the Azure regions where Azure Synapse Analytics (Preview) is available as of September 2020. This will help you find a region where the service is available without being limited to where the resource group is defined. -
Check the I agree to the terms and conditions stated above, then select the Purchase button. The provisioning of your deployment resources will take approximately 13 minutes. Wait until provisioning successfully completes before continuing. You will need the resources in place before running the scripts below.
Note: You may experience a deployment step failing in regards to Role Assignment. This error may safely be ignored.

The entire script will take between 1.5 and 2 hours to complete. Major steps include:
- Configure Synapse resources
- Download all data sets and files into the data lake (~15 mins)
- Execute the setup and execute the SQL pipeline (~30 mins)
- Execute the Cosmos DB pipeline (~25 mins)
- Install VC Redist: https://aka.ms/vs/15/release/vc_redist.x64.exe
- Install MS ODBC Driver 17 for SQL Server: https://www.microsoft.com/download/confirmation.aspx?id=56567
- Install SQL CMD x64: https://go.microsoft.com/fwlink/?linkid=2082790
- Install Microsoft Online Services Sign-In Assistant for IT Professionals RTW: https://www.microsoft.com/download/details.aspx?id=41950
- Install Git client
- Windows PowerShell
-
From your lab VM, open a PowerShell Window as an administrator, run the following command to download the artifacts
mkdir c:\labfiles

cd c:\labfiles

git clone https://github.com/ctesta-oneillmsft/asa-vtd.git synapse-in-a-day-deployment
-
Install Azure PowerShell module
Open Windows PowerShell as an Administrator on your desktop and execute the following:
if (Get-Module -Name AzureRM -ListAvailable) {
    Write-Warning -Message 'Az module not installed. Having both the AzureRM and Az modules installed at the same time is not supported.'
    Uninstall-AzureRm -ea SilentlyContinue
    Install-Module -Name Az -AllowClobber -Scope CurrentUser
} else {
    Install-Module -Name Az -AllowClobber -Scope CurrentUser
}
-
Install
Az.CosmosDBmoduleInstall-Module -Name Az.CosmosDB -AllowClobber
-
Install
sqlservermoduleInstall-Module -Name SqlServer -AllowClobber
-
Install Azure CLI
Invoke-WebRequest -Uri https://aka.ms/installazurecliwindows -OutFile .\AzureCLI.msi; Start-Process msiexec.exe -Wait -ArgumentList '/I AzureCLI.msi /quiet'; rm .\AzureCLI.msi
-
Close the Windows PowerShell window so you can import the newly installed Az.CosmosDB cmdlet.
-
From your lab VM, open Windows PowerShell as an Administrator and execute the following:
Set-ExecutionPolicy Unrestricted -
Execute the following to import the
Az.CosmosDBmodule:Import-Module Az.CosmosDB -
Change directories to the root of this repo within your local file system.
cd c:\labfiles\synapse-in-a-day-deployment\artifacts\environment-setup\automation\
-
Execute
Connect-AzAccountand sign in to your Microsoft user account when prompted. -
Execute
az loginand sign in to your Microsoft user account when prompted. -
Execute
.\01-environment-setup.ps1
-
You will be prompted to setup your Azure PowerShell and Azure CLI context.
-
You may be prompted to enter the name of your desired Azure Subscription. You can copy and paste the value from the list to select one. Note: Be certain to include the number next to the subscription name when you copy it.
Select the resource group you selected during Task 2.2. This will make sure automation runs against the correct environment you provisioned in Azure.

During the execution of the automation script you may be prompted to approve installations from PS-Gallery. Please approve to proceed with the automation.

NOTE This script will take up to 75 minutes to complete.


You may encounter a few errors and warnings during the script execution. The errors below can safely be ignored:
-
The following error may occur when creating SQL users and adding role assignments in the dedicated SQL pool, and can safely be ignored:
Principal '[email protected]' could not be created. Only connections established with Active Directory accounts can create other Active Directory users.
-
Errors when creating the Synapse notebooks (*.ipynb files) that state
Unsupported operation: CreateOrUpdateNotebookResourcecan safely be ignored.


Complete this task after setup has completed.
-
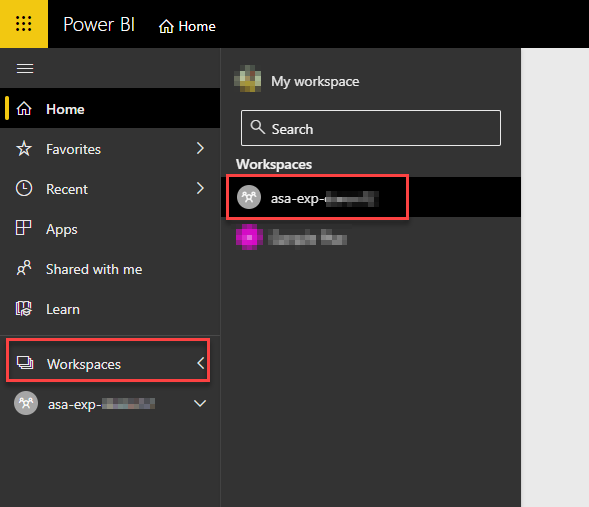
Sign in into the Power BI Portal using your Azure credentials.
-
From the hamburger menu select Workspaces to access the list of workspaces available to you. Select your workspace.
-
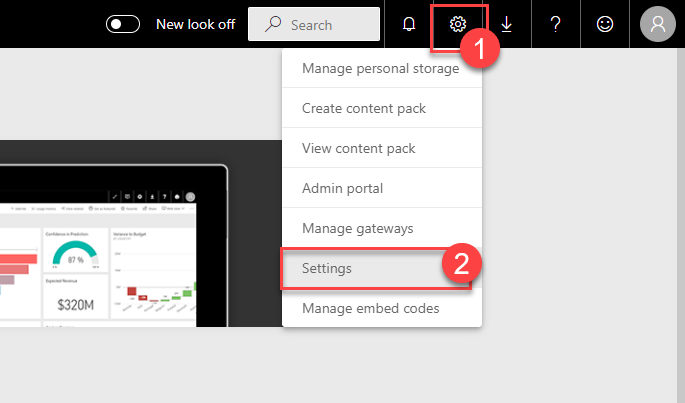
Select the Settings icon from the top right bar, and select Settings again to navigate to the settings page.
-
Select datasets tab to access the list of datasets available. Then select
2-Billion Rows Demodataset to access its settings. From the settings page open Data source credentials and select Edit credentials.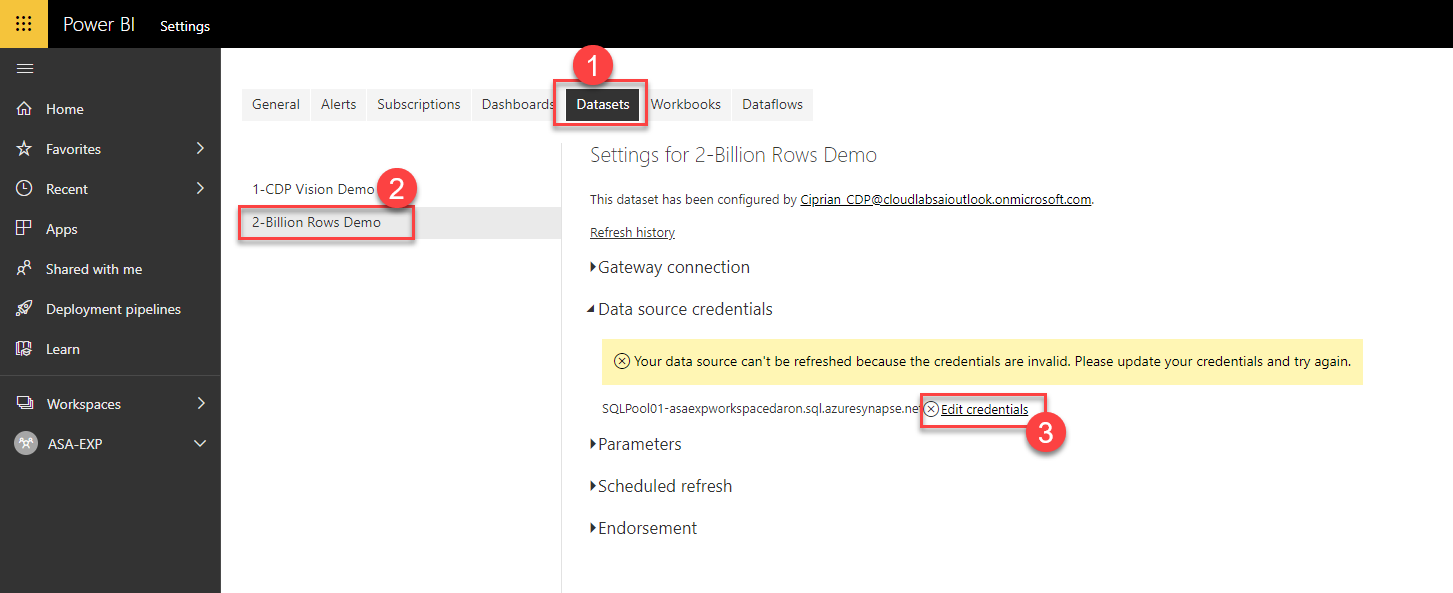
-
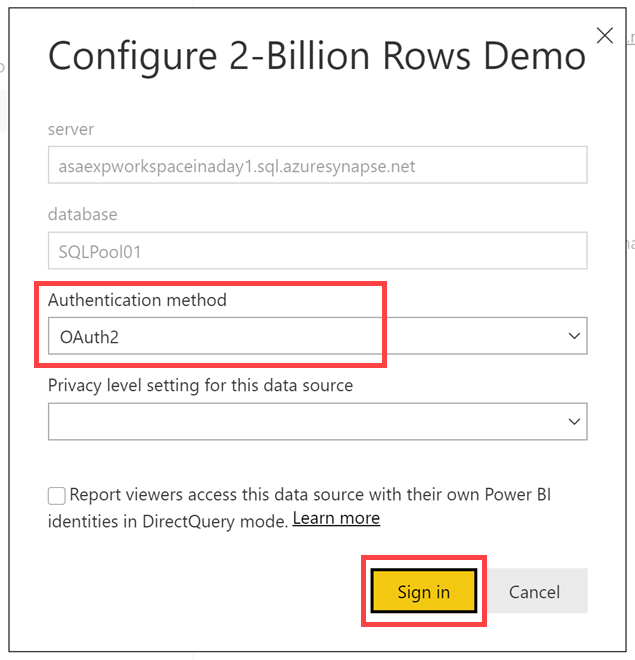
Select Microsoft Account for the Authentication method and select Sign In to complete the process.


Note:
If you are not planning on using the Synapse workspace environment right away, follow the steps in this task to pause the SQL pool. Otherwise, you will incur potentially significant cost.
-
Navigate to the resource group into which you deployed this environment.
-
Select the SQL pool (
SQLPool01).
-
Select || Pause to pause the pool.


You no longer need the virtual machine if you created one for this lab setup.
-
Open the VM in your Azure resource group, select Delete, then select Yes when prompted.

