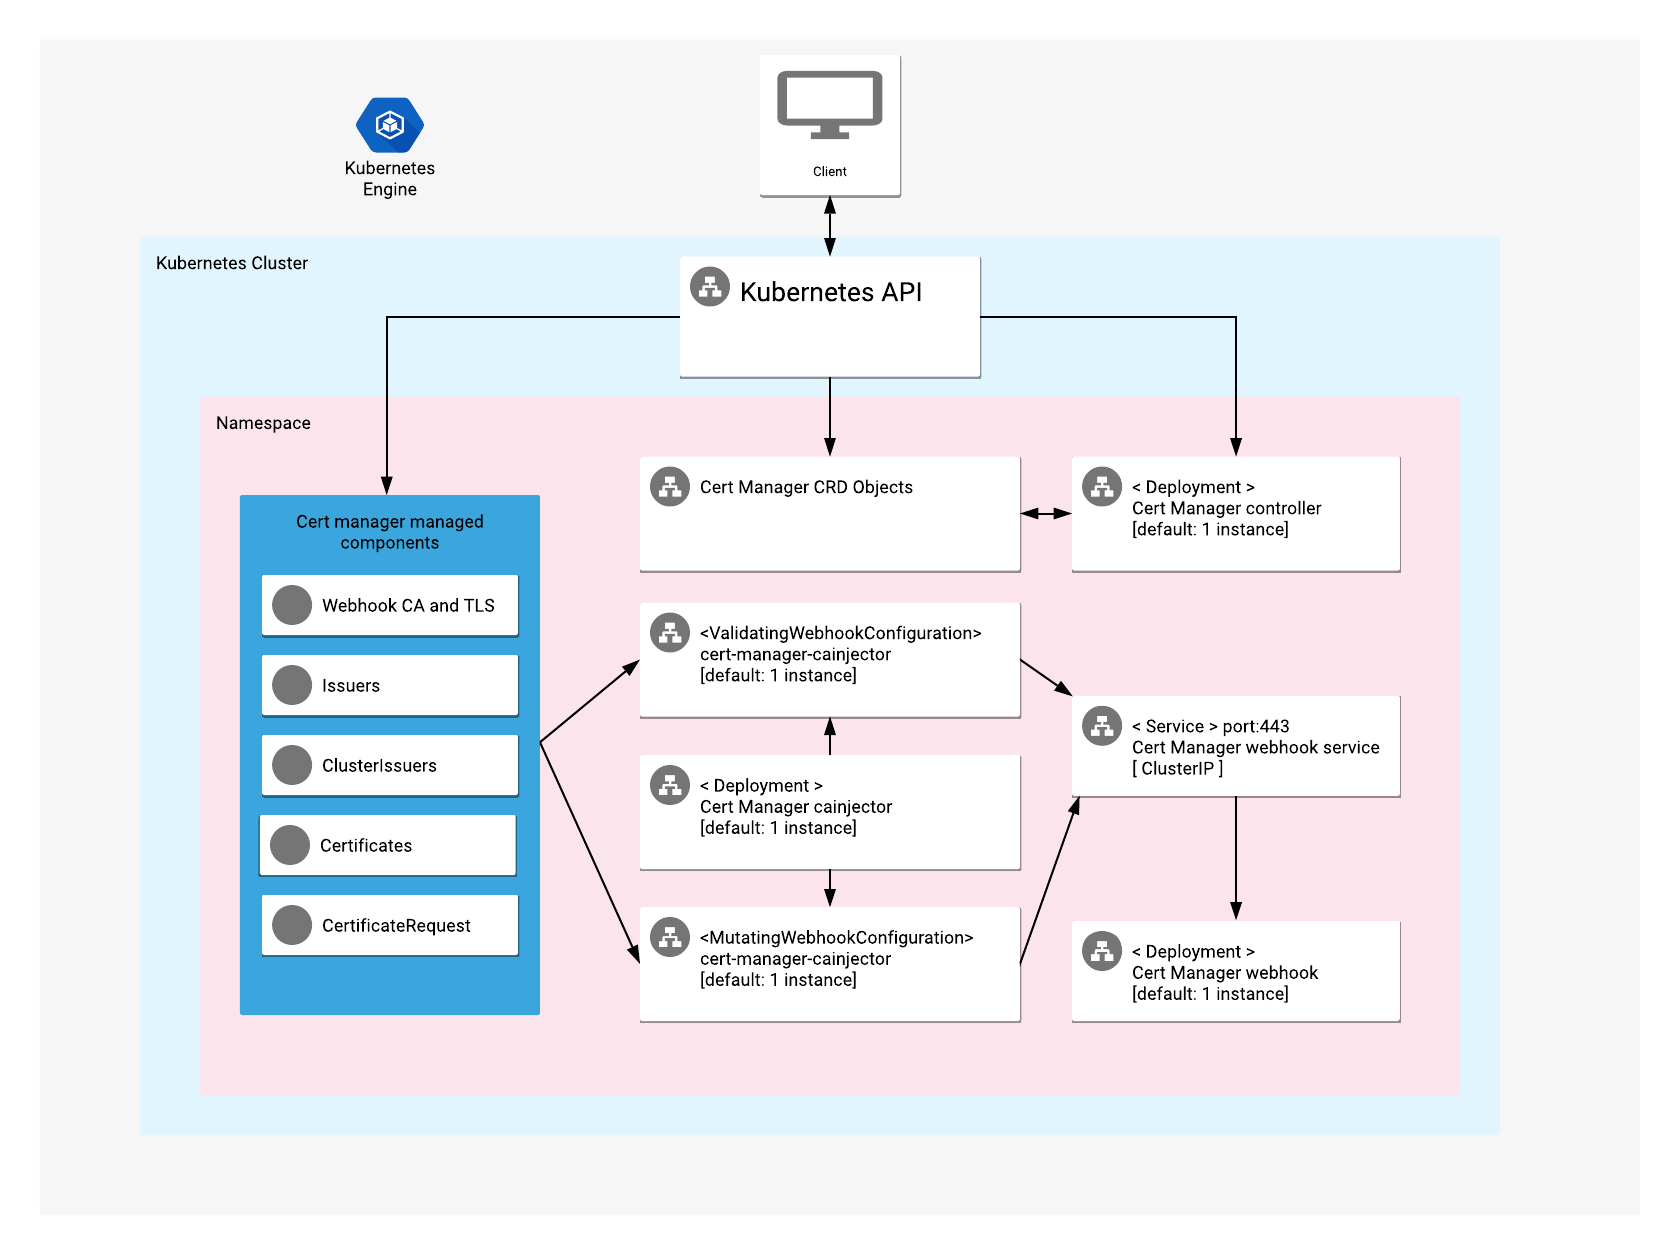
Cert Manager provides native Kubernetes automation for creating and managing Transport Layer Security (TLS) certificates.
It includes support for making self-signed certificates, using your own Certificate Authority (CA), and using external services such as Let’s Encrypt, HashiCorp Vault, and Venafi.
It checks that certificates are valid and up-to-date, and attempts to renew certificates before they expire.
For more information, visit the Cert Manager official website.
Popular open stacks on Kubernetes, packaged by Google.
This app offers Cert Manager custom resource definitions (CRDs), WebHooks, and deployments of Cert Manager on a Kubernetes cluster.
Get up and running with a few clicks! To install this Cert Manager app to a Google Kubernetes Engine cluster via Google Cloud Marketplace, follow the on-screen instructions.
You'll need the following tools in your development environment. If you are
using Cloud Shell, then gcloud, kubectl, Docker, and Git are installed in
your environment by default.
Configure gcloud as a Docker credential helper:
gcloud auth configure-dockerCreate a new cluster from the command-line:
export CLUSTER=cert-manager-cluster
export ZONE=us-west1-a

gcloud container clusters create "${CLUSTER}" --zone "${ZONE}"
Configure kubectl to connect to the new cluster:
gcloud container clusters get-credentials "${CLUSTER}" --zone "${ZONE}"Clone this repo, and its associated tools repo:
git clone --recursive https://github.com/GoogleCloudPlatform/click-to-deploy.gitAn Application resource is a collection of individual Kubernetes components, such as Services, Deployments, and so on, that you can manage as a group.
To set up your cluster to understand Application resources, run the following command:
kubectl apply -f "https://raw.githubusercontent.com/GoogleCloudPlatform/marketplace-k8s-app-tools/master/crd/app-crd.yaml"You need to run this command once.
The Application resource is defined by the Kubernetes SIG-apps community. You can find the source code at github.com/kubernetes-sigs/application.
Navigate to the cert-manager directory:
cd click-to-deploy/k8s/cert-managerChoose an instance name and
namespace
for the app. In most cases, you can use the default namespace.
export APP_INSTANCE_NAME=cert-manager-1
export NAMESPACE=default
Enable Cloud Monitoring:
NOTE: Your Google Cloud Marketplace project must have Cloud Monitoring enabled. If you are using a non-Google Cloud cluster, you cannot export your app's metrics to Cloud Monitoring.
By default, the app does not export metrics to Cloud Monitoring. To enable
this option, change the value to true.
export METRICS_EXPORTER_ENABLED=trueSet up the image tag:
It is advised to use a stable image reference, which you can find on Marketplace Container Registry. For example:
export TAG="0.13.0-20200311-092536"Alternatively, you can use a short tag which points to the latest image for the selected version.
Warning: This tag is not stable, and the image it references might change over time.
export TAG="0.13"Configure the container image:
export IMAGE_CONTROLLER="marketplace.gcr.io/google/cert-manager"
export IMAGE_METRICS_EXPORTER="marketplace.gcr.io/google/cert-manager/prometheus-to-sd:${TAG}"
By default, each deployment has 1 replica, but you can choose to set the number of replicas for Cert Manager controller, webhook and cainjector.
export CONTROLLER_REPLICAS=3
export WEBHOOK_REPLICAS=3
export CAINJECTOR_REPLICAS=3If you use a different namespace than the default, run the following
command to create a new namespace:
kubectl create namespace "${NAMESPACE}"Define the environment variables:
export CONTROLLER_SERVICE_ACCOUNT="${APP_INSTANCE_NAME}-cert-manager-controller"
export WEBHOOK_SERVICE_ACCOUNT="${APP_INSTANCE_NAME}-cert-manager-webhook"
export CAINJECTOR_SERVICE_ACCOUNT="${APP_INSTANCE_NAME}-cert-manager-cainjector"
export CRD_SERVICE_ACCOUNT="${APP_INSTANCE_NAME}-crd-creator-job"
Expand the manifest to create Service Accounts:
cat resources/service-accounts.yaml \
  | envsubst '${APP_INSTANCE_NAME} \
              ${NAMESPACE} \
              ${CONTROLLER_SERVICE_ACCOUNT} \
              ${WEBHOOK_SERVICE_ACCOUNT} \
              ${CAINJECTOR_SERVICE_ACCOUNT} \
              ${CRD_SERVICE_ACCOUNT}' \
    > "${APP_INSTANCE_NAME}_sa_manifest.yaml"
Create the accounts on the same cluster as kubectl:
kubectl apply -f "${APP_INSTANCE_NAME}_sa_manifest.yaml" \
--namespace "${NAMESPACE}"Use helm template to expand the template. We recommend that you save the
expanded manifest file for future updates to your app.
helm template chart/cert-manager \
  --name "${APP_INSTANCE_NAME}" \
  --namespace "${NAMESPACE}" \
  --set controller.image.repo="${IMAGE_CONTROLLER}" \
  --set controller.image.tag="${TAG}" \
  --set controller.serviceAccountName="${CONTROLLER_SERVICE_ACCOUNT}" \
  --set controller.replicas="${CONTROLLER_REPLICAS:-1}" \
  --set deployer.image="gcr.io/cloud-marketplace-tools/k8s/deployer_helm:0.8.0" \
  --set CDRJobServiceAccount="${CRD_SERVICE_ACCOUNT}" \
  --set webhook.serviceAccountName="${WEBHOOK_SERVICE_ACCOUNT}" \
  --set webhook.replicas="${WEBHOOK_REPLICAS:-1}" \
  --set cainjector.serviceAccountName="${CAINJECTOR_SERVICE_ACCOUNT}" \
  --set cainjector.replicas="${CAINJECTOR_REPLICAS:-1}" \
  --set metrics.exporter.enabled="${METRICS_EXPORTER_ENABLED:-false}" \
> "${APP_INSTANCE_NAME}_manifest.yaml"Use kubectl to apply the manifest to your Kubernetes cluster:
kubectl apply -f "${APP_INSTANCE_NAME}_manifest.yaml" --namespace "${NAMESPACE}"To get the Cloud Console URL for your app, run the following command:
echo "https://console.cloud.google.com/kubernetes/application/${ZONE}/${CLUSTER}/${NAMESPACE}/${APP_INSTANCE_NAME}"To view the app, open the URL in your browser.
To deploy an Issuer instance:
kubectl apply --namespace "${NAMESPACE}" -f - <<EOF
apiVersion: cert-manager.io/v1alpha2
kind: Issuer
metadata:
  name: test-selfsigned
spec:
  selfSigned: {}
EOF
To request a self-signed certificate:
kubectl apply --namespace "${NAMESPACE}" -f - <<EOF
apiVersion: cert-manager.io/v1alpha2
kind: Certificate
metadata:
  name: selfsigned-cert
spec:
  dnsNames:
    - example.com
  secretName: selfsigned-cert-tls
  issuerRef:
    name: test-selfsigned
EOF
The created certificate is the Secret selfsigned-cert-tls.
You can also choose to deploy the Issuer and the certificate to another namespace.
For additional configuration options, refer to the Cert Manager documentation.
To change the number of replicas of the controller, use the following
command, where REPLICAS is your desired number of replicas:
export REPLICAS=3
kubectl scale deployment "${APP_INSTANCE_NAME}-cert-manager" \
  --namespace "${NAMESPACE}" --replicas=$REPLICAS
To change the number of replicas of cainjector, use the following command,
where REPLICAS is your desired number of replicas:
export REPLICAS=3
kubectl scale deployment "${APP_INSTANCE_NAME}-cert-manager-cainjector" \
  --namespace "${NAMESPACE}" --replicas=$REPLICAS
To change the number of replicas of the webhook, use the following command,
where REPLICAS is your desired number of replicas:
export REPLICAS=3
kubectl scale deployment "${APP_INSTANCE_NAME}-cert-manager-webhook" \
--namespace "${NAMESPACE}" --replicas=$REPLICASTo back up Cert Manager resources, use the following command:
kubectl get --all-namespaces --output=yaml \
issuer,clusterissuer,certificates,certificaterequests > backup_file.yamlkubectl apply -f backup_file.yamlTo update your deployment of Cert Manager, refer to the official documentation for actions specific to your current version.
To avoid complications, create a backup before you update Cert Manager.
-
In the Cloud Console, open Kubernetes Applications.
-
From the list of apps, click Cert Manager.
-
On the Application Details page, click Delete.
Set your installation name and Kubernetes namespace:
export APP_INSTANCE_NAME=cert-manager-1
export NAMESPACE=defaultNOTE: We recommend that you use a
kubectlversion that is the same version as that of your cluster. Using the same versions forkubectland the cluster helps to avoid unforeseen issues.
To delete the resources, use the expanded manifest file used for the installation.
Run kubectl on the expanded manifest file:
kubectl delete -f ${APP_INSTANCE_NAME}_manifest.yaml --namespace ${NAMESPACE}You can also delete the resources by using types and a label:
kubectl delete application \
  --namespace ${NAMESPACE} \
  --selector app.kubernetes.io/name=${APP_INSTANCE_NAME}
NOTE: This will delete only the
cert-managerapp. Allcert-manager-managed resources will remain available.
If you don't need the deployed app or the GKE cluster, delete the cluster by using this command:
gcloud container clusters delete "${CLUSTER}" --zone "${ZONE}"