The Azure Management Portal is your one-stop-shop for creating and managing new cloud resources, like websites, virtual machines, and storage accounts. Once you get started, the portal will be your home to configure, monitor, and scale your resources with ease and agility.
This lab includes the following tasks:
In this lab, you will learn how to:
- Work with the Azure Management Portal
- Create new elements and services
- Manage allocated resources
In this task we will walk through the different pieces of the Azure Management Portal.
-
Open you browser and navigate to manage.windowsazure.com.
-
Enter your credentials to access your Azure Subscription. You will land on the portal's home view. By default this view will show all the items you have ever created under your subcription.

Management Portal - Landing Page
-
On the left side, notice the sidebar displaying all the available services and tools. Clicking any of these items will filter the list by that specific type.

Left Sidebar
-
Look at the portal's footer and notice the NEW button on the left and the Help button on the right. We will see more about these two items as we move on to the other tasks.

NEW Button


-
Click NEW button that is located on the bottom left part of the screen.

NEW Button Clicked
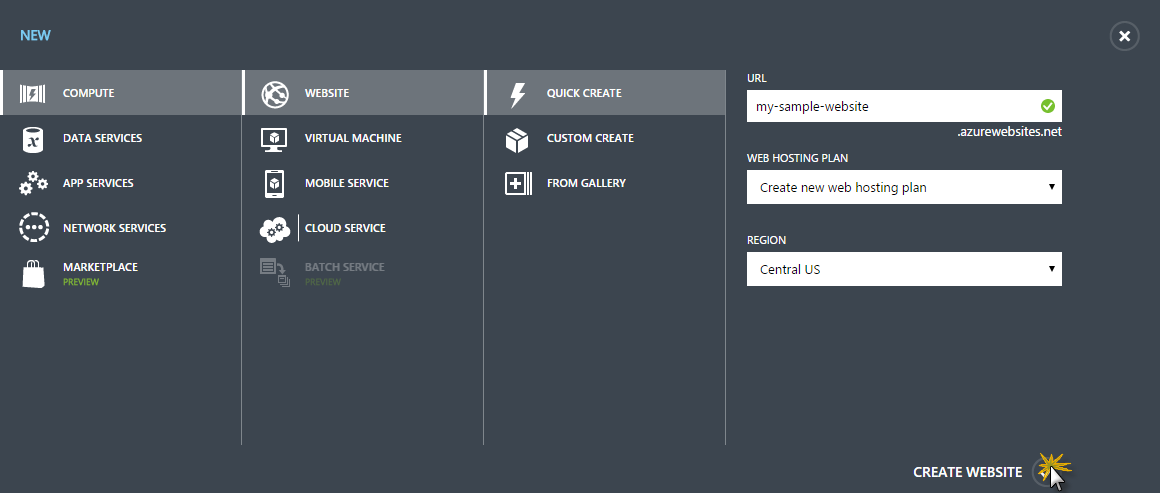
This will display the Create Wizard. In this section you can select the type of element, service or resource we want to create. In this case you will create a Website.
-
Click COMPUTE. The compute services will be displayed alongside.
-
Then click WEBSITE. Three options will be shown.
-
QUICK CREATE: This option will allow you to setup your website with the minimum amount of steps.
-
CUSTOM CREATE: You will have the chance to create a SQL Database to attach to this website and setup a continuous deployment source.
-
FROM GALLERY: The gallery features a list of templates ready to jumpstart your website.
 Website Creation Options
 -
-
Click QUICK CREATE. The creation form is presented. Here you will select the URL for your website and the region where you would like to deploy. It is recommended to select the region which is closest to your audience; for this task leave the field as is.
-
Enter the URL for your website, and click CREATE WEBSITE.
Note: The website URL has to be unique since it will be of public access.
Creating the Website
-
Notice that the WEBSITES item is selected on the sidebar, and the recently created asset is displayed.
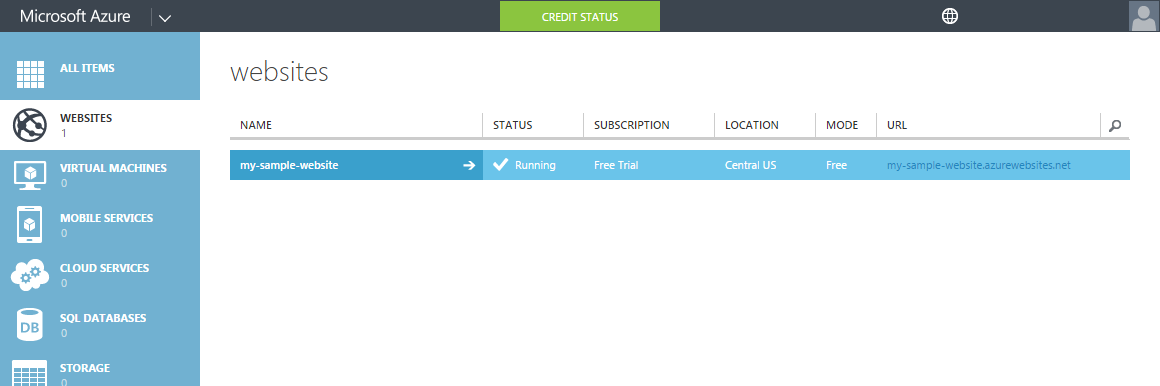
Website Created
-
Click the site name you have just created to enter the site dashboard. Then click, the BROWSE button, located at the bottom, to navigate to the site.

Browsing the Website
-
Click the website's name to display the Quick Start Management page. This page provides quick access to important actions related to managing the deployment of a site in Windows Azure. This is also the default landing page in the portal for a newly created website.

Entering the site's management page

Website's Quickstart Management page
-
Notice the commands located at the bottom of the page. These are:
- BROWSE: To navigate to the current deployed version of the website
- STOP: To stop the website's deployment
- RESTART: To restart the website's deployment
- DELETE: To delete the website
- WEBMATRIX: Allows to install WebMatrix, Microsoft's new one-stop website authoring tool that lets you create, edit, and publish websites easily.
-
Look at the top bar to see the different sections available. These sections are:
- Dashboard
- Monitor
- Webjobs
- Configure
- Scale
- Linked Resources
- Backups
The rest of the task will describe the more important ones.
Note: For more information about all these options, see Manage websites through the Azure Management Portal.
-
Click DASHBOARD. The website's dashboard will show. This view will provide you with the most important information at a glance. Ranging from a health report to usage statistics, this view provides the core details of your service.

The Dashboard view
-
On the top bar, click Monitor. This view allows the setup of tests to check the availability of HTTP or HTTPS endpoints, from up to three geo-distributed locations. A monitoring test fails if the HTTP response code is an error (4xx or 5xx) or the response takes more than 30 seconds. An endpoint is considered available if the monitoring tests succeed from all the specified locations.

The Monitor view
-
Back to the top bar, click WEBJOBS. The WebJobs management page lets you create on demand, scheduled, or continuously running tasks for your website.
Note: For more information regarding the use of Webjobs, see How to Use the WebJobs feature in Microsoft Azure Web Sites.

The Webjobs view
-
Lastly, click the SCALE tab, to go to the scaling options. For increased performance and throughput for your websites on Microsoft Azure, you can scale your Web Hosting Plan mode from Free to Shared, Basic, or Standard. Scaling up on Azure Websites involves two related actions: changing your Web Hosting Plan mode to a higher level of service, and configuring certain settings after you have switched to the higher level of service. You can scale up or down as required. These changes take only seconds to apply and affect all websites in your Web Hosting Plan. They do not require your code to be changed or your applications to be redeployed.

The Scale view


In this lab we walked through the Azure Management Portal, starting by the basic layout of the hub page and moving to the creation and management of resources, and overviewing some of the features that the portal provides.