#Authentication in Azure Libraries for Java
To use the management APIs in the Azure Libraries for Java, as the first step, you need to create an authenticated client. There are several possible approaches to authentication. This document illustrates a couple of the simpler ones.
⚠️ Note, fiel-based authentication is an experimental feature that may or may not be available in later releases, or the file format it relies on may change.
To create an authenticated Azure client:
Azure azure = Azure.authenticate(new File("my.azureauth")).withDefaultSubscription();The authentication file uses the Java properties file format and must contain the following information (assuming you are using the U.S. public cloud):
subscription=########-####-####-####-############
client=########-####-####-####-############
key=XXXXXXXXXXXXXXXX
tenant=########-####-####-####-############
managementURI=https\://management.core.windows.net/
baseURL=https\://management.azure.com/
authURL=https\://login.windows.net/
This approach enables permanent, unattended authentication for your application (i.e. no interactive user login, no token management needed). The client, key and tenant are from your service principal registration. Too learn how to register such a service principal, see Creating a Service Principal in Azure.
Similarly to the file-based approach, this method requires a service principal registration, but instead of storing the credentials in a local file, the required inputs can be supplied directly via an instance of the ApplicationTokenCredentials class:
ServiceClientCredentials credentials = new ApplicationTokenCredentials(client, tenant, key, AzureEnvironment.AZURE);
Azure azure = Azure.authenticate(credentials).withSubscription(subscriptionId);
where client, tenant, key and subscriptionId are strings with the required pieces of informatoin about your service principal and subscription. The last parameter, AzureEnvironment.AZURE represents Azure's U.S. public cloud. You can use a different value out of the currently supported alternatives in the AzureEnvironment enum.
In order for your application to log into your Azure subscription without requiring the user to login manually, you can take advantage of credentials based on the Azure Active Directory service principal functionality. A service principal is analogous to a user account, but it is intended applications to authenticate themselves without human intervention.
If you save such service principal-based credentials as a file, or store them in environment variables, this can simplify and speed up your coding process.
⚠️ Note: exercise caution when saving credentials in a file. Anyone that gains access to that file will have the same access privileges to Azure as your application. In general, file-based authentication is not recommended in production scenarios and should only be used as a quick shortcut to getting started in dev/test scenarios.
You can create a service principal and grant it access privileges for a given subscription using these steps:
- Log into your Azure account.
- Select Browse > Active Directory.
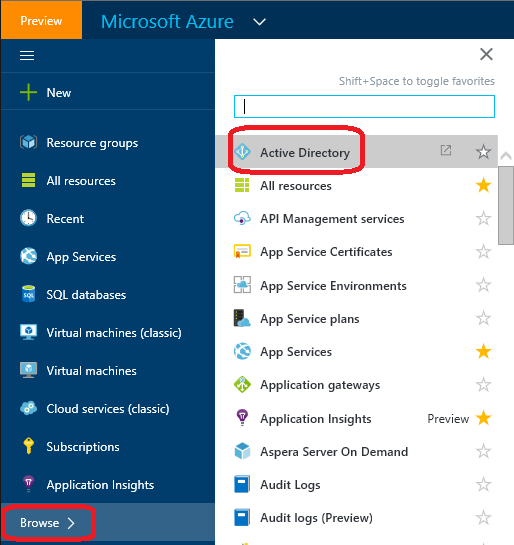
- Select the active directory (if you have more than one listed) that you want to register your app in.
- Click the Applications link.
- Click the Add button at the bottom of the page.

- Type in a name for your application. After your app is registered, it will be listed under that name in the active directory you have selected earlier. You will need to reference that name in a later step.
- Select the Web application and/or web API option, regardless of whether your application is actually going to run on the web or on a desktop computer, and click the arrow to go to the next step.

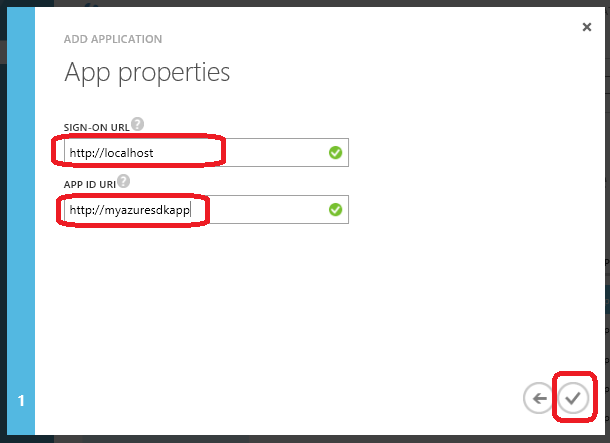
- One the next screen, type in some URL in the Sign-on URL. If your application is not a web app, it does not matter what you type in here, as long as it is a syntactically correct URL format.
- Type in some App ID URI. This is just a unique identifier of your choice for your app in the proper URI format that needs to be unique in your selected Active Directory.
- Click the checkmark when done.
- Wait for the task to complete. You may see a notification like the following in the meantime:

- When you see the app dashboard page, click Configure.
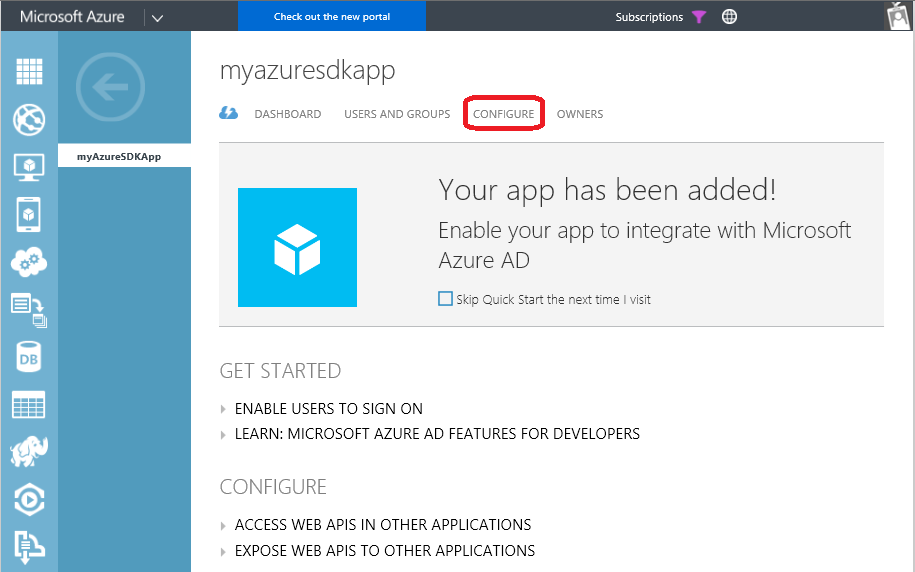
- Scroll down the page till you see Client ID and Keys
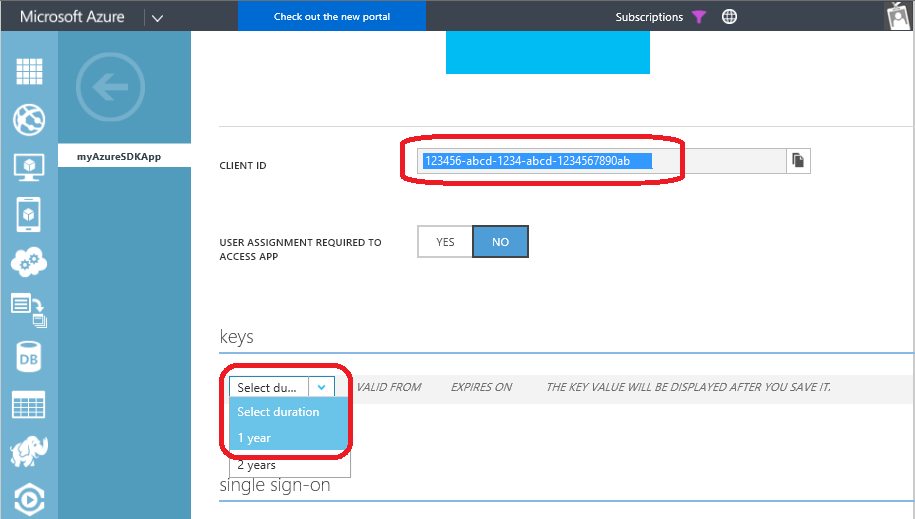
- Create a new blank text file to put your credential information into, and save it as - for example - "my.azureauth"
- Copy the client ID value into your text file, typing "
client=" in front of it, for example:
client=123456-abcd-1234-abcd-1234567890ab
- In the Keys section, select a duration.
- Click Save at the bottom of the page

- After a few seconds, you will see the generated key and a prompt for you to save it:

- Copy the shown key into your text file and prefix it with "
key=", for example:
key=01234567890123456789abcdef01234567890abcdef0123456789abcdef02345
- In the current URL shown in your browser, select the text between the word: "Directory/" and the next slash (/) and copy it.

- Paste the copied value into your text file and prefix it with "
tenant=", for example:
tenant=abcdef01-1234-dcba-9876-abcdef012345
- Assuming you are using public Azure cloud in the U.S., also add the following to your text file:
managementURI=https\://management.core.windows.net/
baseURL=https\://management.azure.com/
authURL=https\://login.windows.net/
(:warning:)Note that this file follows the Java properties file format, so certain characters need to be escaped with a backslash (), for example: colons (:) in URLs.
You can now save the file.
- You need to grant the created service principal a permission to access the desired Azure subscription. Go to the Azure portal again.
- Click Subscriptions and select the subscription in the list that you want to enable your application to access.
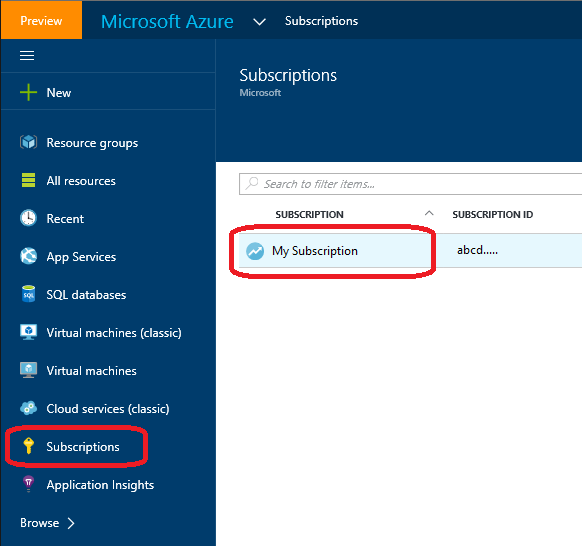
- Click Users, Add

- In the Add Access page, for the Select a role question, select Owner if you want to give your application the ability to modify resources in this subscription.

- Click Add Users, then find and select your application using the name you provided earlier, and click Select.

Now you have all the pieces to be able to authenticate your code without requiring an interactive login nor the need to manage access tokens.