Blockly Developer Tools is a desktop application that helps developers integrate and configure Blockly in their application. The Blockly Developer Tools allows users to:
- Create custom blocks using the block editor.
- Organize custom blocks into groupings called "block libraries".
- Build toolboxes using the toolbox editor.
- Build workspace contents (blocks that are loaded onto a Blockly workspace on load)
- Configure workspace injection options (for the web library).
The developer tools application has four editors:
- The block editor, to create and define custom blocks.
- The toolbox editor, to create and organize the toolbox where users find the available blocks.
- The workspace contents editor can be used to create and save a workspace full of blocks. This is usually used to initialize a project in an app, avoiding a blank canvas.
- The workspace configuration editor configures the options available to the web library, used when injecting a workspace UI into the webpage.
New resource components of your blockly application (such as block libraries, block definitions, toolboxes, workspace contents, and workspace configurations) can be added via the menubar at the top left (under File), as well as via the add button at the bottom left, under the navigation tree.
When first loading the developer tools application, you will be presented with a prepopulated sample project, from which you can start creating your Blockly project.
A project in the Developer Tools is a container for all the Blockly resources used by a Blockly app. While the project is not used by the Blockly API, it is a means to ensure all the components are loaded together, and ensures updates apply to all resources in the project.
Your Blockly project consists of the five resources in a Blockly application, as mentioned earlier (block libraries, block definitions, toolboxes, workspace contents, and workspace configurations). You can create one or more of the aforementioned resources, and choose from your multiple Blockly resources when creating your Blockly application.
You can navigate through your project and your various resources by clicking through the navigation tree at the left side of the application. Clicking on folders will not open up new views, but clicking on Blockly resources will present you with the resource in its editor.
A Block library is a collection of block definitions that are loaded by the app from a single file. The concept is rarely user facing, but makes it easy for developers to mix and match the blocks they intend to load.
Blockly comes with several pre-defined block libraries, such as math blocks, logic blocks, and loop blocks. Most Blockly apps have at least one library of their own custom blocks. At the very least, an app needs an output or action block so that the app does something when running the generated code.
A block library is essentially a grouping of block definitions. This makes it easier for you, the developer, to organize your blocks to refer to them later, save them, and move them around together (as the block definitions that belong in one library will be in the same file).
A well-designed block library, should be easy to understand at a high level. A good example of a block library might be "Movement Blocks," which contains all blocks related to movement for a character or robot.
The developer tools application, when opening an empty project, will auto-create a default block library, "MyFirstBlockLibrary." You can always add more block definitions by using the menubar of the app or by using the add button at the bottom left side of the window.
Within each block library, you can create blocks which are defined by using the editor workspace on the left and seeing the output on the right. There is a preview workspace at the top to see what your block will look like in your final Blockly application, as well as textareas below the preview to see the corresponding generator stubs and block definitions.
Blocks are referenced by their name, so each block you want to create must have a unique name. Even within a given project, block names must be unique.
The toolbox editor helps build the XML for a Toolbox. The material assumes familiarity with features of a Toolbox. If you already have XML for a toolbox that you want to edit here, you can load it by clicking "Load to Edit".
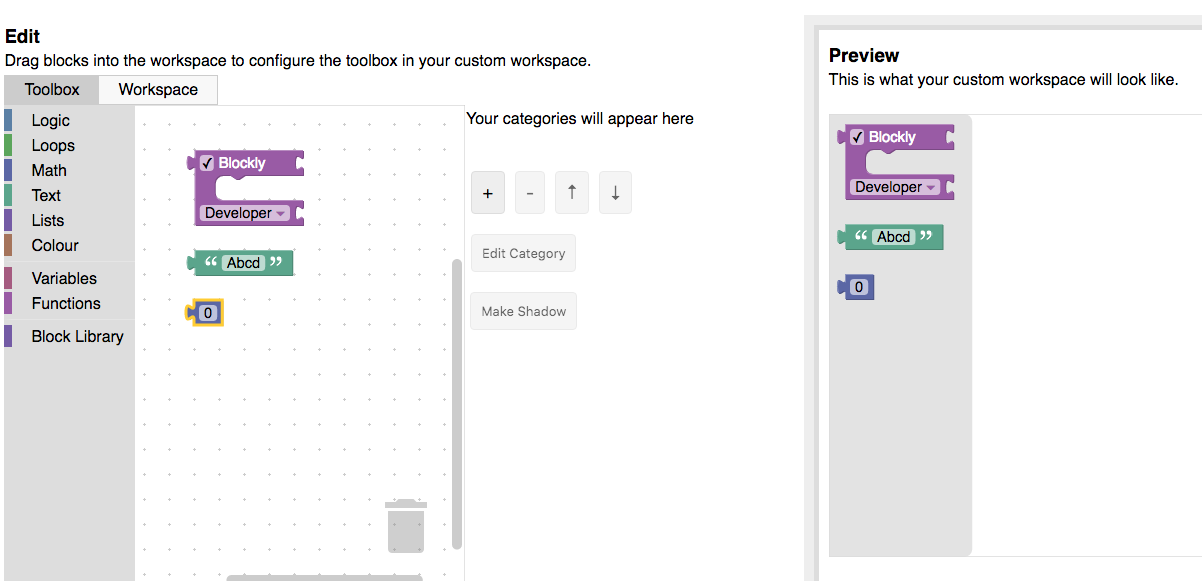
If you have a few blocks and want to display them without any categories, simply drag them into the workspace, and you will see your blocks appear in the toolbox in the preview.
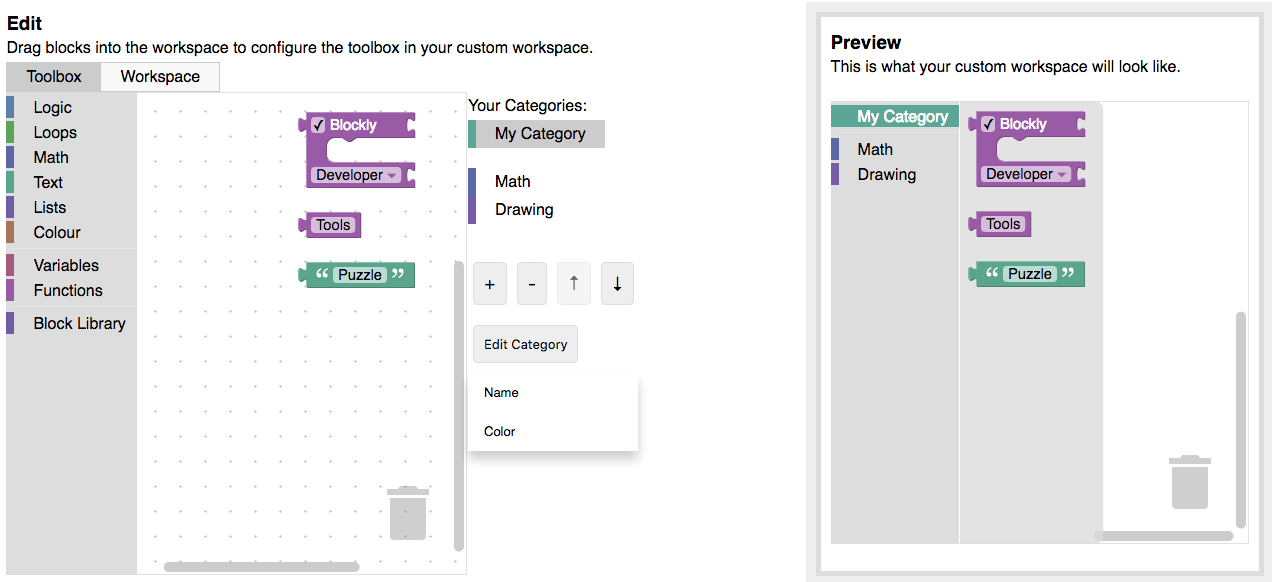
If you want display blocks in categories, click the “+” button and select the dropdown item for new category. This will add a category to your category list that you can select and edit. Select “Standard Category” to add an individual standard Blockly category (Logic, Loops, etc.), or “Standard Toolbox” to add all standard Blockly categories. Use the arrow buttons to reorder categories.
Note: The standard categories and toolbox include all the blocks in the Playground. This set of blocks is not appropriate for most apps and should be pruned as needed. Also, some blocks are not supported on mobile yet.
To change the selected category’s name or color use the “Edit Category” dropdown. Dragging a block into the workspace will add it to the selected category.
By default, you can add any of the standard blocks or any blocks in your library to the toolbox. If you have blocks defined in JSON that aren't in your library, you can import them using the "Import Custom Blocks" button.
Some blocks should be used together or include defaults. This is done with groups and shadows. Any blocks that are connected in the editor will be added to the toolbox as a group. Blocks that are attached to another block can also be changed to shadow blocks by selecting the child block and clicking the "Make Shadow" button. Note: Only child blocks that don't contain a variable may be changed to shadow blocks.
If you include a variable or function block in their toolbox, include a “Variables” or “Functions” category in your toolbox to allow users to fully utilize the block. Learn more about “Variables” or “Functions" categories.
Workspace contents are the blocks that are loaded onto a Blockly workspace from file, often as a template for a user.
To add blocks to your workspace contents, simply drag your desired blocks into the editor workspace. When used in your final Blockly application, the blocks in your editor workspace will be automatically loaded for your end-user. One use case of using workspace contents is for giving your end-user cues on what blocks to start with.
Workspace configurations are presets for an individual Blockly workspace. This
eventually goes into the Blockly.Options object which is created while
injecting Blockly. The configurations editor is simply a checklist of options.
You can make some workspaces readonly, others with a zoom function, and limit
others with the number of blocks they can use.
Once you are satisfied with your Blockly development, you can save your project
via the menubar at the top of the application window (or, for Macs, at the top
menubar). Click File > Save All, decide your project location, and save your
project into a directory of your choice.
You can manually edit the files within your project and load them again at a later time. Your manual changes will be reflected the next time you open up the project in developer tools. However, keep in mind not to touch any files that are not specifically Blockly resource files (such as metadata files, which are necessary for parsing your project structure to load again into the application).
When opening your application, first open the developer tools app and go to
File > Open Project to bring up the popup. Using the file explorer, search
through your local filesystem for the project you wish to open, and open your
project through the metadata file.
Doing so should reload the app with your previously edited Blockly project.
When you are ready to create a Blockly workspace for your application, click on
File > Create Application for Web via the menubar. Doing so will bring up a
popup which allows you to choose one toolbox, one workspace contents, and one
workspace configuration to group together into one Blockly workspace.
You can find the auto-generated inject file in your saved project, and can also manually export one file to save to a different location.


