This project shipped with two parts: FFdynamic library, and "Interactive Live" application build on FFdynamic
- An application Interactive Live
- FFdynamic library Overview
- Getting start with simple application Transcoding
- Write a plugin component
- Installation
- Contribution
Here is an Interactive Live (Ial hereafter) application, which is based on FFdynamic and shows how to use this library to develop complicated program.
Ial does video and audio mixing, then streams it out. It could be run in phones or cloud servers.
Here is an image got from an mobile app show its using scenario. Two streams are decoded, then mixed together and broadcast to audiences as one stream.
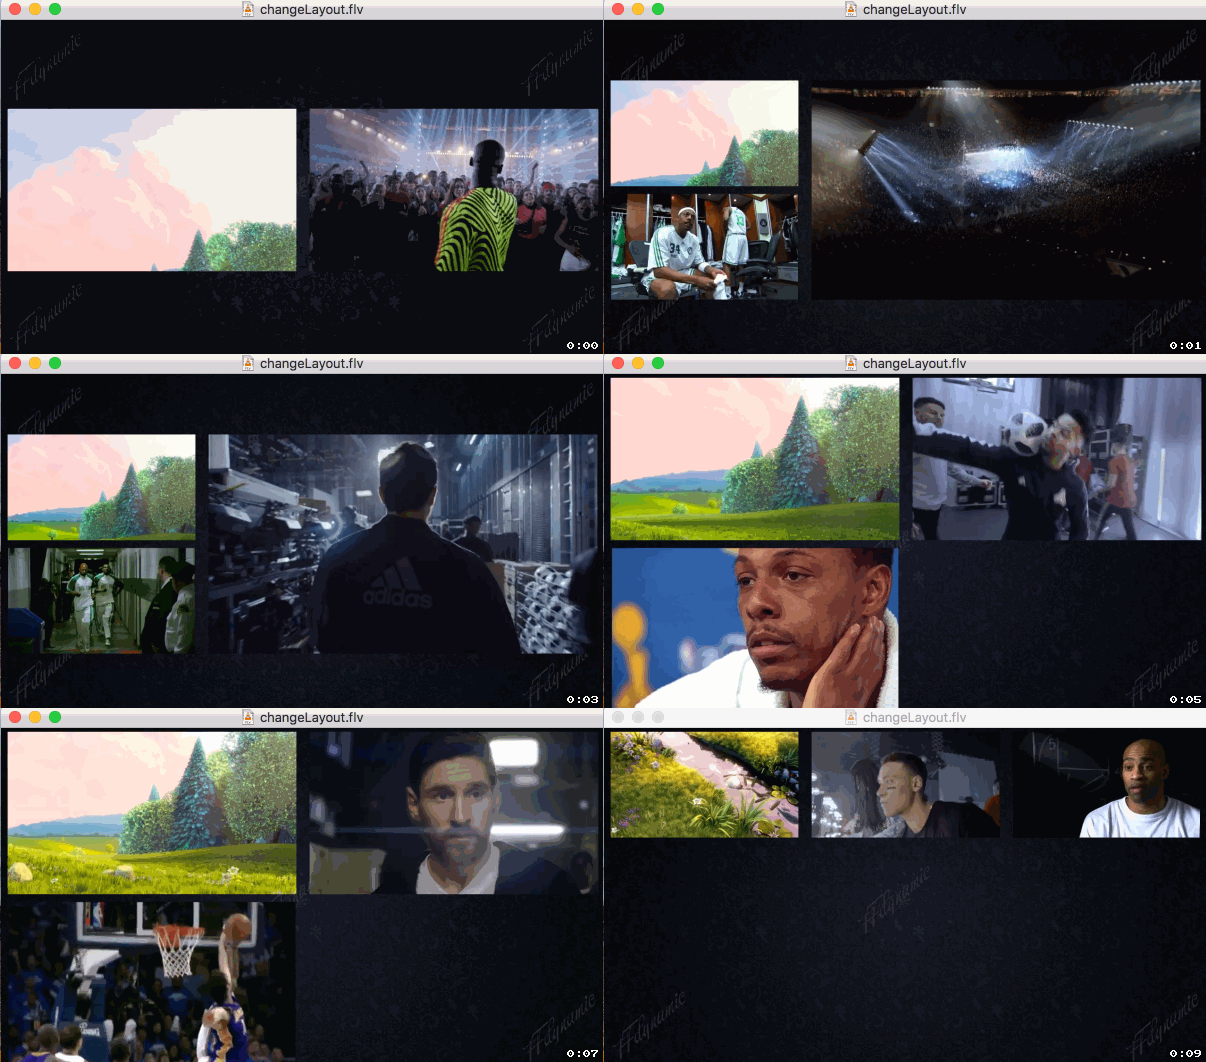
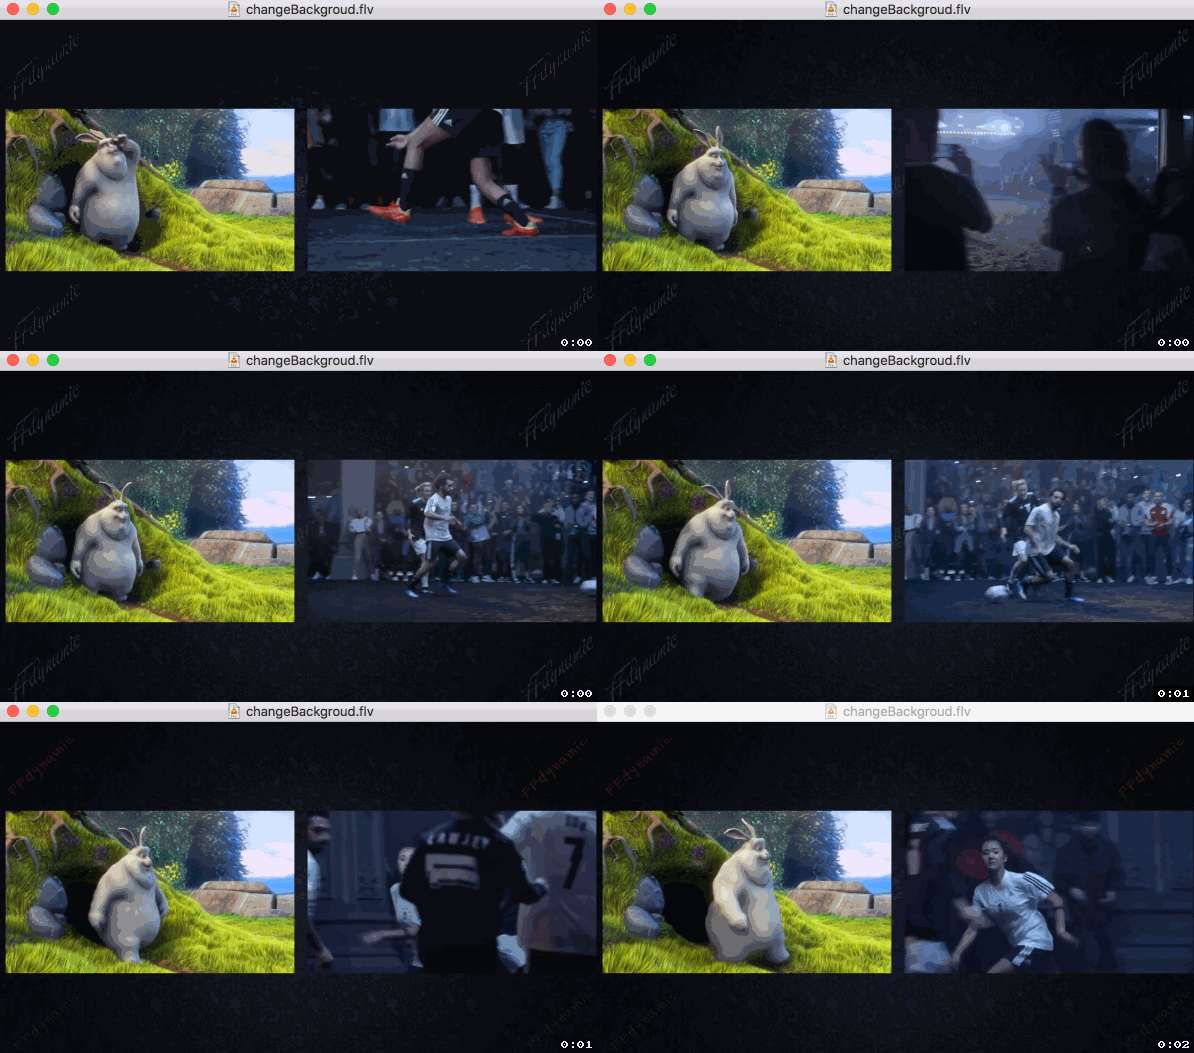
Interactive Live give more flexiable control over the mixing process (dynamical layout change, backgroup change, mute/unmute, etc..), shown in the Following gifs:
The above picture shows auto layout change when a new stream joined in (from 2 cells to 3 cells); then manually set the layout to 4 and 9 cells.
The above picture shows backgroud picture changed by a request (the text 'FFdynami' in backgroud changes font and size)
Both changes are quite smooth, without any frozen or stuck.
For more details, please refer to the application
- Extending: FFdynamic extends FFmpeg in the manner of doing video/audio process compositionally and each component's state can be dynamically changed on the fly.
- compositional
FFdynamic is structured in a modular way. It takes each component (demux, decode, filter, encode, muxer, and cutomized component) as a building block and they can be combined together as desired at creationg time or run time.
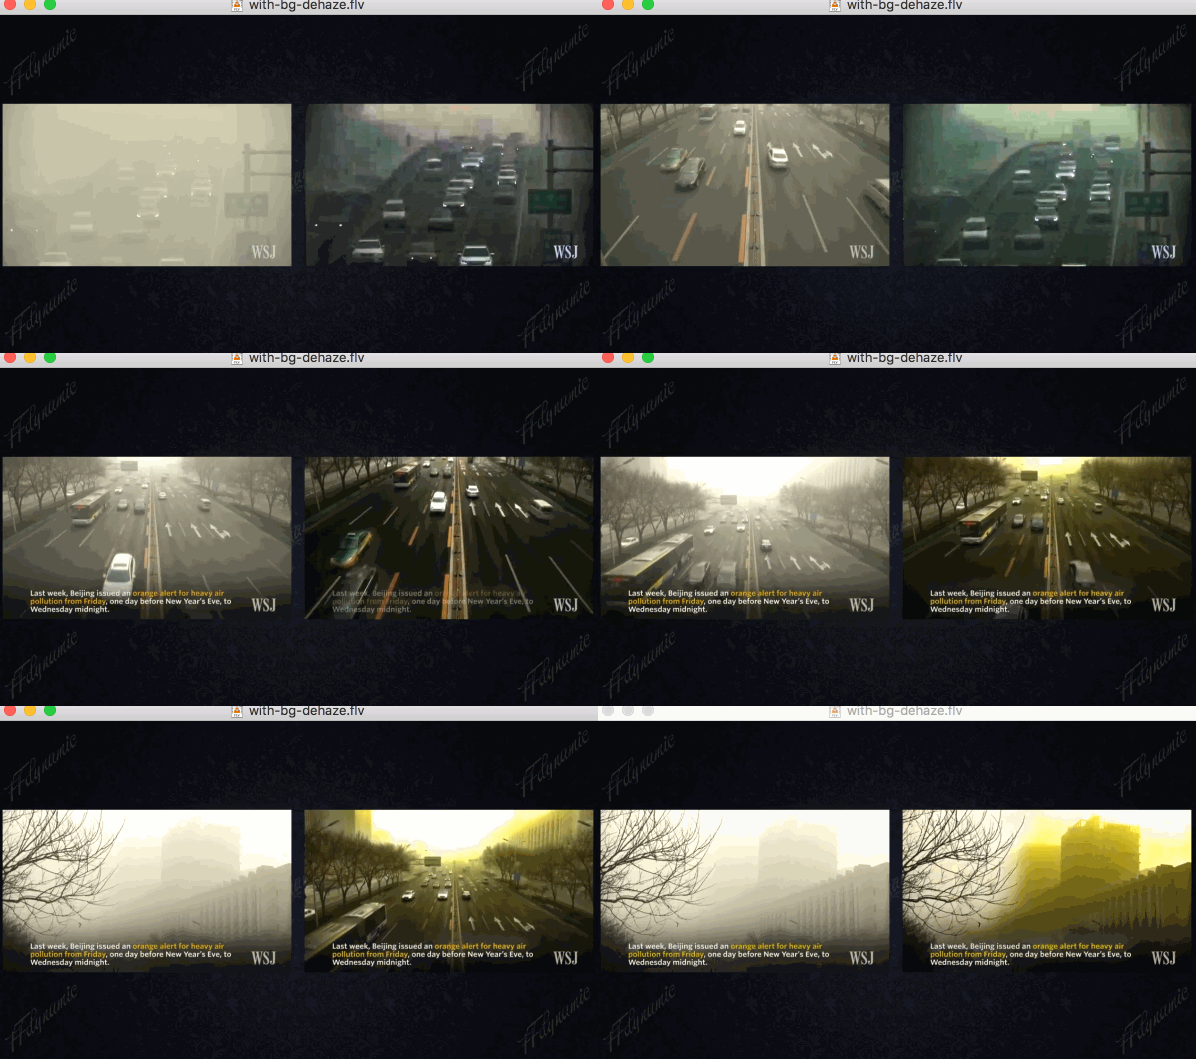
For instance, if we are developing a dehaze algorithm and would like to know how good the dehazed algorithm visually (in compare to original one). FFdynamic provides facilities that allow one to easily realize following composition:
Demux |-> Audio Decode -> |-> Audio Encode -----------------------------------------> |
      |                                                                               | -> Muxer
      |                   |-> Dehaze Filter -> |                                      |
      |-> Video Decode -> |                    | Mix original and dehzed ->| Encode ->|
                          | -----------------> |
As shown, after demux the input stream, we do video decode which will output to two components: 'Dehaze Filter' component and 'mix video' component; after dehaze, its image also output to 'mix video' component, in there we mix original and dehazed image into one. The whole example is here. Normally, one can freely combine components as long as the input data can be processed.
- on the fly
FFdynamic has a runtime event dispatch module, which can pass request to the component needs dynamical state change. For instance, one could set dynamical 'Key Frame' request to video encoder or 'mute' one audio stream.
FFdynamic also has a runtime components pub-sub module, which each component can subscribe interesed events from other components. For instance, one video encoder in a live show is willing to know the region of people faces in the incoming image', so that it could set more bitrate to this region. We can do this by subscribe events to a face detecting component and get published event with ROI.
- customization
One can define their own components, for instance
- a RTP demuxer with private fields
- a object detection module
- a packet sending control module Those components are plugins. Once they are done, they can be composed with other components.
In short, FFdynamic is a scaffold allows develop complex audio/video application in a higher and flexiable manner.
It is suitable for two kind of applications:
- real time audio/video process: live broadcast, video conference backend, transcoding, etc.. with run time control;
- develop new video/audio process algorithm which needs video clips as inputs and video clips as outputs, and communication or coorperation needed between video and audio streams;
We start with a simple scenario, transcoding, to take a flavor of FFdynamic.
   /* create demux, decode, encode, mux options */
    DavWaveOption demuxOption((DavWaveClassDemux()));
    demuxOption.set(DavOptionInputUrl(), argv[1]);

    DavWaveOption videoDecodeOption((DavWaveClassVideoDecode()));
    DavWaveOption audioDecodeOption((DavWaveClassAudioDecode()));

    DavWaveOption videoEncodeOption((DavWaveClassVideoEncode()));
    videoEncodeOption.setVideoSize(1280, 720);
    videoEncodeOption.setAVRational("framerate", {30000, 1001});
    DavWaveOption audioEncodeOption((DavWaveClassAudioEncode()));

    DavWaveOption muxOption((DavWaveClassMux()));
    muxOption.set(DavOptionOutputUrl(), "test-transcode.flv");

    /* build instances */
    DavDefaultInputStreamletBuilder inputBuilder;
    DavDefaultOutputStreamletBuilder outputBuilder;
    DavStreamletOption inputOption;
    inputOption.setInt(DavOptionBufLimitNum(), 20);
    auto streamletInput = inputBuilder.build({demuxOption, videoDecodeOption, audioDecodeOption},
                                             DavDefaultInputStreamletTag("test_input"), inputOption);
    auto streamletOutput = outputBuilder.build({videoEncodeOption, audioEncodeOption, muxOption},
                                               DavDefaultOutputStreamletTag("test_output"));
    CHECK(streamletInput != nullptr && streamletOutput != nullptr);

    /* connect streamlets and start */
    streamletInput << streamletOutput;
    DavRiver river({streamletInput, streamletOutput});
    river.start();
    ......
The source code is here.
This example read an input (local or online stream) then encode it to the format you required (it is just what transcoding does).
First, we create components by create its option:
    DavWaveOption demuxOption((DavWaveClassDemux()));
    demuxOption.set(DavOptionInputUrl, argv[1]);
This will create a demux option, and set input url. If we choose FFmpeg's demuxer (also other libav* components, encode, decode, fitler, muxer), we set other demuxer specific options through AVDictionary just the same as FFmpeg, for example,
demuxOption.set("probesize", "2000000"); // this option will pass to libavformat via AVDictionaryThen, no surprising, we create audio/video decode, audio/video encode, and muxer. Each components set desired options. At this point, no real component is really created, just their options.
    DavDefaultInputStreamletBuilder inputBuilder;
    DavStreamletOption inputOption;
    inputOption.setInt(DavOptionBufLimitNum, 20);
    auto streamletInput = inputBuilder.build({demuxOption, videoDecodeOption, audioDecodeOption},
                                             DavDefaultInputStreamletTag("test_input"), inputOption);
Here, we use a predefined input streamlet builder to build all components. A streamlet is a set of components, with convinient components' manage functionalities (start, stop, pause, etc.. and input/output data interface).
After build input/output streamlet, connect them by:
streamletInput >> streamletOutput;Finally, we start do the transcoding job by:
    DavRiver river({streamletInput, streamletOutput});
    river.start();
A river is just like a streamlet to 'DavWave' component, that it manages streamlet's state.
That is all for transcoding. If one wants more control over the process, dynamically change output bitrate, add outputs streams etc.., you can refer to 'Interactive Live' application. But before that, let's tatke a little bit more about 'Transcoding'.
We can modify above code a little bit to do multiple resolutions and bitrates output as follow:
    DavWaveOption videoEncodeOption1((DavWaveClassVideoEncode()));
    videoEncodeOption.setVideoSize(1280, 720);
    videoEncodeOption.setAVRational("framerate", {30000, 1001});
    DavWaveOption audioEncodeOption1((DavWaveClassAudioEncode()));
    DavWaveOption muxOption1((DavWaveClassMux()));
    muxOption.set(DavOptionOutputUrl, "test-transcode.flv");

    DavWaveOption videoEncodeOption2((DavWaveClassVideoEncode()));
    videoEncodeOption.setVideoSize(1920, 1080);
    videoEncodeOption.set('b', "6000k");
    DavWaveOption audioEncodeOption2((DavWaveClassAudioEncode()));
    DavWaveOption muxOption2((DavWaveClassMux()));
    muxOption.set(DavOptionOutputUrl, "test-transcode-1080p.mp4");

    ////////////////////////////////////////////////////////////////////////////
    DavDefaultOutputStreamletBuilder outputBuilder1;
    DavDefaultOutputStreamletBuilder outputBuilder2;
    auto streamletOutput1 = outputBuilder.build({videoEncodeOption1, audioEncodeOption1, muxOption1},
                                               DavDefaultOutputStreamletTag("test_output_1"));
    auto streamletOutput2 = outputBuilder.build({videoEncodeOption2, audioEncodeOption2, muxOption2},
                                               DavDefaultOutputStreamletTag("test_output_2"));
    CHECK(streamletOutput1 != nullptr && streamletOutput2 != nullptr);
    /* connect streamlets */
    streamletInput >> streamletOutput1;
    streamletInput >> streamletOutput2;

    DavRiver river({streamletInput, streamletOutput1, streamletOutput2});
    river.start();
Above code shows one input and two outputs case (useful for adaptive bitrate transcoding), and the code size is still samll. It scales 'linear'.
For performance, each component runs on its own thread, so the whole task is running in parallel.
On the contrary, FFmpeg do multiple output transcoding in parial parallel:
static int reap_filters(int flush)
{
    AVFrame *filtered_frame = NULL;
    int i;

    /* Reap all buffers present in the buffer sinks */
    for (i = 0; i < nb_output_streams; i++) {
        OutputStream *ost = output_streams[i];
        OutputFile    *of = output_files[ost->file_index];
        int ret = 0;
        ......
        while (1) {
            double float_pts = AV_NOPTS_VALUE; // this is identical to filtered_frame.pts but with higher precision
            ret = av_buffersink_get_frame_flags(filter, filtered_frame,
                                               AV_BUFFERSINK_FLAG_NO_REQUEST);
            ......
            ......
            switch (av_buffersink_get_type(filter)) {
            case AVMEDIA_TYPE_VIDEO:
                .......
                do_video_out(of, ost, filtered_frame, float_pts);
                break;
As shown, if we have 5 outputs (which is normal in live broadcast field, output 1080p60, 1080p30, 720p, 540p, 320p for diffrent devices), FFmpeg will do encode one by one (takes more time, cpu not fully used). Of cause, this is because FFmpeg not targeting this scenario.
Here we introduce how to write a plugin. We develop a dehaze algorithm and make it as a FFdynamic's component. Then we could compose it with other components freely. the following image shows the diagram we mentioned in the 'Overview' part, mix original and dehazed image together to check the result visually.
Refer to here for plugin source files.
- FFMpeg, glog, cmake (minimal version 3.2)
- compiler supports at least c++14 (GCC version 5 or above, Clang 3.4 or above, MSVC 19.0 or above)
- boost, protobuf3 (optional, only for the application 'Interactive Live')
- opencv (optional, if you would like to run plugin example)
protobuf3 is not well supports by some linux distributions' package manager, here is how to manually compile it(sudo required):
DIR=$(mktemp -d) && cd ${DIR} && \
git clone https://github.com/protocolbuffers/protobuf.git && cd protobuf && \
git submodule update --init --recursive && \
./autogen.sh && ./configure && \
make && make check && \
sudo make install && sudo ldconfig
    Under FFdynamic folder: 'sh build.sh'  will build FFdynamic library (need sudo when install)
Under app/interactiveLive folder: 'sh build.sh' will build FFdynamic library and Ial program.Install FFmpeg as usal, then
apt install -y cmake libgflags-dev libgoogle-glog-dev libboost-dev
Install FFmpeg as usal, then
yum install -y glog-devel gflags-devel cmake boost-devel
Install FFmpeg as usal, then
brew install cmake glog gflags protobuf boost
iOS and Android build is not implemented, pull request is welcome.
- nvidia driver, cuda tookit, if you prefer using nvidia codec
To alleviate the build process, there is a docker with all dependencies installed that you can play with.
Welcome all contributions. FFdynamic still in its early stage, although it is already deploied to thousands of server. Here are some TODO list:
- An auto data format negotiate module between components;
- A webui that can easily operate on Interactive Live application;
- Statistics for each component, process time, latency time, detailed info, etc..;
- Build an ELK, then it is easily to know and analyze running data;
- Nvidia codec supports (it is ongoing, will do it via ffmpeg);
- 'Interactive live' set video cell's border line, border color;


