In this demo, we'll show you how MSDN subscribers can create a Dev/Test VM using Gallery Images that include Windows 8.1 Enterprise and Visual Studio 2013 already installed. This demo is specifically for people with MSDN subscriptions. The Windows 8.1 client images, and Visual Studio 2013 images are not available to non-MSDN subscribers.
While it is called a "demo", it is really a step-by-step hands on lab that presenters and event attendees alike can follow to create a development environment in Azure.
### Goals ### In this demo, you will see how to:- Create a Windows Virtual Machine in Azure
- Configure the operating system security
- Install additional software and tools as needed
- Azure Virtual Machines
- Azure Virtual Machine Windows Client Images for MSDN Subscribers
- Visual Studio 2013 Gallery Image for MSDN Subscribers
In order to execute this demo you need to do a little prep.
- IMPORTANT - Follow all of the steps in this demo to create a VM ahead of time. This will allow you to continue show how subsequent steps are done without having to wait for the provisioning times, reboot times, etc.
- Startup the VM to make sure it is running and that you can connect to it via RDP, BEFORE you start the demo
- As you do the demo live, show them how to create the VM, but rather than waiting for it to be provisioned, switch to the VM you created ahead of time.
- Create an Azure Virtual Machine using an MSDN Gallery Image
- Configure Security to allow for Windows 8.1 App Development
- Install Additional Software as Needed
- Shutting Down or Deleting Your VM
### Create an Azure Virtual Machine using an MSDN Gallery Image ###
-
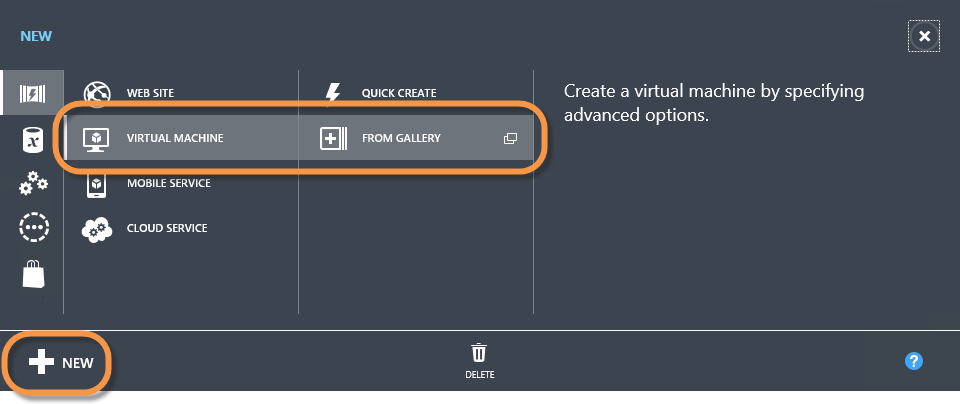
Login to the Azure Managment Portal (https://manage.windowsazure.com) using the appropriate Microsoft Account, and switch to the "VIRTUAL MACHINES" page, then along the bottom, click "+NEW" | "COMPUTE" | "VIRTUAL MACHINE" | "FROM GALLERY":
Note: The Microsoft Account you connect as must have access to an Azure Account associated with an MSDN benefit. Otherwise, the MSDN gallery images will not be available. If you have more than one subscription associated with the same Microsoft Account, use the Subscriptions filter along the top of the portal window to choose the appropriate MSDN subscription.
-
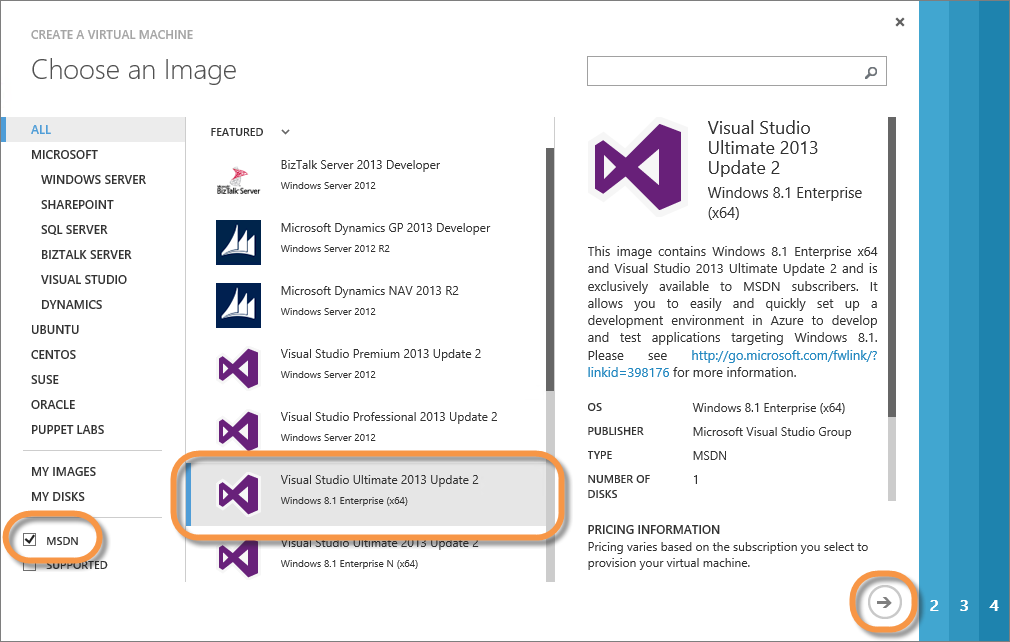
On the "Chose an Image", enable the "MSDN" checkbox, and select the "Visual Studio Ultimate 2013 Update 2 on Windows 8.1 Enterprise (x64)" (or an appropriate later version), and click the "Next" (Right Arrow) button to continue:
-
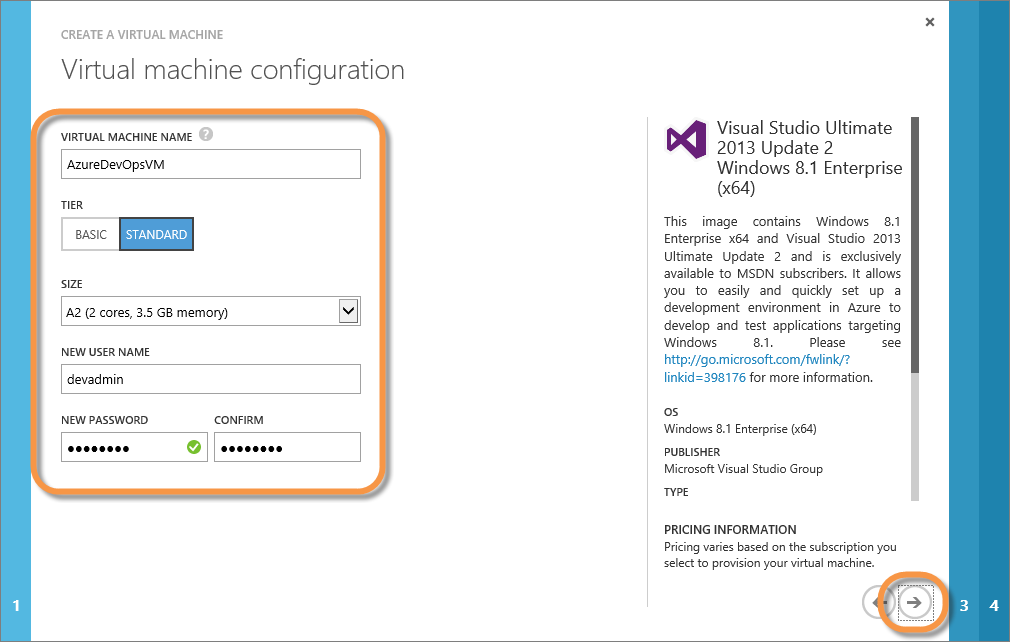
On the "Virtual machine configuration" page, enter the following, then click the Next (Right Arrow) button to continue:
- VIRTUAL MACHINE NAME: Enter a valid windows server computer name
- TIER: Choose STANDARD. You can actually choose BASIC if you prefer, and the VM will cost slightly less to execute, but you can't do load balancing or virtual networks with BASIC VMs. I prefer to choose STANDARD for demo VMs I will be deleting soon anyhow so I can show all features if asked.
- SIZE: Choose A2. You can go larger if you have available cores and credits. I don't recommend going smaller for demo though because the VM performancw will suffer, and the demo will run slower. Use your best judgement, but remember that you can change this in the future if needed.
- NEW USER NAME: Enter a valid windows user name. This will be the name of the built-in administrator account.
- NEW PASSWORD / CONFIRM: Enter a complex password for the built-in administrator account.
-
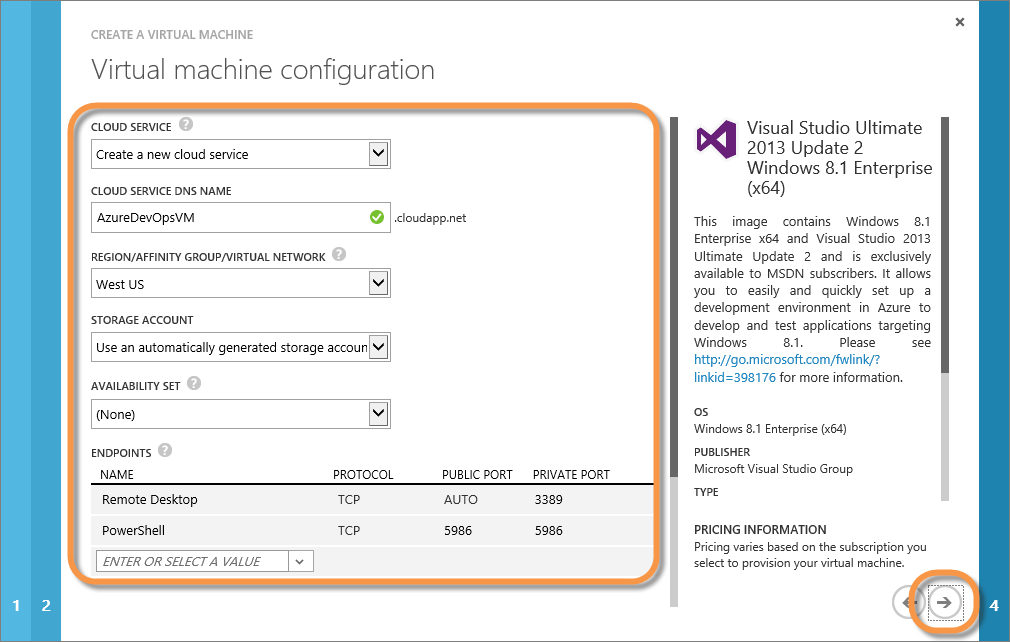
On the next "Virtual Machine Configuration" page, enter the following, then click the Next (Right Arrow) button to continue:
- CLOUD SERVICE: Choose Create a new cloud service
- CLOUD SERVICE DNS NAME: Accept the default cloud service host name if it is valid. If it isn't, edit it until you get a valid, unique, hostname (indicated by the green circle and checkmark). This is the fully qualified DNS host name you will use to access all VM endpoints exposed on this cloud service.
- REGION / AFFINITY GROUP / VIRTUAL NETWORK: Choose the data region closest to you to host your VM.
- STORAGE ACCOUNT: Choose "Use an automatically generated storage account" to let the wizard provision an account for you.
- AVAILABILITY SET": Choose (None)
- ENDPOINTS: Leave the default Remote Desktop and PowerShell endpoints. Note that the **Remote Desktop"" endpoint uses a dynamic (AUTO) public port that will be assigned at creating time. This allows you to run multiple VMs in the cloud service, each with their own custom RDP endpoint.
-
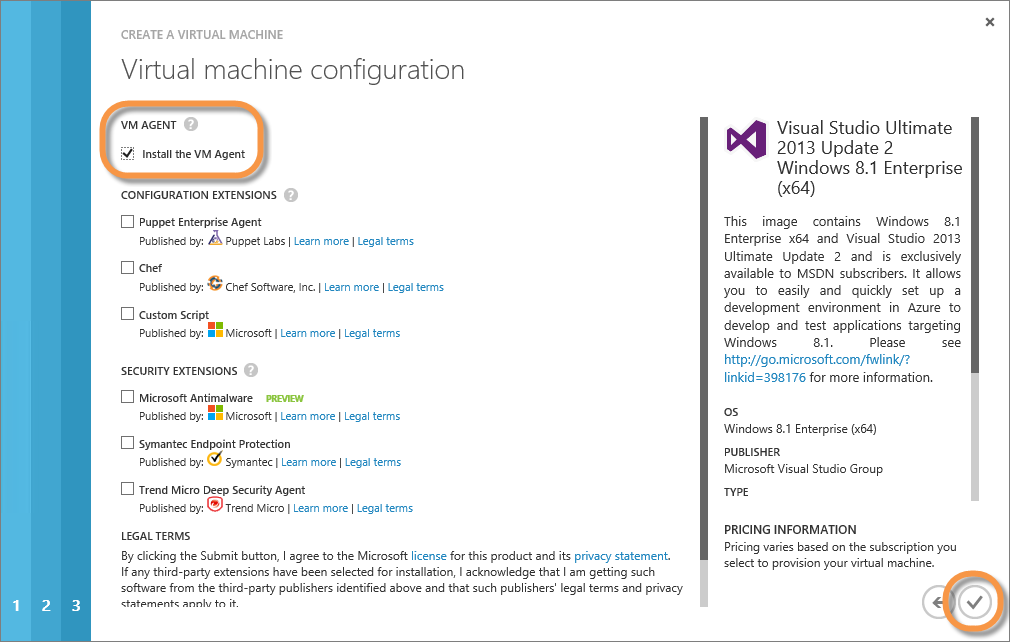
On the final "Virtual maching configuration" page, leave the defaults (ensure that "Install the VM Agent" is checked), and click the "Finish" (Checkmark) button to complete the wizard.
Note: The VM Agent allows a few things. Allows various extensions to be installed in your VM. These include the VMAccess extension, that can be used to reset your password if needed, the BGInfo extension which configures the BGInfo utility to show useful information on your VM wallpaper, as well as the Puppet Enterprise Agent, and the Chef agent which allow the VM to be managed by a Puppet or Chef server. We won't mess with Puppet or Chef in this demo.
-
Back in the portal, on the VIRTUAL MACHINES page, you should now see your new VM being provisioned. It will take 5-10 minutes for the VM to be ready to connect to via RDP. If you have a previously created VM ready to go, this is a good time to swtich over to it to demonstrate the remaining steps so you don't have to wait for the VM provisioning to complete. Its ok if all subsequent steps have been completed on the second VM. You can still how how the steps are completed, even if they are already done.
-
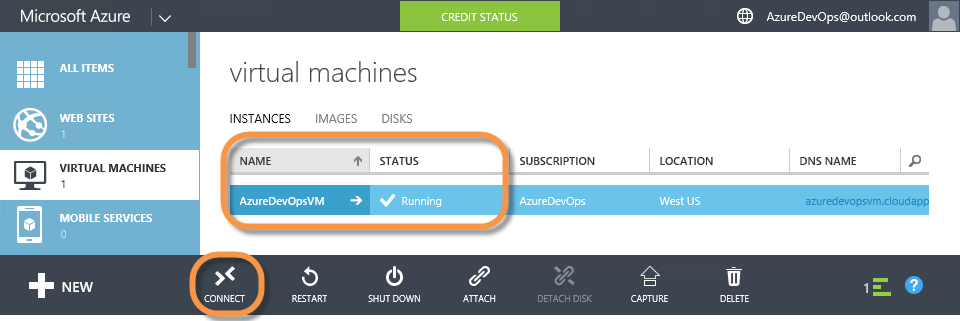
Once the VM is running, you can select it by clicking on its status, not it's name. Clicking on it's name opens it's dashboard. Which is fine if you want to show it, we just aren't going to walk through the dashboard here. Once you have it selected, you can click on the "CONNECT" button along the bottom of the portal.
-
The portal will inform you that a .RDP file will be downloaded. Click OK to acknowlegde.
-
Your browser should prompt you to save the file. Save it to your "Downloads" folder:
-
Open the folder where the .RDP File was downloaded:
-
Then double click on the .RDP file to open it.
Note: Of course you could have just opened it rather than saving it, but by saving it, you can open it and edit it. This may be necessary if you need to manage which devices get connected, the screen resolution, as well as other settings. Later we'll talk about editing the file as a way to enable Microsoft Accounts to login to the remote VM. So, for that reason we are saving it here now.
-
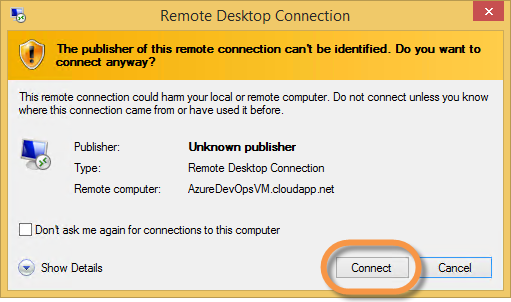
If prompted to confirm the publisher of the .RDP file, optionally enable the "Don't ask me again for connections to this computer" checkbox if you don't want to receive this prompt in the future. Then click "Connect" to confirm.
-
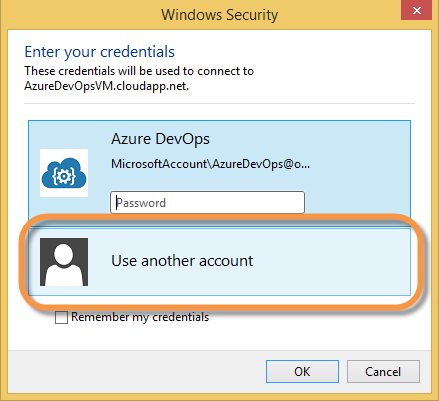
In the "Windows Security" dialog, first select "Use another account":
-
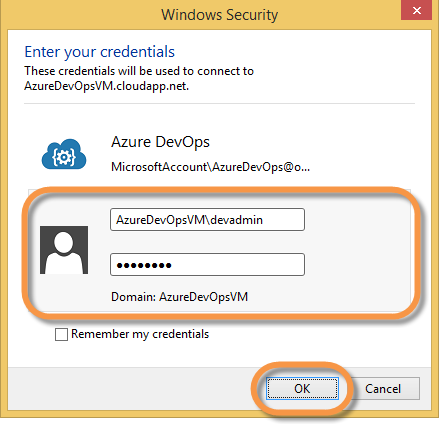
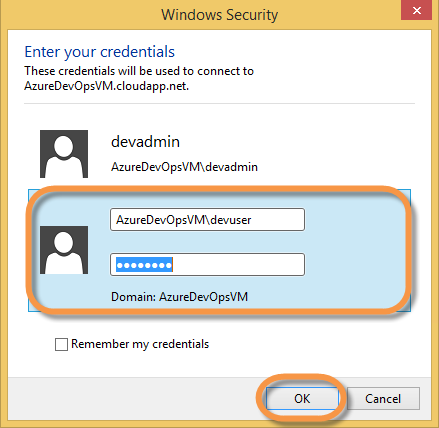
Then, in the credential prompt enter:
- User Name: Enter the built-in administrator user name you specified when creating the VM. You must enter it in the <VM Name>\<User Name> format.
- Password: The complex password you specified for the built-in administrator account when creating the VM earlier.
-
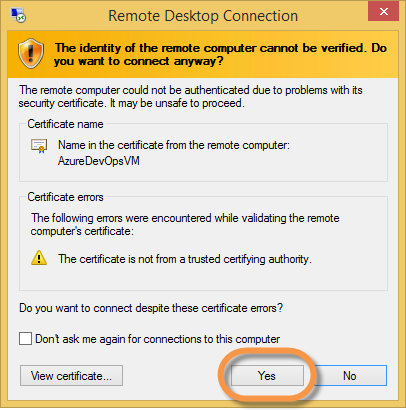
If you receive a prompt stating that "The identity of the remote computer annot be verified...", optionally enable the "Don't ask me again..." checkbox if you don't want to receive prompts in the future, then click "Yes" to continue:
-
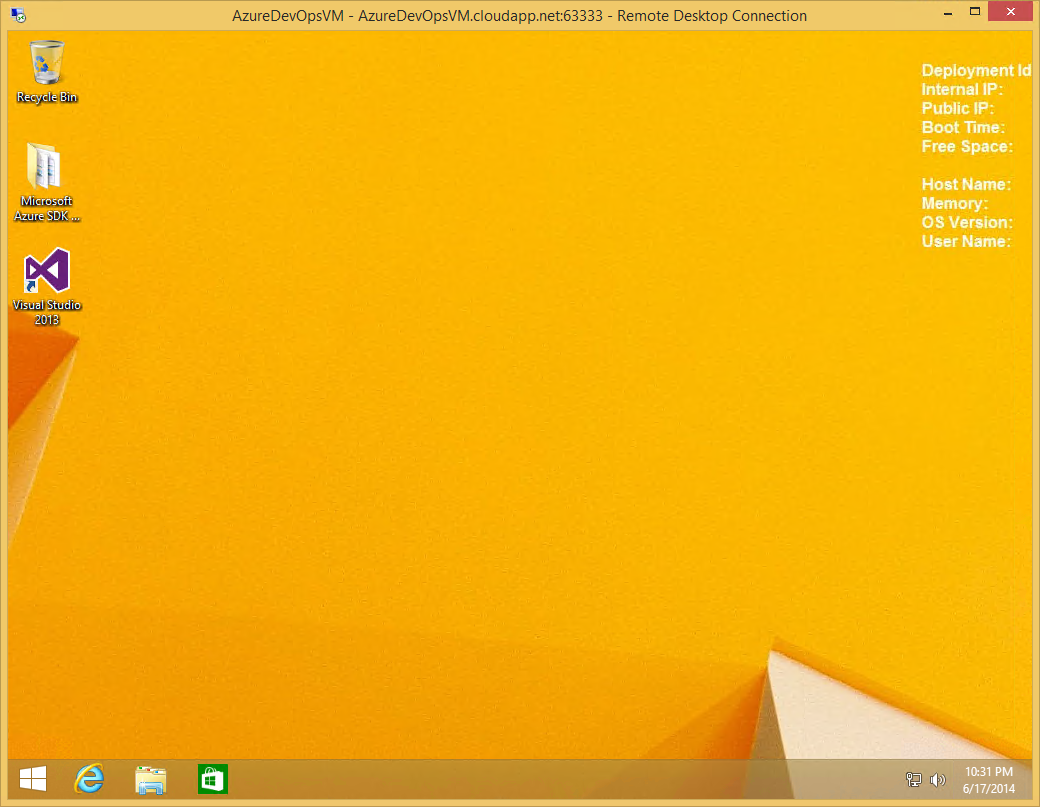
When the connection completes, you should see the remote desktop:
### Configure Security to allow for Windows 8.1 App Development ###
If you hope to do Windows App development with this VM (unfortunately, you can't currently do Windows Phone App development in an Azure VM), you will need to login as a separate account, that is not the built-in administrator. This is because the built-in administrator has policy restrictions set on it that prevent it from deploying store apps. If you tried yourself, when you tried to debug a Windows Store app in Visual Studio, you would receive an error like this:
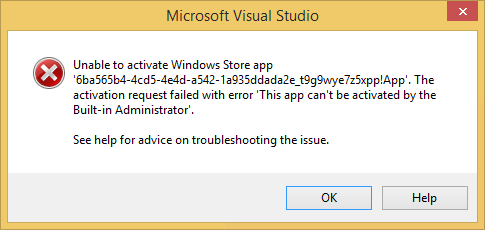
So, what kind of account should you use? Well, you have two choices:
- A traditional "Local" account: Easiest, but least funcationality
- A Microsoft Account: Requires a few more steps, but has all the benefits of a Microsoft Account
If you choose to use a Microsoft Account, you again have a decision to make:
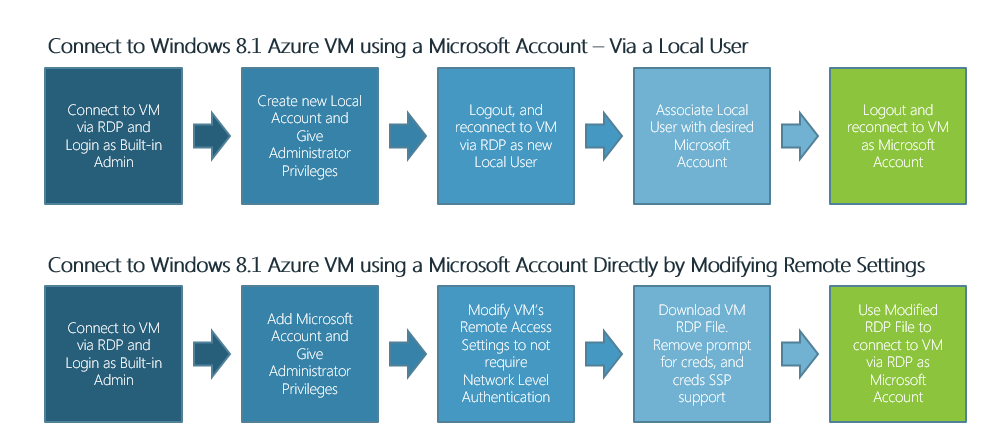
- Create a "Local" account first, then associate it with a "Microsoft Account": Messy from an "account" perspective, but all-in-all is probably the easiest.
- Add a "Microsoft Account" Directly. Cleaner from an "account" perspective but requires chaning remote desktop, and RDP file settings to work.
For this demo, we will use the first option of creating a Local account, then associating it with a Microsoft Account. This doesn't require changing any Remote Desktop or RDP file settings, and as such is the easiest way to work with an Azure VM, since the RDP file would need to be edited each time it was downloaded. If you want to learn about the second option of adding a Microsoft Account directly, and modifying the Remote Desktop and RDP file settings, go to Windows Client images for MSDN subscribers and read the instructions under the "How do I use a Microsoft account to remote desktop into the VMs?" heading.
-
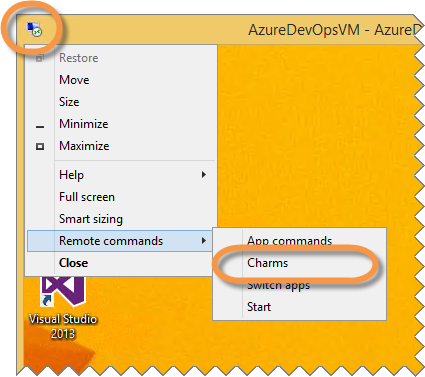
In the Remote Desktop Connection window for the VM, ensure that you are logged in as the built-in administrator account you specified when creating them VM. Access the system "Charms" bar by moving your mouse to the lower right-corner of the remote desktop, or by using the Remote Desktop Connection window's system menu:
Or
-
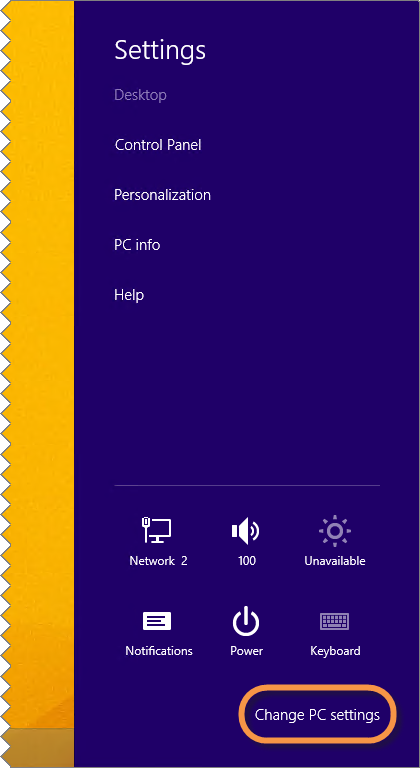
Then, click on the "Settings" charm:
-
Then click on "Change PC settings"
-
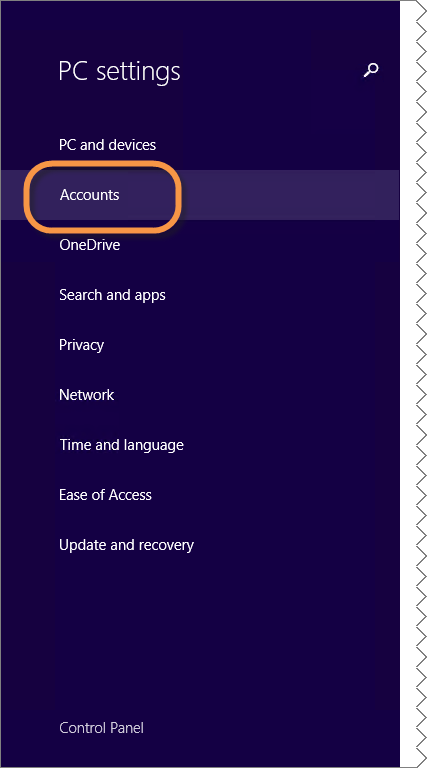
Then click on "Accounts"
-
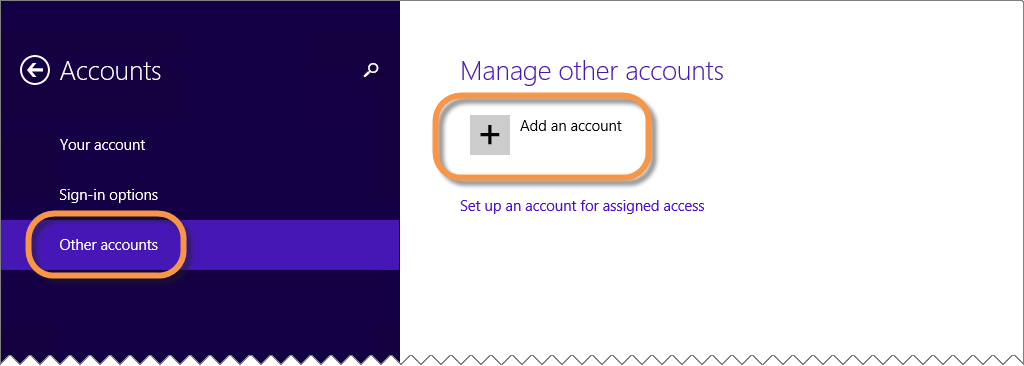
On the "Acounts" Page, click "Other Accounts" then **"Add an account"
-
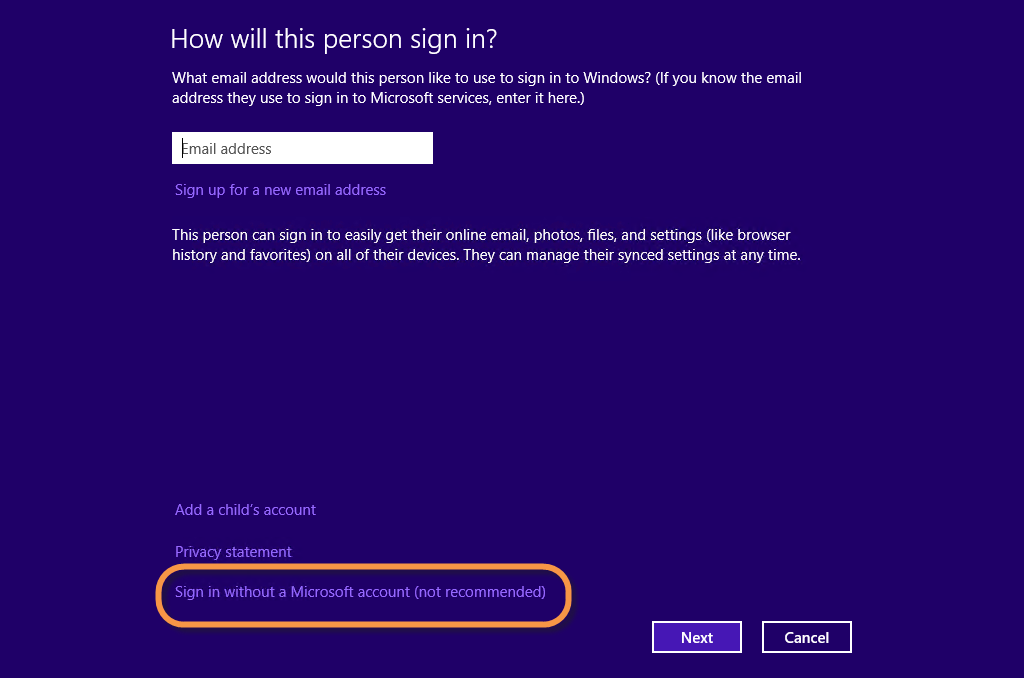
On the "How will this person sign in?" page, click the ""Sign in without a Microsoft account (not recommended)"* link along the bottom. Don't worry about that "not recommended" part. We'll associate it with our Microsoft Account in just a bit.
-
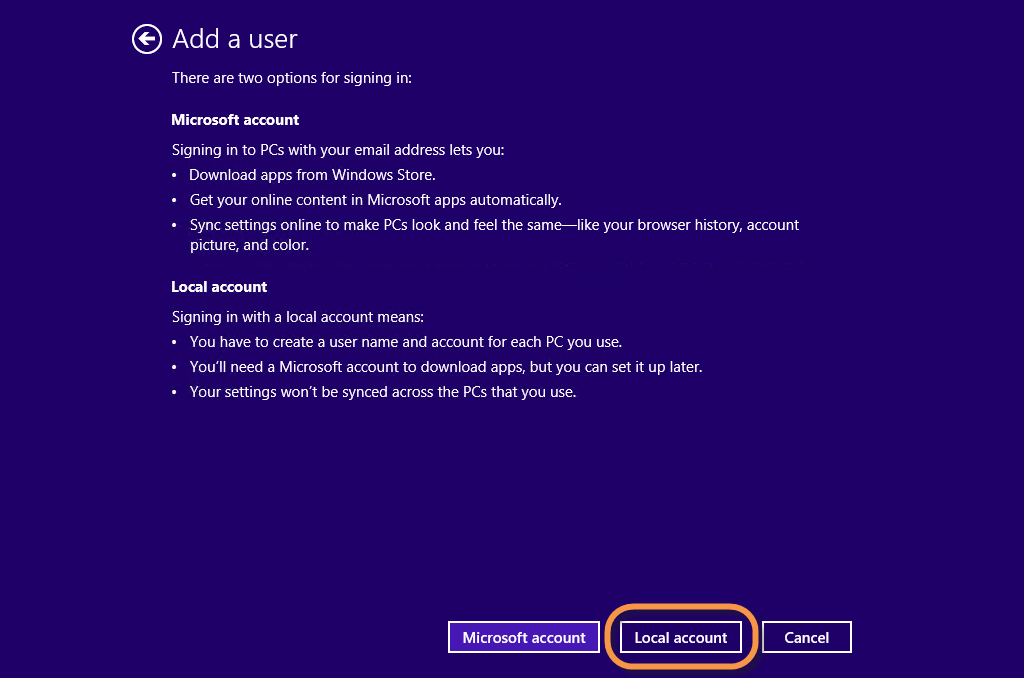
On the "Add a user" page, click the "Local account" button
-
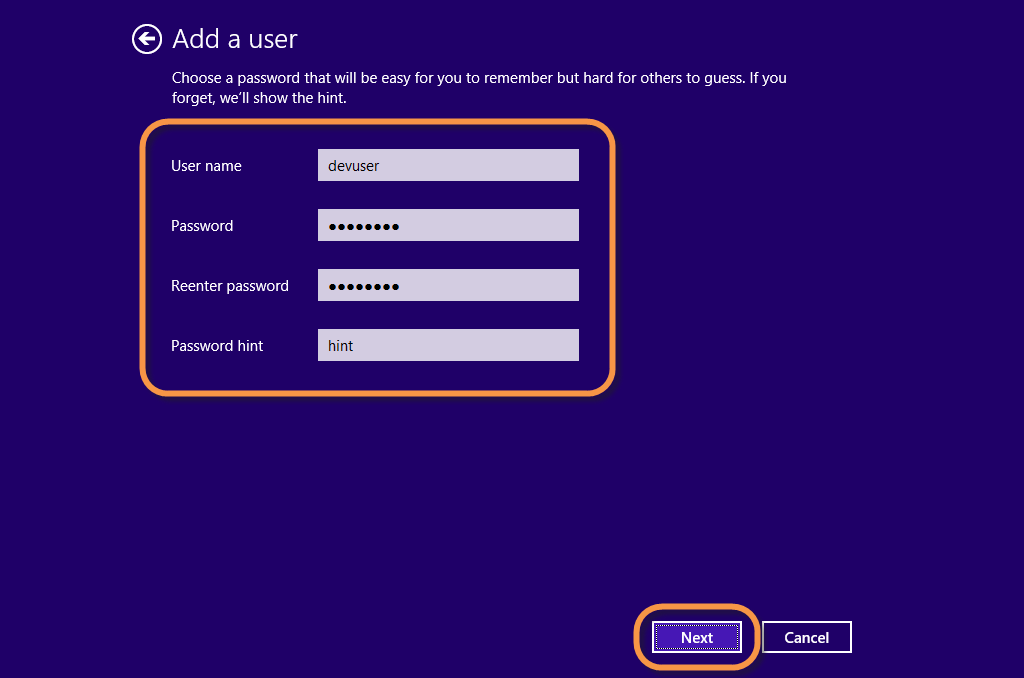
On the next "Add a user" page, enter the credentials for the new user and click "Next"
-
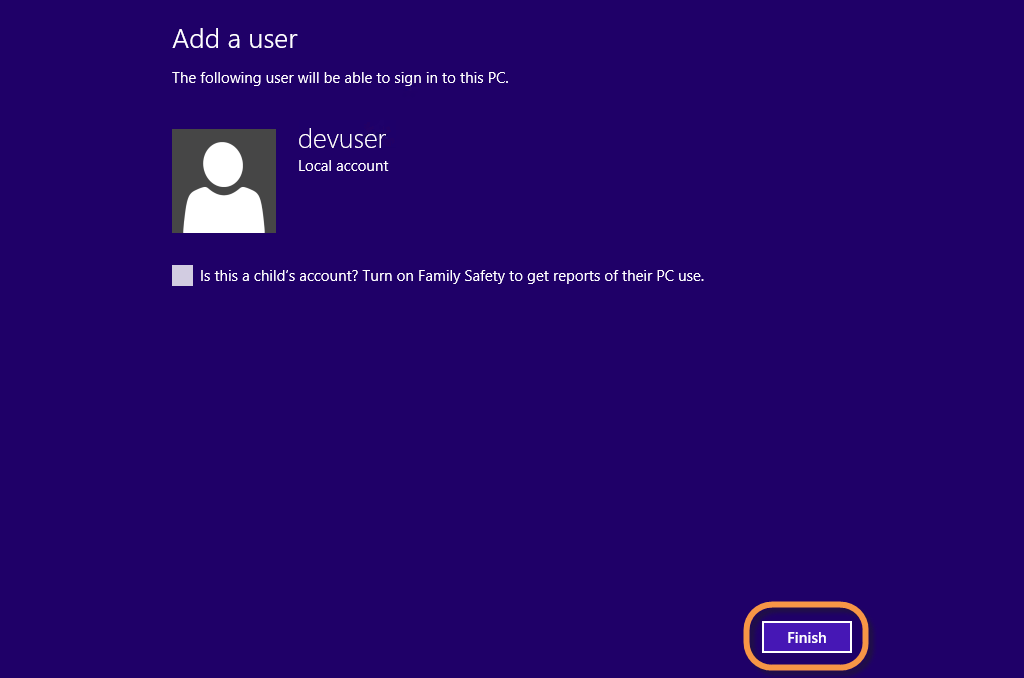
On the final "Add a user" page, click "Finish"
-
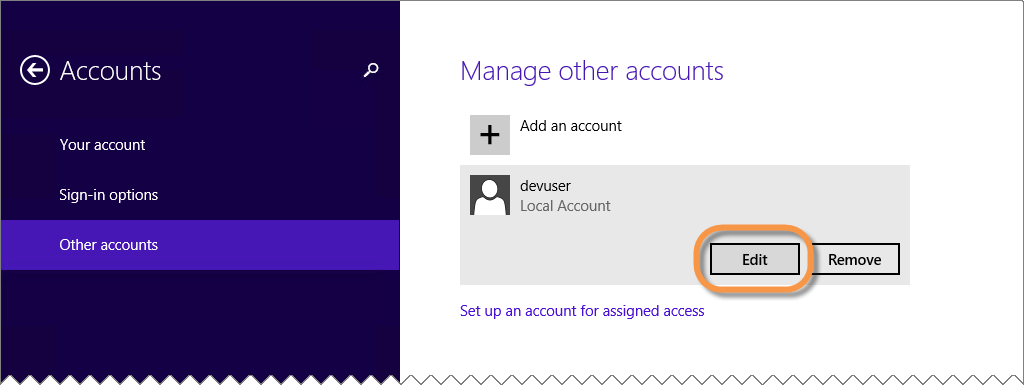
Back on the "Manage other accounts" page, click the new user, then click "Edit" to modify it:
-
In the **Edit account, change the user type to "Administrator" (You don't have to do this, but it makes sure that your dev user will have all the permissions it needs in the VM). Then click "OK"
-
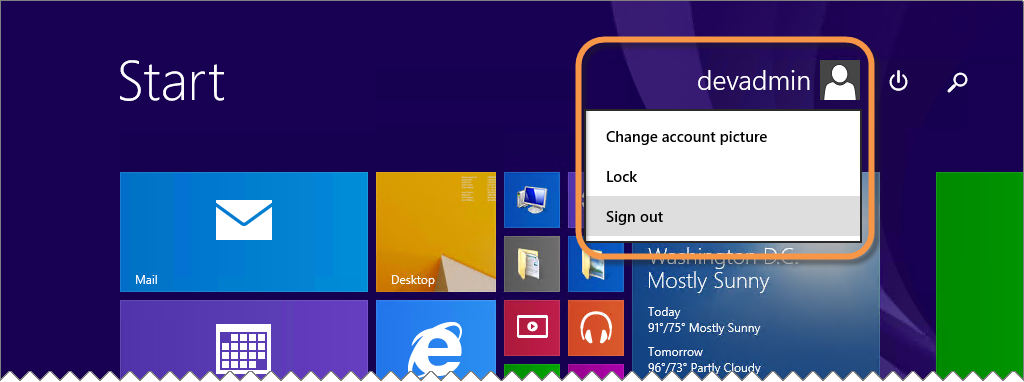
Return to the Start Screen in the remote VM (you can use the Remote Desktop Connection window commands as described previously). The click on the built-in administrators user name, and select "Sign out" to log out, and disconnect from the VM. The Remote Desktop Connection window will close.
-
Back on your machine, re-connect to the VM either by opening the saved .RDP file or by selecting the VM in the portal, and choosing "CONNECT" again.
Or
-
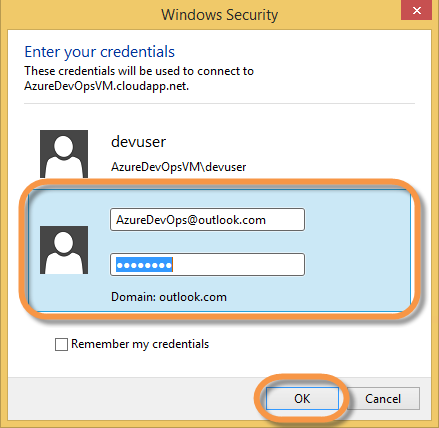
Again, follow the prompts, but this time login using the credentials of the Local user you just created (Make sure to use the <VM Name>\<User Name> format for the user name.
-
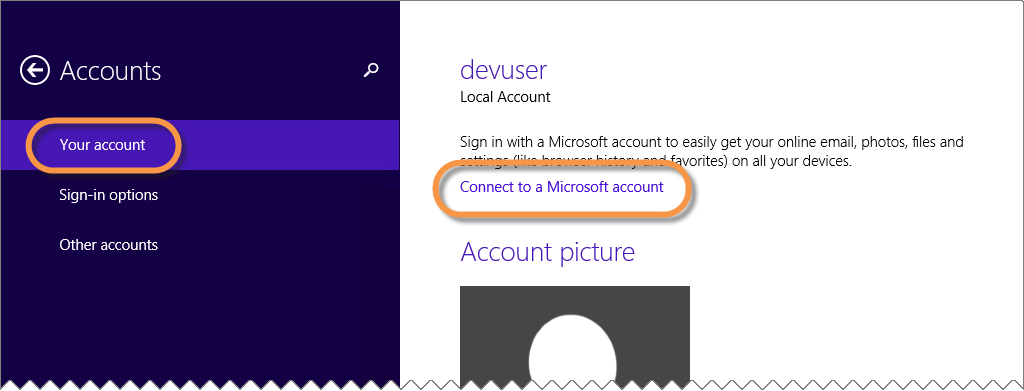
Using the steps described above, return to the ""Accounts"* page in ** PC Settings"**. Then from the "Your account" page, click "Connect to a Microsoft account"
-
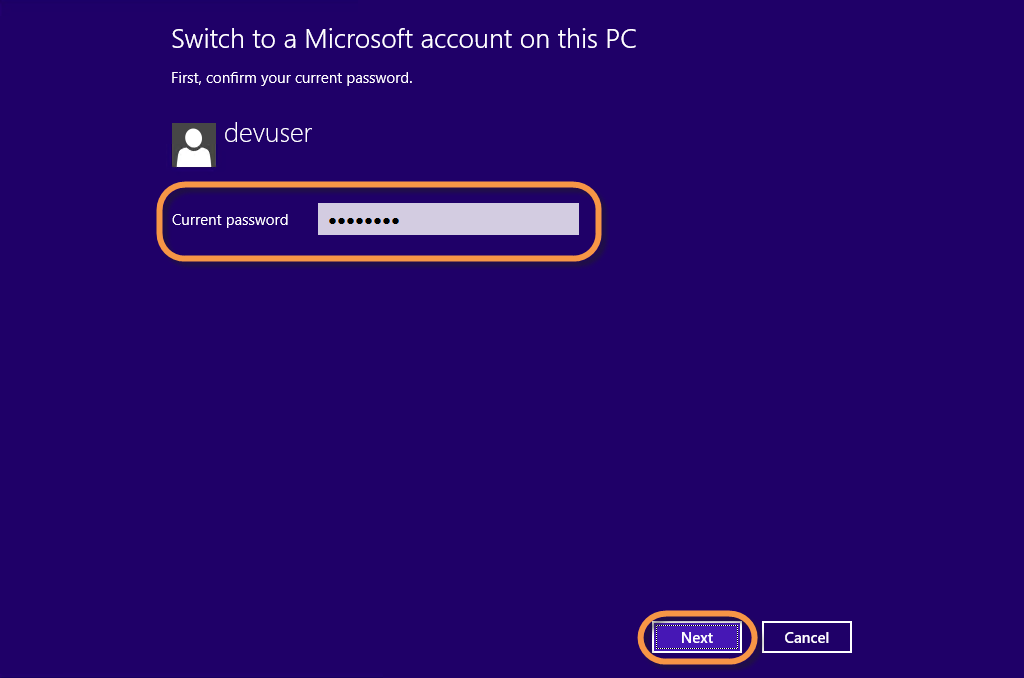
Confirm the password of the currently logged in local user, and click Next:
-
Then, enter the credentials for the Microsoft Account you wish to use:
-
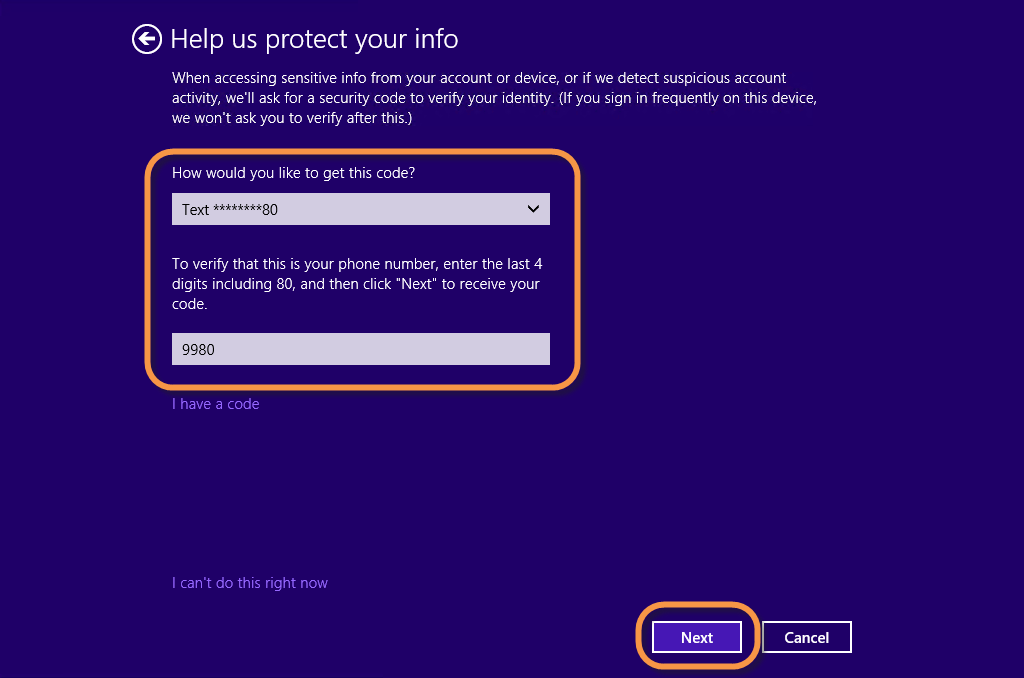
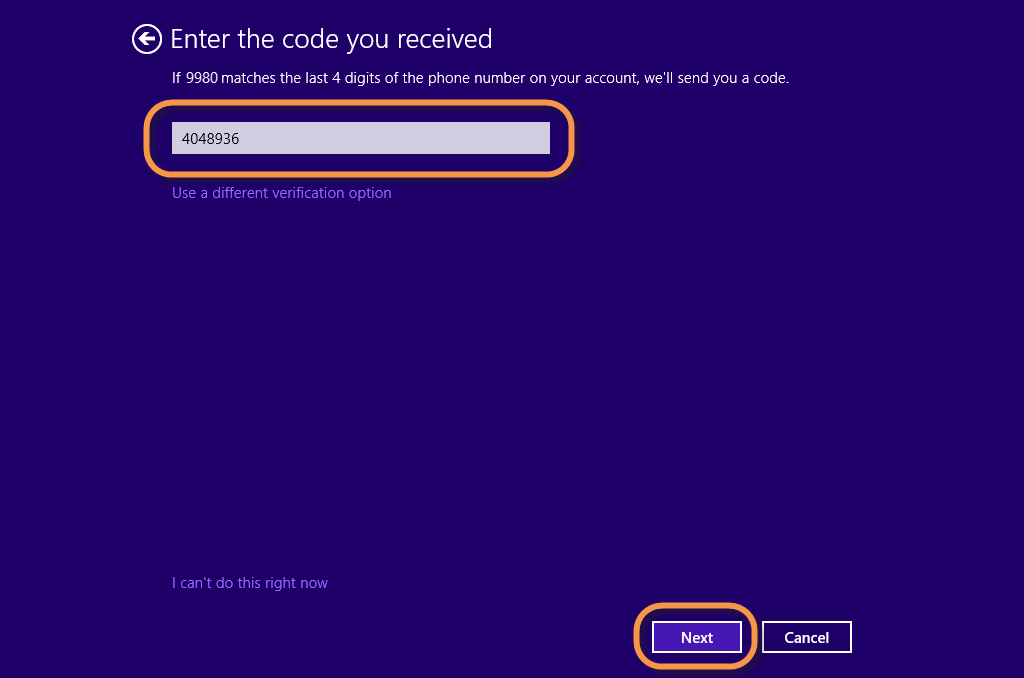
On the "Help us protect your info" page, follow the prompts to verify your identity:
-
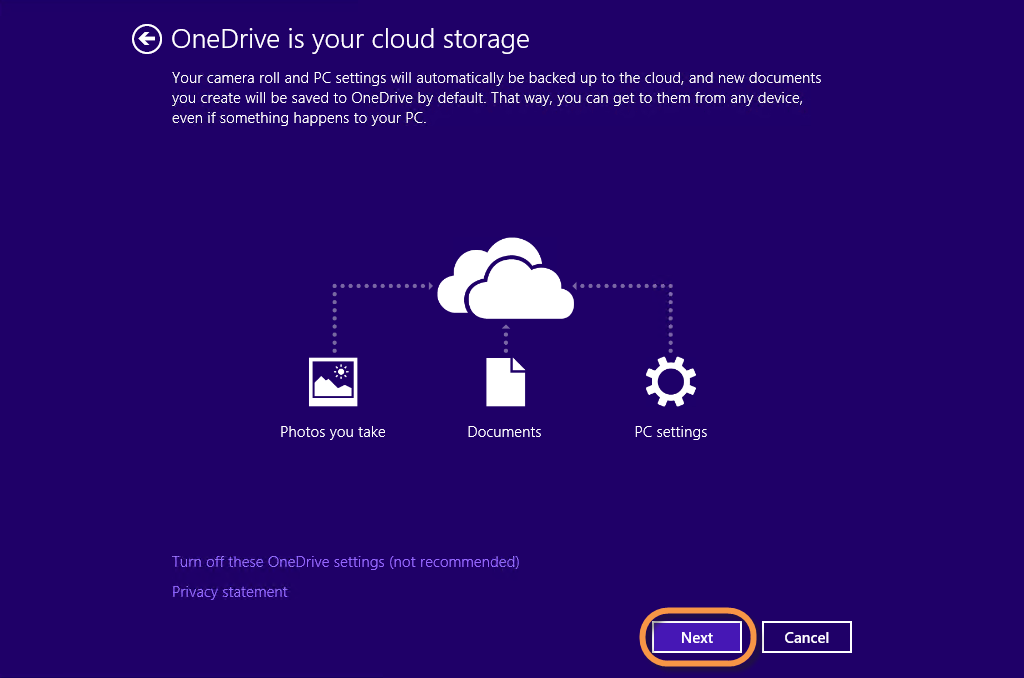
Click "Next" on the OneDrive page
-
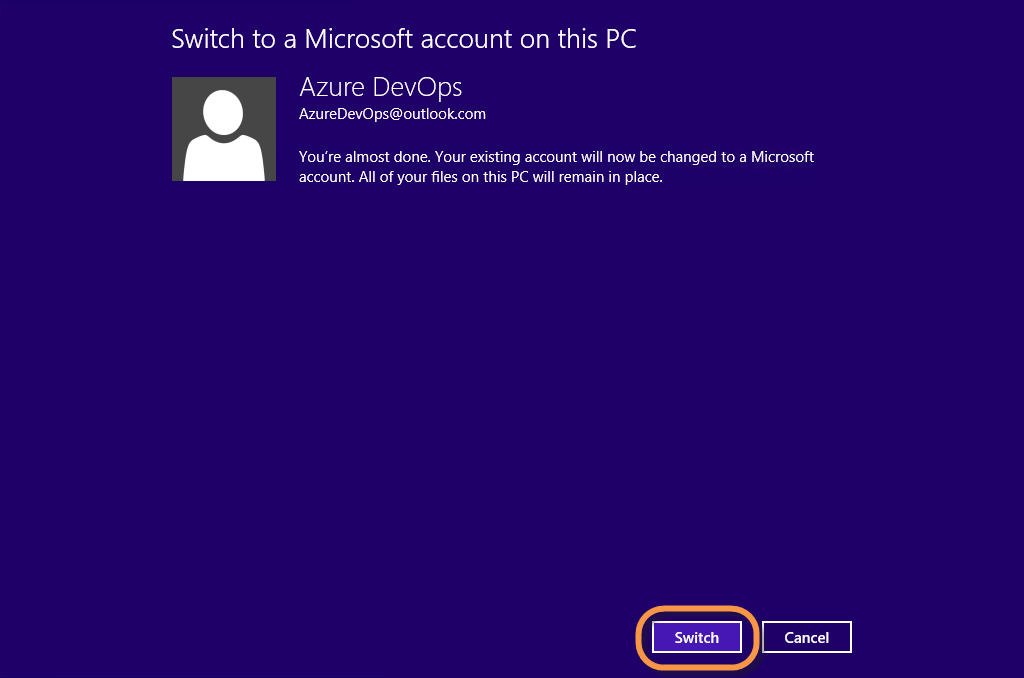
Finally, click "Switch" to confirm the switch:
-
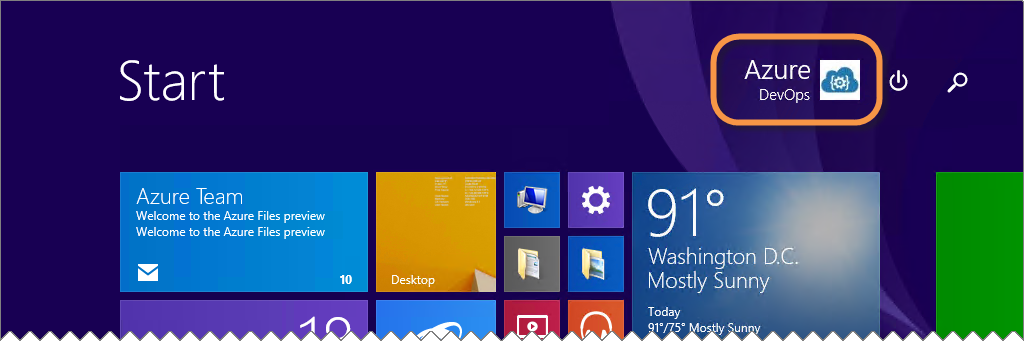
Sign out of the Remote Desktop Connection as described before, and re-connect one more time, this time using your Microsoft Account credentials for the connection:
-
You should now be connected with your Microsoft Account, with local Administrator privileges!
-
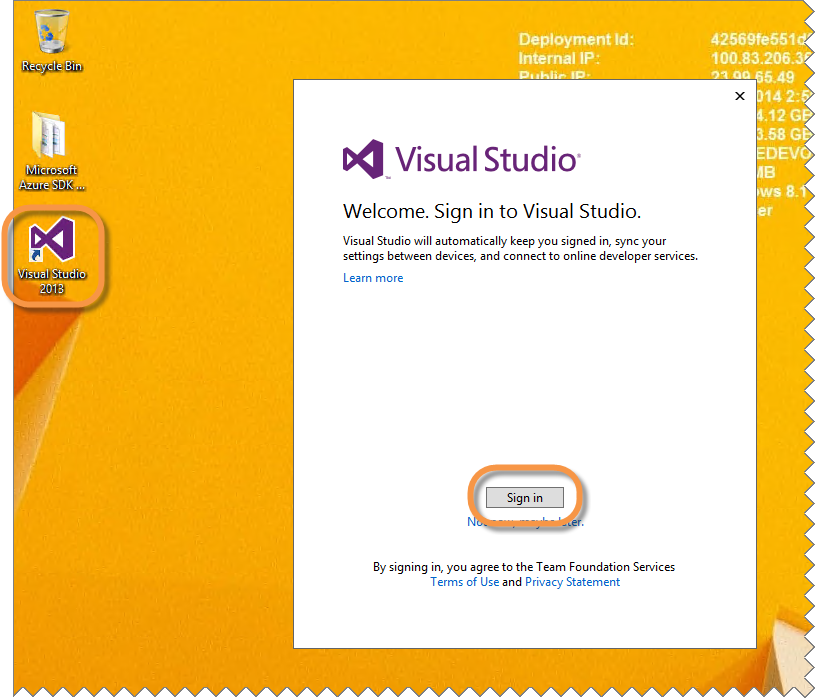
Next, let's open Visual Studio and get signed in. On the desktop of the VM, click the "Visual Studio 2013" icon, and when prompted, click "Sign In"
-
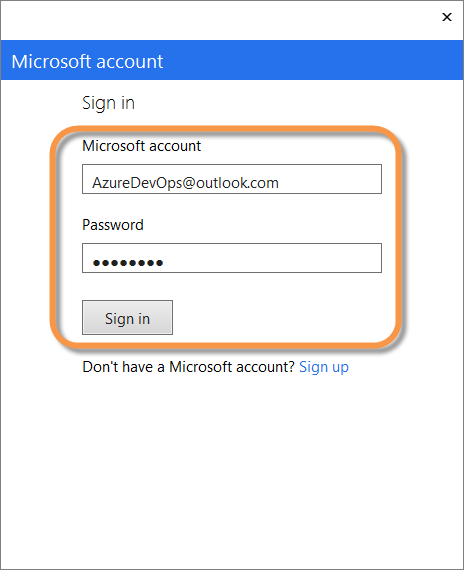
Enter the credentials for the Microsoft Account associated with your MSDN subscription, and click "Sign in"
-
If any other prompts appear, answer them to the best of your ability
-
When complete you should be signed into Visual Studio with your Microsoft Account
-
You can close Visual Studio when you are done.
### Install Additional Software as Needed ###
The VM image we used already has "Visual Studio Ultimate 2013 Update 2" installed, but we often need additional tools. If you plan on using this VM for the subsequent demos in this series, you will also want to ensure that you have
- "Azure SDK 2.3" or later
- "Applicaiton Insights Tools for Visual Studio"
- Any Updates to Visual Studio
- Optionally SQL Server 2014 Express or Developer Editions
- etc.
In this demo we'll walk through the first few installations.
-
Open a Remote Desktop Connection to your VM, and login as the Microsoft Account we provisioned previously. All subsequent steps are to be performed within the Remote Desktop Connection window unless otherwise specified.
-
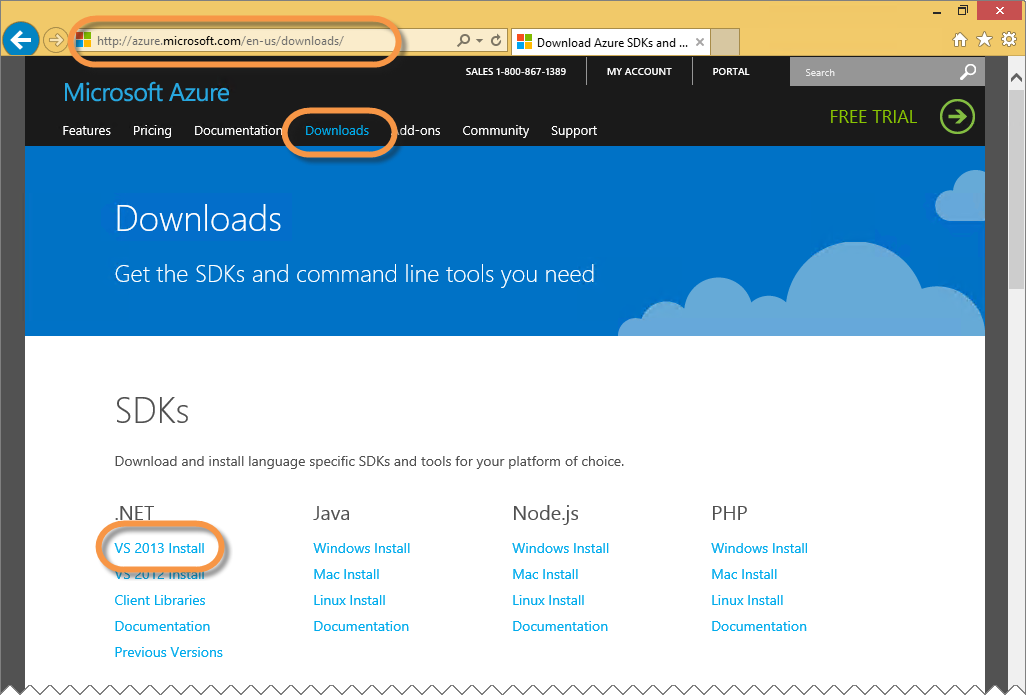
Open Internet Explorer and navigate to "http://azure.microsoft.com" (If prompted, select to "Use Recommended Settings" in IE). From the "Downloads" page, click the "VS 2013 Install"
-
When prompted, click "Run" to run the installer after it is downloaded:
-
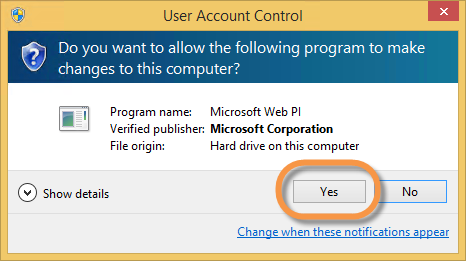
In the "User Account Control" window, click "Yes"
-
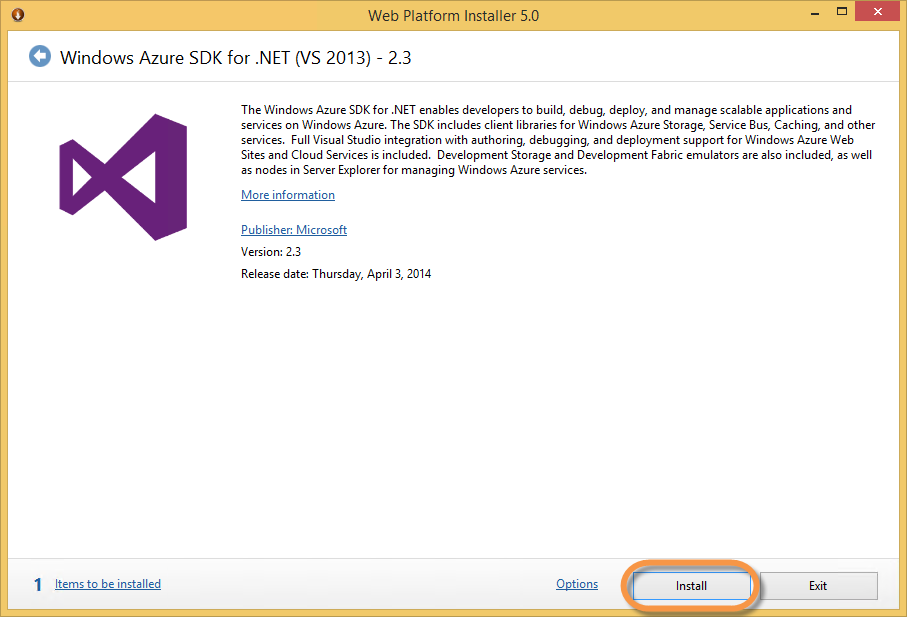
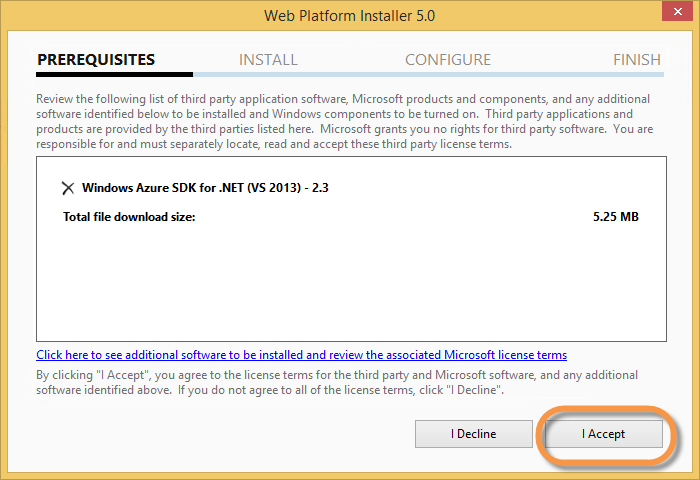
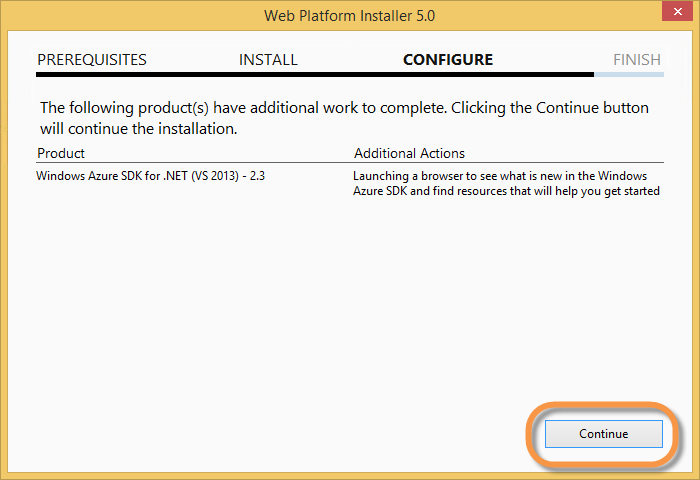
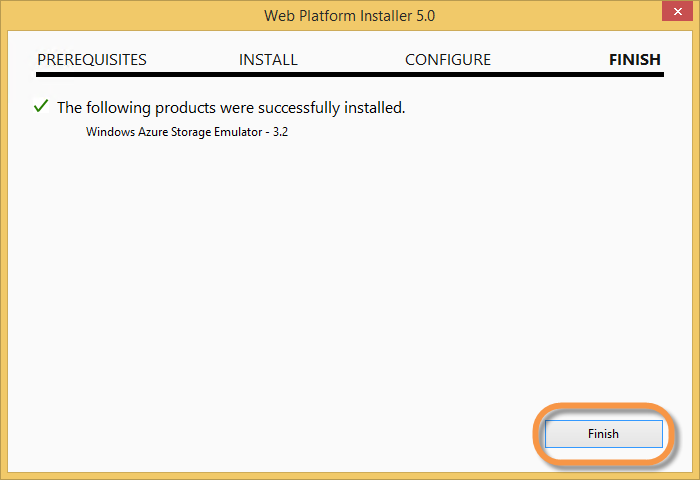
Follow the prompts to install the "Azure SDK 2.3"
-
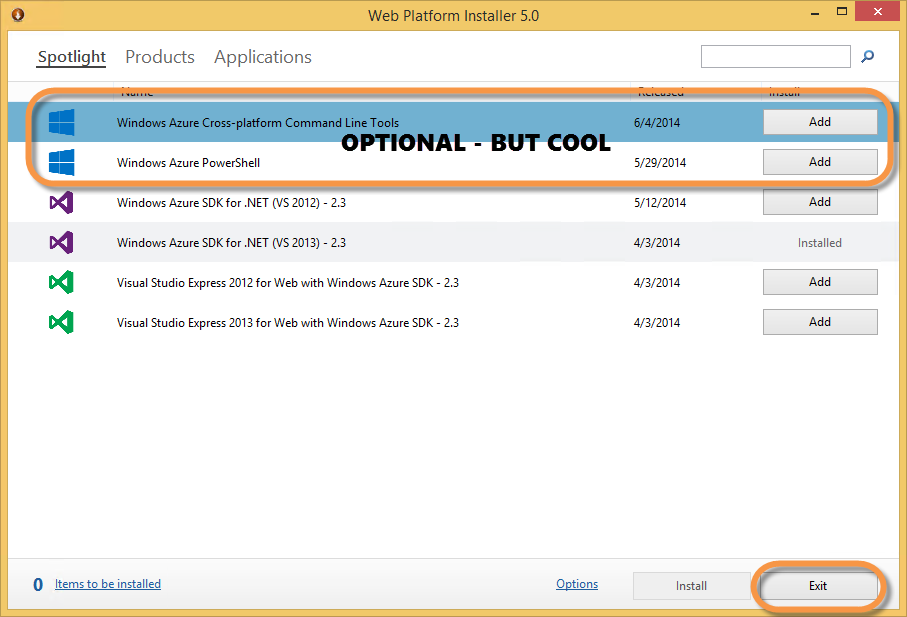
You may optionally want to install the "Windows Azure Cross-Platform Command Line Tools" and the "Windows Azure PowerShell" items as well. When done. Click "Exit"
-
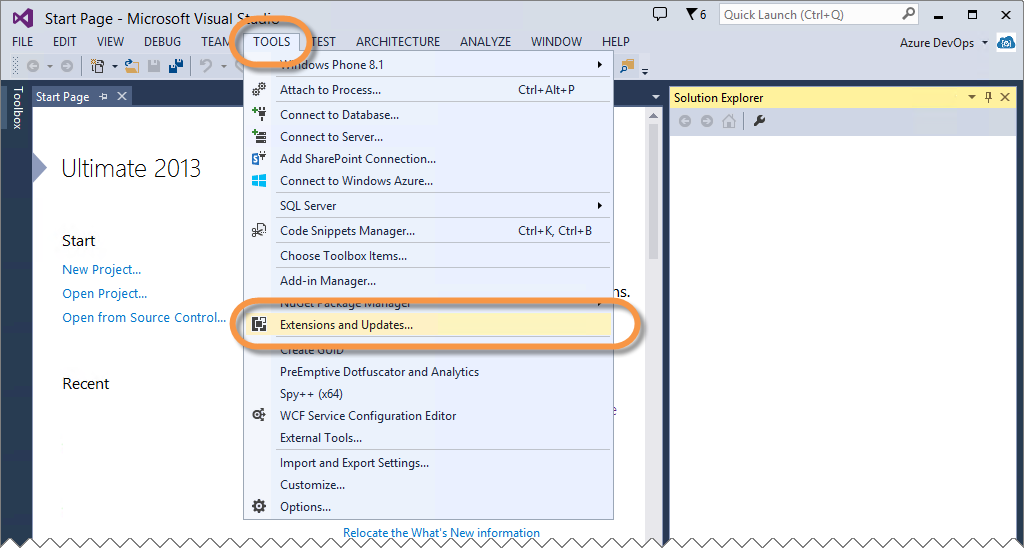
Open Visual Studio 2013, and from the menu bar, select "Tools" | "Extensions and Updates..."
-
In the "Extensions and Updates" window, select "Online" on the left hand side, then in the search box in the top right corner, enter "Application Insights". From the search results list, select "Application Insights Tools for Visual Studio" and click "Download":
-
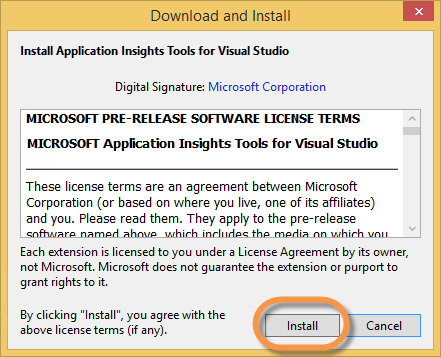
In the "Download and Install" window, click "Install"
-
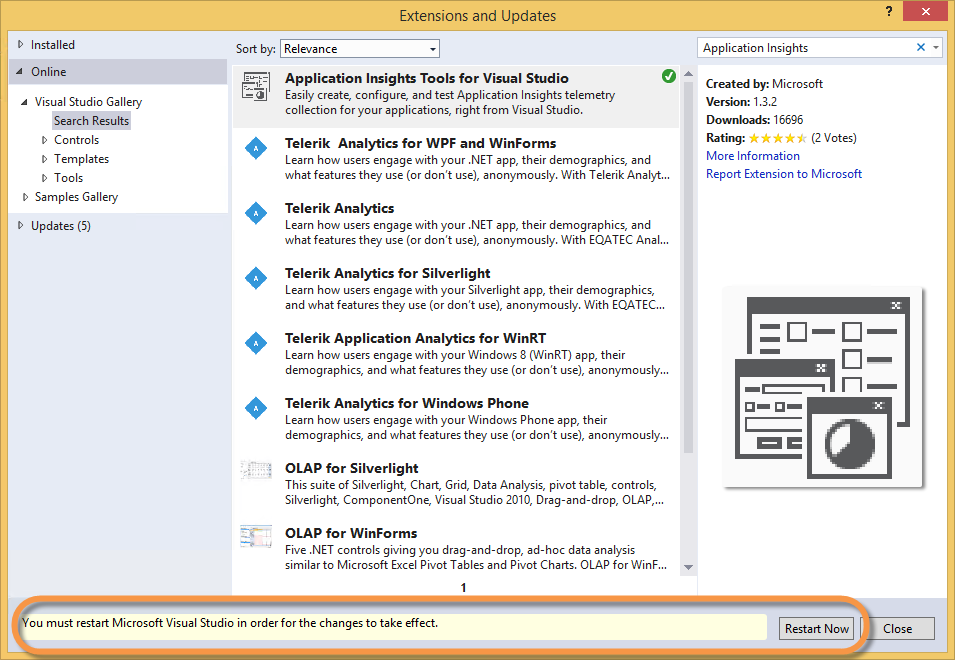
When the installation is complete, click the "Restart Now" button to restart Visual Studio:
-
Back in Visual Studio, again from the menu bar, select "TOOLS" | "Extensions and Updates"
-
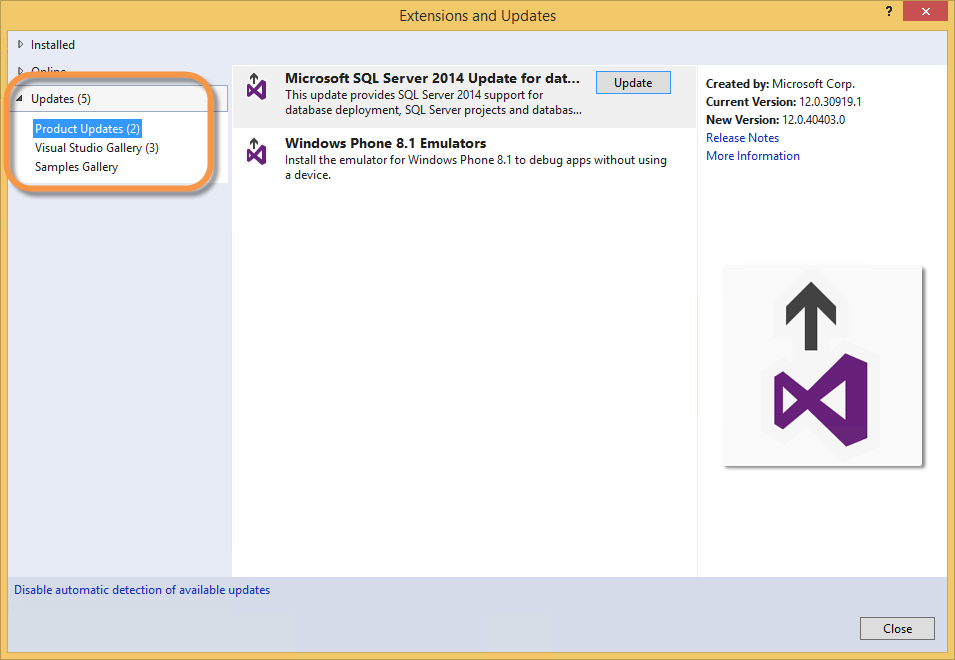
In the "Extensions and Updates" window, select "Updates" along the left, and proceed to install the various "Product Updates" and "Visual Studio Gallery" updates.
-
Follow the prompts for each. Some may require you to close Visul Studio to continue, or restart Visual Studio when the installation is complete. Continue to return to "Extensions and Updates" to install the next update until they have all been installed. However, you may want to SKIP then "Windows Phone 8.1 Emulators" because you can't run the emulator in an Azure VM and it would just be a waste of time and storage.
### Shutting Down or Deleting Your VM ###
At some point you'll be done using your shiny new VM. It could be that you just want to shut it down for a while to avoid compute costs when you don't need them machine, or it could be that you are done forever and want to delete the VM. In this last section we'll cover a few scenarios
- Shutting down your VM to Stop Compute Billing
- Deleting a VM and it's Attached Disks
- Deleting the Entire Cloud Service and it's Deployments
-
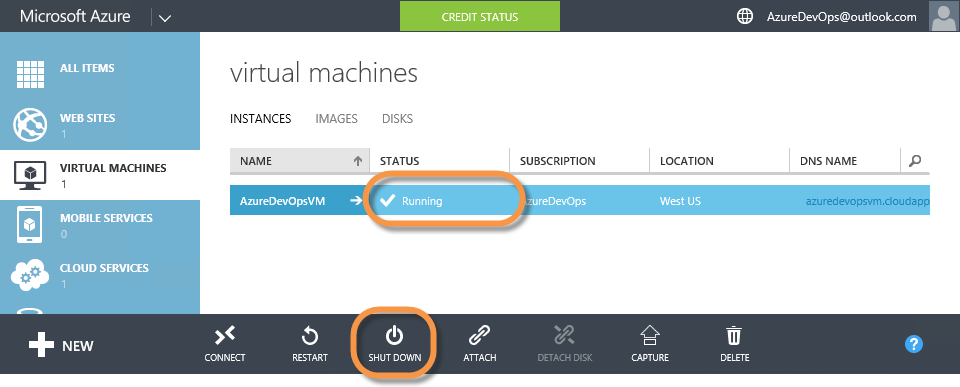
Open the Azure Management Portal and sign in with an account that has permissions to manage your VMs. Switch to the "VIRTUAL MACHINES" page, and select the VM you wish to stop by clicking on it's Status (not its name), then click the "SHUTDOWN" button along the bottom:
-
You will be prompted to verify that you want to shutdown the VM, and that the IP addresses that were allocated to the VM will be released. Click "Yes" to confirm the shutdown

-
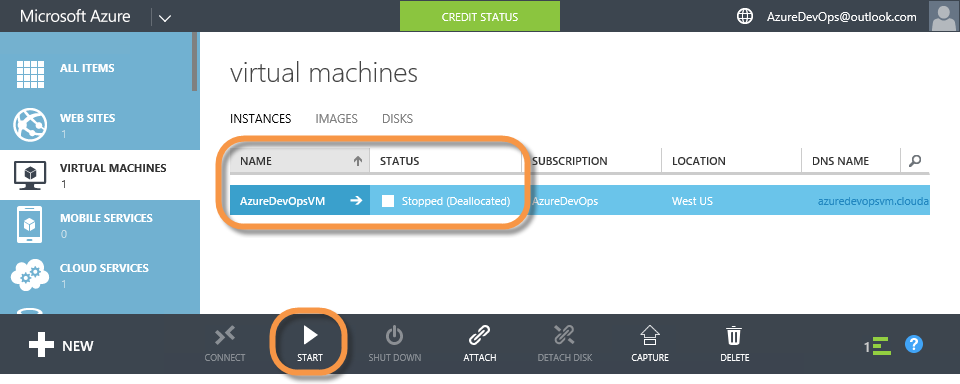
Wait until the VM's status reads "Stopped (Deallocated)". Once the machine is "DEALLOCATED" you are no longer being bill for compute costs. However, you are still incurring storage costs for the *.vhd files associated with the Virtual Hard Disks. Of course, you can always start the VM back up by selecting it, and clicking the "START" button along the bottom.
-
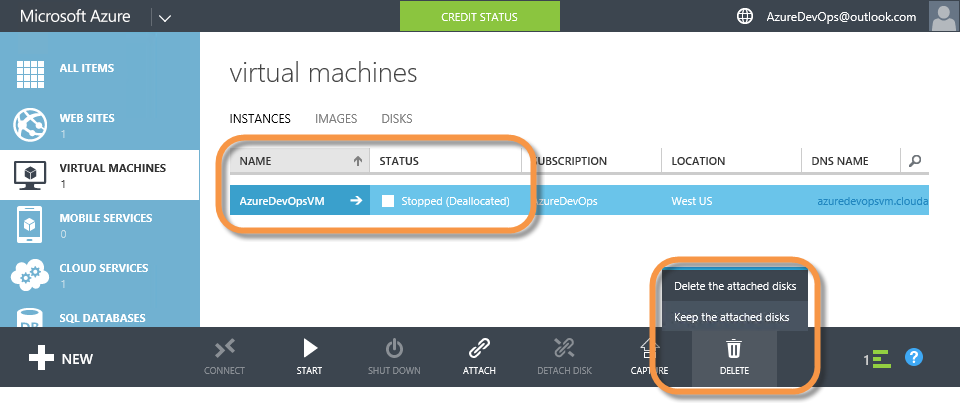
If you don't plan on using the VM anymore, you can delete it, and stop being billed for the *.vhd file storage costs. To delete a VM and it's attached disks, in the Azure Management Portal, on the "VIRTUAL MACHINES" page, select the VM and click the "DELETE" button along the bottom. You can then choose to either "Delete the attached disks", or to "Keep the attached disks" (in which case you will still pay for their storage):
Note: You might decide to keep the attached disks so you can download them to your local network before you delete them, or perhaps to create a new Virtual Machine using those same disks in the future. Just remember that you will continue to incur storage costs for them.
-
When prompted, read the information, and if you aggree, click "Yes" to delete the VM and it's disks.

-
The third option we'll cover here is to delete the Cloud Service that contains the VM, and all Web Role or Work Role deployments as well as any VMs and their attached disks. This is an easy (albeit scary) way to delete an entire cloud service and everything in it. BE CAREFUL!!!.
-
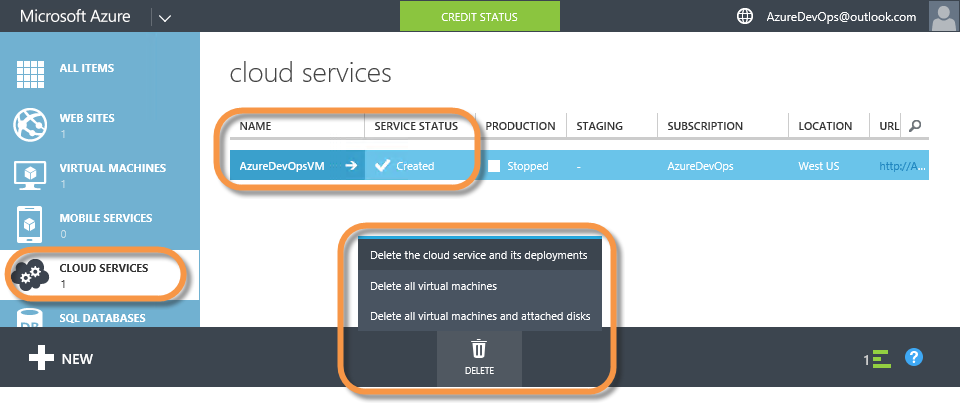
In the Azure Management Portal, go to the "CLOUD SERVICES" Page, and select the Cloud Service that you want to delete, again by clicking on it's status, then click the "DELETE" button along the bottom, and choose from:
- "Delete the cloud service and its deployments" - This is the most complete (and therefore most destructive) option. This is the one we'll use, but MAKE SURE YOU MEAN IT!
- "Delete all Virtual Machines" - Deletes just the VMs but not their attached disks, and leaves Web Role and Worker Role deployments alone.
- "Delete all virtual machines and their attached disks" - Deletes all VMs and their attached disks, but leaves Web Role and Worker Role deployments alone.
-
Read the confirmation prompt, and if you agree, click "Yes" to delete the cloud service and all it's deployments, VMs and attached disks.

void Main()
{
  var x = 1;
  var y = 2;
  var z = x + y;
}
## Summary ##
Congraulations! In this demo you learned the basics of:
- Creating a Virtual Machine in Azure
- Configuring Security for Windows App Development
- Installing Additional Software as Needed
