| title | description | services | author | manager | editor | tags | ms.service | ms.topic | ms.date | ms.author |
|---|---|---|---|---|---|---|---|---|---|---|
Configure an application gateway with SSL termination - Azure portal | Microsoft Docs |
Learn how to configure an application gateway and add a certificate for SSL termination using the Azure portal. |
application-gateway |
vhorne |
jpconnock |
tysonn |
azure-resource-manager |
application-gateway |
article |
5/15/2018 |
victorh |
You can use the Azure portal to configure an application gateway with a certificate for SSL termination that uses virtual machines for backend servers.
In this article, you learn how to:
[!div class="checklist"]
- Create a self-signed certificate
- Create an application gateway with the certificate
- Create the virtual machines used as backend servers
If you don't have an Azure subscription, create a free account before you begin.
Log in to the Azure portal at https://portal.azure.com
In this section, you use New-SelfSignedCertificate to create a self-signed certificate that you upload to the Azure portal when you create the listener for the application gateway.
On your local computer, open a Windows PowerShell window as an administrator. Run the following command to create the certificate:
New-SelfSignedCertificate \
  -certstorelocation cert:\localmachine\my \
  -dnsname www.contoso.com
You should see something like this response:
PSParentPath: Microsoft.PowerShell.Security\Certificate::LocalMachine\my

Thumbprint                                Subject
----------                                -------
E1E81C23B3AD33F9B4D1717B20AB65DBB91AC630  CN=www.contoso.com

Use [Export-PfxCertificate](https://docs.microsoft.com/powershell/module/pkiclient/export-pfxcertificate) with the Thumbprint that was returned to export a pfx file from the certificate:
$pwd = ConvertTo-SecureString -String "Azure123456!" -Force -AsPlainText
Export-PfxCertificate \
  -cert cert:\localMachine\my\E1E81C23B3AD33F9B4D1717B20AB65DBB91AC630 \
  -FilePath c:\appgwcert.pfx \
-Password $pwdA virtual network is needed for communication between the resources that you create. Two subnets are created in this example: one for the application gateway, and the other for the backend servers. You can create a virtual network at the same time that you create the application gateway.
-
Click New found on the upper left-hand corner of the Azure portal.
-
Select Networking and then select Application Gateway in the Featured list.
-
Enter myAppGateway for the name of the application gateway and myResourceGroupAG for the new resource group.
-
Accept the default values for the other settings and then click OK.
-
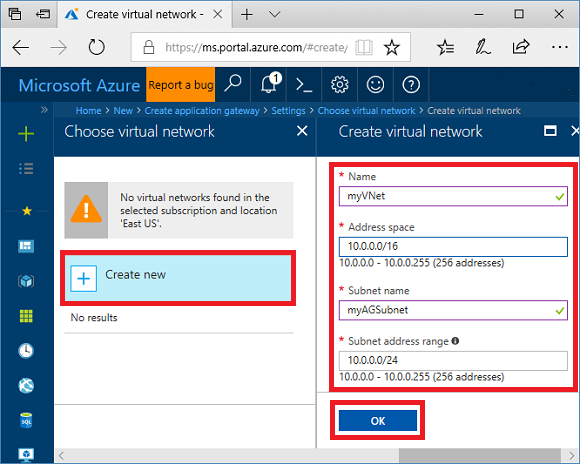
Click Choose a virtual network, click Create new, and then enter these values for the virtual network:
- myVNet - for the name of the virtual network.
- 10.0.0.0/16 - for the virtual network address space.
- myAGSubnet - for the subnet name.
- 10.0.0.0/24 - for the subnet address space.
-
Click OK to create the virtual network and subnet.
-
Click Choose a public IP address, click Create new, and then enter the name of the public IP address. In this example, the public IP address is named myAGPublicIPAddress. Accept the default values for the other settings and then click OK.
-
Click HTTPS for the protocol of the listener and make sure that the port is defined as 443.
-
Click the folder icon and browse to the appgwcert.pfx certificate that you previously created to upload it.
-
Enter mycert1 for the name of the certificate and Azure123456! for the password, and then click OK.

-
Review the settings on the summary page, and then click OK to create the network resources and the application gateway. It may take several minutes for the application gateway to be created, wait until the deployment finishes successfully before moving on to the next section.


-
Click All resources in the left-hand menu, and then click myVNet from the resources list.
-
Click Subnets, and then click Subnet.

-
Enter myBackendSubnet for the name of the subnet and then click OK.

In this example, you create two virtual machines to be used as backend servers for the application gateway. You also install IIS on the virtual machines to verify that the application gateway was successfully created.
-
Click New.
-
Click Compute and then select Windows Server 2016 Datacenter in the Featured list.
-
Enter these values for the virtual machine:
- myVM - for the name of the virtual machine.
- azureuser - for the administrator user name.
- Azure123456! for the password.
- Select Use existing, and then select myResourceGroupAG.
-
Click OK.
-
Select DS1_V2 for the size of the virtual machine, and click Select.
-
Make sure that myVNet is selected for the virtual network and the subnet is myBackendSubnet.
-
Click Disabled to disable boot diagnostics.
-
Click OK, review the settings on the summary page, and then click Create.
-
Open the interactive shell and make sure that it is set to PowerShell.

-
Run the following command to install IIS on the virtual machine:
Set-AzureRmVMExtension ` -ResourceGroupName myResourceGroupAG ` -ExtensionName IIS ` -VMName myVM ` -Publisher Microsoft.Compute ` -ExtensionType CustomScriptExtension ` -TypeHandlerVersion 1.4 ` -SettingString '{"commandToExecute":"powershell Add-WindowsFeature Web-Server; powershell Add-Content -Path \"C:\\inetpub\\wwwroot\\Default.htm\" -Value $($env:computername)"}' ` -Location EastUS -
Create a second virtual machine and install IIS using the steps that you just finished. Enter myVM2 for its name and for VMName in Set-AzureRmVMExtension.

-
Click All resources, and then click myAppGateway.
-
Click Backend pools. A default pool was automatically created with the application gateway. Click appGateayBackendPool.
-
Click Add target to add each virtual machine that you created to the backend pool.

-
Click Save.

-
Click All resources, and then click myAGPublicIPAddress.

-
Copy the public IP address, and then paste it into the address bar of your browser. To accept the security warning if you used a self-signed certificate, select Details and then Go on to the webpage:

Your secured IIS website is then displayed as in the following example:


In this tutorial, you learned how to:
[!div class="checklist"]
- Create a self-signed certificate
- Create an application gateway with the certificate
- Create the virtual machines used as backend servers
To learn more about application gateways and their associated resources, continue to the how-to articles.