| title | description | author | ms.author | ms.date | ms.topic | ms.service | services | manager | ms.devlang | ms.custom |
|---|---|---|---|---|---|---|---|---|---|---|
Provision a simulated TPM device to Azure IoT Hub using Java | Microsoft Docs |
Azure Quickstart - Create and provision a simulated TPM device using Java device SDK for Azure IoT Hub Device Provisioning Service. This quickstart uses individual enrollments. |
wesmc7777 |
wesmc |
04/09/2018 |
quickstart |
iot-dps |
iot-dps |
timlt |
java |
mvc |
Create and provision a simulated TPM device using Java device SDK for Azure IoT Hub Device Provisioning Service
[!INCLUDE iot-dps-selector-quick-create-simulated-device-tpm]
These steps show how to create a simulated device on your development machine running Windows OS, run the Windows TPM simulator as the Hardware Security Module (HSM) of the device, and use the code sample to connect this simulated device with the Device Provisioning Service and your IoT hub.
If you're unfamiliar with the process of autoprovisioning, be sure to also review Auto-provisioning concepts. Also make sure you've completed the steps in Set up IoT Hub Device Provisioning Service with the Azure portal before continuing.
The Azure IoT Device Provisioning Service supports two types of enrollments:
- Enrollment groups: Used to enroll multiple related devices.
- Individual Enrollments: Used to enroll a single device.
This article will demonstrate individual enrollments.
[!INCLUDE IoT Device Provisioning Service basic]
-
Make sure you have Java SE Development Kit 8 installed on your machine.
-
Download and install Maven.
-
Make sure
gitis installed on your machine and is added to the environment variables accessible to the command window. See Software Freedom Conservancy's Git client tools for the latest version ofgittools to install, which includes the Git Bash, the command-line app that you can use to interact with your local Git repository. -
Open a command prompt. Clone the GitHub repo for device simulation code sample.
git clone https://github.com/Azure/azure-iot-sdk-java.git --recursive -
Run the TPM simulator. Click Allow access to allow changes to Windows Firewall settings. It listens over a socket on ports 2321 and 2322. Do not close this window; you need to keep this simulator running until the end of this Quickstart guide.
.\azure-iot-sdk-java\provisioning\provisioning-tools\tpm-simulator\Simulator.exe
-
In a separate command prompt, navigate to the root folder and build the sample dependencies.
cd azure-iot-sdk-java mvn install -DskipTests=true -
Navigate to the sample folder.
cd provisioning/provisioning-samples/provisioning-tpm-sample -
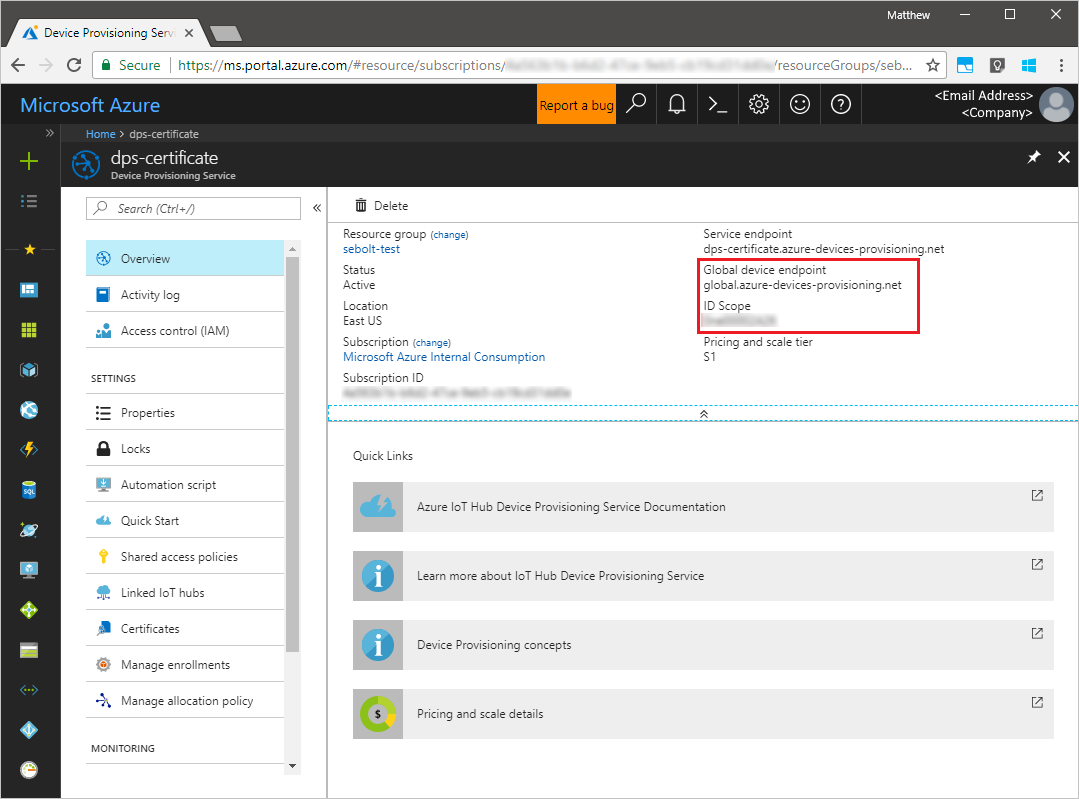
Sign in to the Azure portal, click on the All resources button on the left-hand menu and open your Device Provisioning service. Note your ID Scope and Provisioning Service Global Endpoint.
-
Edit
src/main/java/samples/com/microsoft/azure/sdk/iot/ProvisioningTpmSample.javato include your ID Scope and Provisioning Service Global Endpoint as noted before.private static final String idScope = "[Your ID scope here]"; private static final String globalEndpoint = "[Your Provisioning Service Global Endpoint here]"; private static final ProvisioningDeviceClientTransportProtocol PROVISIONING_DEVICE_CLIENT_TRANSPORT_PROTOCOL = ProvisioningDeviceClientTransportProtocol.HTTPS;
-
Build the project. Navigate to the target folder and execute the created jar file.
mvn clean install cd target java -jar ./provisioning-tpm-sample-{version}-with-deps.jar -
The program begins running. Note the Endorsement Key and Registration ID for the next section and leave the program running.


-
Sign in to the Azure portal, click on the All resources button on the left-hand menu and open your Device Provisioning service.
-
On the Device Provisioning Service summary blade, select Manage enrollments. Select Individual Enrollments tab and click the Add individual enrollment button at the top.
-
Under the Add Enrollment, enter the following information:
- Select TPM as the identity attestation Mechanism.
- Enter the Registration ID and Endorsement key for your TPM device as noted previously.
- Select an IoT hub linked with your provisioning service.
- Enter a unique device ID. Make sure to avoid sensitive data while naming your device.
- Update the Initial device twin state with the desired initial configuration for the device.
- Once complete, click the Save button.

On successful enrollment, the Registration ID of your device appears in the list under the Individual Enrollments tab.

-
On the command window running the Java sample code on your machine, click enter to continue running the application. Notice the messages that simulate the device booting and connecting to the Device Provisioning Service to get your IoT hub information.

-
On successful provisioning of your simulated device to the IoT hub linked with your provisioning service, the device ID appears on the hub's Device Explorer blade.

If you changed the initial device twin state from the default value in the enrollment entry for your device, it can pull the desired twin state from the hub and act accordingly. For more information, see Understand and use device twins in IoT Hub


If you plan to continue working on and exploring the device client sample, do not clean up the resources created in this Quickstart. If you do not plan to continue, use the following steps to delete all resources created by this Quickstart.
- Close the device client sample output window on your machine.
- Close the TPM simulator window on your machine.
- From the left-hand menu in the Azure portal, click All resources and then select your Device Provisioning service. Open the Manage Enrollments blade for your service, and then click the Individual Enrollments tab. Select the REGISTRATION ID of the device you enrolled in this Quickstart, and click the Delete button at the top.
- From the left-hand menu in the Azure portal, click All resources and then select your IoT hub. Open the IoT Devices blade for your hub, select the DEVICE ID of the device you registered in this Quickstart, and then click Delete button at the top.
In this Quickstart, you’ve created a TPM simulated device on your machine and provisioned it to your IoT hub using the IoT Hub Device Provisioning Service. To learn how to enroll your TPM device programmatically, continue to the Quickstart for programmatic enrollment of a TPM device.
[!div class="nextstepaction"] Azure Quickstart - Enroll TPM device to Azure IoT Hub Device Provisioning Service