title: Provision a simulated X.509 device to Azure IoT Hub using Node.js | Microsoft Docs description: Create and provision a simulated X.509 device using Node.js device SDK for Azure IoT Hub Device Provisioning Service.This quickstart uses individual enrollments. author: wesmc7777 ms.author: wesmc ms.date: 04/09/2018 ms.topic: quickstart ms.service: iot-dps services: iot-dps manager: timlt ms.devlang: nodejs ms.custom: mvc
Create and provision an X.509 simulated device using Node.js device SDK for IoT Hub Device Provisioning Service
[!INCLUDE iot-dps-selector-quick-create-simulated-device-x509]
These steps show how to create an enrollment entry in the Device Provisioning Service, simulate an X.509 device on your development machine, connect the simulated device with the Device Provisioning Service, and register the device on your IoT hub using the Azure IoT Hub Node.js Device SDK.
If you're unfamiliar with the process of autoprovisioning, be sure to also review Auto-provisioning concepts. Also make sure you've completed the steps in Set up IoT Hub Device Provisioning Service with the Azure portal before continuing.
The Azure IoT Device Provisioning Service supports two types of enrollments:
- Enrollment groups: Used to enroll multiple related devices.
- Individual Enrollments: Used to enroll a single device.
This article will demonstrate individual enrollments.
[!INCLUDE IoT Device Provisioning Service basic]
-
Complete the steps in the Setup IoT Hub Device Provisioning Service with the Azure portal before you proceed.
-
Make sure you have Node.js v4.0 or above installed on your machine.
-
Make sure Git is installed on your machine and is added to the environment variables accessible to the command window.
-
Make sure OpenSSL is installed on your machine and is added to the environment variables accessible to the command window. This library can either be built and installed from source or downloaded and installed from a third party such as this.
[!NOTE] If you have already created your root, intermediate, and/or leaf X.509 certificates, you may skip this step and all following steps regarding certificate generation.
In this section you, will use a self-signed X.509 certificate, it is important to keep in mind the following:
- Self-signed certificates are for testing only, and should not be used in production.
- The default expiration date for a self-signed certificate is one year.
You will use sample code from the Azure IoT SDK for Node.js to create the certificate to be used with the individual enrollment entry for the simulated device.
-
Open a command prompt. Clone the GitHub repo for the code samples:
git clone https://github.com/Azure/azure-iot-sdk-node.git --recursive -
Navigate to the certificate generator script and build the project.
cd azure-iot-sdk-node/provisioning/tools npm install -
Create a leaf X.509 certificate by running the script using your own certificate-name. The leaf certificate's common name becomes the Registration ID so be sure to only use lower-case alphanumerics and hyphens.
node create_test_cert.js device {certificate-name} -
Sign in to the Azure portal, click on the All resources button on the left-hand menu and open your Device Provisioning Service instance.
-
On the Device Provisioning Service summary blade, select Manage enrollments. Select Individual Enrollments tab and click the Add individual enrollment button at the top.
-
Under the Add Enrollment panel, enter the following information:
- Select X.509 as the identity attestation Mechanism.
- Under the Primary certificate .pem or .cer file, click Select a file to select the certificate file {certificate-name}_cert.pem created in the previous steps.
- Optionally, you may provide the following information:
- Select an IoT hub linked with your provisioning service.
- Enter a unique device ID. Make sure to avoid sensitive data while naming your device.
- Update the Initial device twin state with the desired initial configuration for the device.
- Once complete, click the Save button.

On successful enrollment, your X.509 device appears as {certificatename} under the Registration ID column in the Individual Enrollments tab. Note this value for later.

The Azure IoT Hub Node.js Device SDK provides an easy way to simulate a device. For further reading, see Device concepts.
-
In the Azure portal, select the Overview blade for your Device Provisioning service and note down the GLobal Device Endpoint and ID Scope values.

-
Copy your certificate and key to the sample folder.
copy .\{certificate-name}_cert.pem ..\device\samples\{certificate-name}_cert.pem copy .\{certificate-name}_key.pem ..\device\samples\{certificate-name}_key.pem -
Navigate to the device test script and build the project.
cd ..\device\samples npm install -
Edit the register_x509.js file. Save the file after making the following changes.
- Replace
provisioning hostwith the Global Device Endpoint noted in Step 1 above. - Replace
id scopewith the Id Scope noted in Step 1 above. - Replace
registration idwith the Registration Id noted in the previous section. - Replace
cert filenameandkey filenamewith the files you copied in Step 2 above.
- Replace
-
Execute the script and verify the device was provisioned successfully.
node register_x509.js -
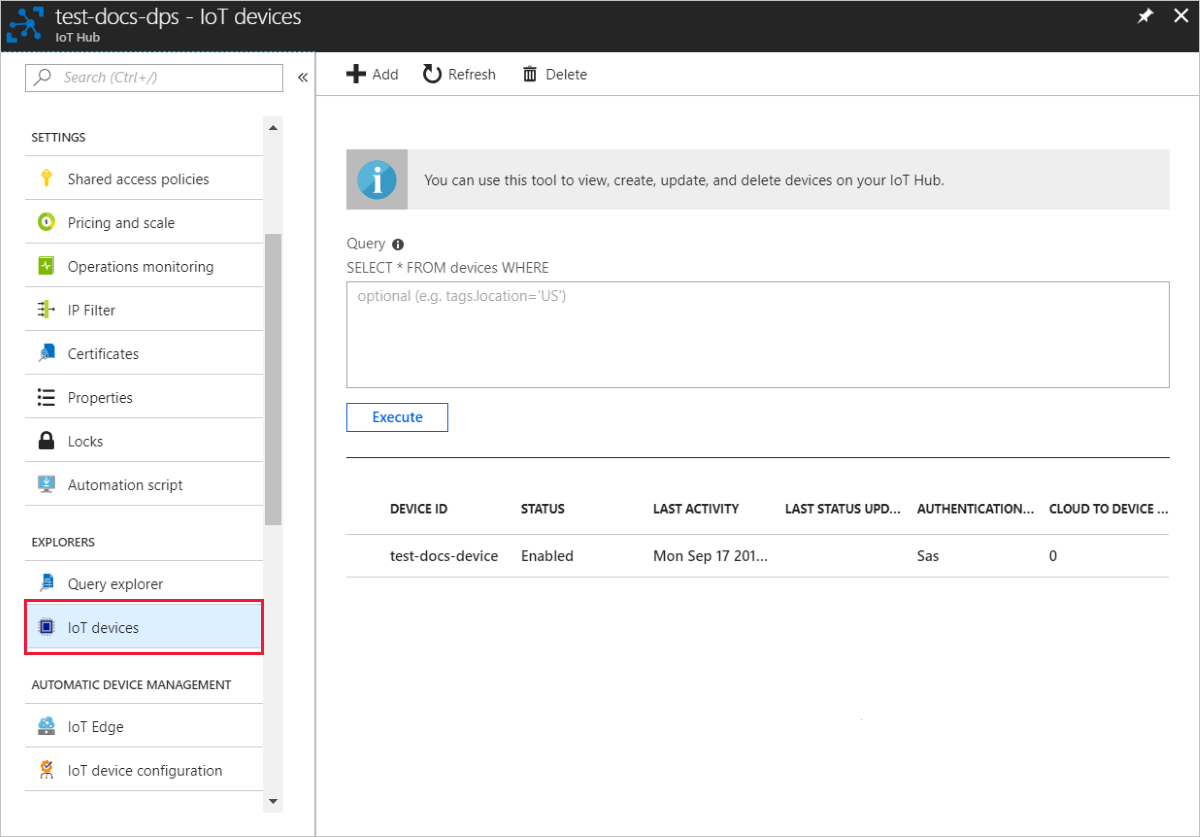
In the portal, navigate to the IoT hub linked to your provisioning service and open the IoT Devices blade. On successful provisioning of the simulated X.509 device to the hub, its device ID appears on the IoT Devices blade, with STATUS as enabled. You might need to click the Refresh button at the top if you already opened the blade prior to running the sample device application.
If you changed the initial device twin state from the default value in the enrollment entry for your device, it can pull the desired twin state from the hub and act accordingly. For more information, see Understand and use device twins in IoT Hub.


If you plan to continue working on and exploring the device client sample, do not clean up the resources created in this Quickstart. If you do not plan to continue, use the following steps to delete all resources created by this Quickstart.
- Close the device client sample output window on your machine.
- From the left-hand menu in the Azure portal, click All resources and then select your Device Provisioning service. Open the Manage Enrollments blade for your service, and then click the Individual Enrollments tab. Select the REGISTRATION ID of the device you enrolled in this Quickstart, and click the Delete button at the top.
- From the left-hand menu in the Azure portal, click All resources and then select your IoT hub. Open the IoT Devices blade for your hub, select the DEVICE ID of the device you registered in this Quickstart, and then click Delete button at the top.
In this Quickstart, you’ve created a simulated X.509 device and provisioned it to your IoT hub using the Azure IoT Hub Device Provisioning Service on the portal. To learn how to enroll your X.509 device programmatically, continue to the Quickstart for programmatic enrollment of X.509 devices.
[!div class="nextstepaction"] Azure Quickstart - Enroll X.509 devices to Azure IoT Hub Device Provisioning Service