| title | description | author | manager | ms.service | services | ms.topic | ms.date | ms.author | ms.custom |
|---|---|---|---|---|---|---|---|---|---|
Configure message routing with Azure IoT Hub (.NET) | Microsoft Docs |
Configure message routing with Azure IoT Hub |
robinsh |
timlt |
iot-hub |
iot-hub |
tutorial |
09/11/2018 |
robinsh |
mvc |
Message routing enables sending telemetry data from your IoT devices to built-in Event Hub-compatible endpoints or custom endpoints such as blob storage, Service Bus Queue, Service Bus Topic, and Event Hubs. While configuring message routing, you can create routing queries to customize the route that matches a certain condition. Once set up, the incoming data is automatically routed to the endpoints by the IoT Hub.
In this tutorial, you learn how to set up and use routing queries with IoT Hub. You will route messages from an IoT device to one of multiple services, including blob storage and a Service Bus queue. Messages to the Service Bus queue will be picked up by a Logic App and sent via e-mail. Messages that do not have routing specifically set up are sent to the default endpoint, and viewed in a Power BI visualization.
In this tutorial, you perform the following tasks:
[!div class="checklist"]
- Using Azure CLI or PowerShell, set up the base resources -- an IoT hub, a storage account, a Service Bus queue, and a simulated device.
- Configure endpoints and routes in IoT hub for the storage account and Service Bus queue.
- Create a Logic App that is triggered and sends e-mail when a message is added to the Service Bus queue.
- Download and run an app that simulates an IoT Device sending messages to the hub for the different routing options.
- Create a Power BI visualization for data sent to the default endpoint.
- View the results ...
- ...in the Service Bus queue and e-mails.
- ...in the storage account.
- ...in the Power BI visualization.
-
An Azure subscription. If you don't have an Azure subscription, create a free account before you begin.
-
Install Visual Studio.
-
A Power BI account to analyze the default endpoint's stream analytics. (Try Power BI for free.)
-
An Office 365 account to send notification e-mails.
[!INCLUDE cloud-shell-try-it.md]
For this tutorial, you need an IoT hub, a storage account, and a Service Bus queue. These resources can be created using Azure CLI or Azure PowerShell. Use the same resource group and location for all of the resources. Then at the end, you can remove everything in one step by deleting the resource group.
The following sections describe how to do these required steps. Follow the CLI or the PowerShell instructions.
-
Create a resource group.
-
Create an IoT hub in the S1 tier. Add a consumer group to your IoT hub. The consumer group is used by the Azure Stream Analytics when retrieving data.
-
Create a standard V1 storage account with Standard_LRS replication.
-
Create a Service Bus namespace and queue.
-
Create a device identity for the simulated device that sends messages to your hub. Save the key for the testing phase.
Copy and paste this script into Cloud Shell. Assuming you are already logged in, it runs the script one line at a time.
The variables that must be globally unique have $RANDOM concatenated to them. When the script is run and the variables are set, a random numeric string is generated and concatenated to the end of the fixed string, making it unique.
# This is the IOT Extension for Azure CLI.
# You only need to install this the first time.
# You need it to create the device identity.
az extension add --name azure-cli-iot-ext

# Set the values for the resource names that don't have to be globally unique.
# The resources that have to have unique names are named in the script below
#   with a random number concatenated to the name so you can probably just
#   run this script, and it will work with no conflicts.
location=westus
resourceGroup=ContosoResources
iotHubConsumerGroup=ContosoConsumers
containerName=contosoresults
iotDeviceName=Contoso-Test-Device

# Create the resource group to be used
#   for all the resources for this tutorial.
az group create --name $resourceGroup \
    --location $location

# The IoT hub name must be globally unique, so add a random number to the end.
iotHubName=ContosoTestHub$RANDOM
echo "IoT hub name = " $iotHubName

# Create the IoT hub.
az iot hub create --name $iotHubName \
    --resource-group $resourceGroup \
    --sku S1 --location $location

# Add a consumer group to the IoT hub.
az iot hub consumer-group create --hub-name $iotHubName \
    --name $iotHubConsumerGroup

# The storage account name must be globally unique, so add a random number to the end.
storageAccountName=contosostorage$RANDOM
echo "Storage account name = " $storageAccountName

# Create the storage account to be used as a routing destination.
az storage account create --name $storageAccountName \
    --resource-group $resourceGroup \
	--location $location \
    --sku Standard_LRS

# Get the primary storage account key.
#    You need this to create the container.
storageAccountKey=$(az storage account keys list \
    --resource-group $resourceGroup \
    --account-name $storageAccountName \
    --query "[0].value" | tr -d '"')

# See the value of the storage account key.
echo "$storageAccountKey"

# Create the container in the storage account.
az storage container create --name $containerName \
    --account-name $storageAccountName \
    --account-key $storageAccountKey \
    --public-access off

# The Service Bus namespace must be globally unique, so add a random number to the end.
sbNameSpace=ContosoSBNamespace$RANDOM
echo "Service Bus namespace = " $sbNameSpace

# Create the Service Bus namespace.
az servicebus namespace create --resource-group $resourceGroup \
    --name $sbNameSpace \
    --location $location

# The Service Bus queue name must be globally unique, so add a random number to the end.
sbQueueName=ContosoSBQueue$RANDOM
echo "Service Bus queue name = " $sbQueueName

# Create the Service Bus queue to be used as a routing destination.
az servicebus queue create --name $sbQueueName \
    --namespace-name $sbNameSpace \
	--resource-group $resourceGroup

# Create the IoT device identity to be used for testing.
az iot hub device-identity create --device-id $iotDeviceName \
    --hub-name $iotHubName

# Retrieve the information about the device identity, then copy the primary key to
#   Notepad. You need this to run the device simulation during the testing phase.
az iot hub device-identity show --device-id $iotDeviceName \
    --hub-name $iotHubName
Copy and paste this script into Cloud Shell. Assuming you are already logged in, it runs the script one line at a time.
The variables that must be globally unique have $(Get-Random) concatenated to them. When the script is run and the variables are set, a random numeric string is generated and concatenated to the end of the fixed string, making it unique.
# Log into Azure account.
Login-AzureRMAccount

# Set the values for the resource names that don't have to be globally unique.
# The resources that have to have unique names are named in the script below
#   with a random number concatenated to the name so you can probably just
#   run this script, and it will work with no conflicts.
$location = "West US"
$resourceGroup = "ContosoResources"
$iotHubConsumerGroup = "ContosoConsumers"
$containerName = "contosoresults"
$iotDeviceName = "Contoso-Test-Device"

# Create the resource group to be used
#   for all resources for this tutorial.
New-AzureRmResourceGroup -Name $resourceGroup -Location $location

# The IoT hub name must be globally unique, so add a random number to the end.
$iotHubName = "ContosoTestHub$(Get-Random)"
Write-Host "IoT hub name is " $iotHubName

# Create the IoT hub.
New-AzureRmIotHub -ResourceGroupName $resourceGroup `
    -Name $iotHubName `
    -SkuName "S1" `
    -Location $location `
    -Units 1

# Add a consumer group to the IoT hub for the 'events' endpoint.
Add-AzureRmIotHubEventHubConsumerGroup -ResourceGroupName $resourceGroup `
  -Name $iotHubName `
  -EventHubConsumerGroupName $iotHubConsumerGroup `
  -EventHubEndpointName "events"

# The storage account name must be globally unique, so add a random number to the end.
$storageAccountName = "contosostorage$(Get-Random)"
Write-Host "storage account name is " $storageAccountName

# Create the storage account to be used as a routing destination.
# Save the context for the storage account
#   to be used when creating a container.
$storageAccount = New-AzureRmStorageAccount -ResourceGroupName $resourceGroup `
    -Name $storageAccountName `
    -Location $location `
    -SkuName Standard_LRS `
    -Kind Storage
$storageContext = $storageAccount.Context

# Create the container in the storage account.
New-AzureStorageContainer -Name $containerName `
    -Context $storageContext

# The Service Bus namespace must be globally unique,
#   so add a random number to the end.
$serviceBusNamespace = "ContosoSBNamespace$(Get-Random)"
Write-Host "Service Bus namespace is " $serviceBusNamespace

# Create the Service Bus namespace.
New-AzureRmServiceBusNamespace -ResourceGroupName $resourceGroup `
    -Location $location `
    -Name $serviceBusNamespace

# The Service Bus queue name must be globally unique,
#  so add a random number to the end.
$serviceBusQueueName  = "ContosoSBQueue$(Get-Random)"
Write-Host "Service Bus queue name is " $serviceBusQueueName

# Create the Service Bus queue to be used as a routing destination.
New-AzureRmServiceBusQueue -ResourceGroupName $resourceGroup `
    -Namespace $serviceBusNamespace `
    -Name $serviceBusQueueName
Next, create a device identity and save its key for later use. This device identity is used by the simulation application to send messages to the IoT hub. This capability is not available in PowerShell, but you can create the device in the Azure portal.
-
Open the Azure portal and log into your Azure account.
-
Click on Resource groups and select your resource group. This tutorial uses ContosoResources.
-
In the list of resources, click your IoT hub. This tutorial uses ContosoTestHub. Select IoT Devices from the Hub pane.
-
Click + Add. On the Add Device pane, fill in the device ID. This tutorial uses Contoso-Test-Device. Leave the keys empty, and check Auto Generate Keys. Make sure Connect device to IoT hub is enabled. Click Save.

-
Now that it's been created, click on the device to see the generated keys. Click the Copy icon on the Primary key and save it somewhere such as Notepad for the testing phase of this tutorial.


You are going to route messages to different resources based on properties attached to the message by the simulated device. Messages that are not custom routed are sent to the default endpoint (messages/events).
| value | Result |
|---|---|
| level="storage" | Write to Azure Storage. |
| level="critical" | Write to a Service Bus queue. A Logic App retrieves the message from the queue and uses Office 365 to e-mail the message. |
| default | Display this data using Power BI. |
Now set up the routing for the storage account. You go to the Message Routing pane, then add a route. When adding the route, define a new endpoint for the route. After this is set up, messages where the level property is set to storage are written to a storage account automatically.
The data is written to blob storage in the Avro format.
-
In the Azure portal, click Resource Groups, then select your resource group. This tutorial uses ContosoResources.
-
Click the IoT hub under the list of resources. This tutorial uses ContosoTestHub.
-
Click Message Routing. In the Message Routing pane, click +Add. On the Add a Route pane, click +Add next to the Endpoint field, as displayed in the following picture:

-
Select Blob storage. You see the Add Storage Endpoint pane.

-
Enter a name for the endpoint. This tutorial uses StorageContainer.
-
Click Pick a container. This takes you to a list of your storage accounts. Select the one you set up in the preparation steps. This tutorial uses contosostorage. It shows a list of containers in that storage account. Select the container you set up in the preparation steps. This tutorial uses contosoresults. Click Select. You return to the Add endpoint pane.
-
For the purpose of this tutorial, use the defaults for the rest of the fields.
[!NOTE] You can set the format of the blob name using the Blob file name format. The default is
{iothub}/{partition}/{YYYY}/{MM}/{DD}/{HH}/{mm}. The format must contain {iothub}, {partition}, {YYYY}, {MM}, {DD}, {HH}, and {mm} in any order.For example, using the default blob file name format, if the hub name is ContosoTestHub, and the date/time is October 30, 2018 at 10:56 a.m., the blob name will look like this:
ContosoTestHub/0/2018/10/30/10/56.The blobs are written in the Avro format.
-
Click Create to create the storage endpoint and add it to the route. You return to the Add a route pane.
-
Now complete the rest of the routing query information. This query specifies the criteria for sending messages to the storage container you just added as an endpoint. Fill in the fields on the screen.
Name: Enter a name for your routing query. This tutorial uses StorageRoute.
Endpoint: This shows the endpoint you just set up.
Data source: Select Device Telemetry Messages from the dropdown list.
Enable route: Be sure this is enabled.
Routing query: Enter
level="storage"as the query string.
Click Save. When it finishes, it returns to the Message Routing pane, where you can see your new routing query for storage. Close the Routes pane, which returns you to the Resource group page.


Now set up the routing for the Service Bus queue. You go to the Message Routing pane, then add a route. When adding the route, define a new endpoint for the route. After this is set up, message where the level property is set to critical are written to the Service Bus queue, which triggers a Logic App, which then sends an e-mail with the information.
-
On the Resource group page, click your IoT hub, then click Message Routing.
-
In the Message Routing pane, click +Add.
-
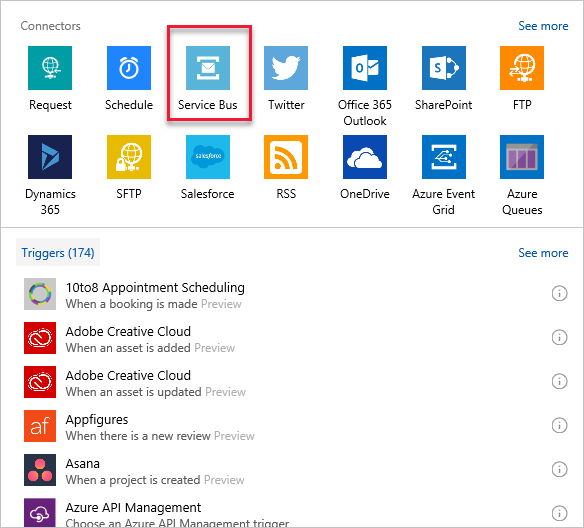
On the Add a Route pane, click +Add next to the Endpoint field. Select Service Bus Queue. You see the Add Service Bus Endpoint pane.

-
Fill in the fields:
Endpoint Name: Enter a name for the endpoint. This tutorial uses CriticalQueue.
Service Bus Namespace: Click on this field to reveal the dropdown list; select the service bus namespace you set up in the preparation steps. This tutorial uses ContosoSBNamespace.
Service Bus queue: Click on this field to reveal the dropdown list; select the Service Bus queue from the dropdown list. This tutorial uses contososbqueue.
-
Click Create to add the Service Bus queue endpoint. You return to the Add a route pane.
-
Now you complete the rest of the routing query information. This query specifies the criteria for sending messages to the Service Bus queue you just added as an endpoint. Fill in the fields on the screen.

Name: Enter a name for your routing query. This tutorial uses SBQueueRoute.
Endpoint: This shows the endpoint you just set up.
Data source: Select Device Telemetry Messages from the dropdown list.
Routing query: Enter level="critical" as the query string.

-
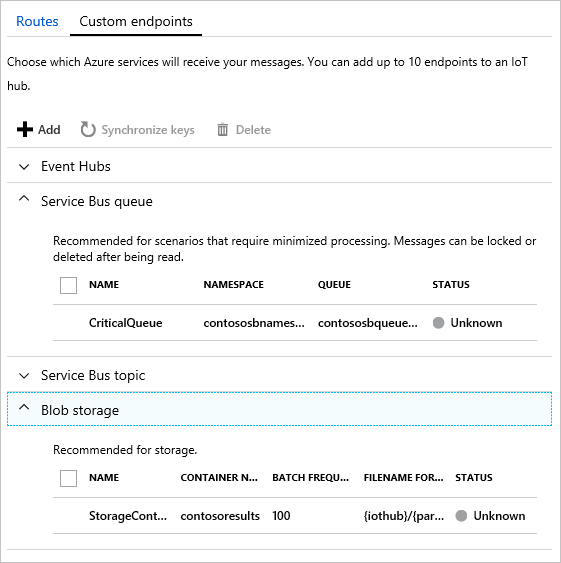
Click Save. When it returns to the Routes pane, you see both of your new routes, as displayed here.

-
You can see the custom endpoints you set up by clicking on the Custom Endpoints tab.
-
Close the Message Routing pane, which returns you to the Resource group pane.


The Service Bus queue is to be used for receiving messages designated as critical. Set up a Logic app to monitor the Service Bus queue, and send an e-mail when a message is added to the queue.
-
In the Azure portal, click + Create a resource. Put logic app in the search box and click Enter. From the search results displayed, select Logic App, then click Create to continue to the Create logic app pane. Fill in the fields.
Name: This field is the name of the logic app. This tutorial uses ContosoLogicApp.
Subscription: Select your Azure subscription.
Resource group: Click Use existing and select your resource group. This tutorial uses ContosoResources.
Location: Use your location. This tutorial uses West US.
Log Analytics: This toggle should be turned off.

Click Create.
-
Now go to the Logic App. The easiest way to get to the Logic App is to click on Resource groups, select your resource group (this tutorial uses ContosoResources), then select the Logic App from the list of resources. The Logic Apps Designer page appears (you might have to scroll over to the right to see the full page). On the Logic Apps Designer page, scroll down until you see the tile that says Blank Logic App + and click it.
-
A list of connectors is displayed. Select Service Bus.
-
A list of triggers is displayed. Select Service Bus - When a message is received in a queue (auto-complete).

-
On the next screen, fill in the Connection Name. This tutorial uses ContosoConnection.

Click the Service Bus namespace. This tutorial uses ContosoSBNamespace. When you select the namespace, the portal queries the Service Bus namespace to retrieve the keys. Select RootManageSharedAccessKey and click Create.

-
On the next screen, select the name of the queue (this tutorial uses contososbqueue) from the dropdown list. You can use the defaults for the rest of the fields.

-
Now set up the action to send an e-mail when a message is received in the queue. In the Logic Apps Designer, click + New step to add a step, then click Add an action. In the Choose an action pane, find and click Office 365 Outlook. On the triggers screen, select Office 365 Outlook - Send an email.

-
Next, log into your Office 365 account to set up the connection. Specify the e-mail addresses for the recipient(s) of the e-mails. Also specify the subject, and type what message you'd like the recipient to see in the body. For testing, fill in your own e-mail address as the recipient.
Click Add dynamic content to show the content from the message that you can include. Select Content -- it will include the message in the e-mail.

-
Click Save. Then close the Logic App Designer.


To see the data in a Power BI visualization, first set up a Stream Analytics job to retrieve the data. Remember that only the messages where the level is normal are sent to the default endpoint, and will be retrieved by the Stream Analytics job for the Power BI visualization.
-
In the Azure portal, click Create a resource > Internet of Things > Stream Analytics job.
-
Enter the following information for the job.
Job name: The name of the job. The name must be globally unique. This tutorial uses contosoJob.
Resource group: Use the same resource group used by your IoT hub. This tutorial uses ContosoResources.
Location: Use the same location used in the setup script. This tutorial uses West US.

-
Click Create to create the job. To get back to the job, click Resource groups. This tutorial uses ContosoResources. Select the resource group, then click the Stream Analytics job in the list of resources.

-
Under Job Topology, click Inputs.
-
In the Inputs pane, click Add stream input and select IoT Hub. On the screen that comes up, fill in the following fields:
Input alias: This tutorial uses contosoinputs.
Subscription: Select your subscription.
IoT Hub: Select the IoT Hub. This tutorial uses ContosoTestHub.
Endpoint: Select Messaging. (If you select Operations Monitoring, you get the telemetry data about the IoT hub rather than the data you're sending through.)
Shared access policy name: Select iothubowner. The portal fills in the Shared Access Policy Key for you.
Consumer group: Select the consumer group you created earlier. This tutorial uses contosoconsumers.
For the rest of the fields, accept the defaults.

-
Click Save.

-
Under Job Topology, click Outputs.
-
In the Outputs pane, click Add, and then select Power BI. On the screen that comes up, fill in the following fields:
Output alias: The unique alias for the output. This tutorial uses contosooutputs.
Dataset name: Name of the dataset to be used in Power BI. This tutorial uses contosodataset.
Table name: Name of the table to be used in Power BI. This tutorial uses contosotable.
Accept the defaults for the rest of the fields.
-
Click Authorize, and sign into your Power BI account.

-
Click Save.

-
Under Job Topology, click Query.
-
Replace
[YourInputAlias]with the input alias of the job. This tutorial uses contosoinputs. -
Replace
[YourOutputAlias]with the output alias of the job. This tutorial uses contosooutputs.
-
Click Save.
-
Close the Query pane. This returns you to the view of the resources in the Resource Group. Click the Stream Analytics job. This tutorial calls it contosoJob.

In the Stream Analytics job, click Start > Now > Start. Once the job successfully starts, the job status changes from Stopped to Running.
To set up the Power BI report, you need data, so you'll set up Power BI after creating the device and running the device simulation application.
Earlier in the script setup section, you set up a device to simulate using an IoT device. In this section, you download a .NET console app that simulates a device that sends device-to-cloud messages to an IoT hub. This application sends messages for each of the different routing methods.
Download the solution for the IoT Device Simulation. This downloads a repo with several applications in it; the solution you are looking for is in iot-hub/Tutorials/Routing/SimulatedDevice/.
Double-click on the solution file (SimulatedDevice.sln) to open the code in Visual Studio, then open Program.cs. Substitute {iot hub hostname} with the IoT hub host name. The format of the IoT hub host name is {iot-hub-name}.azure-devices.net. For this tutorial, the hub host name is ContosoTestHub.azure-devices.net. Next, substitute {device key} with the device key you saved earlier when setting up the simulated device.
     static string myDeviceId = "contoso-test-device";
     static string iotHubUri = "ContosoTestHub.azure-devices.net";
     // This is the primary key for the device. This is in the portal.
     // Find your IoT hub in the portal > IoT devices > select your device > copy the key.
     static string deviceKey = "{your device key here}";
Run the console application. Wait a few minutes. You can see the messages being sent on the console screen of the application.
The app sends a new device-to-cloud message to the IoT hub every second. The message contains a JSON-serialized object with the device ID, temperature, humidity, and message level, which defaults to normal. It randomly assigns a level of critical or storage, causing the message to be routed to the storage account or to the Service Bus queue (which triggers your Logic App to send an e-mail). The default (normal) readings will be displayed in the BI report you set up next.
If everything is set up correctly, at this point you should see the following results:
-
You start getting e-mails about critical messages.

This means the following:
- The routing to the Service Bus queue is working correctly.
- The Logic App retrieving the message from the Service Bus queue is working correctly.
- The Logic App connector to Outlook is working correctly.
-
In the Azure portal, click Resource groups and select your Resource Group. This tutorial uses ContosoResources. Select the storage account, click Blobs, then select the Container. This tutorial uses contosoresults. You should see a folder, and you can drill down through the directories until you see one or more files. Open one of those files; they contain the entries routed to the storage account.


This means the following:
- The routing to the storage account is working correctly.
Now with the application still running, set up the Power BI visualization to see the messages coming through the default routing.
-
Sign in to your Power BI account.
-
Go to Workspaces and select the workspace that you set when you created the output for the Stream Analytics job. This tutorial uses My Workspace.
-
Click Datasets.
You should see the listed dataset that you specified when you created the output for the Stream Analytics job. This tutorial uses contosodataset. (It may take 5-10 minutes for the dataset to show up the first time.)
-
Under ACTIONS, click the first icon to create a report.

-
Create a line chart to show real-time temperature over time.
- On the report creation page, add a line chart by clicking the line chart icon.

-
On the Fields pane, expand the table that you specified when you created the output for the Stream Analytics job. This tutorial uses contosotable.
-
Drag EventEnqueuedUtcTime to Axis on the Visualizations pane.
-
Drag temperature to Values.
A line chart is created. The x-axis displays date and time in the UTC time zone. The y-axis displays temperature from the sensor.
-
Create another line chart to show real-time humidity over time. To set up the second chart, follow the same steps above and place EventEnqueuedUtcTime on the x-axis and humidity on the y-axis.

-
Click Save to save the report.


You should be able to see data on both charts. This means the following:
- The routing to the default endpoint is working correctly.
- The Azure Stream Analytics job is streaming correctly.
- The Power BI Visualization is set up correctly.
You can refresh the charts to see the most recent data by clicking the Refresh button on the top of the Power BI window.
If you want to remove all of the resources you've created, delete the resource group. This action deletes all resources contained within the group. In this case, it removes the IoT hub, the Service Bus namespace and queue, the Logic App, the storage account, and the resource group itself.
Log into your Power BI account. Go to your workspace. This tutorial uses My Workspace. To remove the Power BI visualization, go to DataSets and click the trash can icon to delete the dataset. This tutorial uses contosodataset. When you remove the dataset, the report is removed as well.
To remove the resource group, use the az group delete command.
az group delete --name $resourceGroup
To remove the resource group, use the Remove-AzureRmResourceGroup command. $resourceGroup was set to ContosoIoTRG1 back at the beginning of this tutorial.
Remove-AzureRmResourceGroup -Name $resourceGroup
In this tutorial, you learned how to use message routing to route IoT Hub messages to different destinations by performing the following tasks.
[!div class="checklist"]
- Using Azure CLI or PowerShell, set up the base resources -- an IoT hub, a storage account, a Service Bus queue, and a simulated device.
- Configure endpoints and routes in IoT hub for the storage account and Service Bus queue.
- Create a Logic App that is triggered and sends e-mail when a message is added to the Service Bus queue.
- Download and run an app that simulates an IoT Device sending messages to the hub for the different routing options.
- Create a Power BI visualization for data sent to the default endpoint.
- View the results ...
- ...in the Service Bus queue and e-mails.
- ...in the storage account.
- ...in the Power BI visualization.
Advance to the next tutorial to learn how to manage the state of an IoT device.
[!div class="nextstepaction"] Configure your devices from a back-end service