| title | description | services | documentationcenter | author | manager | editor | tags | Customer intent | ms.assetid | ms.service | ms.devlang | ms.topic | ms.tgt_pltfrm | ms.workload | ms.date | ms.author | ms.custom |
|---|---|---|---|---|---|---|---|---|---|---|---|---|---|---|---|---|---|
Tutorial: Load Balancer VMs within a zone--Azure portal | Microsoft Docs |
This tutorial demonstrates how to create a Standard Load Balancer with zonal frontend to load balance VMs within an availability zone by using Azure portal |
load-balancer |
na |
KumudD |
jeconnoc |
azure-resource-manager |
As an IT administrator, I want to create a load balancer that load balances incoming internet traffic to virtual machines within a specific zone in a region. |
load-balancer |
na |
tutorial |
na |
infrastructure-services |
05/17/2018 |
kumud |
mvc |
Tutorial: Load balance VMs within an availability zone with Standard Load Balancer by using the Azure portal
This tutorial creates a public Azure Standard Load Balancer instance with a zonal frontend that uses a public IP standard address by using the Azure portal. In this scenario, you specify a particular zone for your frontend and backend instances, to align your data path and resources with a specific zone. You learn how to perform the following functions:
[!div class="checklist"]
- Create a Standard Load Balancer instance with a zonal frontend.
- Create network security groups to define incoming traffic rules.
- Create zonal virtual machines (VMs) and attach them to a load balancer.
- Create a load balancer health probe.
- Create a load balancer traffic rules.
- Create a basic Internet Information Services (IIS) site.
- View a load balancer in action.
For more information about using availability zones with Standard Load Balancer, see Standard Load Balancer and Availability Zones.
If you prefer, use Azure CLI to complete this tutorial.
Sign in to the Azure portal at http://portal.azure.com.
Standard Load Balancer only supports a standard public IP address. When you create a new public IP while creating the load balancer, it's automatically configured as a Standard SKU version. It's also automatically zone redundant.
-
On the upper left side of the screen, select Create a resource > Networking > Load Balancer.
-
In the Create load balancer page, enter these values for the load balancer:
- myLoadBalancer, for the name of the load balancer.
- Public, for the type of the load balancer.
- myPublicIPZonal, for the new public IP address that you create. Select Choose a public IP address. Then select Create new. For name, enter myPublicIP. SKU is standard by default. For Availability zone, select Zone 1.
- myResourceGroupZLB, for the name of the new resource group that you create.
- westeurope, for the location.
-
Select Create to create the load balancer.


In this section, you create a virtual network. You also create two virtual machines in same zone (namely, zone 1) for the region to add to the backend pool of your load balancer. Then you install IIS on the virtual machines to help test the zone-redundant load balancer. If one VM fails, the health probe for the VM in the same zone fails. Traffic continues to be served by other VMs within the same zone.
-
On the upper left side of the screen, select Create a resource > Networking > Virtual network. Enter these values for the virtual network:
- myVnet, for the name of the virtual network.
- myResourceGroupZLB, for the name of the existing resource group.
- myBackendSubnet, for the subnet name.
-
Select Create to create the virtual network.


-
On the upper left side of the screen, select Create a resource. In the search box, enter Network Security Group. In the network security group page, select Create.
-
In the Create network security group page, enter these values:
- myNetworkSecurityGroup, for the name of the network security group.
- myResourceGroupLBAZ, for the name of the existing resource group.


In this section, you create NSG rules to allow inbound connections that use HTTP and Microsoft Remote Desktop Protocol (RDP) by using the Azure portal.
- In the Azure portal, select All resources in the leftmost menu. Then search for and select myNetworkSecurityGroup. It's located in the myResourceGroupZLB resource group.
- Under Settings, select Inbound security rules. Then select Add.
- Enter these values for the inbound security rule named myHTTPRule to allow for inbound HTTP connections that use port 80:
- Service Tag, for Source.
- Internet, for Source service tag.
- 80, for Destination port ranges.
- vTCP, for Protocol.
- Allow, for Action.
- 100, for Priority.
- myHTTPRule, for Name.
- Allow HTTP, for Description.
- Select OK.

-
Repeat steps 2 to 4 to create another rule named myRDPRule. This rule allows for an inbound RDP connection that uses port 3389, with the following values:
- Service Tag, for Source.
- Internet, for Source service tag.
- 3389, for Destination port ranges.
- TCP, for Protocol.
- Allow, for Action.
- 200, for Priority.
- myRDPRule, for Name.
- Allow RDP, for Description.


-
On the upper left side of the screen, select Create a resource > Compute > Windows Server 2016 Datacenter. Enter these values for the virtual machine:
- myVM1, for the name of the virtual machine.
- azureuser, for the administrator user name.
- myResourceGroupZLB, for Resource group. Select Use existing, and then select myResourceGroupZLB.
-
Select OK.
-
Select DS1_V2 for the size of the virtual machine. Choose Select.
-
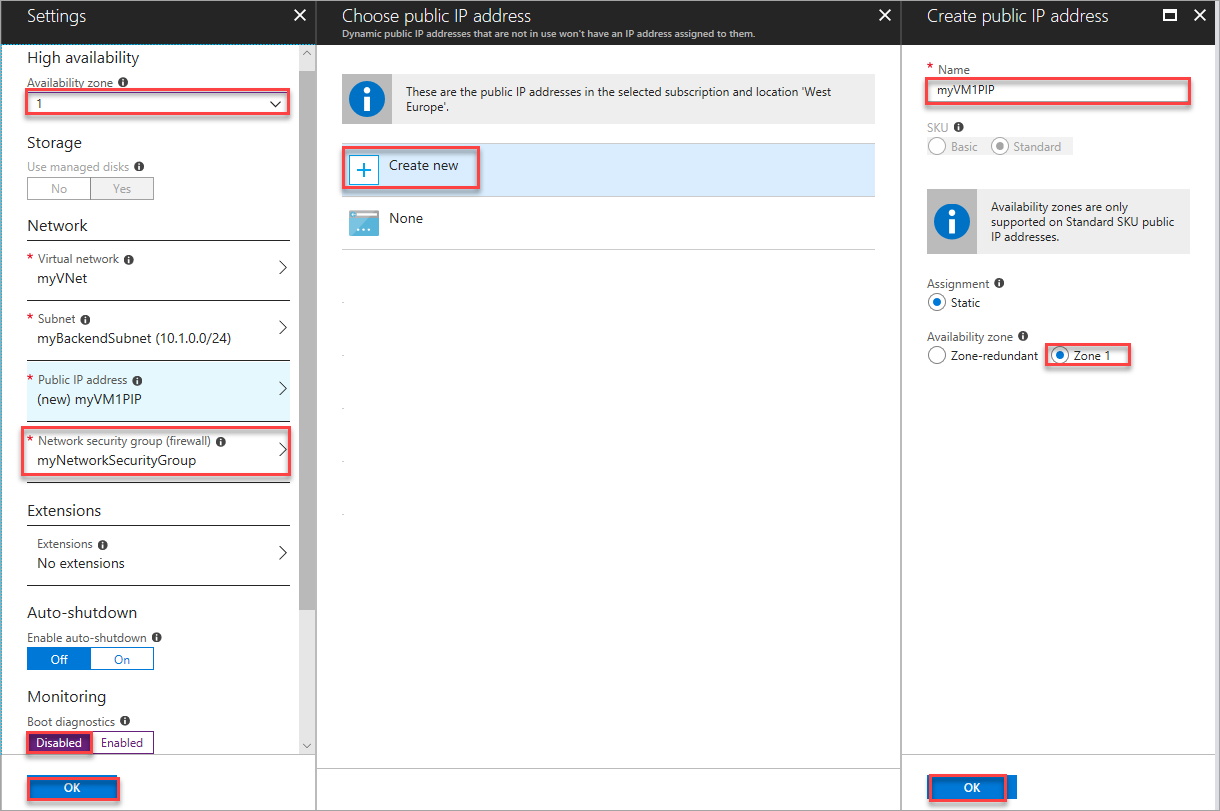
Enter these values for the VM settings:
- zone 1, for the Availability zone where you place the VM.
- myVNet. Ensure it's selected as the virtual network.
- myVM1PIP, for the standard public IP address that you create. Select Create new. Then for name type, select myVM1PIP. For Zone, select 1. The IP address SKU is standard by default.
- myBackendSubnet. Make sure it's selected as the subnet.
- myNetworkSecurityGroup, for the name of the network security group firewall that already exists.
-
Select Disabled to disable boot diagnostics.
-
Select OK. Review the settings on the summary page. Then select Create.
-
Repeat steps 1 to 6 to create a second VM, named myVM2, in Zone 1. Make myVnet the virtual network. Make myVM2PIP the standard public IP address. Make myBackendSubnet the subnet. And make myNetworkSecurityGroup the network security group.

-
Select All resources in the leftmost menu. Then from the resources list, select myVM1. It's located in the myResourceGroupZLB resource group.
-
On the Overview page, select Connect to use RDP to go to the VM.
-
Sign in to the VM with the user name and password that you specified when you created the VM. To specify the credentials you entered when you created the VM, you might need to select More choices. Then select Use a different account. And then select OK. You might receive a certificate warning during the sign-in process. Select Yes to proceed with the connection.
-
On the server desktop, navigate to Windows Administrative Tools > Windows PowerShell.
-
In the PowerShell window, run the following commands to install the IIS server. These commands also remove the default iisstart.htm file and then add a new iisstart.htm file that displays the name of the VM:
# install IIS server role Install-WindowsFeature -name Web-Server -IncludeManagementTools # remove default htm file remove-item C:\inetpub\wwwroot\iisstart.htm # Add a new htm file that displays server name Add-Content -Path "C:\inetpub\wwwroot\iisstart.htm" -Value $("Hello World from" + $env:computername) -
Close the RDP session with myVM1.
-
Repeat steps 1 to 7 to install IIS on myVM2.
In this section, you configure load balancer settings for a backend address pool and a health probe. You also specify load balancer and network address translation rules.
To distribute traffic to the VMs, a backend address pool contains the IP addresses of the virtual network interface cards that are connected to the load balancer. Create the backend address pool myBackendPool to include VM1 and VM2.
-
Select All resources in the leftmost menu. Then select myLoadBalancer from the resources list.
-
Under Settings, select Backend pools. Then select Add.
-
On the Add a backend pool page, take the following actions:
- For name, enter myBackEndPool as the name for your backend pool.
- For Virtual network, in the drop-down menu, select myVNet.
- For Virtual machine and IP address, add myVM1 and myVM2 and their corresponding public IP addresses.
-
Select Add.
-
Check to make sure your load balancer backend pool setting displays both the VMs: myVM1 and myVM2.


Use a health probe so the load balancer can monitor the status of your app. The health probe dynamically adds or removes VMs from the load balancer rotation based on their response to health checks. Create a health probe myHealthProbe to monitor the health of the VMs.
-
Select All resources in the leftmost menu. Then select myLoadBalancer from the resources list.
-
Under Settings, select Health probes. Then select Add.
-
Use these values to create the health probe:
- myHealthProbe, for the name of the health probe.
- HTTP, for the protocol type.
- 80, for the port number.
- 15, for number of Interval in seconds between probe attempts.
- 2, for number of Unhealthy threshold or consecutive probe failures that must occur before a VM is considered unhealthy.
-
Select OK.


A load balancer rule defines how traffic is distributed to the VMs. You define the frontend IP configuration for the incoming traffic and the backend IP pool to receive the traffic, along with the required source and destination port. Create a load balancer rule myLoadBalancerRuleWeb, for listening to port 80 in the frontend FrontendLoadBalancer. The rule sends load-balanced network traffic to the backend address pool myBackEndPool, also by using port 80.
-
Select All resources in the leftmost menu. Then select myLoadBalancer from the resources list.
-
Under Settings, select Load balancing rules. Then select Add.
-
Use these values to configure the load balancing rule:
- myHTTPRule, for the name of the load balancing rule.
- TCP, for the protocol type.
- 80, for the port number.
- 80, for the backend port.
- myBackendPool, for the name of the backend pool.
- myHealthProbe, for the name of the health probe.
-
Select OK.


-
Find the public IP address for the load balancer on the Overview screen. Select All resources. Then select myPublicIP.
-
Copy the public IP address. Then paste it into the address bar of your browser. The default page that includes the name of the web server page is displayed on the browser.

-
To see the load balancer in action, force stop the VM that is displayed. Refresh the browser to see the other server name displayed on the browser.

When they're no longer needed, delete the resource group, load balancer, and all related resources. Select the resource group that contains the load balancer. Then select Delete.
- Learn more about Standard Load Balancer.
- Load balance VMs across availability zones.