| title | description | services | ms.service | author | ms.author | manager | ms.topic | ms.custom | ms.date | ms.reviewer | ms.suite |
|---|---|---|---|---|---|---|---|---|---|---|---|
Create and automate your first workflow - Azure Logic Apps | Microsoft Docs |
Quickstart for how to create your first logic app that automates tasks, processes, and workflows with Azure Logic Apps. Create logic apps for system integration and enterprise application integration (EAI) solutions for your systems & cloud services |
logic-apps |
logic-apps |
ecfan |
estfan |
jeconnoc |
quickstart |
mvc |
07/20/2018 |
klam, LADocs |
integration |
This quickstart introduces how to build your first automated workflow with Azure Logic Apps. In this article, you create a logic app that regularly checks a website's RSS feed for new items. If new items exist, the logic app sends an email for each item. When you're done, your logic app looks like this workflow at a high level:

To follow this quickstart, you need an email account from a provider that's supported by Logic Apps, such as Office 365 Outlook, Outlook.com, or Gmail. For other providers, review the connectors list here. This logic app uses an Office 365 Outlook account. If you use another email account, the overall steps are the same, but your UI might slightly differ.
Also, if you don't have an Azure subscription, sign up for a free Azure account.
Sign in to the Azure portal with your Azure account credentials.
-
From the main Azure menu, choose Create a resource > Integration > Logic App.

-
Under Create logic app, provide details about your logic app as shown here. After you're done, choose Pin to dashboard > Create.

Property Value Description Name MyFirstLogicApp The name for your logic app Subscription <your-Azure-subscription-name> The name for your Azure subscription Resource group My-First-LA-RG The name for the Azure resource group used to organize related resources Location West US The region where to store your logic app information Log Analytics Off Keep the Off setting for diagnostic logging. -
After Azure deploys your app, the Logic Apps Designer opens and shows a page with an introduction video and commonly used triggers. Under Templates, choose Blank Logic App.


Next, add a trigger that fires when a new RSS feed item appears. Every logic app must start with a trigger, which fires when a specific event happens or when a specific condition is met. Each time the trigger fires, the Logic Apps engine creates a logic app instance that starts and runs your workflow.
-
On the designer, enter "rss" in the search box. Select this trigger: RSS - When a feed item is published

-
Provide this information for your trigger as shown and described:

Property Value Description The RSS feed URL http://feeds.reuters.com/reuters/topNewsThe link for the RSS feed that you want to monitor Interval 1 The number of intervals to wait between checks Frequency Minute The unit of time for each interval between checks Together, the interval and frequency define the schedule for your logic app's trigger. This logic app checks the feed every minute.
-
To hide the trigger details for now, click inside the trigger's title bar.

-
Save your logic app. On the designer toolbar, choose Save.


Your logic app is now live but doesn't do anything other than check the RSS feed. So, add an action that responds when the trigger fires.
Now add an action that sends email when a new item appears in the RSS feed.
-
Under the When a feed item is published trigger, choose + New step > Add an action.

-
Under Choose an action, enter "send an email" as your filter. From the actions list, select the "send an email" action for the email provider that you want.

To filter the actions list to a specific app or service, you can select that app or service first:
- For Azure work or school accounts, select Office 365 Outlook.
- For personal Microsoft accounts, select Outlook.com.
-
If asked for credentials, sign in to your email account so that Logic Apps creates a connection to your email account.
-
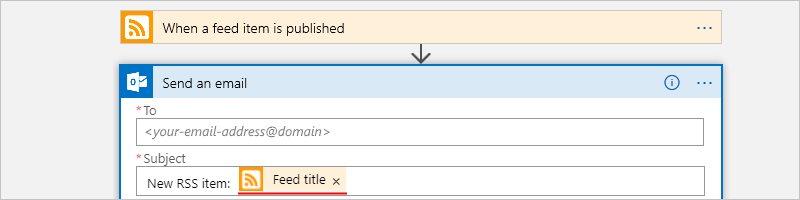
In the Send an email action, specify the data that you want the email to include.
-
In the To box, enter the recipient's email address. For testing purposes, you can use your own email address.
For now, ignore the Add dynamic content list that appears. When you click inside some edit boxes, this list appears and shows any available parameters from the previous step that you can include as inputs in your workflow.
-
In the Subject box, enter this text with a trailing blank space:
New RSS item:
-
From the Add dynamic content list, select Feed title to include the RSS item title.

When you're done, the email subject looks like this example:
If a "For each" loop appears on the designer, then you selected a token for an array, for example, the categories-Item token. For these kinds of tokens, the designer automatically adds this loop around the action that references that token. That way, your logic app performs the same action on each array item. To remove the loop, choose the ellipses (...) on the loop's title bar, then choose Delete.
-
In the Body box, enter this text, and select these tokens for the email body. To add blank lines in an edit box, press Shift + Enter.

Property Description Feed title The item's title Feed published on The item's publishing date and time Primary feed link The URL for the item
-
-
Save your logic app.


Next, test your logic app.
To manually start your logic app, on the designer toolbar bar, choose Run. Or, wait for your logic app to check the RSS feed based on your specified schedule (every minute). If the RSS feed has new items, your logic app sends an email for each new item. Otherwise, your logic app waits until the next interval before checking again.
For example, here is a sample email that this logic app sends. If you don't get any emails, check your junk email folder.

Technically, when the trigger checks the RSS feed and finds new items, the trigger fires, and the Logic Apps engine creates an instance of your logic app workflow that runs the actions in the workflow. If the trigger doesn't find new items, the trigger doesn't fire and "skips" instantiating the workflow.
Congratulations, you've now successfully built and run your first logic app with the Azure portal!
When you no longer need this sample, delete the resource group that contains your logic app and related resources.
-
On the main Azure menu, go to Resource groups, and select your logic app's resource group. On the Overview page, choose Delete resource group.

-
Enter the resource group name as confirmation, and choose Delete.


Note
When you delete a logic app, no new runs are instantiated. All in-progress and pending runs are canceled. If you have thousands of runs, cancellation might take significant time to complete.
- For questions, visit the Azure Logic Apps forum.
- To submit or vote on feature ideas, visit the Logic Apps user feedback site.
In this quickstart, you created your first logic app that checks for RSS updates based your specified schedule (every minute), and takes action (sends email) when updates exist. To learn more, continue with this tutorial that creates more advanced schedule-based workflows:
[!div class="nextstepaction"] Check traffic with a scheduled-based logic app