App Service offers built-in support for Cross Origin Resource Sharing (CORS), which enables JavaScript clients to make cross-domain calls to APIs that are hosted in API apps. App Service lets you configure CORS access to your API without writing any code in your API.
This article contains two sections:
-
The How to configure CORS section explains in general how to configure CORS for any API app, web app, or mobile app. It applies equally to all frameworks that are supported by App Service, including .NET, Node.js, and Java.
-
Starting with the Continuing the .NET getting-started tutorials section, the article is a tutorial that demonstrates CORS support by building on what you did in the first API Apps getting started tutorial.
You can configure CORS in the Azure portal or by using Azure Resource Manager tools.
-
In a browser go to the Azure portal.
-
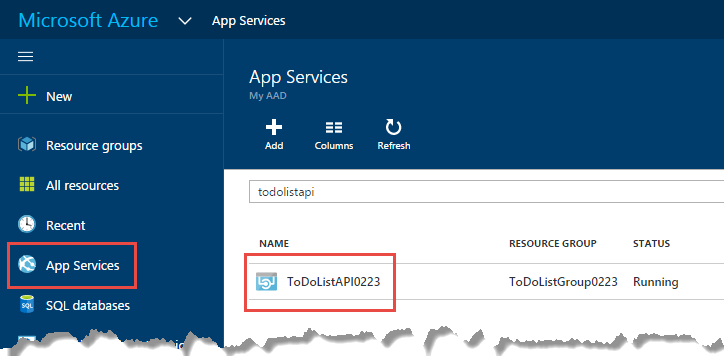
Click App Services, and then click the name of your API app.
-
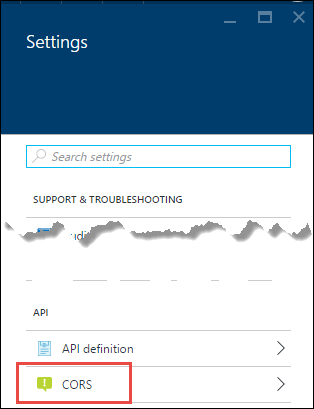
In the Settings blade that opens to the right of the API app blade, find the API section, and then click CORS.
-
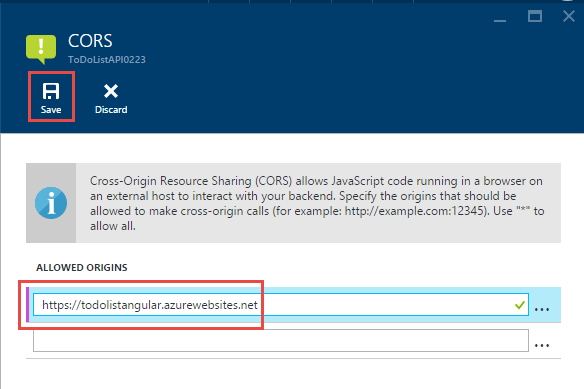
In the text box enter the URL or URLs that you want to allow JavaScript calls to come from.
For example, if you deployed your JavaScript application to a web app named todolistangular, enter "https://todolistangular.azurewebsites.net". As an alternative, you can enter an asterisk (*) to specify that all origin domains are accepted.
-
Click Save.
After you click Save, the API app will accept JavaScript calls from the specified URLs.
You can also configure CORS for an API app by using Azure Resource Manager templates in command line tools such as Azure PowerShell and the Azure CLI.
For an example of an Azure Resource Manager template that sets the CORS property, open the azuredeploy.json file in the repository for this tutorial's sample application. Find the section of the template that looks like the following example:
	"cors": {
	    "allowedOrigins": [
	        "todolistangular.azurewebsites.net"
	    ]
	}
If you are following the Node.js or Java getting-started series for API apps, you have completed the getting started series. Skip to the Next steps section to find suggestions for further learning about API Apps.
The remainder of this article is a continuation of the .NET getting-started series and assumes that you successfully completed the first tutorial.
In the first tutorial, you created a middle tier API app and a data tier API app. In this tutorial you create a single-page application (SPA) web app that calls the middle tier API app. For the SPA to work you have to enable CORS on the middle tier API app.
In the ToDoList sample application, the ToDoListAngular project is a simple AngularJS client that calls the middle tier ToDoListAPI Web API project. The JavaScript code in the app/scripts/todoListSvc.js file calls the API by using the AngularJS HTTP provider.
	angular.module('todoApp')
	.factory('todoListSvc', ['$http', function ($http) {
	    var apiEndpoint = "http://localhost:46439";

	    $http.defaults.useXDomain = true;
	    delete $http.defaults.headers.common['X-Requested-With'];

	    return {
	        getItems : function(){
	            return $http.get(apiEndpoint + '/api/TodoList');
	        },

	        /* Get by ID, Put, and Delete methods not shown */

	        postItem : function(item){
	            return $http.post(apiEndpoint + '/api/TodoList', item);
	        }
	    };
	}]);
The procedure to create a new App Service web app and deploy a project to it is similar to what you saw for creating and deploying an API app in the first tutorial in this series. The only difference is that the app type is Web App instead of API App. For screen shots of the dialogs, see
-
In Solution Explorer, right-click the ToDoListAngular project, and then click Publish.
-
In the Profile tab of the Publish Web wizard, click Microsoft Azure App Service.
-
In the App Service dialog box, click New.
-
In the Hosting tab of the Create App Service dialog box, enter a Web App Name that is unique in the azurewebsites.net domain.
-
Choose the Azure Subscription you want to work with.
-
In the Resource Group drop-down list, choose the same resource group you created earlier.
-
In the App Service Plan drop-down list, choose the same plan you created earlier.
-
Click Create.
Visual Studio creates the web app, creates a publish profile for it, and displays the Connection step of the Publish Web wizard.
Don't click Publish yet. In the following section, you configure the new web app to call the middle tier API app that is running in App Service.
-
Go to the Azure portal, and then navigate to the Web App blade for the web app that you created to host the TodoListAngular (front end) project.
-
Click Settings > Application Settings.
-
In the App settings section, add the following key and value:
Key Value Example toDoListAPIURL https://{your middle tier API app name}.azurewebsites.net https://todolistapi0121.azurewebsites.net -
Click Save.
When the code runs in Azure, this value overrides the localhost URL that is in the Web.config file.
The code that gets the setting value is in index.cshtml:
 <script type="text/javascript">
     var apiEndpoint = "@System.Configuration.ConfigurationManager.AppSettings["toDoListAPIURL"]";
 </script>
 <script src="app/scripts/todoListSvc.js"></script>
The code in todoListSvc.js uses the setting:
 return {
     getItems : function(){
         return $http.get(apiEndpoint + '/api/TodoList');
     },
     getItem : function(id){
         return $http.get(apiEndpoint + '/api/TodoList/' + id);
     },
     postItem : function(item){
         return $http.post(apiEndpoint + '/api/TodoList', item);
     },
     putItem : function(item){
         return $http.put(apiEndpoint + '/api/TodoList/', item);
     },
     deleteItem : function(id){
         return $http({
             method: 'DELETE',
             url: apiEndpoint + '/api/TodoList/' + id
         });
     }
 };
-
In Visual Studio, in the Connection step of the Publish Web wizard, click Publish.
Visual Studio deploys the ToDoListAngular project to the new web app and opens a browser to the URL of the web app.
-
In your browser Developer Tools, open the Console window.
-
In the browser window that displays the AngularJS UI, click the To Do List link.
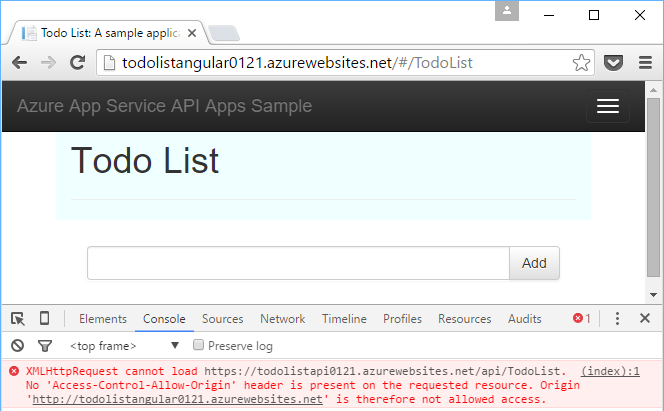
The JavaScript code tries to call the middle tier API app, but the call fails because the front end is running in a different domain than the back end. The browser's Developer Tools Console window shows a cross-origin error message.
In this section, you configure the CORS setting in Azure for the middle tier ToDoListAPI API app. This setting will allow the middle tier API app to receive JavaScript calls from the web app that you created for the ToDoListAngular project.
-
In a browser, go to the Azure portal.
-
Click App Services, and then click the ToDoListAPI (middle tier) API app.
-
In the Settings blade that opens to the right of the API app blade, find the API section, and then click CORS.
-
In the text box, enter the URL for the ToDoListAngular (front end) web app. For example, if you deployed the ToDoListAngular project to a web app named todolistangular0121, allow calls from the URL
https://todolistangular0121.azurewebsites.net.As an alternative, you can enter an asterisk (*) to specify that all origin domains are accepted.
-
Click Save.
After you click Save, the API app will accept JavaScript calls from the specified URL. In this screen shot, the ToDoListAPI0223 API app will accept JavaScript client calls from the ToDoListAngular web app.
-
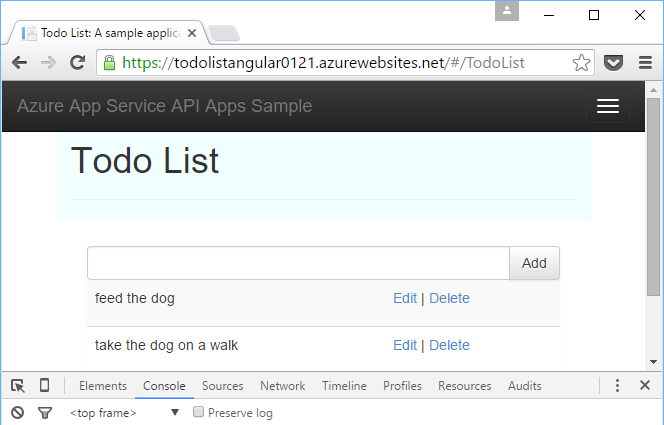
Open a browser to the HTTPS URL of the web app.
This time the application lets you view, add, edit, and delete to-do items.
In a Web API project, you can install the Microsoft.AspNet.WebApi.Cors NuGet package to specify in code which domains your API will accept JavaScript calls from.
Web API CORS support is more flexible than App Service CORS support. For example, in code you can specify different accepted origins for different action methods, while for App Service CORS you specify one set of accepted origins for all of an API app's methods.
[AZURE.NOTE] Don't try to use both Web API CORS and App Service CORS in one API app. App Service CORS will take precedence and Web API CORS will have no effect. For example, if you enable one origin domain in App Service, and enable all origin domains in your Web API code, your Azure API app will only accept calls from the domain you specified in Azure.
The following steps summarize the process for enabling Web API CORS support. For more information, see Enabling Cross-Origin Requests in ASP.NET Web API 2.
-
In a Web API project, install the Microsoft.AspNet.WebApi.Cors NuGet package.
-
Include a
config.EnableCors()line of code in the Register method of the WebApiConfig class, as in the following example.public static class WebApiConfig { public static void Register(HttpConfiguration config) { // Web API configuration and services // The following line enables you to control CORS by using Web API code config.EnableCors(); // Web API routes config.MapHttpAttributeRoutes(); config.Routes.MapHttpRoute( name: "DefaultApi", routeTemplate: "api/{controller}/{id}", defaults: new { id = RouteParameter.Optional } ); } } -
In your Web API controller, add a
usingstatement for theSystem.Web.Http.Corsnamespace, and add theEnableCorsattribute to the controller class or to individual action methods. In the following example, CORS support applies to the entire controller.namespace ToDoListAPI.Controllers { [HttpOperationExceptionFilterAttribute] [EnableCors(origins:"https://todolistangular0121.azurewebsites.net", headers:"accept,content-type,origin,x-my-header", methods: "get,post")] public class ToDoListController : ApiController
If you use Azure API Management with an API app, configure CORS in API Management instead of in the API app. For more information, see the following resources:
In case you run into a problem while going through this tutorial, here are some troubleshooting ideas.
-
Make sure that you're using the latest version of the Azure SDK for .NET for Visual Studio 2015.
-
Make sure that you entered
httpsin the CORS setting, and make sure that you're usinghttpsto run the front-end web app. -
Make sure that you entered the CORS setting in the middle tier API app, not in the front-end web app.
-
If you're configuring CORS in both application code and Azure App Service, note that the App Service CORS setting will override whatever you're doing in application code.
To learn more about Visual Studio features that simplify troubleshooting, see Troubleshooting Azure App Service apps in Visual Studio.
In this article, you saw how to enable App Service CORS support so that client JavaScript code can call an API in a different domain. To learn more about API apps, read the introduction to authentication in App Service, and then go to the user authentication for API apps tutorial.
