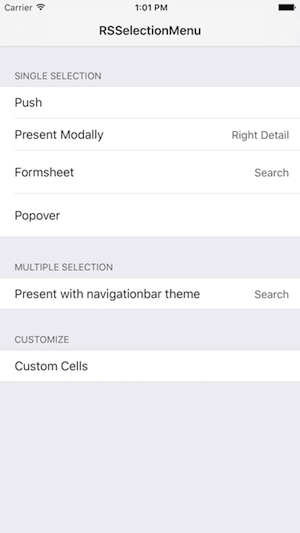
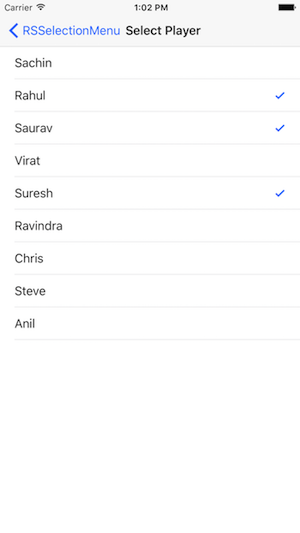
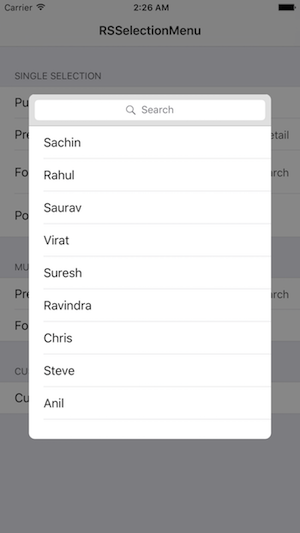
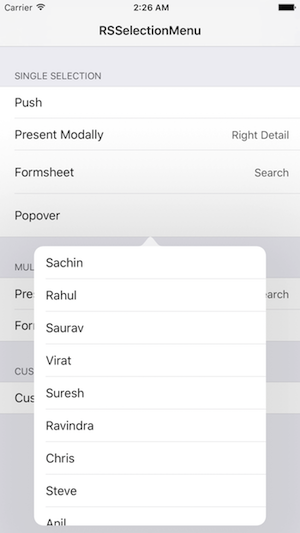
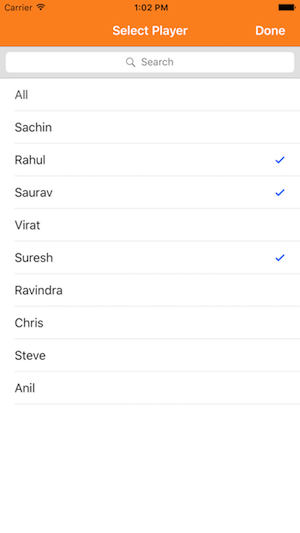
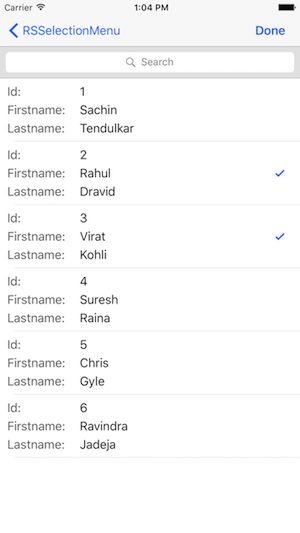
An elegant selection list or dropdown menu for iOS with single or multiple selections.
- Show selection menu as List, Popover or FormSheet with single or multiple selection.
- Use different cell types. (Basic, RightDetail, SubTitle)
- Works with Swift premitive types as well as custom NSObject classes.
- Show selection menu with your custom cells.
- Search from the list with inbuilt SearchBar.
- iOS 10.0+
- Xcode 8.3+
- Swift 3.0+
pod 'RSSelectionMenu'RSSelectionMenu is developed in swift 3.2. So if you're using Swift 4.0 then put following script in your end of pod file.
post_install do |installer|
    installer.pods_project.targets.each do |target|
        target.build_configurations.each do |config|
            config.build_settings['SWIFT_VERSION'] = '3.2'
        end
    end
end- Alternatively you can follow below steps.
- Go to pods projects in your workspace.
- Select RSSelectionMenu target.
- Go to Build Settings and set Swift Language Version to 3.2
- Provide dataSource array and selected items (if any) to show selection list.
- Update your selected items array when user selects any item.
let simpleDataArray = ["Sachin", "Rahul", "Saurav", "Virat", "Suresh", "Ravindra", "Chris"]
var simpleSelectedArray = [String]()

// Show menu with datasource array - Default SelectionType = Single
// Here you'll get cell configuration where you can set any text based on condition
// Cell configuration following parameters.
// 1. UITableViewCell   2. Object of type T   3. IndexPath

let selectionMenu =  RSSelectionMenu(dataSource: simpleDataArray) { (cell, object, indexPath) in
    cell.textLabel?.text = object
}

// set default selected items when menu present on screen.
// Here you'll get onDidSelectRow

selectionMenu.setSelectedItems(items: simpleSelectedArray) { (text, isSelected, selectedItems) in

    // update your existing array with updated selected items, so when menu presents second time updated items will be default selected.
    self.simpleSelectedArray = selectedItems
}

// show as PresentationStyle = Push
selectionMenu.show(style: .Push, from: self)- Set SelectionType to .Multiple
let selectionMenu = RSSelectionMenu(selectionType: .Multiple, dataSource: dataArray, cellType: .Basic) { (cell, object, indexPath) in
    cell.textLabel?.text = object
}- Set cell type to RightDetail or SubTitle while initialization.
let selectionMenu = RSSelectionMenu(selectionType: .Single, dataSource: dataArray, cellType: .RightDetail) { (cell, object, indexPath) in

    // here you can set any text from object
    // let's set firstname in title and lastname as right detail

    let firstName = object.components(separatedBy: " ").first
    let lastName = object.components(separatedBy: " ").last

    cell.textLabel?.text = firstName
    cell.detailTextLabel?.text = lastName
}

selectionMenu.setSelectedItems(items: selectedDataArray) { (text, selected, selectedItems) in
    self.selectedDataArray = selectedItems
}

// show as default
selectionMenu.show(from: self)- Set default selection value to "", None or All while presenting.
// To show first row as Empty, when dropdown as no value selected by default
// Here you'll get Text and isSelected when user selects first row

selectionMenu.addFirstRowAs(rowType: .Empty, showSelected: self.firstRowSelected) { (text, isSelected) in

    // update your flag here to maintain consistency. -  This is required to be update when presenting for the second time.
    self.firstRowSelected = isSelected
}- Add searchbar as headerView when you want to search from list.
- You'll get notified when user starts typing in searchbar.
// show searchbar
selectionMenu.showSearchBar { (searchtext) -> ([String]) in

    // return filtered array based on any condition
    // here let's return array where name starts with specified search text

    return self.dataArray.filter({ $0.lowercased().hasPrefix(searchText.lowercased()) })
}- Change seachbar placeholder text, searchbar tint color.
- Change searchbar cancel button attributes (Title and TintColor)
// show searchbar with placeholder and tint color
selectionMenu.showSearchBar(withPlaceHolder: "Search Player", tintColor: UIColor.withAlphaComponent(0.5)) { (searchtext) -> ([String]) in
    return self.dataArray.filter({ $0.lowercased().hasPrefix(searchtext.lowercased()) })
}

// customize default cancel button of seachbar
// 1. Set cancel button title to "Dismiss"
// 2. Change tint color. - nil value will set the default tint color

selectionMenu.searchBarCancelButtonAttributes = SearchBarCancelButtonAttributes("Dismiss", nil)- Change presentation type to .Formsheet or .Popover while presenting. - Default style is .Present
// show as formsheet
selectionMenu.show(style: .Formsheet, from: self)

// show as popover
selectionMenu.show(style: .Popover(sourceView: sourceView, size: nil), from: self)- Change Navigation Title, NavigationBar color, Title Color and BarButtonItem titles.
// set navigation title and color
selectionMenu.setNavigationBar(title: "Select Player", attributes: [NSForegroundColorAttributeName: UIColor.white], barTintColor: UIColor.orange.withAlphaComponent(0.5))

// right barbutton title - Default is 'Done'
selectionMenu.rightBarButtonTitle = "Submit"

// left barbutton title - Default is 'Cancel'
selectionMenu.leftBarButtonTitle = "Close"- Provide custom cell with xib file name and cell identifier.
let selectionMenu =  RSSelectionMenu(selectionType: .Multiple, dataSource: customDataArray, cellType: .Custom(nibName: "CustomTableViewCell", cellIdentifier: "cell")) { (cell, person, indexPath) in

    // cast cell to your custom cell type
    let customCell = cell as! CustomTableViewCell

    // set cell data here
}- RSSelectionMenu can also works with Custom Models.
- Inherit your models from NSObject.
- Implement UniqueProperty protocol and define your unique property in the model.
// Implement UniqueProperty protocol and return property name which has unique value.
// You can also specify this later by - selectionMenu.uniquePropertyName = "id"

class Person: NSObject, UniqueProperty {

    let id: Int
    let firstName: String
    let lastName: String

    init(id: Int, firstName: String, lastName: String) {
    self.id = id
    self.firstName = firstName
    self.lastName = lastName
    }

    // Here id has the unique value for each person
    func uniquePropertyName() -> String {
        return "id"
    }
}

var customDataArray = [Person]()
var customselectedDataArray = [Person]()

// prepare data array with models
customDataArray.append(Person(id: 1, firstName: "Sachin", lastName: "Tendulkar"))
customDataArray.append(Person(id: 2, firstName: "Rahul", lastName: "Dravid"))
customDataArray.append(Person(id: 3, firstName: "Virat", lastName: "Kohli"))


// Show menu with datasource array with Models - SelectionType = Multiple, CellType = Custom

let selectionMenu =  RSSelectionMenu(selectionType: .Multiple, dataSource: customDataArray, cellType: .Custom(nibName: "CustomTableViewCell", cellIdentifier: "cell")) { (cell, person, indexPath) in

    // cast cell to your custom cell type
    let customCell = cell as! CustomTableViewCell

    // here you'll get specified model object
    // set data based on your need
    customCell.setData(person)
}

// show with default selected items and update when user selects any row
selectionMenu.setSelectedItems(items: customselectedDataArray) { (text, selected, selectedItems) in
    self.customselectedDataArray = selectedItems
}

// show searchbar
selectionMenu.showSearchBar { (searchtext) -> ([Person]) in
    return self.customDataArray.filter({ $0.firstName.lowercased().hasPrefix(searchtext.lowercased()) })
}

selectionMenu.show(style: .Push, from: self)- If you don't want to implement protocol then set your unique property as below.
selectionMenu.uniquePropertyName = "id" // replace your property name or dictionary key here which has unique value.See Example for more details.
RSSelectionMenu is released under the MIT license. See LICENSE for details.
