xhost: apt install x11-xserver-utils
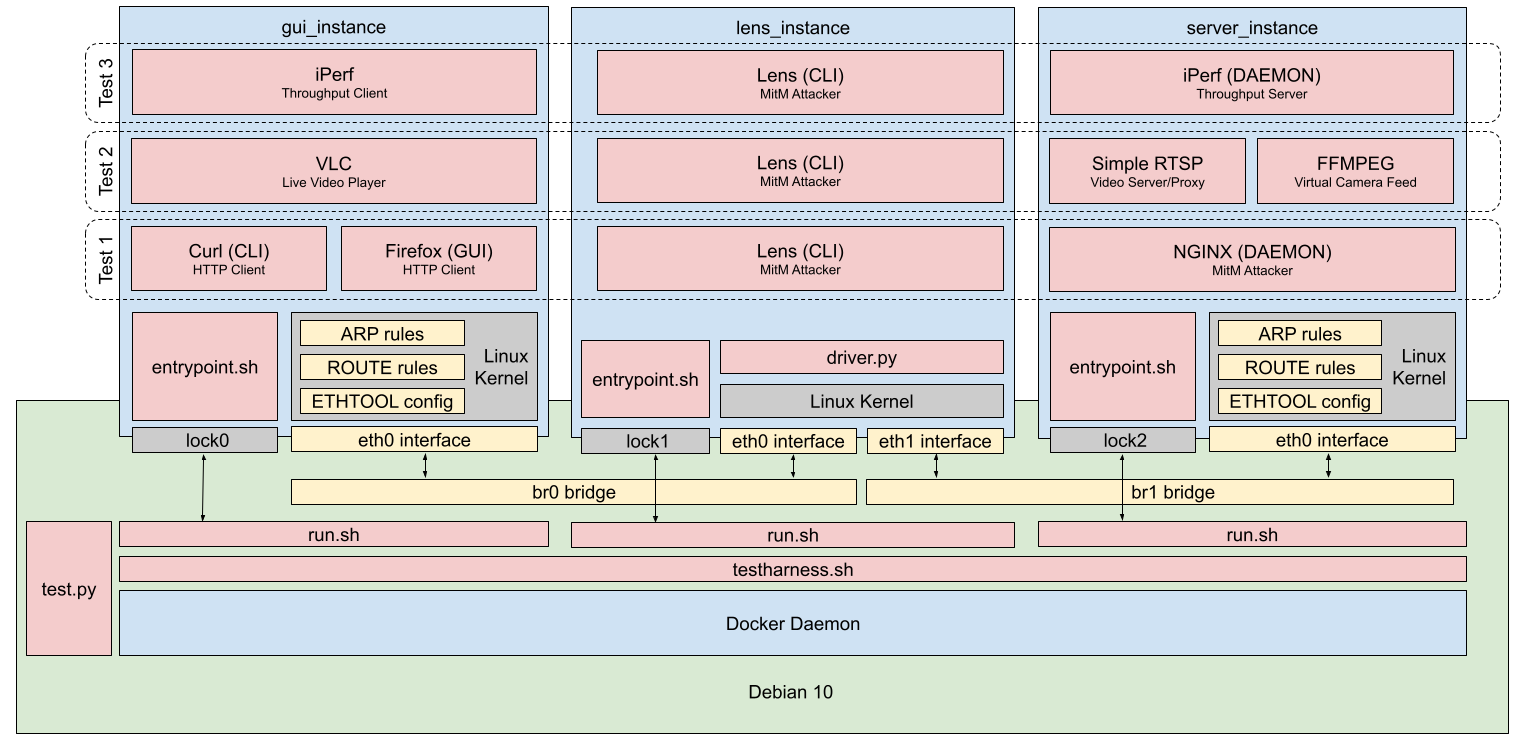
The overall architecture of the test suite is given in the block diagram below.
- Networking is in yellow
- Applications are in red
- Docker is in blue
Three interactive shells are required for a full demonstration.
- Leftmost shell will be for a
gui_instancecontainer - Middle shell will be for a
lens_instancecontainer - Rightmost shell will be for
server_instancecontainer
Start the test harness using the testharness.sh wrapper script.
sudo ./testharness.sh httpConfirm that all three containers listed below are running.
viewer_instancecamera_instancelens_instance
The middle shell should already be attached to a lens_instance container.
In the leftmost shell, attach to gui_instance.
sudo docker container attach gui_instanceIn the rightmost shell, attach to server_instance.
sudo docker container attach server_instanceWithin the leftmost shell inside the container, load a website from the server.
firefox -private 192.168.0.2Observe that modification should have occured. To confirm, place the driver back into passive mode to confirm. Within the middle shell inside the container run:
driver passiveStart the test harness using the automated test contol script test.py. To save time the script can either generate results and save them to a temp file with
sudo ./test.py --saveOr load results from a temp file and generate the associated plots.
sudo ./test.py --loadTo generate packets on a specific interface, either cURL or ping can be used.
curl --interface eth0 localhost:80
ping -I eth0 localhost:80
To capture packets on an interface, use TCPdump.
tcpdump -e -n -i -vvv -xx eth0
sudo tcpdump -e -n -vvv -xx -w cap.hex -i eth0
Hexdump can be used to load captures which were previously saved.
hexdump -C cap.hexUse wget to pull a servable copy of the website recursively.
wget -k -H -E -p -nd --no-parent -e robots=off https://en.wikipedia.org/wiki/Man-in-the-middle_attackLikely this will result in file names/paths which contain characters like ? which are invalid on windows and should not be commited to git. Therefore zip the resulting website by navigating into the folder and running:
tar -czvf ../payload.tar *
When attaching multiple times to a docker container, all connections share the same stdin and stdout. To get a second shell to a container, run one of the commands below.
sudo docker exec -it iperf_instance bash
sudo docker exec -it gui_instance bash
sudo docker exec -it lens_instance bash
sudo docker exec -it server_instance bashInstall wireshark
sudo apt update
sudo apt install wireshark
Note that wireshark required root permissions to capture packets in its default configuration and so should be run with sudo wireshark from a new shell.
If there are both public and private ip addresses in the capture, then consider only ones in the ranges of private IPs. 1) 10.0.0.0 to 10.255.255.255 2) 172.16.0.0 to 172.31.255.255 3) 192.168.0.0 to 192.168.255.255
sudo apt-get install python3-matplotlib
https://stackoverflow.com/questions/26999595/what-steps-are-needed-to-stream-rtsp-from-ffmpeg
The docker daemon is only accessible to root users by default. We can fix this with the following commands.
sudo groupadd docker
sudo usermod -aG docker $USER
See https://docs.docker.com/engine/install/linux-postinstall/ for more
