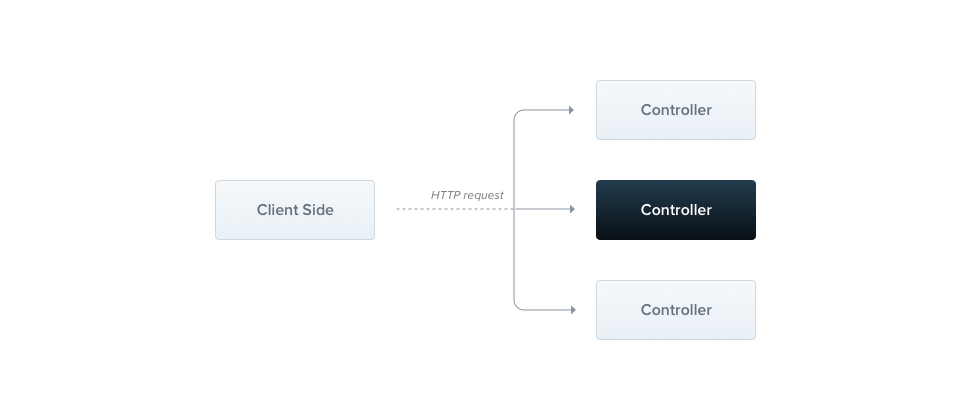
- 先刪除src/modules/app.controller.ts,然後在資料夾根目錄,下cmd指令,創建Users資料夾:
cd src/modules & mkdir Users
- 在src/modules/Users,新增users.controller.ts,其程式碼如下:
import { Controller, Get, Post } from '@nestjs/common';

@Controller()
export class UsersController {

    @Get('users')
    getAllUsers() { }

    @Get('users/:id')
    getUser() { }

    @Post('users')
    addUser() { }
}
說明: UsersController是一個帶有裝飾器(Decorator)的類,裝飾器(Decorator)會把metadata連接到controller上,我們定義好了上述/users、/users/:id,但ApplicationModule(根模組),尚未引用UsersController,程式會完全沒變化,所以要去src/modules/app.module.ts改寫程式碼。
- 在src/modules/app.module.ts,改寫成下圖所示。
import { Module } from '@nestjs/common';
import { UsersController } from './Users/users.controller';

@Module({
  modules: [],
  controllers: [UsersController],
  components: [],
})
export class ApplicationModule { }
說明: 如此ApplicationModule就知道有UsersController的存在,程式也會去執行它。
- 下cmd指令,重啟server,並使用Postman觀察http://localhost:3000/users
ctrl+C
npm start
[Nest] 8472   - 2017-12-5 21:19:20   [NestFactory] Starting Nest application...
[Nest] 8472   - 2017-12-5 21:19:20   [InstanceLoader] ApplicationModule dependencies initialized +7ms
[Nest] 8472   - 2017-12-5 21:19:20   [RoutesResolver] UsersController {/}: +55ms
[Nest] 8472   - 2017-12-5 21:19:20   [RouterExplorer] Mapped {/users, GET} route +2ms
[Nest] 8472   - 2017-12-5 21:19:20   [RouterExplorer] Mapped {/users/:id, GET} route +1ms
[Nest] 8472   - 2017-12-5 21:19:20   [RouterExplorer] Mapped {/users, POST} route +1ms
[Nest] 8472   - 2017-12-5 21:19:20   [NestApplication] Nest application successfully started +3ms
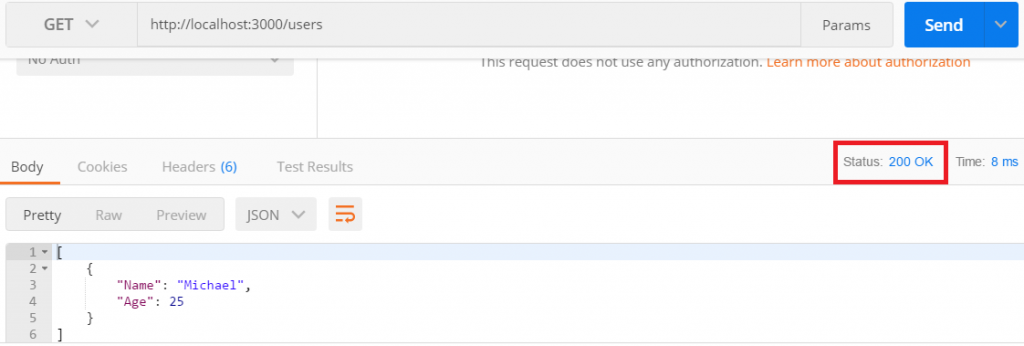
Application based on Express is listening on port 3000說明: 觀察到Console畫面,UserController有load進去、路徑也有map,且Postman的結果會得到200狀態碼,代表Controller已經有被運行成功。
- 向http://localhost:3000/users 發Http GET請求時,回傳點假資料看一下,程式碼修改如下圖。
import { Controller, Get, Post } from '@nestjs/common';

@Controller()
export class UsersController {

    @Get('users')
    getAllUsers() {
        //假資料
        const users = [{ "Name": "Michael","Age":25 }];
        return users;
    }

    @Get('users/:id')
    getUser() { }

    @Post('users')
    addUser() { }
}- 下cmd指令,重啟server,並使用Postman觀察http://localhost:3000/users
ctrl+C
npm start
說明: 結果符合預期。
- 在每個裝飾器(Decorator)都寫路徑似乎很麻煩,我們可以直接在Controller傳入路徑前綴,程式碼修改如下圖。
import { Controller, Get, Post } from '@nestjs/common';

@Controller('users')
export class UsersController {

    @Get()
    getAllUsers() {
        //假資料
        const users = [{ "Name": "Michael","Age":25 }];
        return users;
    }

    @Get('/:id')
    getUser() { }

    @Post()
    addUser() { }
}
說明: 程式碼精簡許多,適合寫Restful API。
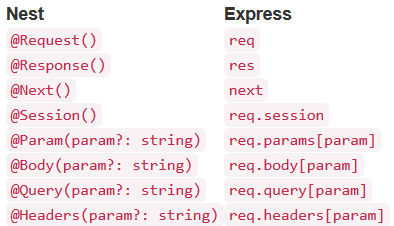
- Nestjs有對比Express自定義參數,下圖為對照表。
- 使用Nestjs自定義的Express參數,並且重啟server,修改程式碼如下圖。
import { Controller, Get, Post, Request, Response, Param, Next, HttpStatus } from '@nestjs/common';

@Controller('users')
export class UsersController {

    @Get()
    //使用Express的參數
    getAllUsers( @Request() req, @Response() res, @Next() next) {
        //假資料
        const users = [{ "Name": "Michael","Age":25 }];
        //多種HttpStatus可用
        res.status(HttpStatus.OK).json(users);
    }

    @Get('/:id')
    //使用Express的參數
    getUser( @Param() params) {
        return { "getUser": params.id };
    }

    @Post()
addUser() { }對http://localhost:3000/user 發出GET請求
說明:可以看出來HttpStatus.OK等於200狀態碼。
對http://localhost:3000/user/2 發出GET請求
說明:確認有捕捉到params。
- POST 部分,程式碼如下圖:
import { Controller, Get, Post, Request, Response, Param, Next, HttpStatus, Body } from '@nestjs/common';
import { CreateUserDTO } from './DTO/create-users.dto';

@Controller('users')
export class UsersController {

    @Get()
    //使用Express的參數
    getAllUsers( @Request() req, @Response() res, @Next() next) {
        //假資料
        const users = [{ "Name": "Michael", "Age": 25 }];
        //多種HttpStatus可用
        res.status(HttpStatus.OK).json(users);
    }

    @Get('/:id')
    //使用Express的參數
    getUser( @Param() params) {
        return { "getUser": params.id };
    }

    @Post()
    addUser(@Body() body) {
        //顯示POST過來的body請求體
        console.log(body);
    }
}-
使用Postman,向http://localhost:3000/users 發出POST請求,如下圖:
-
console顯示如下圖:
[Nest] 9812   - 2017-12-5 22:27:37   [NestFactory] Starting Nest application...
[Nest] 9812   - 2017-12-5 22:27:38   [InstanceLoader] ApplicationModule dependencies initialized +9ms
[Nest] 9812   - 2017-12-5 22:27:38   [RoutesResolver] UsersController {/users}: +39ms
[Nest] 9812   - 2017-12-5 22:27:38   [RouterExplorer] Mapped {/, GET} route +5ms
[Nest] 9812   - 2017-12-5 22:27:38   [RouterExplorer] Mapped {/:id, GET} route +1ms
[Nest] 9812   - 2017-12-5 22:27:38   [RouterExplorer] Mapped {/, POST} route +2ms
[Nest] 9812   - 2017-12-5 22:27:38   [NestApplication] Nest application successfully started +1ms
Application based on Express is listening on port 3000
{ Name: 'Michael Chen' }
說明:接收到POST請求的body。
- 再進一步,我們建立一個檔名為create-users.dto.ts的DTO類別(Data Transfer Object),並定義好schema,如下圖所示。
cd src/modules/Users & mkdir DTO
cd DTO
export class CreateUserDTO{
    readonly _name:string;
    readonly _age:number;
}- 修改UsersController程式碼如下圖。
import { Controller, Get, Post, Request, Response, Param, Next, HttpStatus, Body } from '@nestjs/common';
import { CreateUserDTO } from './DTO/create-users.dto';

@Controller('users')
export class UsersController {

    @Get()
    //使用Express的參數
    getAllUsers( @Request() req, @Response() res, @Next() next) {
        //假資料
        const users = [{ "Name": "Michael", "Age": 25 }];
        //多種HttpStatus可用
        res.status(HttpStatus.OK).json(users);
    }

    @Get('/:id')
    //使用Express的參數
    getUser( @Param() params) {
        return { "getUser": params.id };
    }

    @Post()
    //post過來的body要符合DTO class所描述的屬性
    addUser(@Body() createUserDTO:CreateUserDTO) {
        //顯示POST過來的body請求體
        console.log('姓名:',createUserDTO._name,'年紀:',createUserDTO._age);
    }
}-
接著,透過Postman 往http://localhost:3000/users POST 一組資料,如下圖所示。
-
POST 部分大功告成,可以收到POST過來的參數物件,且已經map到DTO 的class屬性,之後就可以對這組資料做物件操作,console畫面如下。
[Nest] 12128   - 2017-12-5 22:37:25   [NestFactory] Starting Nest application...
[Nest] 12128   - 2017-12-5 22:37:25   [InstanceLoader] ApplicationModule dependencies initialized +7ms
[Nest] 12128   - 2017-12-5 22:37:25   [RoutesResolver] UsersController {/users}: +26ms
[Nest] 12128   - 2017-12-5 22:37:25   [RouterExplorer] Mapped {/, GET} route +4ms
[Nest] 12128   - 2017-12-5 22:37:25   [RouterExplorer] Mapped {/:id, GET} route +2ms
[Nest] 12128   - 2017-12-5 22:37:25   [RouterExplorer] Mapped {/, POST} route +1ms
[Nest] 12128   - 2017-12-5 22:37:25   [NestApplication] Nest application successfully started +2ms
Application based on Express is listening on port 3000
姓名: Michael Chen 年紀: 25程式碼在github


