[WACOM.INCLUDE disclaimer]
You can configure the most commonly used settings for a cloud service in the Azure Management Portal. Or, if you like to update your configuration files directly, download a service configuration file to update, and then upload the updated file and update the cloud service with the configuration changes. Either way, the configuration updates are pushed out to all role instances.
You can also enable a Remote Desktop connection to one or all roles running in your cloud service. Remote Desktop allows you to access the desktop of your application while it is running and troubleshoot and diagnose problems. You can enable a Remote Desktop connection to your role even if you did not configure the service definition file (.csdef) for Remote Desktop during application development. There is no need to redeploy your application in order to enable a Remote Desktop connection.
Azure can only ensure 99.95 percent service availability during the configuration updates if you have at least two role instances (virtual machines) for every role. That enables one virtual machine to process client requests while the other is being updated. For more information, see Service Level Agreements.
##Table of Contents##
-
In the Azure Management Portal, click Cloud Services. Then click the name of the cloud service to open the dashboard.
-
Click Configure.
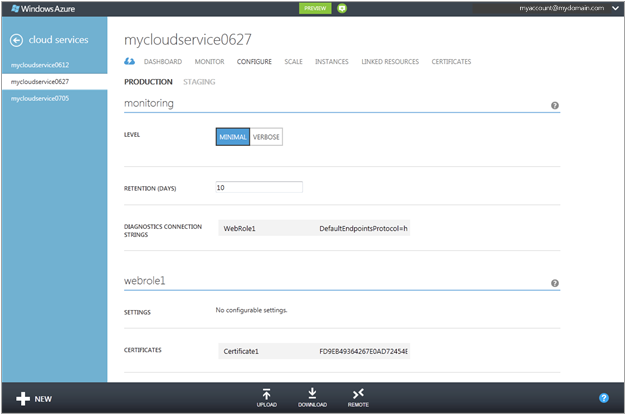
On the Configure page, you can configure monitoring, update role settings, and choose the guest operating system and family for role instances (virtual machines).
-
In monitoring settings, set the monitoring level to Verbose or Minimal, and configure the diagnostics connection strings that are required for verbose monitoring. For instructions, see How to Monitor Cloud Services.
-
For service roles (grouped by role), you can update the following settings:
- Settings Modify the values of miscellaneous configuration settings that are specified in the ConfigurationSettings elements of the service configuration (.cscfg) file.
- Certificates Change the certificate thumbprint that's being used in SSL encryption for a role. To change a certificate, you must first upload the new certificate (on the Certificates page). Then update the thumbprint in the certificate string displayed in the role settings.
-
In operating system settings, you can change the operating system family or version for role instances (virtual machines), or choose Automatic to resume automatic updates of the current operating system version. The operating system settings apply to web roles and worker roles, but do not affect VM roles that were added to hosted services in the previous Azure Management Portal.
When you deploy a new cloud service, you can choose either the Windows Server 2008 R2, Windows Server 2008 with Service Pack 2 (SP2), or Windows Server 2012 operating system. During deployment, the most recent operating system version is installed on all role instances, and the operating systems are updated automatically by default.
If you need for your cloud service to run on a different operating system version because of compatibility requirements in your code, you can choose an operating system family and version. When you choose a specific operating system version, automatic operating system updates for the cloud service are suspended. You will need to ensure the operating systems receive updates.
If you resolve all compatibility issues that your apps have with the most recent operating system version, you can resume automatic operating system updates by setting the operating system version to Automatic.
-
To save your configuration settings, and push them to the role instances, click Save. (Click Discard to cancel the changes.) Save and Discard are added to the command bar after you change a setting.
###To update a cloud service configuration file manually###
-
Download a cloud service configuration file (.cscfg) with the current configuration. On the Configure page for the cloud service, click Download. Then click Save, or click Save As to save the file.
-
After you update the service configuration file, upload and apply the configuration updates:
a. On the Configure page, click Upload.
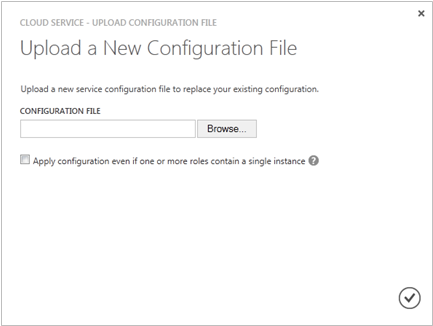
Upload a New Configuration File opens.
b. In Configuration file, use Browse to select the updated .cscfg file.
c. If your cloud service contains any roles that have only one instance, select the Apply configuration even if one or more roles contain a single instance check box to enable the configuration updates for the roles to proceed.
Unless you define at least two instances of every role, Azure cannot guarantee at least 99.95 percent availability of your cloud service during service configuration updates. For more information, see Service Level Agreements.
d. Click OK (checkmark).
Remote Desktop enables you to access the desktop of a role running in Azure. You can use a Remote Desktop connection to troubleshoot and diagnose problems with your application while it is running. You can enable a Remote Desktop connection in your role during application design or after you have deployed the application to Azure (while the role is running). Enabling a Remote Desktop connection in a running role through the Management Portal does not require you to redeploy your application. To authenticate the Remote Desktop connection you can use a previously uploaded certificate or you can create a new certificate.
On the Configure page for your cloud service, you can enable Remote Desktop or change the local Administrator account or password used to connect to the virtual machines, the certificate used in authentication, or the expiration date.
If your cloud service consists of two or more connected Windows Server-based virtual machines, you don't have to configure remote access, as these virtual machines are configured automatically for Remote Desktop.
###To configure Remote Access in the service definition file###
Add Import elements to the service definition file (.csdef) to import the RemoteAccess and RemoteForwarder modules into the service model. When those modules are present, Azure adds the configuration settings for Remote Desktop to the service configuration file. To complete the Remote Desktop configuration, you will need to import a certificate to Azure, and specify the certificate in the service configuration file. For more information, see Set Up a Remote Desktop Connection for a Role in Azure.
###To enable or modify Remote Access for role instances in the Management Portal###
-
Log in to the Management Portal and click Cloud Services. Then click the name of the cloud service to open the dashboard.
-
Open the Configure page for the cloud service, and click Remote.
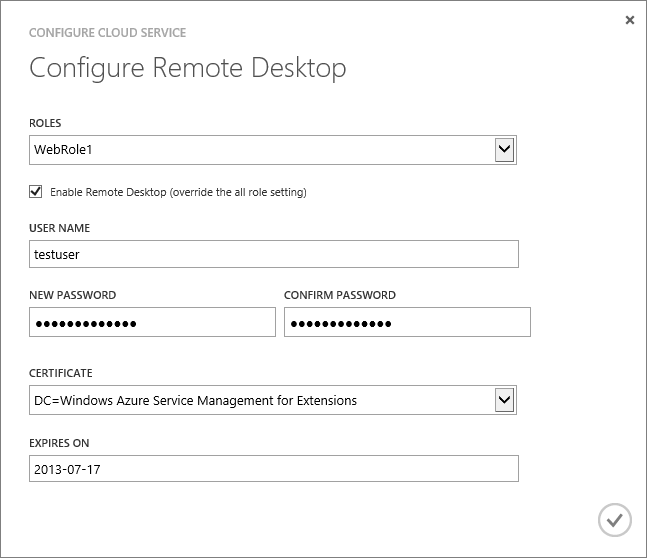
Configure Remote Desktop displays the settings (if any) that were added to the service configuration file when the cloud service was deployed, as shown below.
[WACOM.NOTE] Warning: All role instances will be restarted when you first enable Remote Desktop and click OK (checkmark). To prevent a reboot, the certificate used to encrypt the password must be installed on the role. If no certificate is installed you will see this option:
To prevent a restart, install a certificate and then return to this dialog (see [Using Remote Desktop with Azure Roles][] for more information). If you choose an existing certificate, then a configuration update will be sent to all the instances in the role.
-
In Roles, select the service role you want to update or select All for all roles.
-
Make any of the following changes:
-
To enable Remote Desktop, select the Enable Remote Desktop check box. To disable Remote Desktop, clear the check box.
-
Create an account to use in Remote Desktop connections to the role instances.
-
Update the password for the existing account.
-
Select an uploaded certificate to use for authentication (upload the certificate using Upload on the Certificates page) or create a new certificate.
-
Change the expiration date for the Remote Desktop configuration.
-
When you finish your configuration updates, click OK (checkmark).
-
To connect to a role instance:
a. Click Instances to open the Instances page.
b. Select a role instance that has Remote Desktop configured.
c. Click Connect, and follow the instructions to open the desktop of the virtual machine.
d. Click Open and then Connect to start the Remote Desktop connection.
###To disable Remote Access for role instances in the Management Portal###
-
Log in to the Management Portal and click Cloud Services. Then click the name of the cloud service to open the dashboard.
-
Open the Configure page for the cloud service, and click Remote.
-
In Roles, select the service role you want to update or select All for all roles.
-
Un-check, or clear, the Enable Remote Desktop check box.
-
Click OK (checkmark).


