The purpose of this code is to make simple bridge between any UART enabled system (Arduino, etc) and HTTP web services over WIFI network. User should simply send and receive data from UART enabled application. Data received on nodemcu UART RX pin will be sent to HTTP server using POST method. HTTP response code and body from server will be sent out via nodemcu UART TX pin. Some special characters and commands are defined in order to see nodemcu status. See flowchart diagram and description below for details.
Lets say you have exosite account and you want to send data from arduino to exosite. You could do it by using ethernet shield but do you really want to drag ethernet cable all over your back yard just to see what are the weather conditions on your garden? Well maybe you do but that's not our case. In our case you connect Arduino to ESP8266 / nodemcu over serial port. That way arduino will send data using Serial.println() functions and ESP8266 will handle all the WiFi access point, DHCP, TCP/IP and HTTP communications. In fact it will translate messages from UART to HTTP application layer.
When you power up nodemcu the UART handling routine is initialised and waits for user input.
The desired data should be terminated by \n (carriage return) character termination at the end. This character is defined in UART_TERMINATOR1 variable.
Aftere receiving string\r\n the nodemcu strips all \r' and \n` characters and then immediately responds with STATUS_REGISTER byte. Then it examines string from input and takes appropriate action.
The first thing to be done is to pass to nodemcu which SSID and password should be used to connect to WIFI. Third parameter must be CIK for your Exosite device.
After nodemcu is powered up it spits out some info at 115200 baud and then switches to 9600 where LUA interpreter executes init.lua. UART handling routine is then initialised which waits for SSID, WIFI password and CIK. You should send it to nodemcu like this:
myssid\r\n
wifipassword\r\n
exositecik\r\n
After receiving this it tries to connect to AP and after that it waits for data on UART RX pin. If you want to write data to exosite you must first define all the necessary parameters on your exosite dashboard (device and data sources). Lets say you send the following string using Arduino:
Walias1=value1&alias2=value2&aliasN=valueN\r\n
ESP8266 / nodemcu will translate this into HTTP POST request and push it to m2.exosite.com:
POST /onep:v1/stack/alias HTTP/1.1
Host: m2.exosite.com
X-Exosite-CIK: <CIK>
Content-Type: application/x-www-form-urlencoded; charset=utf-8
Content-Length: <length>
<blank line>
alias1=value1&alias2=value2&aliasN=valueN
If everything is OK the server should respond with:
HTTP/1.1 204 No Content
Date: <date>
Server: <server>
Connection: Close
Content-Length: 0
<blank line>
ESP8266 / nodemcu takes HTTP response code out of this and responds to arduino:
<status_register_byte>204\n
Its similar if you want to read value from exosite. From arduino send: Ralias1&alias2\r\n
ESP8266 / nodemcu will translate this into HTTP GET and push it to m2.exosite.com:
GET /onep:v1/stack/alias?alias1&alias HTTP/1.1 Host: m2.exosite.com X-Exosite-CIK: Accept: application/x-www-form-urlencoded; charset=utf-8
If everything is OK the server should respond with:
HTTP/1.1 200 OK Date: Server: Connection: Close Content-Length: alias1=value1&alias2=value2
ESP8266 / nodemcu takes HTTP response code out of this and responds to arduino:
<status_register_byte>200\nalias1=value1&alias2=value2\n
nodemcu is always listening for bytes `0xf0` and `0xf3` which also must be terminated by `UART_TERMINATOR1` character.
If you send `0xf0` the nodemcu responds with one byte which represents status register value.
If you send `0xf3` the nodemcu disconnects from MQTT broker and reboots.
You can also send `uartstop` which removes UART handling routine currently in place and returns you back to the LUA interpreter.

The first byte it sends out on UART is always status register value.

Status register bits explanation:
HCPSIAAA 00111101
H - 1 means TCP socket is open towards HTTP server m2.exosite.com, 0 means socket is closed. TCP connection opens automatically so this is just for debugging purposes. C - 0 means waiting for CIK, 1 means got CIK P - 0 means waiting for wifi password (should be entered immediately after ssid), 1 means got wifi password S - 0 means waiting for ssid input (after power-on / reboot), 1 means got ssid I - 1 means got IP from DHCP, 0 means wifi.sta.getip() is nil AAA - convert these bits to decimal and see the wifi.sta.status() return values - https://github.com/nodemcu/nodemcu-firmware/wiki/nodemcu_api_en#wifistastatus 000 = 0: STATION_IDLE, 001 = 1: STATION_CONNECTING, 010 = 2: STATION_WRONG_PASSWORD, 011 = 3: STATION_NO_AP_FOUND, 100 = 4: STATION_CONNECT_FAIL, 101 = 5: STATION_GOT_IP.
For example:
11111101 means: connected to HTTP server, got CIK, got SSID, got wifi password, STATION_GOT_IP 01111101 means: not connected to HTTP server, got CIK, got SSID, got wifi password, STATION_GOT_IP 00000101 means: connected to AP but waiting for SSID and wifi password input, dont have IP, not connected to MQTT broker. This happens after reboot.
Code is written in such manner that it should reopen TCP connection if not connected to HTTP (after HTTP timeout) but there is data to be sent. It also reconnects if WIFI AP disappears and appears later. I tried this.
## Installation
Just upload init.lua to your nodemcu / esp8266 using your favourite esp file uploader :) I find it easy with http://esp8266.ru/esplorer/ . I tried on Windows 7 and Linux.
## Schematics
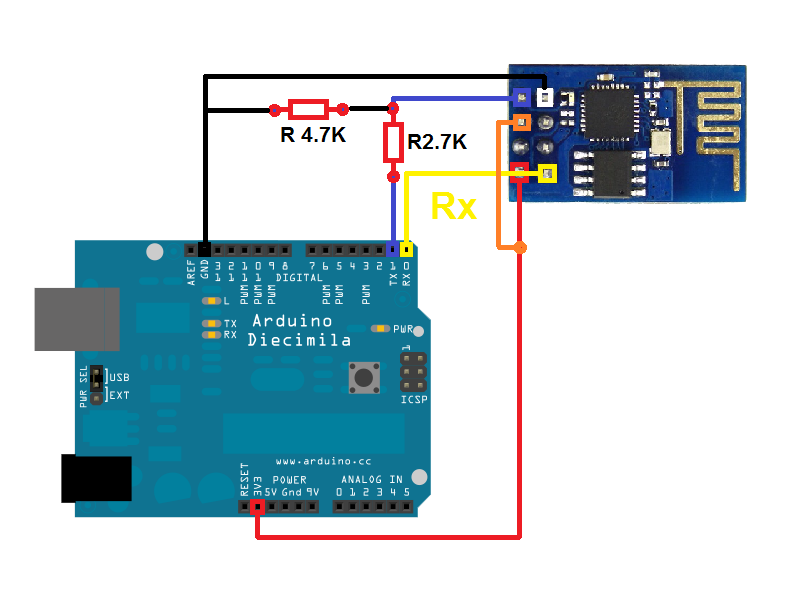
I suggest you connect your ESP8266 or nodemcu to ARDUINO in similar fashion as it is described in this blogpost: http://microcontrollerkits.blogspot.com/2015/02/wifi-module-esp8266-at-command-test.html
In case page becomes unavailable see the pictures below:
For Arduino **5V** Power Supply and Logic **( Need logic Converter )**

For Arduino **3.3V** Power Supply and Logic

## Prerequisites
-lua firmware on nodemcu / esp8266 -tool to upload .lua files
Please report when you encounter unwanted behaviour :)