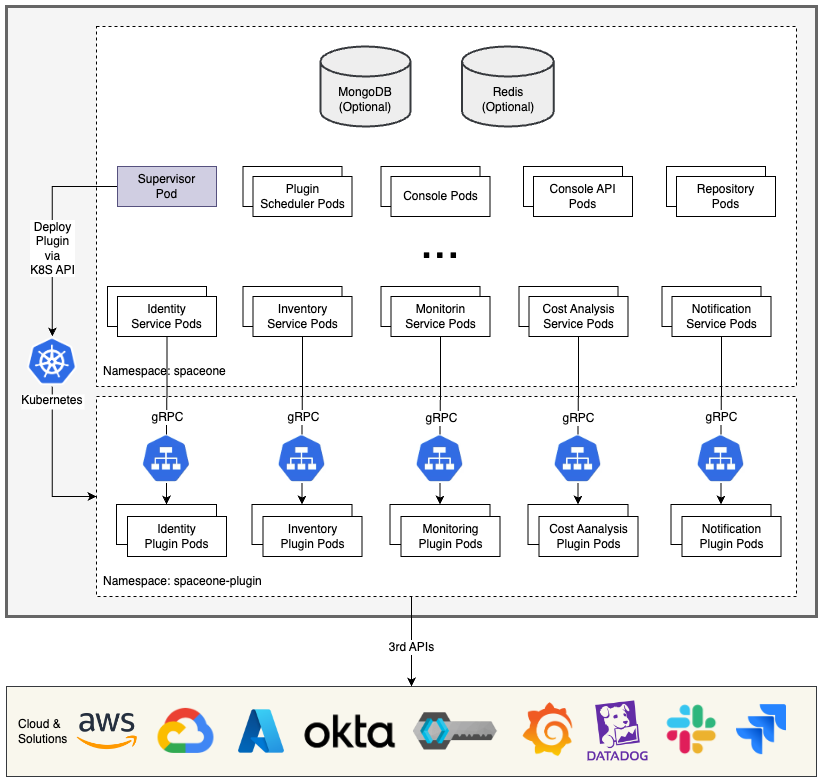
A Helm Chart for Cloudforet 1.12.
- Kubernetes 1.21+
- Helm 3.2.0+
- Service Domain & SSL Certificate (optional)
- Console:
console.example.com - REST API:
*.api.example.com - gRPC API:
*.grpc.example.com - Webhook:
webhook.example.com
- Console:
- MongoDB 5.0+ (optional)
You can install the Cloudforet using the following the steps.
helm repo add cloudforet https://cloudforet-io.github.io/charts
helm repo update
helm search repokubectl create ns spaceone
kubectl create ns spaceone-pluginIf you want to use only one namespace, you don't create the spaceone-plugin namespace.
First, download the rbac.yaml file.
wget https://raw.githubusercontent.com/cloudforet-io/charts/master/examples/rbac.yaml -O rbac.yamlAnd execute the following command.
kubectl apply -f rbac.yaml -n spaceone-pluginhelm install cloudforet cloudforet/spaceone -n spaceoneAfter executing the above command, check the status of the pod.
kubectl get pod -n spaceone

NAME                                      READY   STATUS             RESTARTS      AGE
board-5746fd9657-vtd45                    1/1     Running            0             57s
config-5d4c4b7f58-z8k9q                   1/1     Running            0             58s
console-6b64cf66cb-q8v54                  1/1     Running            0             59s
console-api-7c95848cb8-sgt56              2/2     Running            0             58s
console-api-v2-rest-7d64bc85dd-987zn      2/2     Running            0             56s
cost-analysis-7b9d64b944-xw9qg            1/1     Running            0             59s
cost-analysis-scheduler-ff8cc758d-lfx4n   0/1     Error              3 (37s ago)   55s
cost-analysis-worker-559b4799b9-fxmxj     1/1     Running            0             58s
cost-analysis-worker-559b4799b9-nf5vs     1/1     Running            0             58s
cost-analysis-worker-559b4799b9-swzw8     1/1     Running            0             58s
cost-analysis-worker-559b4799b9-x8f4j     1/1     Running            0             58s
dashboard-b4cc996-mgwj9                   1/1     Running            0             56s
docs-5fb4cc56c7-68qbk                     1/1     Running            0             59s
identity-6fc984459d-zk8r9                 1/1     Running            0             56s
inventory-67498999d6-722bw                1/1     Running            0             57s
inventory-scheduler-5dc6856d44-4spvm      0/1     CrashLoopBackOff   3 (18s ago)   59s
inventory-worker-68d9fcf5fb-x6knb         1/1     Running            0             55s
marketplace-assets-8675d44557-ssm92       1/1     Running            0             59s
mongodb-7c9794854-cdmwj                   1/1     Running            0             59s
monitoring-fdd44bdbf-pcgln                1/1     Running            0             59s
notification-5b477f6c49-gzfl8             1/1     Running            0             59s
notification-scheduler-675696467-gn24j    1/1     Running            0             59s
notification-worker-d88bb6df6-pjtmn       1/1     Running            0             57s
plugin-556f7bc49b-qmwln                   1/1     Running            0             57s
plugin-scheduler-86c4c56d84-cmrmn         0/1     CrashLoopBackOff   3 (13s ago)   59s
plugin-worker-57986dfdd6-v9vqg            1/1     Running            0             58s
redis-75df77f7d4-lwvvw                    1/1     Running            0             59s
repository-5f5b7b5cdc-lnjkl               1/1     Running            0             57s
secret-77ffdf8c9d-48k46                   1/1     Running            0             55s
spacectl-5664788d5d-dtwpr                 1/1     Running            0             59s
statistics-67b77b6654-p9wcb               1/1     Running            0             56s
statistics-scheduler-586875947c-8zfqg     0/1     Error              3 (30s ago)   56s
statistics-worker-68d646fc7-knbdr         1/1     Running            0             58s
supervisor-scheduler-6744657cb6-tpf78     2/2     Running            0             59s
Scheduler pods are in
CrashLoopBackOfforErrorstate. This is because the setup is not complete.
First, download the initializer.yaml file.
wget https://raw.githubusercontent.com/cloudforet-io/charts/master/examples/initializer.yaml -O initializer.yamlAnd execute the following command.
helm install initializer cloudforet/spaceone-initializer -n spaceone -f initializer.yamlFor more information about the initializer, please refer the spaceone-initializer.
Complete the initialization, you can get the system token from the initializer pod logs.
kubectl logs initializer-5f5b7b5cdc-lnjkl -n spaceone

...
TASK [Print Admin API Key] *********************************************************************************************
"{TOKEN}"

FINISHED [ ok=23, skipped=0 ] ******************************************************************************************

FINISH SPACEONE INITIALIZE
Create the values.yaml file and edit the values.
console:
  production_json:
    # If you don't have a service domain, you refer to the following 'No Domain & IP Access' example.
    CONSOLE_API:
      ENDPOINT: https://console.api.example.com       # Change the endpoint
    CONSOLE_API_V2:
      ENDPOINT: https://console-v2.api.example.com    # Change the endpoint

global:
  shared_conf:
    TOKEN: '{TOKEN}'                                    # Change the system token
For more advanced configuration, please refer the following the links.
- Documents
- Examples
- Default Values
- Infra & Kubernetes
- Change Pod Replica
- Node Selector
- Change Namespace
- One Namespace
- Set Private Docker Registry
- Set HTTP Proxy
- Set Container Resource Request & Limit
- Application
- Set External Database
- Change Database Name
- Multi-Tenancy Mode
- Enable Monitoring Webhook & Notification
- Change Secret Storage
- Set Private Assets & Docs
After editing the values.yaml file, upgrade the helm chart.
helm upgrade cloudforet cloudforet/spaceone -n spaceone -f values.yaml
kubectl delete po -n spaceone -l app.kubernetes.io/instance=cloudforetkubectl get pod -n spaceoneIf all pods are in Running state, the setup is complete.
After the installation, you need to configure the ingress to access the console and API.
You can upgrade the cloudforet from the previous version.
helm repo update
helm upgrade cloudforet cloudforet/spaceone -n spaceone -f values.yaml
kubectl delete po -n spaceone -l app.kubernetes.io/instance=cloudforetYou can uninstall the cloudforet with the following command.
helm delete cloudforet -n spaceone
helm delete cloudforet-initializer -n spaceonekubectl delete ingress --all -n spaceonekubectl delete deployment --all -n spaceone-plugin
kubectl delete service --all -n spaceone-pluginkubectl delete namespace spaceone
kubectl delete namespace spaceone-plugin