| title | description | services | documentationcenter | author | manager | editor | ms.assetid | ms.service | ms.devlang | ms.topic | ms.tgt_pltfrm | ms.workload | ms.date | ms.author |
|---|---|---|---|---|---|---|---|---|---|---|---|---|---|---|
Creating an on-premises virtual machine image for the Azure Marketplace | Microsoft Docs |
Understand and execute the steps to create an on-premises VM image and deploy to the Azure Marketplace for others to purchase. |
marketplace-publishing |
HannibalSII |
hascipio |
26dfbd5a-8685-4b19-987e-c20ca60540ec |
marketplace |
na |
article |
Azure |
na |
04/29/2016 |
hascipio; v-divte |
We strongly recommend that you develop Azure virtual hard disks (VHDs) directly in the cloud by using Remote Desktop Protocol. However, if you must, it is possible to download a VHD and develop it by using on-premises infrastructure.
For on-premises development, you must download the operating system VHD of the created VM. These steps would take place as part of step 3.3, above.
In order to download the VHD, first locate the blob URL for the operating system disk.
Locate the blob URL from the new Microsoft Azure portal:
-
Go to Browse > VMs, and then select the deployed VM.
-
Under Configure, select the Disks tile, which opens the Disks blade.

-
Select the OS Disk, which opens another blade that displays disk properties, including the VHD location.
-
Copy this blob URL.

-
Now, delete the deployed VM without deleting the backing disks. You can also stop the VM instead of deleting it. Do not download the operating system VHD when the VM is running.


After you know the blob URL, you can download the VHD by using the Azure portal or PowerShell.
Note
At the time of this guide’s creation, the functionality to download a VHD is not yet present in the new Microsoft Azure portal.
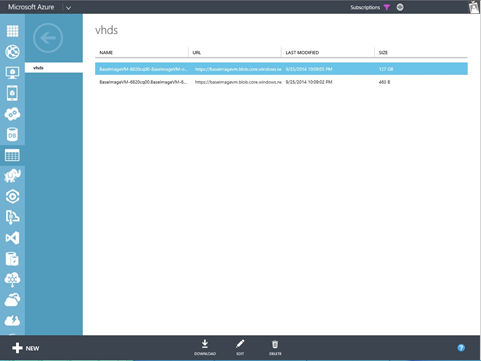
Download the operating system VHD via the current Azure portal
-
Sign in to the Azure portal if you have not done so already.
-
Click the Storage tab.
-
Select the storage account within which the VHD is stored.

-
This displays storage account properties. Select the Containers tab.

-
Select the container in which the VHD is stored. By default, when created from the portal, the VHD is stored in a vhds container.

-
Select the correct operating system VHD by comparing the URL to the one you saved.
-
Click Download.


In addition to using the Azure portal, you can use the Save-AzureVhd cmdlet to download the operating system VHD.
    Save-AzureVhd –Source <storageURIOfVhd> `
    -LocalFilePath <diskLocationOnWorkstation> `
    -StorageKey <keyForStorageAccount>
For example, Save-AzureVhd -Source “https://baseimagevm.blob.core.windows.net/vhds/BaseImageVM-6820cq00-BaseImageVM-os-1411003770191.vhd” -LocalFilePath “C:\Users\Administrator\Desktop\baseimagevm.vhd” -StorageKey
Note
Save-AzureVhd also has a NumberOfThreads option that can be used to increase parallelism to make the best use of available bandwidth for the download.
If you prepared your VHDs on-premises, you need to upload them into a storage account in Azure. This step takes place after creating your VHD on-premises but before obtaining certification for your VM image.
We recommend that VHDs be uploaded into a storage account in a region in the United States. All VHDs for a single SKU should be placed in a single container within a single storage account.
To create a storage account, you can use the Microsoft Azure portal, PowerShell, or the Linux command-line tool.
Create a storage account from the Microsoft Azure portal
-
Click New.
-
Select Storage.
-
Fill in the storage account name, and then select a location.

-
Click Create.
-
The blade for the created storage account should be open. If not, select Browse > Storage Accounts. On the Storage account blade, select the storage account created.
-
Select Containers.

-
On the Containers blade, select Add, and then enter a container name and the container permissions. Select Private for container permissions.


Tip
We recommend that you create one container per SKU that you are planning to publish.

Using PowerShell, create a storage account by using the New-AzureStorageAccount cmdlet.
New-AzureStorageAccount -StorageAccountName “mystorageaccount” -Location “West US”
Then you can create a container within that storage account by using the NewAzureStorageContainer cmdlet.
New-AzureStorageContainer -Name “containername” -Permission “Off”
Note
Those commands assume that the current storage account context has already been set in PowerShell. Refer to Setting up Azure PowerShell for more details on PowerShell setup.
From Linux command-line tool, create a storage account as follows.
azure storage account create mystorageaccount --location "West US"
Create a container as follows.
azure storage container create containername --account-name mystorageaccount --accountkey <accountKey>
After the storage account and container are created, you can upload your prepared VHDs. You can use PowerShell, the Linux command-line tool, or other Azure Storage management tools.
Use the Add-AzureVhd cmdlet.
Add-AzureVhd –Destination “http://mystorageaccount.blob.core.windows.net/containername/vmsku.vhd” -LocalFilePath “C:\Users\Administrator\Desktop\vmsku.vhd”
With the Linux command-line tool, use the following:
azure vm image create --location --OS Linux