??? tip "This feature is included only in tasmota-sensors and tasmota32 binaries"
When [compiling your build](Compile-your-build) add the following to `user_config_override.h`:
```c++
#ifndef USE_AS3935
#define USE_AS3935      // [I2cDriver48] Enable AS3935 Franklin Lightning Sensor (I2C address 0x03) (+5k4 code)
#endif
```
The AS3935 is a programmable fully integrated Lightning Sensor IC that detects the presence and approach of potentially hazardous lightning activity in the vicinity and provides an estimation on the distance to the head of the storm. The embedded lightning algorithm checks the incoming signal pattern to reject the potential man-made disturbers.
Tasmota driver includes:
- support for all AS3935 Parameters
- support of all related commands for configuration
- support of NF-Auto Function to auto Threshold the Noise Reduction
- support of Auto Disturber
- support of calibrating the internal OSC with switchable Caps
| AS3935 | ESP |
|---|---|
| GND | GND |
| VCC | 3.3V |
| SDA | GPIOx |
| SCL | GPIOy |
| IRQ | GPIOz |
!!! warning "Sensor uses a software interrupt. Make sure that the connection with the IRQ pin is stable to prevent flicker."
In the Configuration -> Configure Module page assign:
- GPIOx to
I2C SDA - GPIOy to
I2C SCL - GPIOz to
AS3935
!!! tip "Note for I^2^C Use"
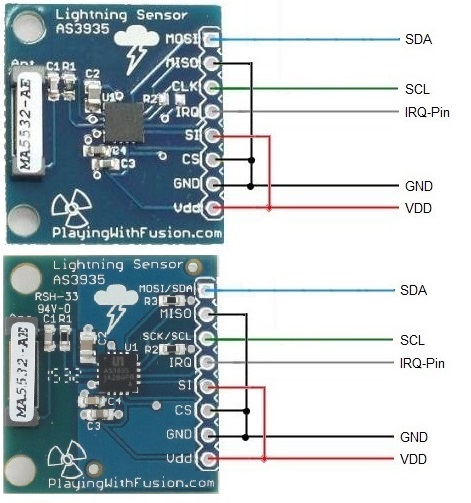
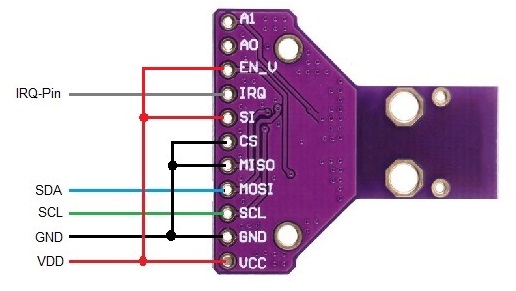
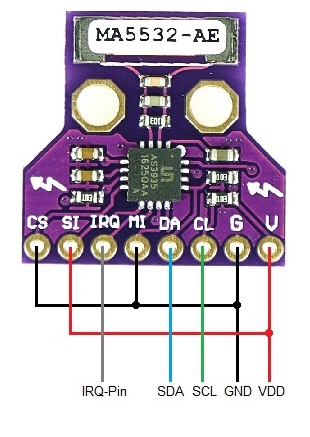
You will need to wire up all of the associated pins for the different boards.
- Always connect CS and MISO to GND.
- If "SI" is present, you need to connect to VCC.
See some wiring on the Board pictures below. I2C wiring
After a reboot the driver will detect AS3935 automatically.
and in MQTT topic when an Event occurs:
{"Time":"2020-01-01T17:07:07","AS3935":{"Event":4,"Distance":12,"Energy":58622,"Stage":1}}
| Console Commands | Description | values | Bitlength |
|---|---|---|---|
| AS3935power | Power On/Off the Device | 0/1 (On/Off) | (1 Bit) |
| AS3935setnf | Noise Floor Level | value from 0-7 | (3 Bit) |
| AS3935setml | Minimum number of lightning | 1, 5, 9, 16 | (2 bit) |
| AS3935default | load default for Sensor and Settings | no argument | |
| AS3935setgain | Set Indoor/Outdoor | Indoors/Outdoors | (Ascii) |
| AS3935settunecaps | Internal Tuning Cap. | value from 0-15 | (4 Bits) |
| AS3935setrej | Spike rejection | value from 0-15 | (4 Bits) |
| AS3935setwdth | Watchdog threshold | value from 0-15 | (4 Bits) |
| AS3935setminstage | min stage that could be come with NFautotune | value from 0-15: 0-7 Indoors, 8-15 Outdoors | (4 Bits) |
| AS3935disturber | Set Disturber | 0/1 (On/Off) | (1 Bit) |
| AS3935autonf | Set Auto Tune for Noise Level | 0/1 (On/Off) | (1 Bit) |
| AS3935autodisturber | Set Auto-Disturber | 0/1 (On/Off) | (1 Bit) |
| AS3935autonfmax | Auto Tune with INDOOR and OUTDOOR | 0/1 (On/Off) | (1 Bit) |
| AS3935lightevent | mqtt messages only for lightning events | 0/1 (On/Off) | (1 Bit) |
| AS3935noirqevent | suppress mqtt "IRQ with no Event" Messages | 0/1 (On/Off) | (1 Bit) |
| AS3935settings | show all settings | no argument | |
| AS3935calibrate | auto calibrate the internal Capacitors | no argument | |
| AS3935disttime | time for reset Disturber in auto-mode | 0-15 min. | (4 Bit) |
| AS3935nftime | time for auto-Nf threshold | 0-15 min | (4 Bit) |
!!! note "Note for AS3935Calibrate"
Normally you don't need the calibrate function. If you buy the AS3935, the module has a sticker on it with the calibrated cap.
Use AS3935Settunecaps for setting up this value.
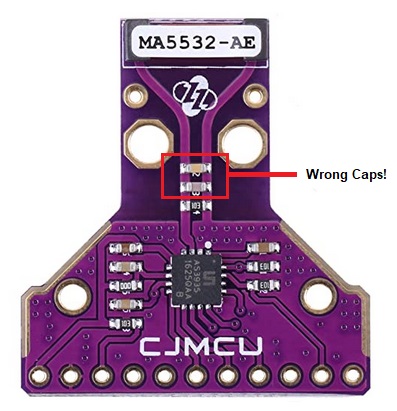
if the calibration fails, it is possible that you have a board with the wrong caps on it! (some CJMCU-Boards)
| No. | Description | Suppress with Command AS3935lightevent |
Suppress with Command AS3935noirqevent |
|---|---|---|---|
| 0 | no event | ||
| 1 | Lightning with Distance detected | ||
| 2 | Lightning out of Distance | ||
| 3 | Distance cannot be determined | ||
| 4 | Storm is Overhead | ||
| 5 | Noise level too high | * | |
| 6 | Disturber detected | * | |
| 7 | Irq with no Event detected | * | |
| 8 | Irq Pin flicker detected | ||
| 9 | Device is Powerd Off |
Setting table of the NF-noise sensitivity and stages:
| Stages | NF-LEV | AFE-GB | uVrms | Sensitivity |
|---|---|---|---|---|
| Stage 0 | 000 | Indoors | 28 | highly sensitive |
| Stage 1 | 001 | Indoors | 45 | |
| Stage 2 | 010 | Indoors | 62 | |
| Stage 3 | 011 | Indoors | 78 | |
| Stage 4 | 100 | Indoors | 95 | |
| Stage 5 | 101 | Indoors | 112 | |
| Stage 6 | 110 | Indoors | 130 | |
| Stage 7 | 111 | Indoors | 146 | |
| Stage 8 | 000 | Outdoors | 390 | |
| Stage 9 | 001 | Outdoors | 630 | |
| Stage 10 | 010 | Outdoors | 860 | |
| Stage 11 | 011 | Outdoors | 1100 | |
| Stage 12 | 100 | Outdoors | 1330 | |
| Stage 13 | 101 | Outdoors | 1570 | |
| Stage 14 | 110 | Outdoors | 1800 | |
| Stage 15 | 111 | Outdoors | 2000 | less sensitive |
!!! tips "Hint and Tips"
- take a stabilized power supply.
- keep a distance of at least 200 mm from the ESP and the AS3395
- be careful with "ready to Use" devices like Sonoff, etc. they don't have a good power supply inside.
- use a Ferrit clamp filter on the sensor cable.
- wire all related Pins for I
2C use.
You can find some troubleshooting tips in the Tasmota GitHub discussion.
!!! warning
"Some type of this sensor have wrong capacitors (100pF and 1000pF) installed and the calibration fails.
The correct caps are 680pF and 270pF."


