


- Minimum Requirements
- Installation
- Usage
- API
- Docs Translations
- Integrations
- PHP 7.1
- Composer
- ext-posix
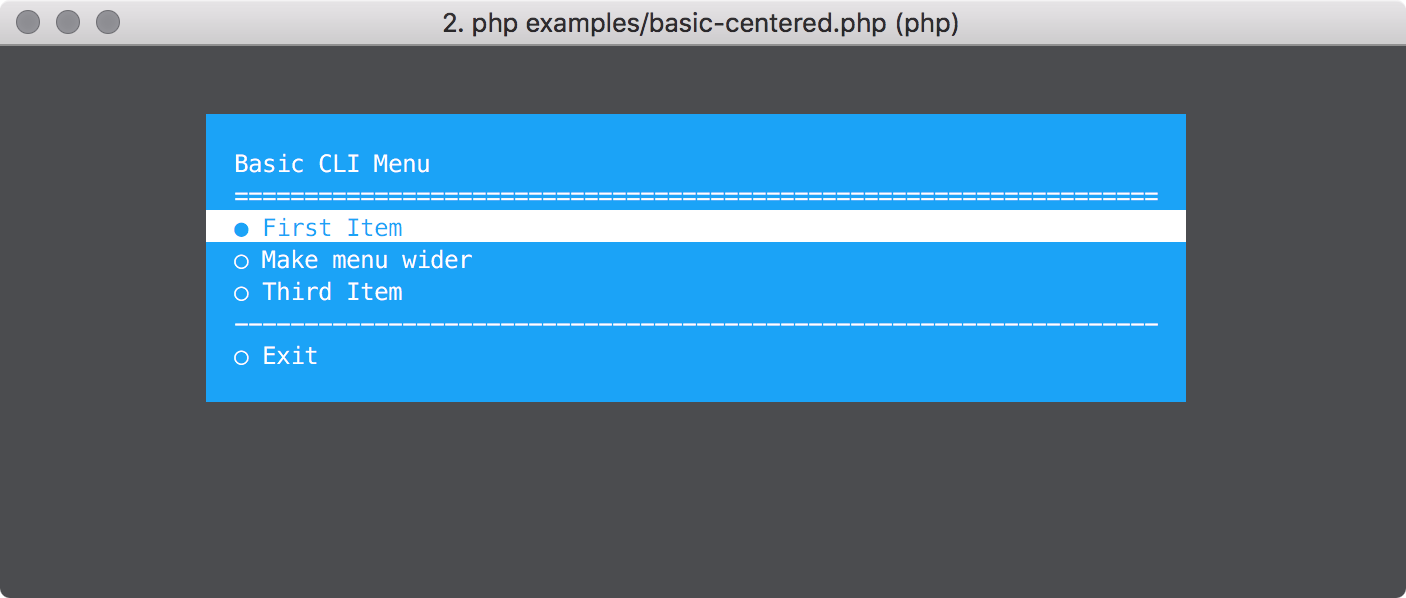
composer require php-school/cli-menuHere is a super basic example menu which will echo out the text of the selected item to get you started.
<?php

use PhpSchool\CliMenu\CliMenu;
use PhpSchool\CliMenu\CliMenuBuilder;

require_once(__DIR__ . '/../vendor/autoload.php');

$itemCallable = function (CliMenu $menu) {
    echo $menu->getSelectedItem()->getText();
};

$menu = (new CliMenuBuilder)
    ->setTitle('Basic CLI Menu')
    ->addItem('First Item', $itemCallable)
    ->addItem('Second Item', $itemCallable)
    ->addItem('Third Item', $itemCallable)
    ->addLineBreak('-')
    ->setBorder(1, 2, 'yellow')
    ->setPadding(2, 4)
    ->setMarginAuto()
    ->build();


$menu->open();Check out the examples directory and run them to see what is possible! The best way to run the examples is to git clone the repository:
git clone [email protected]:php-school/cli-menu.git
cd cli-menu
composer install --no-dev
cd examples
php basic.php


The CliMenu object is constructed via the Builder class
$menu = (new CliMenuBuilder)
    /**
     *  Customise
    **/
    ->build();
Once you have a menu object, you can open and close it like so:
$menu->open();
$menu->close();You can give your menu a title and you can customise the separator, a line which displays under the title.
Whatever string you pass to setTitleSeparator will be repeated for the width of the Menu.
$menu = (new CliMenuBuilder)
    ->setTitle('One Menu to rule them all!')
    ->setTitleSeparator('*-')
->build();You can change the foreground and background colour of the menu to any of the following colours:
- black
- red
- green
- yellow
- blue
- magenta
- cyan
- white
$menu = (new CliMenuBuilder)
    ->setForegroundColour('green')
    ->setBackgroundColour('black')
    ->build();
If your terminal supports 256 colours then you can also use any of those by specifying the code, like 230. You can find a list
of the colours and codes here. If you specify a code and the terminal does not support 256 colours
it will automatically fallback to a sane default, using a generated map you can see in src/Util/ColourUtil.php. You can also manually specify the
fallback colour as the second argument to setForegroundColour and `setBackgroundColour.
In this example if no 256 colour support is found it will automatically fall back to green and blue.
$menu = (new CliMenuBuilder)
    ->setForegroundColour('40')
    ->setBackgroundColour('92')
    ->build();
In this example if no 256 colour support is found it will fall back to yellow and magenta.
$menu = (new CliMenuBuilder)
    ->setForegroundColour('40', 'yellow')
    ->setBackgroundColour('92', 'magenta')
->build();Customise the width of the menu. Setting a value larger than the size of the terminal will result in the width being the same as the terminal size. The width will include the padding and the border. So with a width of 100 and all around border of 5 and all around padding of 5 will leave for a content width of 80 (5 + 5 + 80 + 5 + 5).
$menu = (new CliMenuBuilder)
    ->setWidth(1000) //if terminal is only 400, width will also be 400
->build();The padding can be set for all sides with one value or can be set individually for top/bottom and left/right.
$menu = (new CliMenuBuilder)
    ->setPadding(10) //10 padding top/bottom/left/right
    ->build();
Different values can also be set for the top/bottom and the left/right padding:
$menu = (new CliMenuBuilder)
    ->setPaddingTopBottom(10)
    ->setPaddingLeftRight(5)
    ->build();
Configure top/bottom and left/right padding using the shorthand method:
$menu = (new CliMenuBuilder)
    ->setPadding(10, 5) //top/bottom = 10, left/right = 5
->build();The margin can be customised as one value. It is only applied to the left side of the menu. It can also be set automatically which will center the menu nicely in the terminal.
Automatically center menu:
$menu = (new CliMenuBuilder)
    ->setWidth(200)
    ->setMarginAuto()
    ->build();
Arbitrary margin:
$menu = (new CliMenuBuilder)
->setWidth(200)
->setMargin(5) //5 margin left
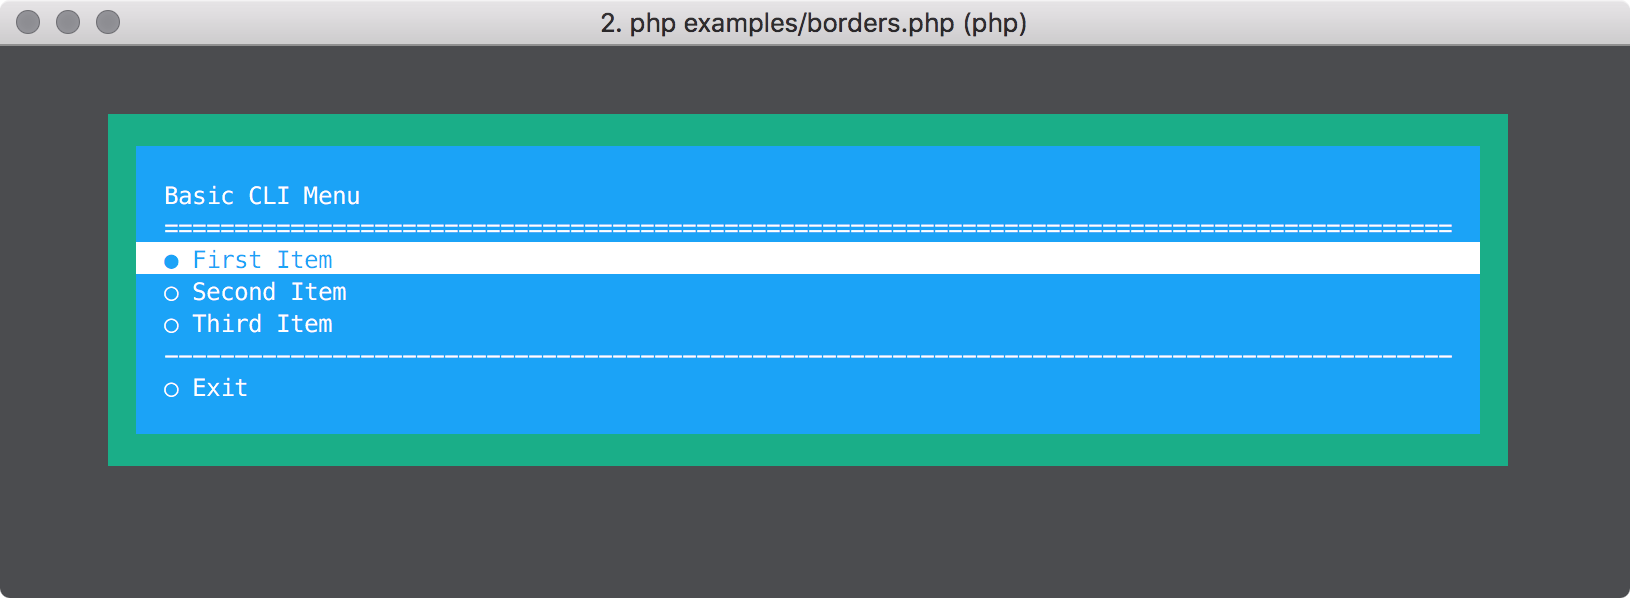
->build();Borders can be customised just like CSS borders. We can add any amount of border to either side, left, right top or bottom and we can apply a colour to it.
Set universal red border of 2:
$menu = (new CliMenuBuilder)
    ->setWidth(200)
    ->setBorder(2, 'red')
    ->build();
Configure each border separately:
$menu = (new CliMenuBuilder)
    ->setWidth(200)
    ->setBorderTopWidth(2)
    ->setBorderRightWidth(4)
    ->setBorderBottomWidth(2)
    ->setBorderLeftWidth(4)
    ->setBorderColour('42', 'red') //SpringGreen2 fallback to red
    ->build();
Configure each border separately using the shorthand method, like CSS:
$menu = (new CliMenuBuilder)
    ->setWidth(200)
    ->setBorder(3, 4, 'red') //top/bottom = 3, left/right = 4
    ->setBorder(3, 4, 5, 'red') //top = 3, left/right = 4, bottom = 5
    ->setBorder(3, 4, 5, 6, 'red') //top = 3, left = 4, bottom = 5, right = 6
->build();Modify the exit button text:
$menu = (new CliMenuBuilder)
    ->setExitButtonText("Don't you want me baby?")
->build();You can remove the exit button altogether:
$menu = (new CliMenuBuilder)
    ->disableDefaultItems()
    ->build();
Note: This will also disable the Go Back button for sub menus.
You can manually add exit and go back buttons using the following:
use PhpSchool\CliMenu\CliMenuBuilder;
use PhpSchool\CliMenu\Action\ExitAction;
use \PhpSchool\CliMenu\Action\GoBackAction;

require_once(__DIR__ . '/../vendor/autoload.php');

$menu = (new CliMenuBuilder)
    ->disableDefaultItems()
    ->addSubMenu('Super Sub Menu')
        ->setTitle('Behold the awesomeness')
        ->addItem('Return to parent menu', new GoBackAction) //add a go back button
        ->end()
    ->addItem('Leave this place now !', new ExitAction) //add an exit button
->build();There a few different types of items you can add to your menu
- Selectable Item - This is the type of item you need for something to be selectable (you can hit enter and it will call your invokable)
- Line Break Item - This is used to break up areas, it can span multiple lines and will be the width of Menu. Whatever string is passed will be repeated.
- Static Item - This will print whatever text is passed, useful for headings.
- Ascii Art Item - Special item which allows usage of Ascii art. It takes care of padding and alignment.
- Sub Menu Item - Special item to allow an item to open another menu. Useful for an options menu.
$menu = (new CliMenuBuilder)
    ->addItem('The Item Text', function (CliMenu $menu) {
        echo 'I am alive!';
    })
    ->build();
You can add multiple items at once like so:
$callable = function (CliMenu $menu) {
    echo 'I am alive!';
};

$menu = (new CliMenuBuilder)
    ->addItems([
        ['Item 1', $callable],
        ['Item 2', $callable],
        ['Item 3', $callable],
    ])
    ->build();
Note: You can add as many items as you want and they can all have a different action. The action is the separate parameter
and must be a valid PHP callable. Try using an Invokable class to keep your actions easily testable.
$menu = (new CliMenuBuilder)
    ->addLineBreak('<3', 2)
    ->build();
The above would repeat the character sequence <3 across the Menu for 2 lines
Static items are similar to Line Breaks, however, they don't repeat and fill. It is output as is. If the text is longer than the width of the Menu, it will be continued on the next line.
$menu = (new CliMenuBuilder)
    ->addStaticItem('AREA 1')
    //add some items here
    ->addStaticItem('AREA 2')
    //add some boring items here
    ->addStaticItem('AREA 51')
    //add some top secret items here
->build();The following will place the Ascii art in the centre of your menu. Use these constants to alter the alignment:
- AsciiArtItem::POSITION_CENTER
- AsciiArtItem::POSITION_LEFT
- AsciiArtItem::POSITION_RIGHT
$art = <<<ART
        _ __ _
       / |..| \
       \/ || \/
        |_''_|
      PHP SCHOOL
LEARNING FOR ELEPHANTS
ART;

$menu = (new CliMenuBuilder)
    ->addAsciiArt($art, AsciiArtItem::POSITION_CENTER)
    ->build();
The third optional parameter to addAsciiArt is alternate text. If the ascii art is too wide for the terminal, then
it will not be displayed at all. However, if you pass a string to the third argument, in the case that the ascii art is too
wide for the terminal the alternate text will be displayed instead.
Sub Menus are really powerful! You can add Menus to Menus, whattttt?? You can have your main menu and then an options menu. The options item will look like a normal item except when you hit it, you will enter to another menu, which can have different styles and colours!
$callable = function (CliMenu $menu) {
    echo "I'm just a boring selectable item";
};

$menu = (new CliMenuBuilder)
    ->addItem('Normal Item', $callable)
    ->addSubMenu('Super Sub Menu')
        ->setTitle('Behold the awesomeness')
        ->addItem(/** **/)
        ->end()
    ->build();
In this example a single sub menu will be created. Upon entering the sub menu, you will be able to return to the main menu or exit completely. A Go Back button will be automatically added, you can customise this text like so:
->addSubMenu('Super Sub Menu')
    ->setTitle('Behold the awesomeness')
    ->setGoBackButtonText('Descend to chaos')
There are a few things to note about the syntax and builder process here
addSubMenureturns an instance ofCliMenuBuilderso you can can customise exactly the same way you would the parent.- If you do not modify the styles of the sub menu (eg, colours) it will inherit styles from the parent!
- You can call
end()on the sub menuCliMenuBuilderinstance to get the parentCliMenuBuilderback again. This is useful for chaining.
If you need the CliMenu instance of the Sub Menu you can grab it after the main menu has been built.
$mainMenuBuilder = new CliMenuBuilder;
$subMenuBuilder = $mainMenuBuilder->addSubMenu('Super Sub Menu');

$menu = $mainMenuBuilder->build();
$subMenu = $mainMenuBuilder->getSubMenu('Super Sub Menu');
You can only do this after the main menu has been built, this is because the main menu builder takes care of building all sub menus.
If you have already have a configured menu builder you can just pass that to addSubMenu and be done:
$subMenuBuilder = (new CliMenuBuilder)
    ->setTitle('Behold the awesomeness')
    ->addItem(/** **/);

$menu = (new CliMenuBuilder)
    ->addSubMenu('Super Sub Menu', $subMenuBuilder)
    ->build();
In this case addSubMenu will return the main menu builder, not the sub menu builder.
The submenu menu item will be an instance of \PhpSchool\CliMenu\MenuItem\MenuMenuItem. If you need access to the submenu,
you can get it via $menuMenuItem->getSubMenu().
In this example we are disabling certain items and a submenu but still having them shown in the output.
$itemCallable = function (CliMenu $menu) {
    echo $menu->getSelectedItem()->getText();
};

$menu = (new CliMenuBuilder)
    ->setTitle('Basic CLI Menu Disabled Items')
    ->addItem('First Item', $itemCallable)
    ->addItem('Second Item', $itemCallable, false, true)
    ->addItem('Third Item', $itemCallable, false, true)
    ->addSubMenu('Submenu')
        ->setTitle('Basic CLI Menu Disabled Items > Submenu')
        ->addItem('You can go in here!', $itemCallable)
        ->end()
    ->addSubMenu('Disabled Submenu')
        ->setTitle('Basic CLI Menu Disabled Items > Disabled Submenu')
        ->addItem('Nope can\'t see this!', $itemCallable)
        ->disableMenu()
        ->end()
    ->addLineBreak('-')
    ->build();
The third param on the ->addItem call is what disables an item while the ->disableMenu() call disables the relevent menu.
The outcome is a full menu with dimmed rows to denote them being disabled. When a user navigates these items are jumped over to the next available selectable item.
The marker displayed by the side of the currently active item can be modified, UTF-8 characters are supported.
The marker for un-selected items can also be modified. If you want to disable it, just set it to a space character. Item
markers only display on selectable items, which are: \PhpSchool\CliMenu\MenuItem\SelectableItem & \PhpSchool\CliMenu\MenuItem\MenuMenuItem.
$menu = (new CliMenuBuilder)
    ->setUnselectedMarker('❅')
    ->setSelectedMarker('✏')

    //disable unselected marker
    ->setUnselectedMarker(' ')
->build();You can optionally display some arbitrary text on the right hand side of an item. You can customise this text and
you indicate which items to display it on. We use it to display [COMPLETED] on completed exercises, where the menu lists
exercises for a workshop application.
Item Extra is currently limited to only \PhpSchool\CliMenu\MenuItem\SelectableItem.
The third parameter to addItem is a boolean whether to show the item extra or not. It defaults to false.
$menu = (new CliMenuBuilder)
    ->setItemExtra('✔')
    ->addItem('Exercise 1', function (CliMenu $menu) { echo 'I am complete!'; }, true)
->build();The next set of documentation applies to methods available directly on the \PhpSchool\CliMenu\CliMenu instance. Typically
you will invoke these methods whilst your menu is open in you action callbacks.
You can modify the menu and its style when executing an action and then you can redraw it! In this example we will toggle the background colour in an action.
$itemCallable = function (CliMenu $menu) {
    $menu->getStyle()->setBg($menu->getStyle()->getBg() === 'red' ? 'blue' : 'red');
    $menu->redraw();
};

$menu = (new CliMenuBuilder)
    ->setTitle('Basic CLI Menu')
    ->addItem('First Item', $itemCallable)
    ->addItem('Second Item', $itemCallable)
    ->addItem('Third Item', $itemCallable)
    ->addLineBreak('-')
    ->build();

$menu->open();
If you change the menu drastically, such as making the width smaller, when it redraws you might see artifacts of the previous draw
as redraw only draws over the top of the terminal. If this happens you can pass true to redraw and it will first clear
the terminal before redrawing.
$itemCallable = function (CliMenu $menu) {
    $menu->getStyle()->setWidth($menu->getStyle()->getWidth() === 100 ? 80 : 100);
    $menu->redraw(true);
};

$menu = (new CliMenuBuilder)
    ->setTitle('Basic CLI Menu')
    ->addItem('First Item', $itemCallable)
    ->addItem('Second Item', $itemCallable)
    ->addItem('Third Item', $itemCallable)
    ->addLineBreak('-')
    ->build();

$menu->open();You can also interact with the menu items in an action. You can add, remove and replace items. If you do this, you will likely want to redraw the menu as well so the new list is rendered.
use PhpSchool\CliMenu\MenuItem\LineBreakItem;

require_once(__DIR__ . '/../vendor/autoload.php');

$itemCallable = function (CliMenu $menu) {
    foreach ($menu->getItems() as $item) {
        $menu->removeItem($item);
    }

    //add single item
    $menu->addItem(new LineBreakItem('-'));

    //add multiple items
    $menu->addItems([new LineBreakItem('-'), new LineBreakItem('*')]);

    //replace all items
    $menu->setItems([new LineBreakItem('+'), new LineBreakItem('-')]);

    $menu->redraw();
};

$menu = (new CliMenuBuilder)
    ->setTitle('Basic CLI Menu')
    ->addItem('First Item', $itemCallable)
    ->addItem('Second Item', $itemCallable)
    ->addItem('Third Item', $itemCallable)
    ->addLineBreak('-')
    ->build();

$menu->open();This functionality allows to map custom key presses to a callable. For example we can set the key press "x" to close the menu:
$exit = function(CliMenu $menu) {
    $menu->close();
}

$menu = (new CliMenuBuilder)
    ->addItem('Item 1')
    ->build();

$menu->addCustomMapping("x", $exit);

$menu->open();
Another example is mapping shortcuts to a list of items:
$myCallback = function(CliMenu $menu) {
    // Do something
}

$menu = (new CliMenuBuilder)
    ->addItem('List of [C]lients', $myCallback)
    ->build();

// Now, pressing Uppercase C (it's case sensitive) will call $myCallback
$menu->addCustomMapping('C', $myCallback);

$menu->open();Show a one line message over the top of the menu. It has a separate style object which is colored by default different to the menu. It can be modified to suit your own style. The dialogue is dismissed with any key press. In the example below we change the background color on the flash to green.
use PhpSchool\CliMenu\CliMenu;
use PhpSchool\CliMenu\Builder\CliMenuBuilder;

require_once(__DIR__ . '/../vendor/autoload.php');

$itemCallable = function (CliMenu $menu) {
    $flash = $menu->flash("PHP School FTW!!");
    $flash->getStyle()->setBg('green');
    $flash->display();
};

$menu = (new CliMenuBuilder)
    ->setTitle('Basic CLI Menu')
    ->addItem('First Item', $itemCallable)
    ->addItem('Second Item', $itemCallable)
    ->addItem('Third Item', $itemCallable)
    ->addLineBreak('-')
    ->build();

$menu->open();Prompts are very similar to flashes except that a button is shown which has to be selected to dismiss them. The button text can be customised.
use PhpSchool\CliMenu\CliMenu;
use PhpSchool\CliMenu\Builder\CliMenuBuilder;

require_once(__DIR__ . '/../vendor/autoload.php');

$itemCallable = function (CliMenu $menu) {
    $menu->confirm('PHP School FTW!')
        ->display('OK!');
};

$menu = (new CliMenuBuilder)
    ->setTitle('Basic CLI Menu')
    ->addItem('First Item', $itemCallable)
    ->addItem('Second Item', $itemCallable)
    ->addItem('Third Item', $itemCallable)
    ->addLineBreak('-')
    ->build();

$menu->open();
Inputs - added in version 3.0 of cli-menu allow to prompt the user for input and validate it. The following types are supported:
text, number and password. Inputs can be executed in any item callback. They have separate style objects which are colored by default different to the menu.
They can be modified to suit your own style.
Each input is created by calling one of the ask* methods which will return an
instance of the input you requested. To execute the prompt and wait for the input you must
call ask() on the input. When the input has been received and validated, ask() will return
an instance of InputResult. InputResult exposes the method fetch to grab the raw input.
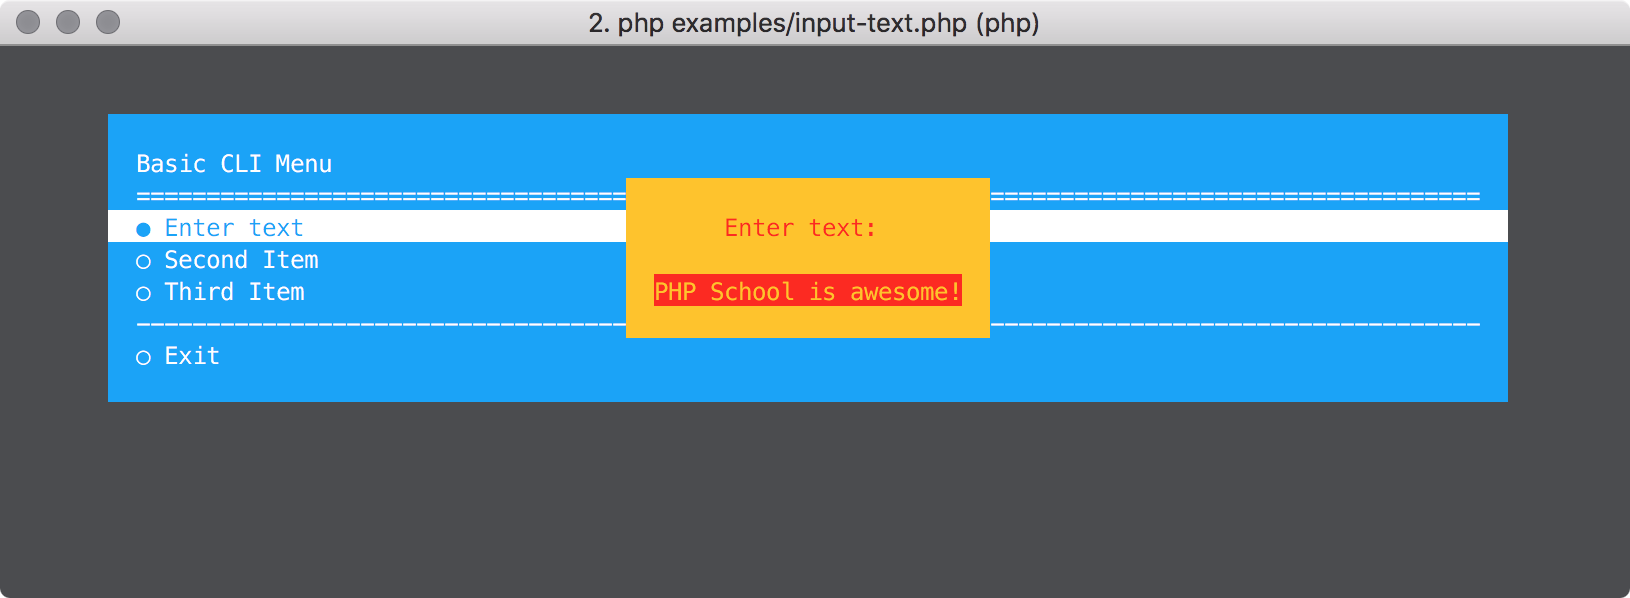
The text input will prompt for a string and when the enter key is hit it will validate that the string is not empty. As well as the style you can modify the prompt text (the default is 'Enter text:'), the placeholder text (the default is empty) and the validation failed text (the default is 'Invalid, try again').
<?php
use PhpSchool\CliMenu\CliMenu;
use PhpSchool\CliMenu\Builder\CliMenuBuilder;
require_once(__DIR__ . '/../vendor/autoload.php');
$itemCallable = function (CliMenu $menu) {
$result = $menu->askText()
->setPromptText('Enter your name')
->setPlaceholderText('Jane Doe')
->setValidationFailedText('Please enter your name')
->ask();
var_dump($result->fetch());
};
$menu = (new CliMenuBuilder)
->setTitle('Basic CLI Menu')
->addItem('Enter text', $itemCallable)
->addLineBreak('-')
->build();
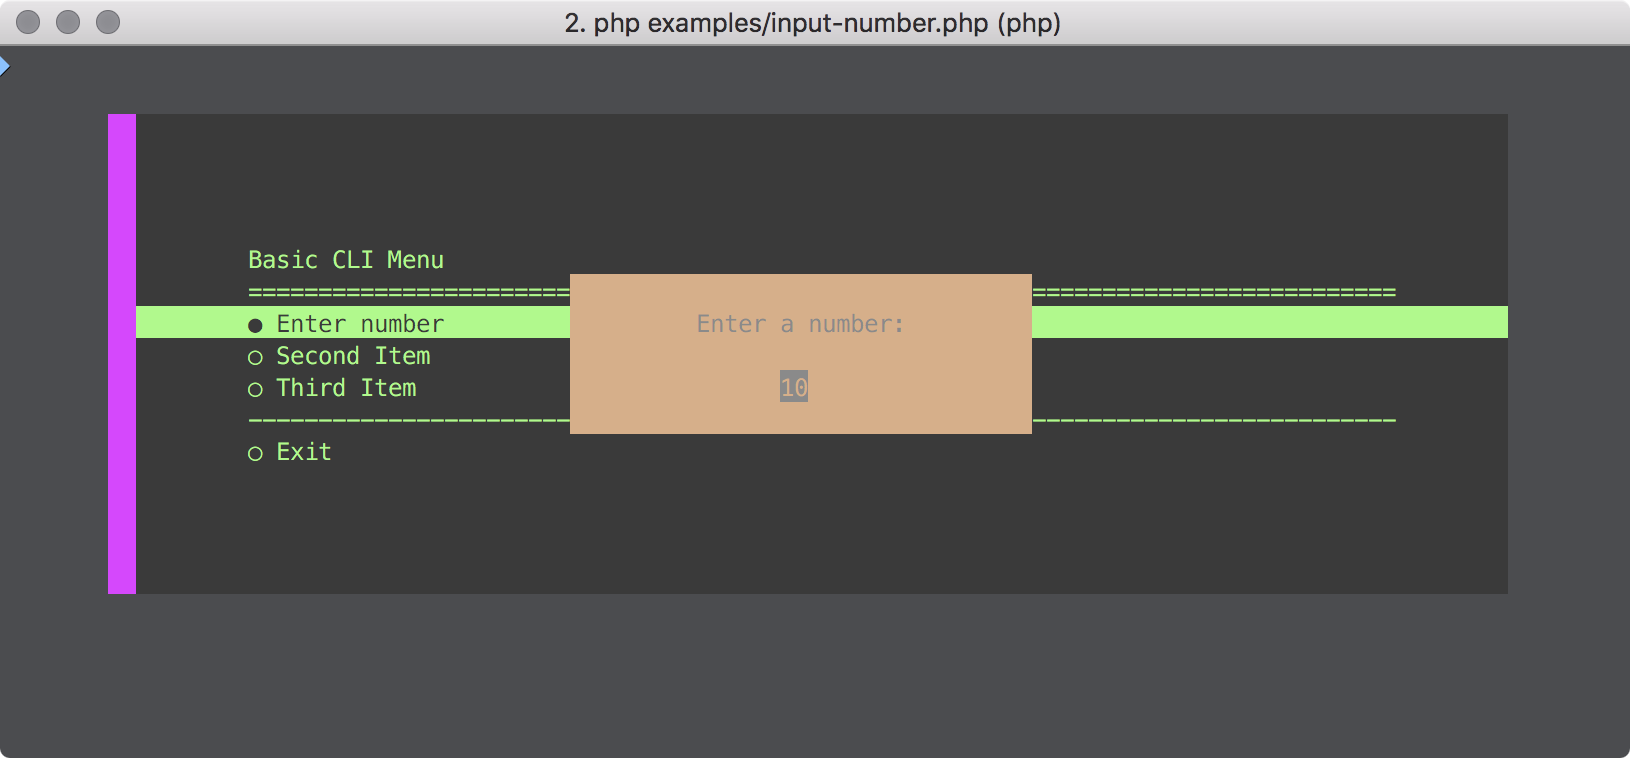
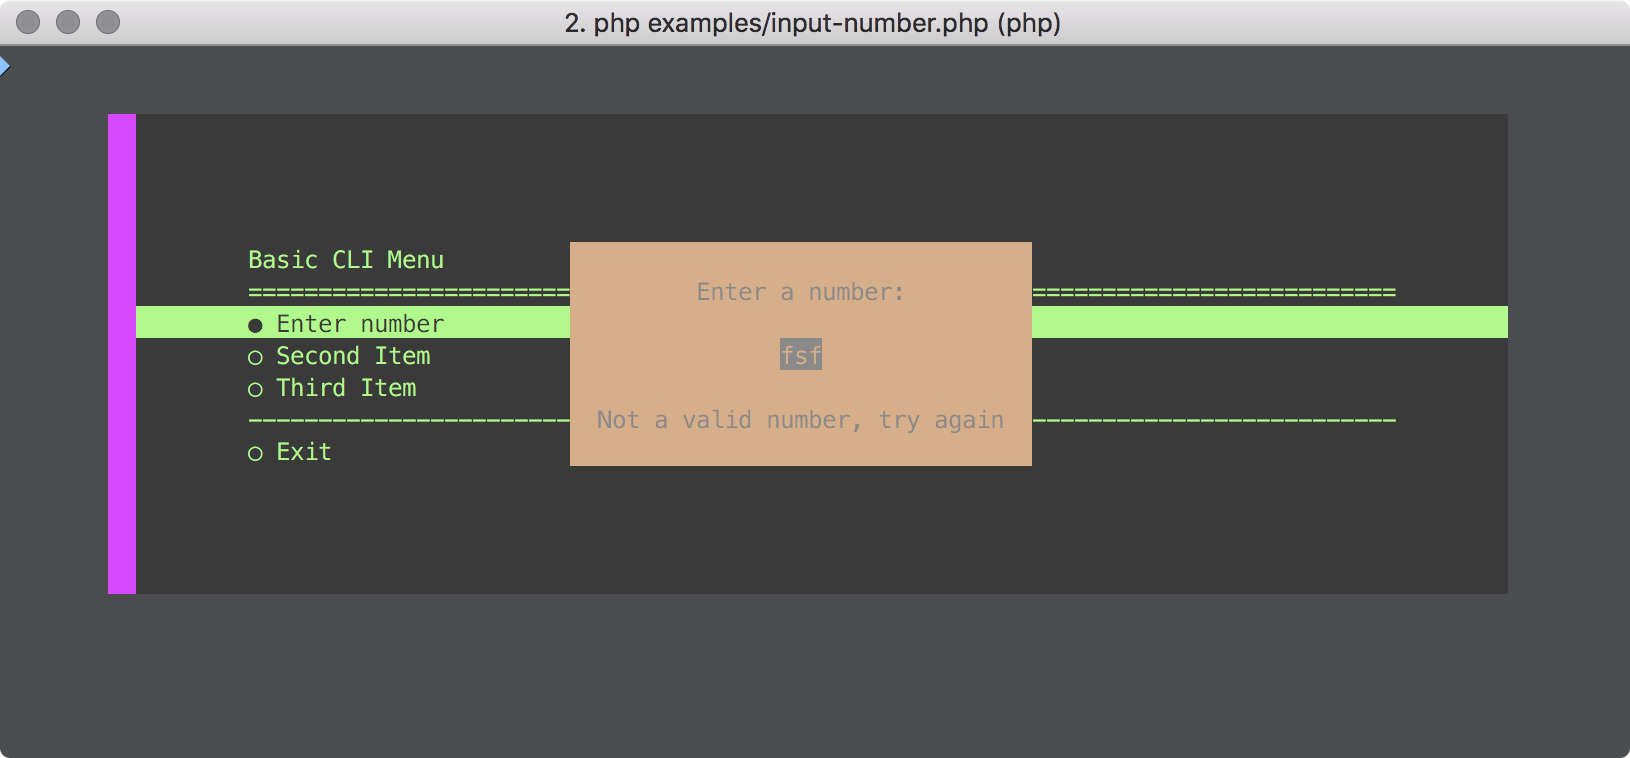
$menu->open();The number input will prompt for an integer value (signed or not) and when the enter key is hit it will validate that
the input is actually a number (/^-?\d+$/). As well as the style you can modify the prompt text (the default is 'Enter a number:'), the
placeholder text (the default is empty) and the validation failed text (the default is 'Not a valid number, try again').
When entering a number you can use the up/down keys to increment and decrement the number.
<?php

use PhpSchool\CliMenu\CliMenu;
use PhpSchool\CliMenu\Builder\CliMenuBuilder;

require_once(__DIR__ . '/../vendor/autoload.php');

$itemCallable = function (CliMenu $menu) {
    $result = $menu->askNumber()
        ->setPrompt('Enter your age')
        ->setPlaceholderText(10)
        ->setValidationFailedText('Invalid age, try again')
        ->ask();

    var_dump($result->fetch());
};

$menu = (new CliMenuBuilder)
    ->setTitle('Basic CLI Menu')
    ->addItem('Enter number', $itemCallable)
    ->addLineBreak('-')
    ->build();
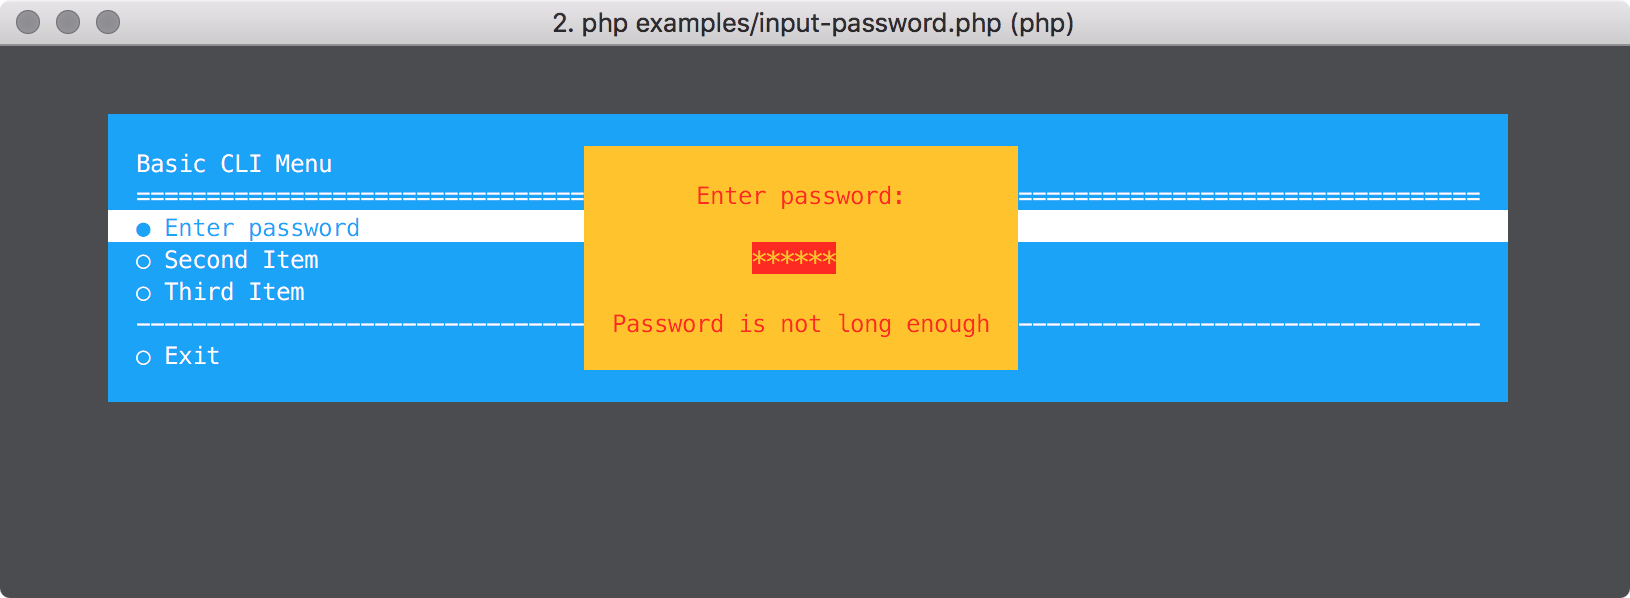
$menu->open();The password input will prompt for a text value and when the enter key is hit it will validate that the input is 16 characters or longer. As well as the style you can modify the prompt text (the default is 'Enter password:'), the placeholder text (the default is empty) and the validation failed text (the default is 'Invalid password, try again'). You can also set a custom password validator as a PHP callable. When typing passwords they are echo'd back to the user as an asterisk.
Ask for a password with the default validation:
<?php

use PhpSchool\CliMenu\CliMenu;
use PhpSchool\CliMenu\Builder\CliMenuBuilder;

require_once(__DIR__ . '/../vendor/autoload.php');

$itemCallable = function (CliMenu $menu) {
    $result = $menu->askPassword()
        ->setPromptText('Please enter your password')
        ->setValidationFailedText('Invalid password, try again')
        ->setPlaceholderText('')
        ->ask();

    var_dump($result->fetch());
};

$menu = (new CliMenuBuilder)
    ->setTitle('Basic CLI Menu')
    ->addItem('Enter password', $itemCallable)
    ->addLineBreak('-')
    ->build();

$menu->open();
Validators can be any PHP callable. The callable will be passed the input value and must return a boolean, false indicating validation failure and true indicating validation success. If validation fails then the validation failure text will be shown.
It is also possible to customise the validation failure message dynamically, but only when using a Closure as a validator.
The closure will be binded to the Password input class which will allow you to call setValidationFailedText inside the closure.
Ask for a password with custom validation. Here we validate the password is not equal to password and that the
password is longer than 20 characters.
<?php

use PhpSchool\CliMenu\CliMenu;
use PhpSchool\CliMenu\Builder\CliMenuBuilder;

require_once(__DIR__ . '/../vendor/autoload.php');

$itemCallable = function (CliMenu $menu) {
    $result = $menu->askPassword()
        ->setPromptText('Please enter your password')
        ->setValidationFailedText('Invalid password, try again')
        ->setPlaceholderText('')
        ->setValidator(function ($password) {
            return $password !== 'password' && strlen($password) > 20;
        })
        ->ask();

    var_dump($result->fetch());
};

$menu = (new CliMenuBuilder)
    ->setTitle('Basic CLI Menu')
    ->addItem('Enter password', $itemCallable)
    ->addLineBreak('-')
    ->build();

$menu->open();
Ask for a password with custom validation and set the validation failure message dynamically:
<?php

use PhpSchool\CliMenu\CliMenu;
use PhpSchool\CliMenu\Builder\CliMenuBuilder;

require_once(__DIR__ . '/../vendor/autoload.php');

$itemCallable = function (CliMenu $menu) {
    $result = $menu->askPassword()
        ->setPromptText('Please enter your password')
        ->setValidationFailedText('Invalid password, try again')
        ->setPlaceholderText('')
        ->setValidator(function ($password) {
            if ($password === 'password') {
                $this->setValidationFailedText('Password is too weak');
                return false;
            } else if (strlen($password) <= 20) {
                $this->setValidationFailedText('Password is not long enough');
                return false;
            }

            return true;
        })
        ->ask();

    var_dump($result->fetch());
};

$menu = (new CliMenuBuilder)
    ->setTitle('Basic CLI Menu')
    ->addItem('Enter password', $itemCallable)
    ->addLineBreak('-')
    ->build();

$menu->open();If you need a new type of input which is not covered by the bundled selection then you can create your own by implementing
\PhpSchool\CliMenu\Input\Input - take a look at existing implementations to see how they are built. If all you need is some custom
validation - extend the \PhpSchool\CliMenu\Input\Text class and overwrite the validate method. You can then use it in
your menu item actions like so:
<?php

use PhpSchool\CliMenu\CliMenu;
use PhpSchool\CliMenu\Builder\CliMenuBuilder;
use PhpSchool\CliMenu\Input\Text;
use PhpSchool\CliMenu\Input\InputIO;

require_once(__DIR__ . '/../vendor/autoload.php');

$itemCallable = function (CliMenu $menu) {

    $style = (new MenuStyle())
        ->setBg('yellow')
        ->setFg('black');

    $input = new class (new InputIO($menu, $menu->getTerminal()), $style) extends Text {
        public function validate(string $value) : bool
        {
            //some validation
            return true;
        }
    };

    $result = $input->ask();

    var_dump($result->fetch());
};

$menu = (new CliMenuBuilder)
    ->setTitle('Basic CLI Menu')
    ->addItem('Enter password', $itemCallable)
    ->addLineBreak('-')
    ->build();

$menu->open();All of the dialogues and inputs expose a getStyle() method which you can use to customise the appearance of them. However, if
you want to create a consistent style for all your dialogues and inputs without configuring it for each one
you can build up a MenuStyle object and pass it to the dialogue and input methods like so:
use PhpSchool\CliMenu\CliMenu;
use PhpSchool\CliMenu\Builder\CliMenuBuilder;

require_once(__DIR__ . '/../vendor/autoload.php');

$popupStyle = (new MenuStyle)
    ->setBg('green')
    ->setFg('magenta');

$itemCallable = function (CliMenu $menu) use ($popupStyle) {
    $menu->flash("PHP School FTW!!", $popupStyle)->display();
    $menu->confirm('PHP School FTW!', $popupStyle)->display('OK!')
    $menu->askNumber($popupStyle)->ask();
};

$menu = (new CliMenuBuilder)
    ->setTitle('Basic CLI Menu')
    ->addItem('First Item', $itemCallable)
    ->addItem('Second Item', $itemCallable)
    ->addItem('Third Item', $itemCallable)
    ->addLineBreak('-')
    ->build();

$menu->open();
Once you get going you might just end up with something that looks a little like this...

You can see the construction code here for more clarity on how to perform advanced configuration: PHP School
(This might not be kept up-to-date since it's a community translation) See this doc in Brazilian Portuguese (pt_BR)