 https://shop.pimoroni.com/products/automation-hat
https://shop.pimoroni.com/products/automation-phat
Automation HAT/pHAT is a home monitoring and automation controller featuring relays, analog channels, powered outputs, and buffered inputs (all 24V tolerant).
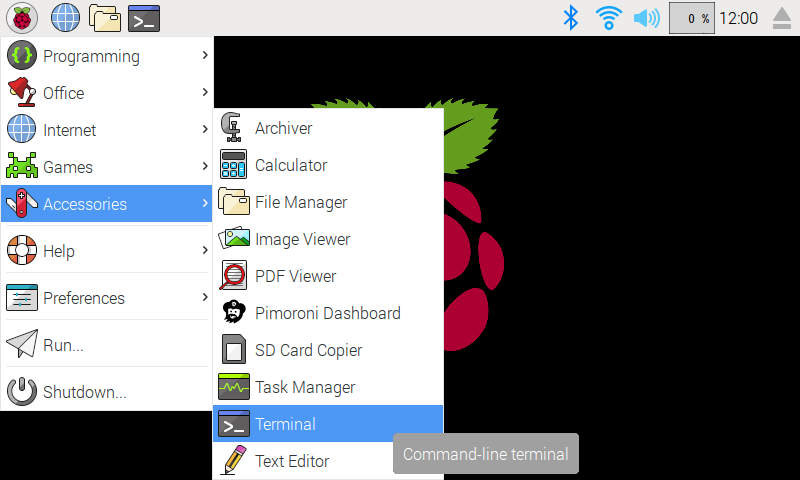
We've created an easy installation script that will install all pre-requisites and get your Automation HAT/pHAT up and running with minimal efforts. To run it, fire up Terminal which you'll find in Menu -> Accessories -> Terminal on your Raspberry Pi desktop, as illustrated below:
In the new terminal window type the command exactly as it appears below (check for typos) and follow the on-screen instructions:
curl https://get.pimoroni.com/automationhat | bashAlternatively, on Raspbian, you can download the pimoroni-dashboard and install your product by browsing to the relevant entry:
sudo apt-get install pimoroni(you will find the Dashboard under 'Accessories' too, in the Pi menu - or just run pimoroni-dashboard at the command line)
If you choose to download examples you'll find them in /home/pi/Pimoroni/automationhat/.
on Raspbian:
sudo apt-get install python3-automationhatother environments:
sudo pip3 install automationhaton Raspbian:
sudo apt-get install python-automationhatother environments:
sudo pip2 install automationhatIf you want to contribute, or like living on the edge of your seat by having the latest code, you should clone this repository, cd to the library directory, and run:
sudo python3 setup.py install(or sudo python setup.py install whichever your primary Python environment may be)
In all cases you will have to enable the i2c bus.
- Guides and tutorials - https://learn.pimoroni.com/automation-hat
- Function reference - http://docs.pimoroni.com/automationhat/
- GPIO Pinout - https://pinout.xyz/pinout/automation_hat / https://pinout.xyz/pinout/automation_phat
- Get help - http://forums.pimoroni.com/c/support
