在开发核心示例程序的过程中,我们已经遇到了四个资源--用户、会话、账户激活和密码重置--但是仅仅第一个被Active Record模型在数据库里的的表支持的。这次终于又可以添加另一个这样的资源:用户微博,它是和特殊用户相关联的短信息。我们首次在看见微博是在第二章里,在这章,我们将通过构建Micropost数据模型从2.3节草图创建全员版的微博,使用和User模型相联系的has_many和belongs_to方法,然后创建操作和现实结果需要的表单和视图片段(包括,11.4节里,上传图片)。在第12章,我们将通过添加关注用户,为了收到他们的微博的来完成我们的迷你版的Twitter。
我们开始通过创建Micropost模型来开始Mircropost资源,他将捕捉微博必要的特性。从2.3节工作的基础上;和在那节的模型一样,我们新的Micropost模型将包含数据验证和User模型的关联。不想模型,目前Micropost模型将是完全测试的,也将有默认的顺序和假如它的用户被删除后自动删除。
假如你正使用Git进行版本控制,我建议现在创建主题分支:
$ git checkout master
$ git checkout -b user-microposts
11.1.1 基本模型
Micropost模型需要仅仅两个属性:content属性来保存微博的内容,和特定用户相关联的微博的用户的user_id。结果是如图11.1显示的Micropost模型的结构。

有了User模型的例子(清单6.1),我们使用generate model来生产微博模型:
$ rails generate model Micropost content:text user:referencesgenerate命令产生了在数据库里创建microposts表的迁移(清单11.1);比较和清单6.2的相似的迁移。最大的不同是references的使用,这个自动添加user_id列(和索引和外键一起)为了在user/micropost相联系。和User模型一样,Micropost模型自动迁移包含了t.timestammp行,它(如在6.1.1节提到的)添加魔法creatd_at和updated_at列显示在途11.1。(我们将在11.4节里放created_at列工作和11.2.1节)
代码清单 11.1: The Micropost migration with added index.
# db/migrate/[timestamp]_create_microposts.rb
 class CreateMicroposts < ActiveRecord::Migration
  def change
    create_table :microposts do |t|
      t.text :content
      t.references :user, index: true, foreign_key: true

      t.timestamps null: false
    end
    add_index :microposts, [:user_id, :created_at]
  end
end
因为我们想要按照创建顺序相反的顺序取回所给用户id的所有微博,清单11.1添加索引(旁注6.2)在user_id和created_at列:
add_index :microposts, [:user_id, :created_at]通过包含user_id和created_at列作为数组,我们为Rails准备创建多重键索引,这意味着Active Record同时使用两个键。
有了清单11.1的数据迁移,我们能和往常一样更新数据库:
$ bundle exec rake db:migrate现在我们已经创建了基本的模型,我们将添加验证来加强想要的设计限制。Micropost模型的必要方面之一是表明那个用户创建微博的user_id的显示。做这个符合语言管理的方法是使用Active Record关联,我们将在11.1.3节实现,但是现在我们将直接从Micropost模型工作。
初始的微博测试和那些User模型的测试(清单6.7)基本相同。在setup步骤,我们创建新的微博当用从fixture里的有效用户关联,然后检查结果是有效的。因为每个微博应该有一个user_id,我们将为user_id的存在性测试添加测试。把这些要素放在一起产生了清单11.2的测试。
代码清单 11.2: Tests for the validity of a new micropost. 红色
# test/models/micropost_test.rb
 require 'test_helper'

class MicropostTest < ActiveSupport::TestCase

  def setup
    @user = users(:michael)
    # This code is not idiomatically correct.
    @micropost = Micropost.new(content: "Lorem ipsum", user_id: @user.id)
  end

  test "should be valid" do
    assert @micropost.valid?
  end

  test "user id should be present" do
    @micropost.user_id = nil
    assert_not @micropost.valid?
  end
end
和在setup方法里的注释说明的一样,创建微博不符合语言习惯,我们将在11.1.3节解决它。
有效的测试已经是绿色的,但是用户id非空测试应该是红色的,因为没有当前任何验证在Micropost模型里:
代码清单 11.3: 红色
$ bundle exec rails test:models
为了解决这个,我们只需要显示在清单11.4的有效性验证(注意belongs_to行在清单11.4里的,它是通过在清单11.1的数据迁移自动生成的。11.1.3节将在更深层次讨论这行的影响)
代码清单 11.3: 红色
$ bundle exec rails test:models
模型测试现在应该是绿色的:
代码清单 11.5: 绿色
$ bundle exec rails test:models
接下来,我们将为微博的content属性添加验证(以2.3.2节为例)。和user_id一样,content属性必须非空,他被限制为不超过140个字符,让它成为实实在在的微博。我们将写一些简单的测试,这些通常跟谁User模型验证测试在6.2节里的有效性测试,无在清单11.6里显示的。
代码清单 11.6: Tests for the Micropost model validations. 红色
# test/models/micropost_test.rb
 require 'test_helper'

class MicropostTest < ActiveSupport::TestCase

  def setup
    @user = users(:michael)
    @micropost = Micropost.new(content: "Lorem ipsum", user_id: @user.id)
  end

  test "should be valid" do
    assert @micropost.valid?
  end

  test "user id should be present" do
    @micropost.user_id = nil
    assert_not @micropost.valid?
  end

  test "content should be present" do
    @micropost.content = "   "
    assert_not @micropost.valid?
  end

  test "content should be at most 140 characters" do
    @micropost.content = "a" * 141
    assert_not @micropost.valid?
  end
end
如在6.2节,代码在清单11.6使用字符串相乘测试微博长度的有效性:
$ rails console
>> "a" * 10
=> "aaaaaaaaaa"
>> "a" * 141
=> "aaaaaaaaaaaaaaaaaaaaaaaaaaaaaaaaaaaaaaaaaaaaaaaaaaaaaaaaaaaaaaaaaaaaaaa
aaaaaaaaaaaaaaaaaaaaaaaaaaaaaaaaaaaaaaaaaaaaaaaaaaaaaaaaaaaaaaaaaaaaaa"
相应的应用程序代码实际和用户name验证一样(清单6.16),如显示在清单11.7)
代码清单 11.7: The Micropost model validations. 绿色
# app/models/micropost.rb
 class Micropost < ActiveRecord::Base
  belongs_to :user
  validates :user_id, presence: true
  validates :content, presence: true, length: { maximum: 140 }
end
在这点,测试集应该是绿色的:
代码清单 11.8: 绿色
$ bundle exec rails test当为Web应用程序构建数据模型是,在单个的模型之间创建关联是必要的。在目前的例子,每个微博是和用户相关联,每个用户(潜在地)和许多微博关联--在2.3.2节见过它们的关系,在图11.2和11.3里用图表显示了.作为实现这些关联的部分,我们将为Micropost模型写测试和为User模型添加几个测试。
使用在这节定义的belongs_to/has_many关联,Rails构建方法显示在表11.1.注意表11.1相反
Micropost.create
Micropost.create!
Micropost.new
我们有
user.microposts.create
user.microposts.create!
user.microposts.build
这些后面的方法继续了符合语言习惯的正确方法来创建微博,即,通过和它像关联的用户。当新的微博用这个方法创建,它的user_id自动地设为正确的值。具体来说,我们能替代代码
@user = users(:michael) # This code is not idiomatically correct.
@micropost = Micropost.new(content: "Lorem ipsum", user_id: @user.id)
从清单11.2的用这个:
@user = users(:michael)
 @micropost = @user.microposts.build(content: "Lorem ipsum")
(和new,build在内存里返回对象一样,不会修改数据库。)一旦我们定义了正确的关联,结果@micropost变量将自动地有@user_id属性和它的用户的id关联。
表11.1: 用户、微博关联方法摘要 为了让像@user.microposts.build的代码工作,我们需要更新User和Micropost模型用和他们相联系的代码。这些中的第一个被在清单11.1的数据迁移通过belongs_to :user自动包含进来,如清单11.9所示。关联的另一半,has_many :microposts,需要手动添加,如在清单11.10所示。
class Micropost < ActiveRecord::Base
  belongs_to :user
  validates :user_id, presence: true
  validates :content, presence: true, length: { maximum: 140 }
 end
代码清单 11.10: A user has_many microposts. 绿色
# app/models/user.rb
class User < ActiveRecord::Base
has_many :microposts
.
.
.
end有了这样创建的关联,我们能更新setup方法在清单11.2里用复合语言习惯的正确做法来构建新的微博,如清单11.11里所示。
代码清单 11.11: Using idiomatically correct code to build a micropost. 绿色
# test/models/micropost_test.rb
 require 'test_helper'

class MicropostTest < ActiveSupport::TestCase

  def setup
    @user = users(:michael)
    @micropost = @user.microposts.build(content: "Lorem ipsum")
  end

  test "should be valid" do
    assert @micropost.valid?
  end

  test "user id should be present" do
    @micropost.user_id = nil
    assert_not @micropost.valid?
  end
  .
  .
  .
end
当然,随着这个微小得重构,测试集应该仍然是绿色的:
代码清单 11.12: 绿色
$ bundle exec rails test在这节,我们将添加几个改进到用户/微博关联。具体来说,我们将为用户的微博以特定顺序取回做安排,然后我们也将依靠用户创建微博,以便假如他们关联的用户删除了后会自动删除。
默认域 默认地,user.microposts方法创建没有保证关于微博的顺序,但是(遵循博客和推特的惯例)我们想要微博以和它们被创建的顺序想法的顺序显示,以便最近发出的最先显示。我们将使用默认scope来安排这个发生。
这是确切的特性的顺序,能容易地得出伪测试代码(例如,测试将通过及时应用程序出错),所以我们将使用测试驱动开发开确保我们正测试正确的事情。具体来说,让我们们写一个确认第一条微博在数据库里的是和我们调用most_recent一样,如在清单11.13显示的一样。
代码清单 11.13: Testing the micropost order. 红色
# test/models/micropost_test.rb
 require 'test_helper'

class MicropostTest < ActiveSupport::TestCase
  .
  .
  .
  test "order should be most recent first" do
    assert_equal Micropost.first, microposts(:most_recent)
  end
end
清单11.13依靠几个微博fixture,我们在清单11.14里定义的。
代码清单 11.14: Micropost fixtures.
# test/fixtures/microposts.yml
 orange:
  content: "I just ate an orange!"
  created_at: <%= 10.minutes.ago %>

tau_manifesto:
  content: "Check out the @tauday site by @mhartl: http://tauday.com"
  created_at: <%= 3.years.ago %>

cat_video:
  content: "Sad cats are sad: http://youtu.be/PKffm2uI4dk"
  created_at: <%= 2.hours.ago %>

most_recent:
  content: "Writing a short test"
  created_at: <%= Time.zone.now %>
注意我们已经显式地设置created_at列使用内嵌Ruby。因为它是“魔法”列,自动地通过Rails更新,靠手动设置一般不可能,但是在fixture里是可能。实践这个可能不是必要的,事实上在许多系统fixuture按顺序创建。在这个例子,最后的fixture在生活里被最后创建(因此是最近的),但是依赖这个行为是愚蠢的,它是易碎的,和可能系统依赖的。
有了在清单11.13和清单11.14里的代码,测试集应该是红色的:
代码清单 11.15: 红色
$ bundle exec rails test TEST=test/models/micropost_test.rb \
>                       TESTOPTS="--name test_order_should_be_most_recent_first"
我们将使用Rails方法default_scope来让测试通过,别的事情能用来设置默认的顺序从数据库里取回的数据。为了强制特殊的顺序,我们包含order参数在default_scope,它让我们通过created_at列排序如下:
order(:created_at)不幸地是,这个排序的结果使用从小到大的排序,这意味着最旧的微博最先出来。为了按相反的顺序把他们拉出来,我们能更近一步,用一些原始的SQL包含字符串:
order('created_at DESC')这里DESC是SQL为“降序”,例如,在降序从最新的到最旧的。在旧版的Rails,使用原始SQL常常是得到想要的行为的唯一选择,但是Rails 4.0我们能使用更自然的纯Ruby语法:
order(created_at: :desc)把这个添加到Micropost默认的scope里,给出清单11.16.
代码清单 11.16: Ordering the microposts with default_scope. 绿色
# app/models/micropost.rb
 class Micropost < ActiveRecord::Base
  belongs_to :user
  default_scope -> { order(created_at: :desc) }
  validates :user_id, presence: true
  validates :content, presence: true, length: { maximum: 140 }
end
清单11.16引入了"stabby lambda"语法为创建Proc对象(过程),或者lambada,是一个匿名的函数(没有名字的函数)。stabby lambda以块作为参数(4.3.2节),然后返回Proc,它用call方法求值。我们能在控制台看看怎么工作:
>> -> { puts "foo" }
=> #<Proc:0x007fab938d0108@(irb):1 (lambda)>
>> -> { puts "foo" }.call
foo
=> nil
(这是高级的Ruby主题,所以假如你现在不理解没关系) 有了清单11.16的代码,测试应该是绿色的:
代码清单 11.17: 绿色
$ bundle exec rails test
依赖:destroy 除了正确的顺序,我们想给微博添加另外的特性。回忆9.4节,网站管理员有销毁用户的能力。假如用户被销毁,用户发布的微博也应该被销毁是站得住脚的。
我们能通过给has_many关联传递一个参数来实现这个行为,如清单11.18所示。
代码清单 11.18: Ensuring that a user’s microposts are destroyed along with the
user.
# app/models/user.rb
 class User < ActiveRecord::Base
  has_many :microposts, dependent: :destroy
  .
  .
  .
end
这里选项dependengt: :destroy为依赖的微博当用户本身被销毁时销毁。这阻止了无用的微博占用数据库当管理员选择从系统内移除用户。
我们能取而清单11.18正工作通过对User模型的测试。所有需要我们知道的是保存用户(所有它得到一个id)和创建关联的微博。然后我们检查销毁用户减少了一个微博。结果显示在清单11.19里,(比较在清单9.57里的为“delete”链接的集成测试)。
代码清单 11.19: A test of dependent: :destroy. 绿色
# test/models/user_test.rb
 require 'test_helper'

class UserTest < ActiveSupport::TestCase

  def setup
    @user = User.new(name: "Example User", email: "[email protected]",
                     password: "foobar", password_confirmation: "foobar")
  end
  .
  .
  .
  test "associated microposts should be destroyed" do
    @user.save
    @user.microposts.create!(content: "Lorem ipsum")
    assert_difference 'Micropost.count', -1 do
      @user.destroy
    end
  end
end
假如在清单11.18里的代码正确地工作,测试集应该仍然是绿色的:
代码清单 11.20: 绿色
$ bundle exec rails test尽管我们仍然没有通过网页创建微博的的方法--在11.3.2节里--这不会阻止我们显示它们(和测试显示)。遵循Twitter的引导,我们计划显示用户的微博不在单独微博index网页,而是直接在用户的show页面显示,如图11.4的页面模型。我们将从相当简单的ERB模板开始,为了在用户个人信息页面上添加微博显示,然后我们将添加微博到9.3.2节的种子数据,一般我们有东西显示。
我们的计划是为了每个用户显示微博在他们各自的个人信息页面(show.html.erb),和他们创建的微博一起。我们将看见,许多想法和在9.3节显示所有用户的的方法是相似的。
尽管我们直到11.3节才需要Micropost控制器,我们现在需要视图目录,所以让我们现在就生成控制器:
$ rails generate controller Microposts在这节我们的主要目的是为每个用户渲染所有微博。我们在9.3.5节看见代码:
<ul class="users">
 <%= render @users %>
</ul>
自动使用_user.html.erb片段来渲染@users变量里的每个用户。我们将定义一个相似的_micropost.html.erb视图片段以便我们能使用相同的技术在微博集合如下:
<ol class="microposts">
 <%= render @microposts %>
</ol>
现在我们使用排序列表标签ol(和不排序标签ul相反),因为微博以特殊的顺序排列(按照与时间先后顺序相反的)。相应的视图片段显示在清单11.21.
代码清单 11.21: A partial for showing a single micropost.
# app/views/microposts/_micropost.html.erb
 <li id="micropost-<%= micropost.id %>">
  <%= link_to gravatar_for(micropost.user, size: 50), micropost.user %>
  <span class="user"><%= link_to micropost.user.name, micropost.user %></span>
  <span class="content"><%= micropost.content %></span>
  <span class="timestamp">
    Posted <%= time_ago_in_words(micropost.created_at) %> ago.
  </span>
</li>
这里使用了很棒的time_ago_in_words辅助方法,它的意思和效果很清晰,我们将在11.2.2节的清单11.21也为每个微博添加CSS id
<li id="micropost-<%= micropost.id %>">这通常是好的实践,当它在未来操作单个微博的可能性打开了(使用Javascript,例如)
接下来是表明显示潜在大量微博的困难。我们将和在9.3.3节解决用户一样的方法来解决这个问题,即,使用分页。和以前一样,我们将使用will_paginate方法:
<%= will_paginate @microposts %>假如你用在用户主页相似的一行比较,清单9.41,你将卡机我们之前
<%= will_paginate %>这个工作,因为在User控制器的环境里,wii_paginate设想名为@users实例变量的存在(正如我们在9.3.3节所见,它应该属于类ActiveRecord::Relation)。在目前的例子,因为我们仍将在User控制器但是想要分页微博,我们将传递显示地@microposts变量给will_paginate。当然,这意味着我们将不得不在用户show动作定义这样一个变量(清单11.22)。
代码清单 11.22: Adding an @microposts instance variable to the user show action.
# app/controllers/users_controller.rb
 class UsersController < ApplicationController
  .
  .
  .
  def show
    @user = User.find(params[:id])
    @microposts = @user.microposts.paginate(page: params[:page])
  end
  .
  .
  .
end
注意这里paginate是多么聪明,它甚至通过微博关联工作,进入microposts表,拉取想要的页面的微博。
我们最后的任务是显示每个用户的微博数量,我们用count方法:
user.microposts.count和paginate一样,我们能通过关联使用count方法。具体来说,count不从数据库拉取所有的微博,然后在结果数组上调用length,当微博数量增长,将变得没有效率。想反,它直接在数据库里执行运算,让数据库来用所给的user_id来计算微博数量(对于所有数据库来说被高度优化)。(在未知事件,查找数量仍会是你应用里的瓶颈,你可以使用counter cacher来让它更快)
把上面的这些要素放在一起,我们现在到了给个人信息页面添加微博的时候了,注意if @user.microposts.any?(在清单7.19里我们之前看见的结构),当用户没有微博的时候,不会显示一个空列表。
代码清单 11.23: Adding microposts to the user show page.
# app/views/users/show.html.erb
 <% provide(:title, @user.name) %>
<div class="row">
  <aside class="col-md-4">
    <section class="user_info">
      <h1>
        <%= gravatar_for @user %>
        <%= @user.name %>
      </h1>
    </section>
  </aside>
  <div class="col-md-8">
    <% if @user.microposts.any? %>
      <h3>Microposts (<%= @user.microposts.count %>)</h3>
      <ol class="microposts">
        <%= render @microposts %>
      </ol>
      <%= will_paginate @microposts %>
    <% end %>
  </div>
</div>
在这点,我们在图11.5里看看我们更新的个人信息页面。它是很令人失望的。当然,这是因为现在没有任何微博。是时候改变它了。
在11.2.1节里为用户微博创建模板,最后是反礼貌的。我们能通过添加微博到9.3.2节种子数据来改正这个悲哀的形势。
为所有用户添加样本微博要花费很长的时间,所以开始我们只选前六名用户(例如,五个带自定义Gravatar的用户,和一个默认Gravatar的用户)使用take方法:
User.order(:created_at).take(6)对order的调用确保我们找到我们创建的前6个用户。
对每个我们选择的用户,我们将创建50个微博(多到超过分页限制的30条)。为了为每个微博生成示例内容,我们将使用Faker gem的好用的Lorem.sentence方法。结果是新的种子数据方法显示在清单11.24里。(在清单11.24里循环的顺序的原因是使用状态feed(12.3节)插入微博。)从同样的用户用大运行给第一个用户种,在视觉上是不好看的。)
代码清单 11.24: Adding microposts to the sample data.
# db/seeds.rb
 .
.
.
users = User.order(:created_at).take(6)
50.times do
  content = Faker::Lorem.sentence(5)
  users.each { |user| user.microposts.create!(content: content) }
end
在这点,我们能和往常一样reseed开发数据库:
$ bundle exec rake db:migrate:reset
$ bundle exec rake db:seed
你也应该退出和重启Rails开发服务器。
有了那个,我们到了欣赏我们的11.2.1节的劳动成果的时候,通过显示每个微博的信息。初步的结果显示在图11.6里。
在图11.6里显示的没有格式化的微博,所以让我们添加一些(清单11.25),看看结果页面。
代码清单 11.25: The CSS for microposts (including all the CSS for this chapter).
# app/assets/stylesheets/custom.css.scss
 .
.
.
/* microposts */

.microposts {
  list-style: none;
  padding: 0;
  li {
    padding: 10px 0;
    border-top: 1px solid #e8e8e8;
  }
  .user {
    margin-top: 5em;
    padding-top: 0;
  }
  .content {
    display: block;
    margin-left: 60px;
    img {
      display: block;
      padding: 5px 0;
    }
  }
  .timestamp {
    color: $gray-light;
    display: block;
    margin-left: 60px;
  }
  .gravatar {
    float: left;
    margin-right: 10px;
    margin-top: 5px;
  }
}

aside {
  textarea {
    height: 100px;
    margin-bottom: 5px;
  }
}

span.picture {
  margin-top: 10px;
  input {
    border: 0;
  }
}
图11.7显示了用户个人信息页面为了第一个用户,然而图11.8显示了另一个用户的个人信息。最后,图11.9显示了第一个用户的第二页,和在底部显示的分页链接一道。在所有三个例子,观测每个微博显示它创建的日期(例如,“1分钟前发出”);这是time_ago_in_work方法的从清单11.21的工作。假如你等几分钟重新加载页面,你将看见文本是怎样依据最新时间更新。
因为刚激活的用户直接被重定向到他们的个人信息页面,我们已经有了测试个人信息正确渲染的测试了(清单10.29)。在这节,我们将写短的集成测试为一些别的要素在个人信息页面,包含这节的工作。我们将通过为我们网站的用户的个人信息页面生成测试:
$ rails generate integration_test users_profile
      invoke test_unit
      create test/integration/users_profile_test.rb
为了测试显示在个人信息的微博,我们需要让用户和fixture微博关联。Rails包含了一个方便的方法来在fixture里建立关联,像这:
orange:
 content: "I just ate an orange!"
 created_at: <%= 10.minutes.ago %>
 user: michael
通过识别user为michael,我们告诉Rails在user fixture里微博和相应的用户关联:
为了测试微博分页,我们也将生成一些额外的微博fixture使用相同内嵌Ruby技术,我们过去在清单9.43里创建的另外的用户:
<% 30.times do |n| %> micropost_<%= n %>: content: <%= Faker::Lorem.sentence(5)
%> created_at: <%= 42.days.ago %> user: michael <% end %>
把这些放一起,给了我们更新过的微博fixture在清单11.26里。
测试数据因此准备好了,测试本身是相当直接的:我们访问用户个人信息页,然后检查页面标题和用户的名称,Gravatar、微博数量,和分页的微博。结果显示在清单11.27里。注意清单4.2里full_title辅助方法的使用,为了测试页面的标题,我们通过包含Application Helper模块进入测试获得读取权限。
在清单11.27里微博数量单眼使用response.body,我们在第十章的练习里简单的看见。尽管它的名字,response.body包含完整的HTML源代码(不只是页面的主体)。这意味着假如我们所关心的是显示在页面某处的微博数量,我们查找如下的匹配:
这是更不具说明下的比assert_select;具体来说,不像assert_select,使用assert_match在这个环境不要求我们表明我们寻找的是那个标签。 清单11.27也引入了内嵌的assert_select语法:
这检查了img标签,带有类为gravatar在顶级的头部标签(h1)。 因为应用程序代码正工作,测试集应该是绿色的:
已经完成了数据模型和显示微博模板,我们现在把我们的注意力转向通过网络创建它们的界面。在这节,我们也看见第一个状态feed的暗示-在第十二章带出完整果实的说明。最后,作为用户,我们将创建通过网络删除微博的可能。
值得一提的是过去的惯例有个打破了:到Micropost的资源的接口将通过Profile和Home页面主要运行,所以我们不需要想new或者edit在Micropost控制器里;我们仅仅需要create和destroy。这导致了Micropost资源的路由显示在清单11.29里。代码在清单11.29里导致显示在表11.2的REST的路由,在表2.3里是路由全集的一个很小的子集。当然,这简化是更高级的标志,不是更低--自从我们在第二章依赖脚手架已经很长一段路了,我们不再需要它的复杂度的更多。
我们在Micropost控制器里用一些读取控制来开始我们的Micropost开发。具体来说,因为我们通过它们的关联用户读取微博,create和destroy动作必须要求用户登录。
测试加强登陆状态和为User控制器的一样(清单9.17和清单9.56)。我们只是发出正确的请求到每个动作,确认微博数量是没有变化,结果被重定向值登陆URL,如在清单11.30所见。
有了在清单11.30里写的需要测试的应用程序代码通过首先需要一点重构。回忆9.2.1节,我们使用前置过滤,叫做logged_in_user方法(清单9.12)使用前置过滤。在这次,我们需要在User控制器里的方法,但是现在我们发现我们在Micropost控制器里也需要它,所以我们将把它移入Application控制器,它是所有控制器的基类(4.4.4节)。结果显示在清单11.31.
为了避免代码重复,你也应该从Users控制器里移除logged_in_user。
有了在清单11.31里的代码,logged_in_user方法现在在Micropost控制器里可用了,这意味着我们能添加create和destroy动作和使用前置过滤限制进入他们,如清单11.32所示。
在这点,测试应该通过:
在第七章,我们通过创建HTML表格发出HTTP POST请求到create动作在Users控制器里来实现用户注册。微博创建的实现是相似的;主要的不同是,和使用单独页面/microposts/new不同,我们将把表单放在主页(例如,根路径/),如在图11.10里的页面模型。
当我们最后离开主页,它显示在图5.6里--那是,它有“现在注册!”按钮在中间。因为微博创建表单仅仅在特定用户登陆的环境里有道理,这节的目标将是依据访问者的登陆状态服务不同版的主页。我们将在清单11.35里实现这个。
我们将用为微博create动作开始,它和它的用户相似(清单7.23);主要的不同位于使用user/micropost关联到build新微博,如在清单11.34所见。注意“健壮参数”(Strong Parameter)的使用,通过micropost_params,它仅仅允许微博的content属性通过网站修改。
为了创建微博建个表单,我们使用在清单11.35里的代码,它依据网站用户是否登陆服务不同HTML。
(在每个if-else条件的分支有如此多得代码是有点乱,清洁它留下来作为练习(11.6节)) 为了让定义在清单11.35里的页面工作,我们需要创建和填充几个视图片段。第一是新的主页侧栏,如代码清单11.36所示。
注意,在个人信息侧边栏(清单11.23)里,在清单11.36里的用户信息显示为用户微博的总数。在显示里有点不同,不妥;在个人信息侧边栏,“Micropost”是标签,和显示在“Micropost(1)”有点道理。在现在的情况,不妥,说“1条微博”是不符合语法的,所以我们准备显示“micropost”和“2 microposts”使用pluralize方法,我们在7.3.3节。
我们接下来为创建微博定义表单(清单11.37),它和在清单7.13里的注册表单相似。
代码清单 11.37: The form partial for creating microposts.
# app/views/sha红色/_micropost_form.html.erb
 <%= form_for(@micropost) do |f| %>
  <%= render 'sha红色/error_messages', object: f.object %>
  <div class="field">
    <%= f.text_area :content, placeholder: "Compose new micropost..." %>
  </div>
  <%= f.submit "Post", class: "btn btn-primary" %>
<% end %>
我们需要创建两个变化在清单11.37工作前。第一,我们需要定义@micropost,它(如以往)我们通过关联:
@micropost = current_user.microposts.build结果显示在清单11.38里。
代码清单 11.38: Adding a micropost instance variable to the home action.
# app/controllers/static_pages_controller.rb
 class StaticPagesController < ApplicationController

  def home
    @micropost = current_user.microposts.build if logged_in?
  end

  def help
  end

  def about
  end

  def contact
  end
end
当然,current_user仅仅当用户登陆时才存在,所以@micropost变量应该仅仅在这种情形下定义。 另一个变化是让清单11.37工作是重定义错误信息视图片段,这样清单11.37里的代码就工作了:
<%= render 'sha红色/error_messages', object: f.object %>你可能回忆起清单7.18里错误信息视图片段参考@user变量显式地,但是在当前我们有@micropost变量。为了统一这些情形,我们可以通过传递表单变量f到视图片段和读取关联的对象通过f.object,以便在
form_for(@user) do |f|f.object是@user,在
form_for(@micropost) do |f|里f.object是@micropost,等等。
为了给视图片段传输对象,我们使用值为对象的哈希和键为视图片段里使用的变量名,在清单11.37里的第二行完成。换句话说,object: f.object创建了名为object的变量,在error_messages视图片段里,我们能使用它构建自定义错误信息,如在清单11.39里所示。
代码清单 11.39: Error messages that work with other objects. 红色
# app/views/sha红色/_error_messages.html.erb
 <% if object.errors.any? %>
  <div id="error_explanation">
    <div class="alert alert-danger">
      The form contains <%= pluralize(object.errors.count, "error") %>.
    </div>
    <ul>
    <% object.errors.full_messages.each do |msg| %>
      <li><%= msg %></li>
    <% end %>
    </ul>
  </div>
<% end %>
在这点,你应该确认测试集是红色的:
代码清单 11.40: 红色
$ bundle exec rails test
这暗示我们需要更新别的错误信息视图片段的存在,我们使用当用户注册时(清单7.18),重置密码(清单10.50),和编辑用户(清单9.2)。更新的版本显示在清单11.41,清单11.43和清单11.42里。
代码清单 11.41: Updating the rendering of user signup errors.
# app/views/users/new.html.erb
 <% provide(:title, 'Sign up') %>
<h1>Sign up</h1>

<div class="row">
  <div class="col-md-6 col-md-offset-3">
    <%= form_for(@user) do |f| %>
      <%= render 'sha红色/error_messages', object: f.object %>
      <%= f.label :name %>
      <%= f.text_field :name, class: 'form-control' %>

      <%= f.label :email %>
      <%= f.email_field :email, class: 'form-control' %>

      <%= f.label :password %>
      <%= f.password_field :password, class: 'form-control' %>

      <%= f.label :password_confirmation, "Confirmation" %>
      <%= f.password_field :password_confirmation, class: 'form-control' %>

      <%= f.submit "Create my account", class: "btn btn-primary" %>
    <% end %>
  </div>
</div>
代码清单 11.42: Updating the errors for editing users.
# app/views/users/edit.html.erb
  <% provide(:title, "Edit user") %>
<h1>Update your profile</h1>

<div class="row">
  <div class="col-md-6 col-md-offset-3">
    <%= form_for(@user) do |f| %>
      <%= render 'sha红色/error_messages', object: f.object %>

      <%= f.label :name %>
      <%= f.text_field :name, class: 'form-control' %>

      <%= f.label :email %>
      <%= f.email_field :email, class: 'form-control' %>

      <%= f.label :password %>
      <%= f.password_field :password, class: 'form-control' %>

      <%= f.label :password_confirmation, "Confirmation" %>
      <%= f.password_field :password_confirmation, class: 'form-control' %>

      <%= f.submit "Save changes", class: "btn btn-primary" %>
    <% end %>

    <div class="gravatar_edit">
      <%= gravatar_for @user %>
      <a href="http://gravatar.com/emails">change</a>
    </div>
  </div>
</div>
代码清单 11.43: Updating the errors for password resets.
# app/views/password_resets/edit.html.erb
 <% provide(:title, 'Reset password') %>
<h1>Password reset</h1>

<div class="row">
  <div class="col-md-6 col-md-offset-3">
    <%= form_for(@user, url: password_reset_path(params[:id])) do |f| %>
      <%= render 'sha红色/error_messages', object: f.object %>

      <%= hidden_field_tag :email, @user.email %>

      <%= f.label :password %>
      <%= f.password_field :password, class: 'form-control' %>

      <%= f.label :password_confirmation, "Confirmation" %>
      <%= f.password_field :password_confirmation, class: 'form-control' %>

      <%= f.submit "Update password", class: "btn btn-primary" %>
    <% end %>
  </div>
</div>
在这点,所有的测试应该是绿色的:
$ bundle exec rails test另外,在这节所有的HTML应该正确的渲染,显示如图11.11里的表单,提交错误的表单显示在图11.12里。


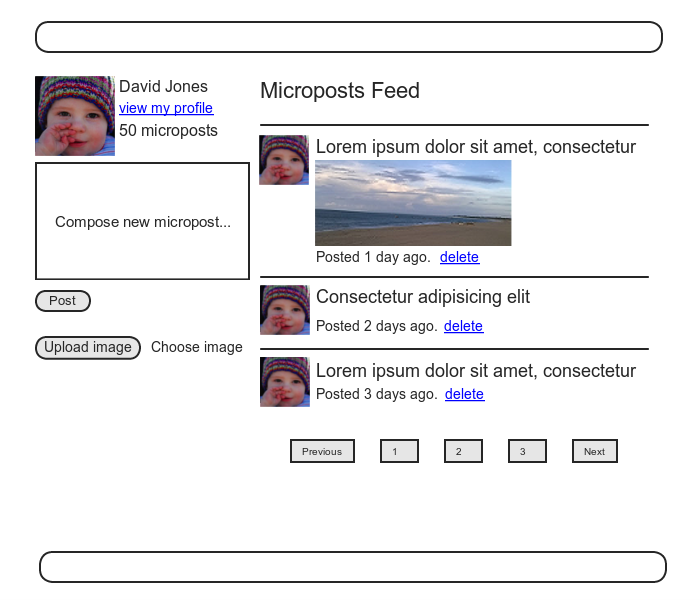
尽管微博表单现在实际运行了,用户不能吉利看见成功提交的结果因为档期主页不显示任何微博。假如你喜欢,你能确认在图11.11里的表单所示的正工作通过提交有效的入口,然后导航到个人信息页面来看见微博,但是更啰嗦。有包含用户自己的微博流将会更好,如图11.13的页面模型。(在第十二章,我们将包含被当前用户关注的用户的微博来一般化这个流。)

代码清单 11.44: A preliminary implementation for the micropost status feed.
# app/models/user.rb
 class User < ActiveRecord::Base
  .
  .
  .
  # Defines a proto-feed.
  # See "Following users" for the full implementation.
  def feed
    Micropost.where("user_id = ?", id)
  end

    private
    .
    .
    .
end
在
Micropost.where("user_id = ?", id)确认id在被包含前在SQL查询里被转义,因此避免严重的安全漏洞,即SQL注入漏洞。这里id属性只是整数(例如,self.if,用户唯一的ID),所以在这种情况没有SQL注入的危险,但是总是转义插入SQL语句的变量是培养好的习惯。
细心的读者可能注意到在这点代码在清单11.44里是大体上等价的和
def feed
  microposts
end
我们已经在清单11.44里使用了代码,因为它在十二章需要的生成更自然的全状态馈送微博。 为了在示例程序里使用feed,我们添加一个@feed_items实例变量为当前用的(分页的)feed,如在清单11.45里,然后添加状态feed视图片段(清单11.46)到主页(清单11.47)。注意,现在有两行需要当用户登陆,清单11.45变为
@micropost = current_user.microposts.build if logged_in?从清单11.38到
if logged_in?
  @micropost  = current_user.microposts.build
  @feed_items = current_user.feed.paginate(page: params[:page])
end
因此移动条件从行最末到if-end语句。
代码清单 11.45: Adding a feed instance variable to the home action.
# app/controllers/static_pages_controller.rb
 class StaticPagesController < ApplicationController

  def home
    if logged_in?
      @micropost  = current_user.microposts.build
      @feed_items = current_user.feed.paginate(page: params[:page])
    end
  end

  def help
  end

  def about
  end

  def contact
  end
end
代码清单 11.46: The status feed partial.
# app/views/sha红色/_feed.html.erb
<% if @feed_items.any? %>
<ol class="microposts">
<%= render @feed_items %>
</ol>
<%= will_paginate @feed_items %>
<% end %>状态feed视图片段推迟了定义在清单11.21里的微博视图片段的渲染:
<%= render @feed_items %>这里Rails知道调用微博视图片段@feed_items的每个要素有类Micropost。这引起Rails查找视图片段在所给的资源的视图目录里的相应的名字:
# app/views/microposts/_micropost.html.erb我们能通过渲染feed视图片段如往常一样(清单11.47)来添加feed到主页。结果显示在主页的feed演示,如要求的(图11.14)
代码清单 11.47: Adding a status feed to the Home page.
# app/views/static_pages/home.html.erb
 <% if logged_in? %>
  <div class="row">
    <aside class="col-md-4">
      <section class="user_info">
        <%= render 'sha红色/user_info' %>
      </section>
      <section class="micropost_form">
        <%= render 'sha红色/micropost_form' %>
      </section>
    </aside>
    <div class="col-md-8">
      <h3>Micropost Feed</h3>
      <%= render 'sha红色/feed' %>
    </div>
  </div>
<% else %>
  .
  .
  .
<% end %>
在这点,创建新的微博如期盼的工作,如在图11.15里所见。有一点轻微的,不过:在失败的微博提及,主页期盼@feed_items实例变量,所以失败的提交现在崩溃了。最容易的解决方法是通过给它赋值一个空的数组来完全压住,图在清单11.48所示。(不幸地是,在这种情况下,返回分页feed不工作。实现它,点击分页链接看为什么)
代码清单 11.48: Adding an (empty) @feed_items instance variable to the create
action.
# app/controllers/microposts_controller.rb
 class MicropostsController < ApplicationController
  before_action :logged_in_user, only: [:create, :destroy]

  def create
    @micropost = current_user.microposts.build(micropost_params)
    if @micropost.save
      flash[:success] = "Micropost created!"
      redirect_to root_url
    else
      @feed_items = []
      render 'static_pages/home'
    end
  end

  def destroy
  end

  private

    def micropost_params
      params.require(:micropost).permit(:content)
    end
end最后添加到Micropost资源的功能是删除微博的能力。如同用户删除(9.4.2节),我们完成这个用“delete”链接,如同在图11.16里的页面模型。和那种情况不同,它限制用户破坏admin用户,删除链接仅仅为当前用户创建的微博。
我们的第一步是添加删除链接到微博视图片段,如在清单11.21里。结果显示在清单11.49里。
代码清单 11.49: Adding a delete link to the micropost partial.
# app/views/microposts/_micropost.html.erb
 <li id="<%= micropost.id %>">
  <%= link_to gravatar_for(micropost.user, size: 50), micropost.user %>
  <span class="user"><%= link_to micropost.user.name, micropost.user %></span>
  <span class="content"><%= micropost.content %></span>
  <span class="timestamp">
    Posted <%= time_ago_in_words(micropost.created_at) %> ago.
    <% if current_user?(micropost.user) %>
      <%= link_to "delete", micropost, method: :delete,
                                       data: { confirm: "You sure?" } %>
    <% end %>
  </span>
</li>
下一步是在Micropost控制器里定义destroy动作,它是模拟清单9.54里的用户状态。主要的不同是,和使用@user变量带admin_user前置过滤不同,我们将发现微博通过管理,假如用户尽力删除别的用户的微博时自动识别。我们将放结果在find,前置过滤correct_user里,它检查当前用户时间有一个所给id的微博。结果显现在清单11.50.
代码清单 11.50: The Microposts controller destroy action.
# app/controllers/microposts_controller.rb
 class MicropostsController < ApplicationController
  before_action :logged_in_user, only: [:create, :destroy]
  before_action :correct_user,   only: :destroy
  .
  .
  .
  def destroy
    @micropost.destroy
    flash[:success] = "Micropost deleted"
    redirect_to request.referrer || root_url
  end

  private

    def micropost_params
      params.require(:micropost).permit(:content)
    end

     def correct_user
      @micropost = current_user.microposts.find_by(id: params[:id])
      redirect_to root_url if @micropost.nil?
    end
end
注意destroy方法在清单11.50里的重定向到URL
request.referrer || root_url这使用了request.referrer方法,它和request.url变量在友好转发(9.2.3节)里使用的变量很相关,只是先前的URL(在这种情况,主页)。这是方便的因为微博显示在主页和用户的个人信息也,所以通过使用request.referer我们安排重定向会页面在两种情形发出的删除请求的。假如退回URL是nil(在一些测试里的状态),清单11.50设置root_url作为默认使用||操作符。(比较定义在清单8.50里的默认选项)。
有了以上代码,删除最近第二条微博的结果显示在图11.17里。

有了11.3.4节的代码,Micropost模型和接口完整了。所有留下来的是写个短的Micropost控制器测试来检查授权和微博集成测试绑一起。
我们通过添加一点微博用不同的用户到微博fixture,如在清单11.51里所示。(我们现在将仅使用一个,但是我们已经为了将来放在别的用户里。)
代码清单 11.51: Adding a micropost with a different owner.
# test/fixtures/microposts.yml
 .
.
.
ants:
  content: "Oh, is that what you want? Because that's how you get ants!"
  created_at: <%= 2.years.ago %>
  user: archer

zone:
  content: "Danger zone!"
  created_at: <%= 3.days.ago %>
  user: archer

tone:
  content: "I'm sorry. Your words made sense, but your sarcastic tone did not."
  created_at: <%= 10.minutes.ago %>
  user: lana

van:
  content: "Dude, this van's, like, rolling probable cause."
  created_at: <%= 4.hours.ago %>
  user: lana
我们接下来写一个简短的测试来确保用户不能删除不同用户的微博,我们也检查正确的重定向,如在清单11.52里所见。
代码清单 11.52: Testing micropost deletion with a user mismatch. 绿色
# test/controllers/microposts_controller_test.rb
 require 'test_helper'

class MicropostsControllerTest < ActionController::TestCase

  def setup
    @micropost = microposts(:orange)
  end

  test "should redirect create when not logged in" do
    assert_no_difference 'Micropost.count' do
      post :create, micropost: { content: "Lorem ipsum" }
    end
    assert_redirected_to login_url
  end

  test "should redirect destroy when not logged in" do
    assert_no_difference 'Micropost.count' do
      delete :destroy, id: @micropost
    end
    assert_redirected_to login_url
  end

  test "should redirect destroy for wrong micropost" do
    log_in_as(users(:michael))
    micropost = microposts(:ants)
    assert_no_difference 'Micropost.count' do
      delete :destroy, id: micropost
    end
    assert_redirected_to root_url
  end
end
最后,我们将写一个集成测试来登陆,检查微博分页,创建无效提交,创建有效提交,删除微博,然后访问另一个用户的页面来确保没有“delete”链接。我们通过如往常一样生产测试开始:
$ rails generate integration_test microposts_interface
      invoke  test_unit
      create    test/integration/microposts_interface_test.rb
测试显示在清单11.53里。看看是否你能连接在清单11.11里的这行到上面提到的步骤。(清单11.53使用post,被follow_redirect!跟随替换了等价的post_via_redirect在图片上传测试的相应的练习(清单11.69))
代码清单 11.53: An integration test for the micropost interface. 绿色
# test/integration/microposts_interface_test.rb
 require 'test_helper'

class MicropostsInterfaceTest < ActionDispatch::IntegrationTest

  def setup
    @user = users(:michael)
  end

  test "micropost interface" do
    log_in_as(@user)
    get root_path
    assert_select 'div.pagination'
    # Invalid submission
    assert_no_difference 'Micropost.count' do
      post microposts_path, micropost: { content: "" }
    end
    assert_select 'div#error_explanation'
    # Valid submission
    content = "This micropost really ties the room together"
    assert_difference 'Micropost.count', 1 do
      post microposts_path, micropost: { content: content }
    end
    assert_redirected_to root_url
    follow_redirect!
    assert_match content, response.body
    # Delete a post.
    assert_select 'a', text: 'delete'
    first_micropost = @user.microposts.paginate(page: 1).first
    assert_difference 'Micropost.count', -1 do
      delete micropost_path(first_micropost)
    end
    # Visit a different user.
    get user_path(users(:archer))
    assert_select 'a', text: 'delete', count: 0
  end
end
因为我们首先写工作应用程序代码,测试集应该是绿色的:
代码清单 11.54: 绿色
$ bundle exec rails test既然我们已经添加了所有微博相关的动作,在这节,我们将让像文本一样包含图片称为可能。我们将使用基本的版本对开发使用是足够好的,然后添加一系列加强让创建图片上传达到生产准备。
添加页面上传需要两个主要可见的要素:为上传图片的表单和微博页面本身。“上传图片”按钮结果的页面模型和微博图形显示在图11.18里。
为了处理图片常常和把它和Micropost关联,我们将使用CarrieerWave图片上传器。为了开始,我们需要包含carrierwave gem在Gemfile里(清单11.55里)。为了补全,清单11.55也包括了mini_magic和fog gem为图片调整大小需要的(11.4.3节)和图片在生产环境上传(11.4.4节)
代码清单 11.55: Adding CarrierWave to the Gemfile.
source 'https://rubygems.org'

gem 'rails',                   '4.2.2'
gem 'bcrypt',                  '3.1.7'
gem 'faker',                   '1.4.2'
gem 'carrierwave',             '0.10.0'
gem 'mini_magick',             '3.8.0'
gem 'fog',                     '1.23.0'
gem 'will_paginate',           '3.0.7'
gem 'bootstrap-will_paginate', '0.0.10'
.
.
.
然后我们像往常一样安装
$ bundle installCarrierWave给Rails生成器添加创建了图片上传器,我们为名为picture的图片使用创建上传器。
$ rails generate uploader Picture图片上传用CarrierWave应该和相应的Active
Record模型里的属性相关联,它简单地在字符串文本框里包含了图片路径的名称包含。结果微博增加了的数据模型显示在图11.19.

为了添加需要的picture属性到Micropost模型,我们生成数据迁移,迁移到开发数据库:
$ rails generate migration add_picture_to_microposts picture:string
$ bundle exec rake db:migrate
告诉CarrierWave和模型关联的图片是使用mount_uploader方法,它用代码属性的符号作为参数,和生成的上传器的类名:
mount_uploader :picture, PictureUploader(这里PictureUploader是在文件picture_uploader.rb的文件里定义,我们将在11.4.2节里编辑,但是现在默认生成的是可以的。)添加上传器到Micropost模型给了代码显示在清单11.56里。
代码清单 11.56: Adding an image to the Micropost model.
# app/models/micropost.rb
 class Micropost < ActiveRecord::Base
  belongs_to :user
  default_scope -> { order(created_at: :desc) }
  mount_uploader :picture, PictureUploader
  validates :user_id, presence: true
  validates :content, presence: true, length: { maximum: 140 }
end
在一些系统,你可能需要重启Rails服务器在这点来保持测试集绿色。(假如你正使用Guar如在3.7.3节描述的一样,你可能也需要重启它,甚至可能需要退出终端,然后在新终端里运行Guard)
为了在主页包含上传器如图11.18所示,我们需要包含file_filed标签在微博表单里,如在清单11.57里所示。
代码清单 11.57: Adding image upload to the micropost create form.
# app/views/sha红色/_micropost_form.html.erb
 <%= form_for(@micropost, html: { multipart: true }) do |f| %>
  <%= render 'sha红色/error_messages', object: f.object %>
  <div class="field">
    <%= f.text_area :content, placeholder: "Compose new micropost..." %>
  </div>
  <%= f.submit "Post", class: "btn btn-primary" %>
  <span class="picture">
    <%= f.file_field :picture %>
  </span>
<% end %>
注意包含
html: { multipart: ture }在参数form_for,对文件上传是必要的。 最后,我们需要添加picture到允许通过网络修改的属性的属性列表。这需要编辑micropost_params方法,如在清单11.58里所示。
代码清单 11.58: Adding picture to the list of permitted attributes.
# app/controllers/microposts_controller.rb
class MicropostsController < ApplicationController
before_action :logged_in_user, only: [:create, :destroy]
before_action :correct_user, only: :destroy
.
.
.
private
def micropost_params
params.require(:micropost).permit(:content, :picture)
end
def correct_user
@micropost = current_user.microposts.find_by(id: params[:id])
redirect_to root_url if @micropost.nil?
end
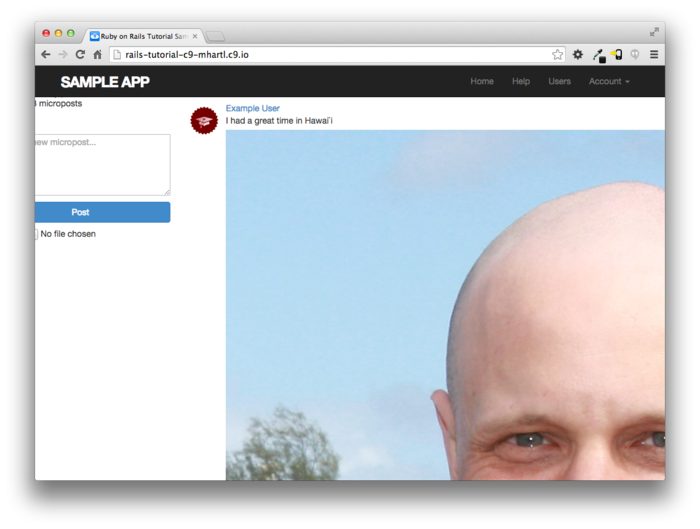
end一旦图片被上传,我们能渲染它使用image_tag辅助方法在微博视图片段,如清单11.59所示。注意picture?逻辑方法的使用,为了阻止显示图片标签当没有图片。这个方法是被CarrierWave自动创建的依据图片属性的名字。结果手动创建成功的提交如图11.20所示。为图片上传写个自动测试作为本章的练习之一(11.6节)。
代码清单 11.59: Adding image display to microposts.
# app/views/microposts/_micropost.html.erb
 <li id="micropost-<%= micropost.id %>">
  <%= link_to gravatar_for(micropost.user, size: 50), micropost.user %>
  <span class="user"><%= link_to micropost.user.name, micropost.user %></span>
  <span class="content">
    <%= micropost.content %>
    <%= image_tag micropost.picture.url if micropost.picture? %>
  </span>
  <span class="timestamp">
    Posted <%= time_ago_in_words(micropost.created_at) %> ago.
    <% if current_user?(micropost.user) %>
      <%= link_to "delete", micropost, method: :delete,
                                       data: { confirm: "You sure?" } %>
    <% end %>
  </span>
</li>
在11.4节里上传器是一个好的开端,但是它有明显的限制。具体来说,它不能在上传文件上加任何限制,假如用户尝试上传很大的无效文件,可能会引起问题。为了急救这个缺陷,我们将验证图片尺寸和格式,在服务和客户端(例如,在浏览器里)
第一个图片验证,限制上传有效的图片文件,显示在CarrierWave上传器本身。结果的代码(在生成的上传器里被注释掉)确认图片名字以有效的图片扩展结尾(PNG, GIF, JPEG的两种格式),图清单11.60所示。
代码清单 11.60: The picture format validation.
# app/uploaders/picture_uploader.rb
 class PictureUploader < CarrierWave::Uploader::Base
  storage :file

  # Override the directory where uploaded files will be sto红色.
  # This is a sensible default for uploaders that are meant to be mounted:
  def store_dir
    "uploads/#{model.class.to_s.underscore}/#{mounted_as}/#{model.id}"
  end

  # Add a white list of extensions which are allowed to be uploaded.
  def extension_white_list
    %w(jpg jpeg gif png)
  end
end
第二个验证控制图片的尺寸,显示在Micropost模型本身里。和之前的模型验证相比,文件尺寸没有相应的内建Rails验证器。作为结果,验证图片需要定义自定义验证,我们命名为picture_size和定义在清单11.61里所示。注意validate的使用(和validates相对)来调用自定义验证。
代码清单 11.61: Adding validations to images.
# app/models/micropost.rb
 class Micropost < ActiveRecord::Base
  belongs_to :user
  default_scope -> { order(created_at: :desc) }
  mount_uploader :picture, PictureUploader
  validates :user_id, presence: true
  validates :content, presence: true, length: { maximum: 140 }
  validate  :picture_size

  private

    # Validates the size of an uploaded picture.
    def picture_size
      if picture.size > 5.megabytes
        errors.add(:picture, "should be less than 5MB")
      end
    end
end
这个自定义有效性验证为调用相应的所给的符号(:picure_size)。在picture_size里,我们添加自定义错误消息到errors集合(在6.2.2节里见过),在这个例子限制5MB(使用在旁注8.2里见过的语法)。
为了和在清单11.60和清单11.61里的验证一道,我们将在上传图片添加两个客户端的检查。我们将首先使用accept参数在file_field输入标签里镜像格式验证:
<%= f.file_field :picture, accept: 'image/jpep,image/gif,image/png' %>有效的格式包含MIME类型被在清单11.60里验证需要的。
接下来,我们将包含一点Javascript(或者,更加详细的,jQuery))发出警告假如用户尝试上传太大的文件(它会阻止上传的时间消耗,和减轻服务器的压力):
$('#micropost_picture').bind('change', function() {
  var size_in_megabytes = this.files[0].size/1024/1024;
  if (size_in_megabytes > 5) {
    alert('Maximum file size is 5MB. Please choose a smaller file.');
  }
});
尽管jQuery不是本书的焦点,你可能可以指出上面监视包含CSS id micropost_picture的页面元素(如被哈希标志#表明的),它是在清单11.57里微博表达的id。(查看这个的方法是用Ctrl-点击,使用你的浏览器的网页查看器。)当有了CSS id变化的要素,jQuery函数发力,然后发出alert方法,假如文件太大。
添加这些额外的检查的结果显示在清单11.62里。
代码清单 11.62: Checking the file size with jQuery.
# app/views/sha红色/_micropost_form.html.erb
 <%= form_for(@micropost, html: { multipart: true }) do |f| %>
  <%= render 'sha红色/error_messages', object: f.object %>
  <div class="field">
    <%= f.text_area :content, placeholder: "Compose new micropost..." %>
  </div>
  <%= f.submit "Post", class: "btn btn-primary" %>
  <span class="picture">
    <%= f.file_field :picture, accept: 'image/jpeg,image/gif,image/png' %>
  </span>
<% end %>

<script type="text/javascript">
  $('#micropost_picture').bind('change', function() {
    var size_in_megabytes = this.files[0].size/1024/1024;
    if (size_in_megabytes > 5) {
      alert('Maximum file size is 5MB. Please choose a smaller file.');
    }
  });
</script>
理解想清单11.62里显示的代码是重要的,它实际上不能阻止用户尝试太大的文件。即使我们的代码阻止它们通过网络提交,它们总能编辑Javascript用网页查看器或者直接发出POST请求,使用,如curl。为了阻止用户上传大的二进制文件。包含一个服务端的验证是必要的,如在清单11.61里。
在11.4.2节里的图片尺寸验证是好的开端,但是他们仍然允许上传足够大得图片破坏我们网站的布局,有时有令人恐怖的结果(图11.21)。因此,允许用户选择相当大的图片在他们的本地硬盘是很方便的,在显示前修改图片文件的大小是好的想法。
我们将使用ImageMagick程序来修改图片的大小,我们需要在开发环境安装。(在11.4.4节我们所见,当使用Heroku为部署ImageMagic在生产环境已经预安装了)在云IDE,我们可以如下:
$ sudo apt-get update
$ sudo apt-get install imagemagick --fix-missing接下来,我们需要为ImageMagick包含CarrierWave的借款,和修改大小命令一起。为了修改命令的大小,在MiniMagick文档里例举了几个可能性,但是我们想要的之一是resize_to_limit: [400, 400],它会修改大文件一并它们小于400px400px,同时只留下更小的文件。在CarrierWave文档关于MiniMagick撑大图片,假如他们是太小了,这不是我们想要的)有了在清单11.63里所见,大文件被好看的修改了大小(图11.22)。
代码清单 11.63: Configuring the image uploader for image resizing.
# app/uploaders/picture_uploader.rb
 class PictureUploader < CarrierWave::Uploader::Base
  include CarrierWave::MiniMagick
  process resize_to_limit: [400, 400]

  storage :file

  # Override the directory where uploaded files will be sto红色.
  # This is a sensible default for uploaders that are meant to be mounted:
  def store_dir
    "uploads/#{model.class.to_s.underscore}/#{mounted_as}/#{model.id}"
  end

  # Add a white list of extensions which are allowed to be uploaded.
  def extension_white_list
    %w(jpg jpeg gif png)
  end
end
在11.4.3节开发的图片上传器对于开发环境来说足够好的,但是(如在storage :file行在清单11.63里所见)它使用本地的文件系统为了储存图片,在生产环境不是好的时间。想法,我们将使用云储存服务器来为我们的应用程序单独保存图片。
为了配置我们的应用程序使用云存储在生产环境里,我们需要使用fog gem,如在清单11.64里所示。
代码清单 11.64: Configuring the image uploader for production.
# app/uploaders/picture_uploader.rb
 class PictureUploader < CarrierWave::Uploader::Base
  include CarrierWave::MiniMagick
  process resize_to_limit: [400, 400]

  if Rails.env.production?
    storage :fog
  else
    storage :file
  end

  # Override the directory where uploaded files will be sto红色.
  # This is a sensible default for uploaders that are meant to be mounted:
  def store_dir
    "uploads/#{model.class.to_s.underscore}/#{mounted_as}/#{model.id}"
  end

  # Add a white list of extensions which are allowed to be uploaded.
  def extension_white_list
    %w(jpg jpeg gif png)
  end
end
清单11.64使用了production?逻辑值从旁注7.1来依据环境切换存储方法:
if Rails.env.production?
  storage :fog
else
  storage :file
end为了云存储有许多选择,但是我们使用最流行的之一,和很好支持的,Amazon.com的Simple Storage Service(S3)。这里是安装必要的步骤:
- 注册Amazon Web服务账户
- 通过AWS识别和许可管理和记录access key和secret key。
- 创建S3bucket(你选择的名字)使用[AWS控制台]https://console.aws.amazon.com/s3(),然后使用上一步创建的授权和许可。
为了在这些步骤进一步的信息,查看S3文档(假如必要,Google或者Stack Overflow)。
一旦你创建和配置你的S3账户,你应该创建和填充CarrierWave配置文件图在清单11.64里所示。
代码清单 11.65: Configuring CarrierWave to use S3.
# config/initializers/carrier_wave.rb
 if Rails.env.production?
  CarrierWave.configure do |config|
    config.fog_c红色entials = {
      # Configuration for Amazon S3
      :provider              => 'AWS',
      :aws_access_key_id     => ENV['S3_ACCESS_KEY'],
      :aws_secret_access_key => ENV['S3_SECRET_KEY']
    }
    config.fog_directory     =  ENV['S3_BUCKET']
  end
end
和生产环境email配置一样(清单10.56),清单11.65使用Heroku ENV变量俩避免硬编码敏感信息。在10.3节,这些变量被通过SendGrid插件自动自动定义,但是在这节,我们需要显示地按定义它们,我们可以使用heroku config:set来完成,如下:
$ heroku config:set S3_ACCESS_KEY=<access key>
$ heroku config:set S3_SECRET_KEY=<secret key>
$ heroku config:set S3_BUCKET=<bucket name>
有了上面的配置,我们准备提交我们的变化,然后部署。我推荐更新.gitignore文件如在清单11.66所示,一般上传的图片直接被忽略。
代码清单 11.66: Adding the uploads directory to the .gitignore file.
# See https://help.github.com/articles/ignoring-files for more about ignoring
# files.
#
# If you find yourself ignoring temporary files generated by your text editor
# or operating system, you probably want to add a global ignore instead:
#   git config --global core.excludesfile '~/.gitignore_global'

# Ignore bundler config.
/.bundle

# Ignore the default SQLite database.
/db/*.sqlite3
/db/*.sqlite3-journal

# Ignore all logfiles and tempfiles.
/log/*.log
/tmp

# Ignore Spring files.
/spring/*.pid

# Ignore uploaded test images.
/public/uploads
现在我们准备在我们的主题分支来提交变化然后合并回主分支:
$ bundle exec rails test
$ git add -A
$ git commit -m "Add user microposts"
$ git checkout master
$ git merge user-microposts
$ git push
然后部署,重置数据库,然后重新繁殖示例数据:
$ git push heroku
$ heroku pg:reset DATABASE
$ heroku run rake db:migrate
$ heroku run rake db:seed
因为Heroku已经安装了ImageMagick,结果是成功地修改图片大小,上传在生产里,如在图11.23里所见。

有了额外的Microposts资源,我们接近完成我们的实例应用程序了。所有需要保留的是的通过让用户相互关注来天津社交层。我们将学习怎样模型化这样的用户关系,看看微博feed的实现在第十二章。
假如你跳过11.4.4节,确保提交和合并了你的变化:
$ bundle exec rails test
$ git add -A
$ git commit -m "Add user microposts"
$ git checkout master
$ git merge user-microposts
$ git push
然后部署到生产环境:
$ git push heroku
$ heroku pg:reset DATABASE
$ heroku run rake db:migrate
$ heroku run rake db:seed
值得一提的是这章看见最后必要的gem安装。为了参考,最后的Gemfile如清单11.67所示。
代码清单 11.67: The final Gemfile for the sample application.
source 'https://rubygems.org'

gem 'rails',                   '4.2.2'
gem 'bcrypt',                  '3.1.7'
gem 'faker',                   '1.4.2'
gem 'carrierwave',             '0.10.0'
gem 'mini_magick',             '3.8.0'
gem 'fog',                     '1.23.0'
gem 'will_paginate',           '3.0.7'
gem 'bootstrap-will_paginate', '0.0.10'
gem 'bootstrap-sass',          '3.2.0.0'
gem 'sass-rails',              '5.0.2'
gem 'uglifier',                '2.5.3'
gem 'coffee-rails',            '4.1.0'
gem 'jquery-rails',            '4.0.3'
gem 'turbolinks',              '2.3.0'
gem 'jbuilder',                '2.2.3'
gem 'sdoc',                    '0.4.0', group: :doc

group :development, :test do
  gem 'sqlite3',     '1.3.9'
  gem 'byebug',      '3.4.0'
  gem 'web-console', '2.0.0.beta3'
  gem 'spring',      '1.1.3'
end

group :test do
  gem 'minitest-reporters', '1.0.5'
  gem 'mini_backtrace',     '0.1.3'
  gem 'guard-minitest',     '2.3.1'
end

group :production do
  gem 'pg',             '0.17.1'
  gem 'rails_12factor', '0.0.2'
  gem 'puma',           '2.11.1'
end- Microposts,像Users,被以Active Record模型为后盾的资源。
- Rails支持多键索引
- 我们能在User和Micropost模型里各自使用has_many和belongs_to来模型化拥有很多微博的用户
- has_many/belongs_to组合给了通过工作关联产生的方法
- 代码user.microposts.build(...)返回新的自动和所给用户关联的Micropost对象
- Rails支持默认顺序通过default_scope
- Scope以匿名函数作为参数
- dependeng: :destroy选项引起对象被删除在同时和相关的对象
- 分页和对象数两个都通过关联实现,导致自动生效的代码
- Fixture支持关联的创建
- 给Rails视图片段传递变量是可能的
- where方法能用了实现Active Record选项
- 我们能通过总是黄金和销毁依赖的对象通过他们的关联来强制安全选项
- 我们可以使用CarrierWave来上传和修改图片的大小。
- 使用分隔的视图片段重构主页,用if-else语句。
- 为边栏的微博数量添加测试(包含正确的复数),清单11.68将帮助我们开始
遵循清单11.69里的模板,在11.4节为图片上传写个测试。如准备,你应该添加图片到fixture目录(使用,例如,cp
test/fixtures/)。为了避免令人困惑的错误,你也将需要配置CarrierWave来在测试里跳过修改图片大小,如在清单11.70里创建的初始化文件。在清单11.69里另外的断言在主页检查文件上传框的和在有效提交后有效图片的属性。注意特殊的fixture_file_upload方法为了在测视力上传文件作为fixtures的使用。提示:为了检查picture属性的有效性,使用assigns方法在10.1.4节提到的,在有效提交后在create动作里读取微博。
代码清单 11.68: A template for the sidebar micropost count test.
# test/integration/microposts_interface_test.rb
 require 'test_helper'

class MicropostInterfaceTest < ActionDispatch::IntegrationTest

  def setup
    @user = users(:michael)
  end
  .
  .
  .
  test "micropost sidebar count" do
    log_in_as(@user)
    get root_path
    assert_match "#{FILL_IN} microposts", response.body
    # User with zero microposts
    other_user = users(:mallory)
    log_in_as(other_user)
    get root_path
    assert_match "0 microposts", response.body
    other_user.microposts.create!(content: "A micropost")
    get root_path
    assert_match FILL_IN, response.body
  end
end
代码清单 11.69: A template for testing image upload.
# test/integration/microposts_interface_test.rb
require 'test_helper'
class MicropostInterfaceTest < ActionDispatch::IntegrationTest
def setup
@user = users(:michael)
end
test "micropost interface" do
log_in_as(@user)
get root_path
assert_select 'div.pagination'
assert_select 'input[type=FILL_IN]'
# Invalid submission
post microposts_path, micropost: { content: "" }
assert_select 'div#error_explanation'
# Valid submission
content = "This micropost really ties the room together"
picture = fixture_file_upload('test/fixtures/rails.png', 'image/png')
assert_difference 'Micropost.count', 1 do
post microposts_path, micropost: { content: content, picture: FILL_IN }
end
assert FILL_IN.picture?
follow_redirect!
assert_match content, response.body
# Delete a post.
assert_select 'a', 'delete'
first_micropost = @user.microposts.paginate(page: 1).first
assert_difference 'Micropost.count', -1 do
delete micropost_path(first_micropost)
end
# Visit a different user.
get user_path(users(:archer))
assert_select 'a', { text: 'delete', count: 0 }
end
.
.
.
end代码清单 11.70: An initializer to skip image resizing in tests.
# config/initializers/skip_image_resizing.rb
if Rails.env.test?
CarrierWave.configure do |config|
config.enable_processing = false
end
end