One very common scenario for API Gateways (Azure APIM or other) is to have a user application (ex. Mobile App) authenticate the user and then make a call to the gateway which will in turn broker calls to the backend services. This allows you to leverage all of the benefits of your API Gateway (ex. Request Limits, Monitoring, Versioning, etc) for those backend services. While fundamentally the setup is pretty straight forward, it becomes a bit more complex if you want the backend services to authorize the user that is sitting on the other side of the gateway.
Fortunately, OAuth provides the 'on-behalf-of' (OBO) flow to enable exactly this situation. The flow looks like the following:

Flow steps:
Note: The flow above is based on Azure AD as the identity provider. In Azure AD every actor in this flow has their own identity. Users are represented as Azure AD Users, and the applications, including the API Gateway, each get an Azure AD Application Registration.
-
User opens the mobile application and the application starts the OAuth code grant flow. This flow involve two calls. First is a request to get an authorization code. The authorization code is where the actual user sign in takes place, depending on the platform the user will be popped out to a browser allowing them to sign in. The authorization code will be returned to the redirect URI specified in the call. This code is then used to call the token endpoint to get an access token (JWT) for the target application/scope.
Note: For native apps (i.e. Windows, iOS, etc) it's recommended you use PKCE (Proof Key for Code Exchange) in your authorization code/access token flow. This will help ensure that if a malicious actor intercepts your authorization code, they cannot use that to impersonate the user and request an access token to the target system. Details of how PKCE works are outside the scope of this doc, but Vittorio Bertocci from Auth0 has a great video explaining PKCE.
-
Mobile app takes the access token and uses it as the Bearer token for the call to the API Gateway.
-
The API Gateway validates the JWT and confirms that the audience claim (aud) is correct.
-
This is where it gets interesting. The API Gateway wants to make a call to the backend on behalf of the calling user, but it doesn't have a valid JWT (i.e. a JWT with the correct claims) for the backend service. To get one the API Gateway calls the identity provider to request a token to the backend service providing its' credentials along with an assertion containing the access token passed from the caller. The identity provider can then validate the caller has access and return a new access token (JWT) with the end users claims for the backend service.
-
Now the API Gateway has a valid access token for the calling user for the backend service. It places that token in the Authorization header and executes the backend service call.
-
Finally, the backend serivce will validate the access token and use the scope and role claims to authorize the end user request.
So how do you actually set up a flow like this? For this walkthrough I'll be using Azure AD as the identify provider, Azure API Management as both the API Gateway and the backend service, and the Azure APIM developer portal and Postman as the client.
The first thing you'll need is a valid Azure AD tenant. I'd recommend you create your own tenant where you can act as an administrator while you work through this, to avoid harassing your AAD Admin if you run into issues.
As noted above, every actor in this flow has it's own identity, so let's create those.
-
In the Azure AD portal navigate to 'App Registrations'.
-
Click '+ New Registration'
-
Provide a name (ex. obo-backend-service), leave the rest as defaults and click 'Register'
-
From the 'Overview' page, make note of the App ID, as you'll need this later.
-
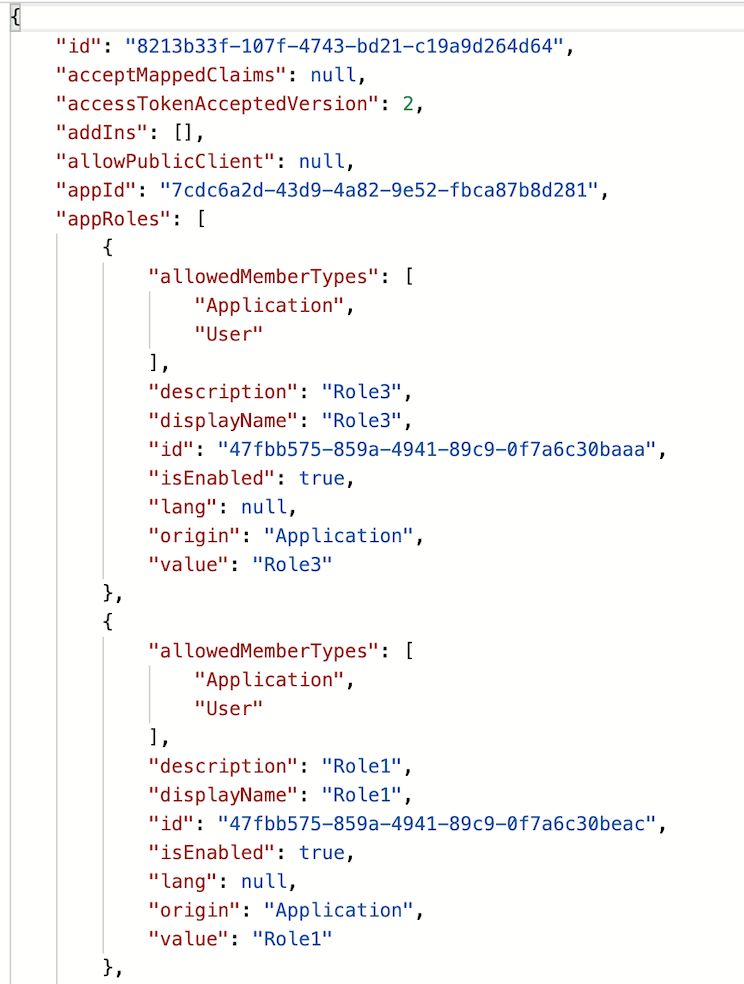
Once you're in your app registration, click on the 'Manifest' section. This is where we'll set OAuth version and optionally add user roles.
-
Set the accessTokenAcceptedVersion to 2
-
Add any custom roles you want for the application. More info on custom roles here.
-
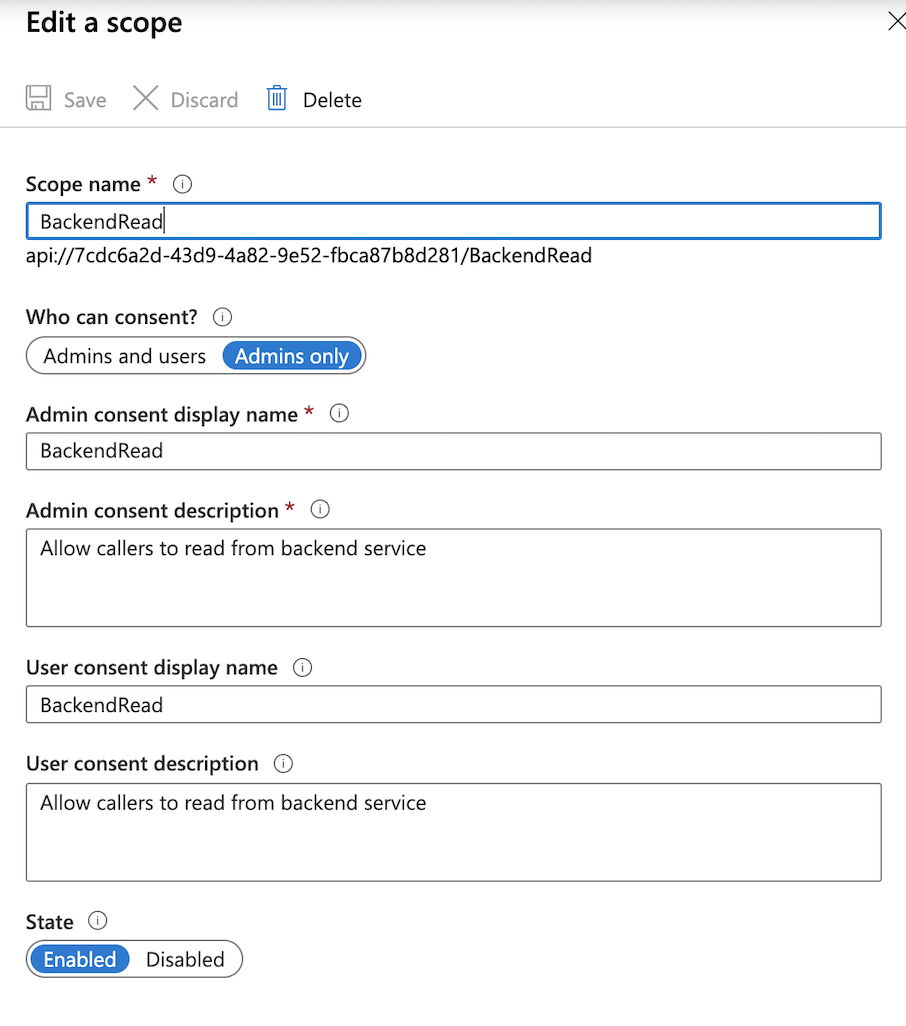
Go to the 'Expose API' section in the app registration, click '+ Add Scope' and create a scope for your backend application. For the consent, if you're the admin you can leave it to admin, but if not you should set 'Users and Admins'.
-
Make note of the fully qualified scope, as you'll need this later.


Follow the same process as above to create an app registration for the API Gateway with two additional steps shown below:
-
Create the registration with an identifieable name (ex. obo-gateway) and make note of the App ID from the 'Overview' page
-
Edit the manifest to set the accessTokenAcceptedVersion and add any custom roles (See above).
-
Go to 'Expose an API', add a scope and make note of the fully qualified scope.
-
Additional Step: Click on 'Certificates & Secrets' and then click on '+ New Secret', provide a secret name and lifetime and click 'Add'. Make note of the secret value for later use.
-
Additional Step: Click on 'API Permission'. From there click on '+ Add Permission', select 'My APIs' and find your backend app. Select the scope you created for the backend app and then click 'Add Permissions'. Optionally, if you're the AAD admin you can click the 'Grant admin consent for 'tenant name' so you dont have to go through the user consent flow.
The client app registration is a bit more simple. You dont need to create any scopes or add custom roles.
-
Create the registration with an identifiable name (ex. client-app) and make note of the App ID from the 'Overview' page.
-
Click on 'Certificates & Secrets' and then click on '+ New Secret', provide a secret name and lifetime and click 'Add'. Make note of the secret value for later use.
-
Additional Step: Click on 'API Permission'. From there click on '+ Add Permission', select 'My APIs' and find your gateway. Select the scope you created for the gateway app and then click 'Add Permissions'. Optionally, if you're the AAD admin you can click the 'Grant admin consent for 'tenant name' so you dont have to go through the user consent flow.
You'll need the Azure AD endpoints for authorization codes and access tokens.
-
Navigate to the 'App registrations' section of Azure AD
-
Click on 'Endpoints' in the top of the window
-
Copy the values for 'OAuth 2.0 authorization endpoint (v2)' and 'OAuth 2.0 token endpoint (v2)' and put them with the App ID's and secrets you noted above.
You can use Postman, among other tools to test out the on-behalf-of flow. I'm going to go the lazy route and use Postman's 'Authorization' feature to get the token and then I'll just copy and paste, but you may choose to do something a bit cleaner.
-
In Postman, create a new request.
-
Click on the 'Authorization' tab
-
Select 'OAuth 2.0' as the 'Type
-
Click 'Get New Access Token' and fill in all of the details using the values you've saved off.
Field Value Token Name Anything you want Grant Type Authorization Code (with or without PKCE) Callback URL Set by Postman Authorize using browser Checked Auth URL Authorization Endpoint from above Access Token URL Token Endpoint from above Code Challenge Method PKCE Only - Defaulted to H256 Code Verifier PKCE Only - Leave Blank Client ID Client App Application ID Client Secret Client App Secret Scope Scope FQDN from Gateway App Registration State Any value (ex. 12345) Client Authentication Send as Basic Auth Header 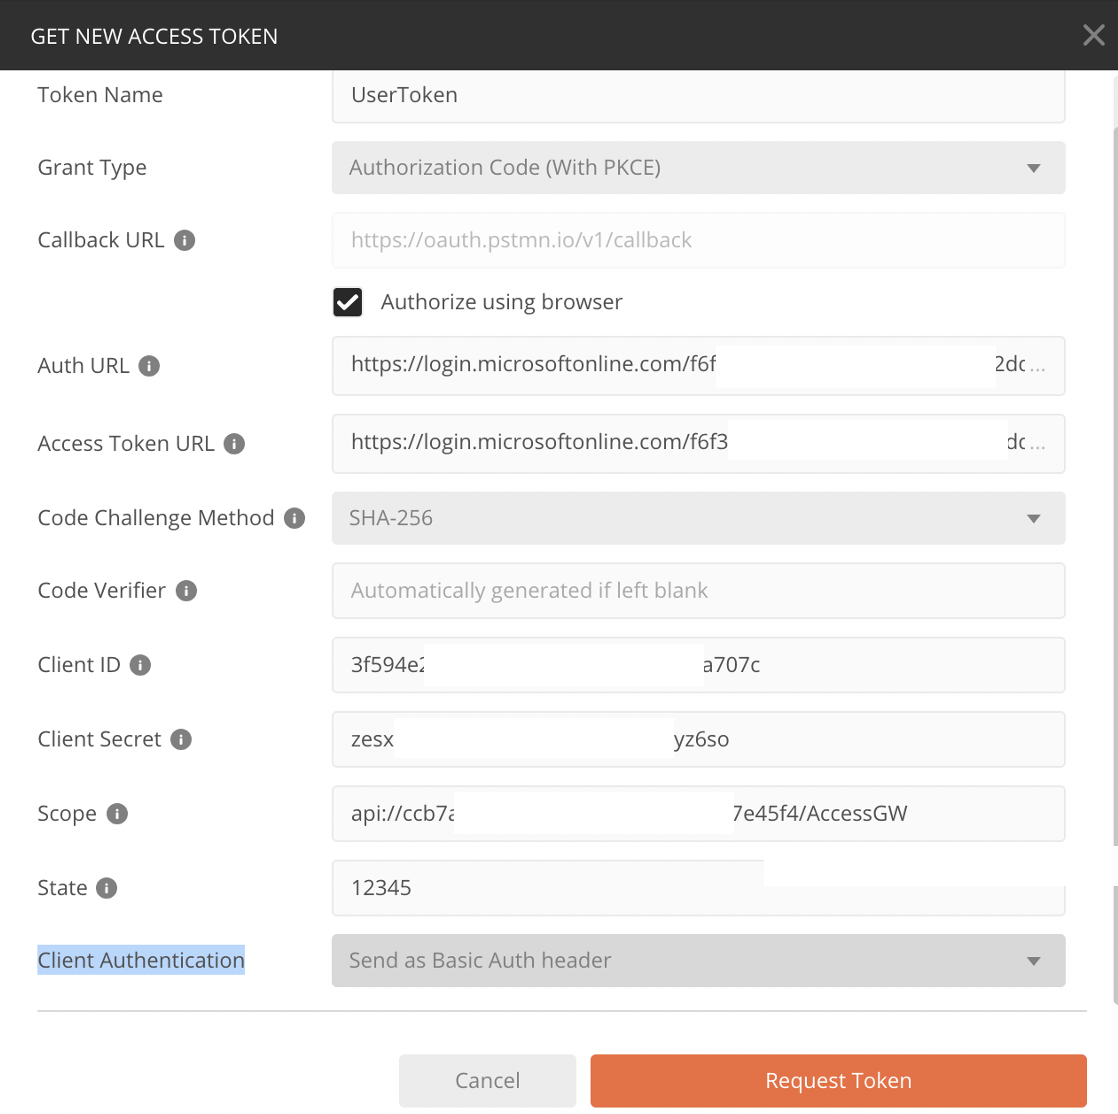
-
Click "Request Token". This will trigger a browser pop-up for you to authenticate to Azure AD and possibly grant the relevant scopes.
-
Copy the Bearer token returned to be used for the next call.
-
Create a new Postman request.
-
Set the request type to 'POST'
-
Paste the token URL from above as the request URL
-
Click on the 'Body' tab and set the type to x-form-www-urlencode
-
Add the following keys and values
Field Value grant_type urn:ietf:params:oauth:grant-type:jwt-bearer client_id Gateway App Registration App ID client_secret Gateway App Registration Secret assertion User Access Token retrieved above (Note: If expired you may need to request again) scope Fully qualified scope for the backend service requested_token_use on_behalf_of -
Click 'Send Request'


At this point you should have the User Access Token, as well as the token returned from the 'on-behalf-of' call flow. You can compare the two by pasting each of them into the JWT decoder at jwt.io.
User Token for Gateway
{
  "aud": "ccb7af20-8888-8888-6a46c77e45f4",
  "iss": "https://login.microsoftonline.com/f6f36f45-a55b-4784-888882dd2f1f8/v2.0",
  "iat": 1590081666,
  "nbf": 1590081666,
  "exp": 1590085566,
  "aio": "AYQAe/8PAAAAYomr/sysmkqNsoICn94CLSaMZ4X8FrrVG3YOicsiDqnTSJ9cQwS2EbfEQOro=",
  "azp": "3f594e2c-e33a-44d0-ba34-d1d64a7a707c",
  "azpacr": "1",
  "idp": "https://sts.windows.net/72f988bf-8888-8888-8888-2d7cd011db47/",
  "name": "[email protected] Griffith",
  "oid": "20cc56e3-6717-8888-8888-22222228b33",
  "preferred_username": "[email protected]",
  "roles": [
    "GatewayRole1"
  ],
  "scp": "AccessGW read",
  "sub": "dq1wl7llaHgzo-L-62h88888888888888sJjQg",
  "tid": "f6f36f45-a55b-4784-a4de-488888881f8",
  "uti": "A4_588888888888_4yAQ",
  "ver": "2.0"
}
User Token for Backend (on-behalf-of)
{
  "aud": "7cdc6a2d-8888-8888-8888-fbca87b8d281",
  "iss": "https://login.microsoftonline.com/f6f36f45-8888-8888-8888-47ce2dd2f1f8/v2.0",
  "iat": 1590081681,
  "nbf": 1590081681,
  "exp": 1590085565,
  "aio": "AYQAe/8PAAAA2WSOsh5IaxeMbEkhInMLfOPmzHab0wFcC+lioRBbnzO/hJfhHc4dZbUcDqd95qBBTUjQyzX/l73xZpXQMmhuB2M8DDaj3+3Dl9Yfs=",
  "azp": "ccb7af20-8888-8888-8888-6a46c77e45f4",
  "azpacr": "1",
  "idp": "https://sts.windows.net/72f988bf-8888-8888-8888-2d7cd011db47/",
  "name": "[email protected] Griffith",
  "oid": "20cc56e3-8888-8888-8888-05d402398b33",
  "preferred_username": "[email protected]",
  "roles": [
    "Role1"
  ],
  "scp": "BackendRead",
  "sub": "3NMEysNEzoA4JI4K8U67-588888888885o8Ans",
  "tid": "f6f36f45-8888-8888-8888-47ce2dd2f1f8",
  "uti": "lFwFUAB3pU8888888ykbAQ",
  "ver": "2.0"
}The first step in setting up Azure API Management to work with OAuth 2.0 is to follow the setup guide in the Azure docs to add the OAuth config and verify the claim from the initial user request. This guide will run you through the following setps. Note that some of these steps you already completed above.
-
Register an application in Azure AD to represent the API
This step was already completed above when you created the App Registration for the Gateway.
-
Register another application in Azure AD to represent a client application
This step was also already completed when you created the Client App Registration.
-
Grant permissions in Azure AD
This step was already completed when you granted the Client App Registration permissions to the Gateway App Registration scope.
-
Enable OAuth 2.0 user authorization in the Developer Console
-
Successfully call the API from the developer portal
-
Configure a JWT validation policy to pre-authorize requests
At this point you should be able to use Postman to generate a User Access token, and use that token to make a request to API Management, which will validate the token and check it for the correct 'aud' claim.
Example Curl
The following curl command hits the Azure API Management 'Echo' sample API, which I've enabled with the OAuth 2.0 and set the validate-jwt policy on.
curl --location --request GET 'https://griffithapim.azure-api.net/echo/resource?param1=sample' \
--header 'Ocp-Apim-Subscription-Key: 65be1ad888888888888882658c757' \
--header 'Authorization: Bearer eyJ0eXAiOiJKV1QiLCJhbGc<TOKEN>ax4dh3yWEXxSpSPvM_hJtOg'
At this point we have an Azure API Management instance up and running that requires an OAuth 2.0 JWT to access the sample 'Echo' api. For this call the only token involved is the User Access token with the scope for the Gateway. What if we wanted to replace that token as the request was inbound with an on-behalf-of token so that the backend service see's the on-behalf of token?
To do this we'll need to add a few more things to our inboud policy, where we currently have the validate-jwt rule. We'll need to:
-
Scrape the inbound JWT token and store it in a variable
-
Execute an HTTP POST to the Azure AD token endpoint passing in the User Token as the 'assertion' value, like we did in the Postman call above
-
Scrape the response of that call and use that to replace the JWT Token for the outbound call.
We can grab the inbound JWT by reading the value of the 'Authorization' inbound request header and pulling out the characters after the first 7 chars, which is just 'Bearer '.
<!--Grab the bearer token value and store in a variable for later use-->
<set-variable name="UserToken" value="@(((String)context.Request.Headers["Authorization"][0]).Substring(7))" />Azure API Management policies support making an HTTP Request, so let's use that. Note that there are several parameters in this call. I'm using Azure API Management 'Named Values' to store those for clarity and security. You can read more about Named Values here. Also notice that I'm grabbing the 'assertion' value from the 'UserToken' variable we created above.
<!--Call AAD to get the on-behalf-of token using the user token from above as the assertion -->
<send-request ignore-error="true" timeout="20" response-variable-name="onBehalfOfToken" mode="new">
    <set-url>{{authorizationServer}}</set-url>
    <set-method>POST</set-method>
    <set-header name="Content-Type" exists-action="override">
        <value>application/x-www-form-urlencoded</value>
    </set-header>
    <set-body>@{
        return "grant_type=urn:ietf:params:oauth:grant-type:jwt-bearer&client_id={{clientId}}&client_secret={{clientSecret}}&assertion=" + (string)context.Variables["UserToken"] + "&scope={{scope}}&requested_token_use=on_behalf_of";
    }</set-body>
</send-request>Finally, we just need to take the new on-behalf-of token and use that to replace the Authorization token for the outgoing request. Note that this value is coming in from the http request above, so we'll need to do a bit of casting to get the value out.
<!--Replace the Authorization header with the new on-behalf-of token-->
<set-header name="Authorization" exists-action="override">
    <value>@("Bearer " + (String)((IResponse)context.Variables["onBehalfOfToken"]).Body.As<JObject>()["access_token"])</value>
</set-header>
Here's what the full policy looks like:
<policies>
    <inbound>
        <base />
        <!--Validate User Token - Checking for Gateway App ID in the aud claim-->
        <validate-jwt header-name="Authorization" failed-validation-httpcode="401" failed-validation-error-message="Unauthorized. Access token is missing or invalid.">
            <openid-config url="https://login.microsoftonline.com/common/v2.0/.well-known/openid-configuration" />
            <required-claims>
                <claim name="aud">
                    <value>{{clientId}}</value>
                </claim>
            </required-claims>
        </validate-jwt>
        <!--Grab the bearer token value and store in a variable for later use-->
        <set-variable name="UserToken" value="@(((String)context.Request.Headers["Authorization"][0]).Substring(7))" />
        <!--Call AAD to get the on-behalf-of token using the user token from above as the assertion -->
        <send-request ignore-error="true" timeout="20" response-variable-name="onBehalfOfToken" mode="new">
            <set-url>{{authorizationServer}}</set-url>
            <set-method>POST</set-method>
            <set-header name="Content-Type" exists-action="override">
                <value>application/x-www-form-urlencoded</value>
            </set-header>
            <set-body>@{
              return "grant_type=urn:ietf:params:oauth:grant-type:jwt-bearer&client_id={{clientId}}&client_secret={{clientSecret}}&assertion=" + (string)context.Variables["UserToken"] + "&scope={{scope}}&requested_token_use=on_behalf_of";
          }</set-body>
        </send-request>
        <set-header name="Authorization" exists-action="override">
            <value>@("Bearer " + (String)((IResponse)context.Variables["onBehalfOfToken"]).Body.As<JObject>()["access_token"])</value>
        </set-header>
    </inbound>
    <backend>
        <base />
    </backend>
    <outbound>
        <base />
    </outbound>
    <on-error>
        <base />
    </on-error>
</policies>
Now you're ready to test. For my testing I used the legacy API Management developer portal (personal preference), but you can use any tool you prefer (i.e. Postman, curl, etc). The key is that you first need to get a valid User Access Token, like we did above using Postman, and pass that in as the 'Authorization' header (i.e. Bearer [token]). Also, dont forget to set your subscription key for API Management in the Ocp-Apim-Subscription-Key header.
You should see the the 'Authorization' header passed to the backend is the on-behalf-of backend token, again you can validate by pasting the token into the JWT decoder at jwt.io
Note: If you're not using the API Management developer portal, dont forget that you can use the Ocp-Apim-Trace header, set to true, to see the full trace of your policy execution. This is CRITICAL to your ability to debug.


Hopefully this helps you set up your own on-behalf-of flows withing Azure API Mangaement with Azure AD. There are some additions that could be made here to improve the above. Most noteably would be caching of the token and a token refresh flow to minimize the calls to Azure AD and to improve performance. I'll add those at a later time. Feel free to hit me up with questions.