Findy agency is a high-performing, multi-tenant identity agency for Aries protocols. It offers a way to allocate Cloud Agents and control them thru gRPC interfaces. You can think it like a database service, or SMTP service, but it's a SSI service. With help of it you can run your DID agents where ever you have installed the Findy Agency. Preferred installation place for it is a host with static internet presence.
The root of trust for each CAs is in FIDO2 authenticators. WebAuth server on-boards new agents and JWT is used for the authorization.
You can use Findy Agency roughly for these purposes:
-
As a multi-tenant service for allocating multiple Cloud Agents which implement Aries agent-to-agent protocols and offer SSI interoperability.
-
As a CLI tool to setup an agency and maintain it. You can create steward DID and wallet; or you can import steward from existing wallet. For command line use it offers all the same features as
indy cli. -
As a high-performing SDK to implement all types SSI Agents like holders, issuers and verifiers with any programming language you chose which is supported by gRPC.
The Findy Agency is very fast and it is extremely resource efficient; and of course it's Aries compatible.
Easiest way to run Findy Agency is from docker container. You can communicate with your agency by gRPC and it offers a CLI tool as well.
To setup running Findy Agency and all of its fellow services like Findy WebAuthn and Findy Vault can be done just entering one command after downloading the proper docker compose file and setting up few folders for docker volumes. Please enter these commands in the dedicated directory of your selection to run the whole stack:
curl -s -o "./docker-compose.yaml" \
 https://raw.githubusercontent.com/findy-network/findy-agent-cli/master/scripts/fullstack/docker-compose.yml
mkdir -p .data/agent .data/auth .data/vault
docker compose up
Please follow the
documentation
and samples from
findy-agent-cli which is
the source for the previous compose file. The CLI repo includes detailed
examples how to allocate new agents and their wallets, make connection between
agents and execute Aries protocols for them.
Ubuntu 20.04 is preferred development environment but macOS is also an option. Please make sure that Go and git are both installed and working properly.
Note! Go modules must be on.
We recommend that you first install findy-wrapper-go and follow its guides to
setup environment and especially install libindy.
-
Install libindy-dev.
-
Clone findy-agent (this repo)
-
Install needed Go packages:
make deps. -
Install the command line application:
make install -
Verify the installation:
findy-agent -versionIt should output similar to:
findy-agent version 0.xx.xx
macOS (from findy-wrapper-go)
Because indy SDK won't offer proper distribution for OSX, we have written a
helper Bash script to perform installation. Follow these steps in
findy-wrapper-go repo:
- Install Homebrew if it isn't already on your machine.
- Clone the repo:
git clone https://github.com/findy-network/findy-wrapper-go - Go to directory
findy-wrapper-go/scripts/mac-libindy:$ cd scripts/mac-libindy - Execute the installation script.
Or, if you want to change the default installation location, enter it as a first argument for the script.
$ ./install.sh$ ./install.sh /my/own/location - Follow the instructions of the
install.shi.e. source the env.sh which is generated to installation directory and is in your clipboard after successful installation.$ source /usr/local/opt/libindy/env.sh - Run the tests to see everything is OK with Go wrapper and
libindy:make test - Then follow instructions from previous section Linux and Ubuntu from step
2 to complete
findy-agentrepo's setup.
The problem solving tip: source env.sh in your dev session.
As said earlier the most convenient way to run Findy Agency is from docker
container. Still, it's at least as easy to run from standalone binary if you
have proper environment for it to run i.e. libindy installed.
The following chapters describe how to start an agency with different type of ledgers. Before running the agency you must create steward DID and wallet for your test network.
To create new steward DID and wallet run the following commands:
$ cd scripts/test
$ findy-agent ledger steward create --config create-steward-to-mem-ledger.yaml
The create-steward-to-mem-ledger.yaml includes following data.
pool-name: "FINDY_MEM_LEDGER"
seed: "000000000000000000000000Steward1"
wallet-name: "sovrin_steward_wallet"
wallet-key: "4Vwsj6Qcczmhk2Ak7H5GGvFE1cQCdRtWfW4jchahNUoE"
You can edit it for your purpose. Please note to use same wallet-key in it and
the start script like mem-server script in the same directory.
Memory ledger is available as long as the agency is running but after that data is lost. It's very good for tests and short demos.
cd scripts/test./mem-server
File ledger is a test ledger where ledger data is persistently stored into a JSON file. It's convenient for cases where you don't want to run all ledger nodes on your machine like development.
cd scripts/test./file-server
-
Create a ledger pool with the name
vonfindy-agent ledger pool create --name="von" --genesis-txn-file="genesis.file" -
Go to
scripts/testdirectory:cd scripts/test -
Run the agency tests:
./von-network-server -
Connect to agency with your client or test it with the agency's ping command. Please see the helper scripts in the
scriptsdirectory.
All of that can be done with the make scratch as well if the predefined ledger
and steward wallet names are OK. The previous steps were for educational
purposes. If you want to start the agency fast e.g., on OSX, the Makefile
approach is preferable. Please see the scrips in the tools directory.
Findy-agent serves all types of cloud agents (CA) like holder, issuer and
verifier. Cloud agents must be allocated before they can be used. CA
allocation is called on-boarding. In most cases it's done thru WebAuthn server
like findy-agent-auth but you can allocate them directly from the agency.
Currently only findy-agent-auth on-boards agents to Findy Agency. Since gRPC
API you should run both Findy Agency and Findy WebAuthn Service where later is
only used for authentication: register and login. The JWT token is used to
access allocated CA. Please see more [information].
findy-agent is a multi-tenant identity agency that is capable serve thousands of agents with one installation, and which can scale horizontally.
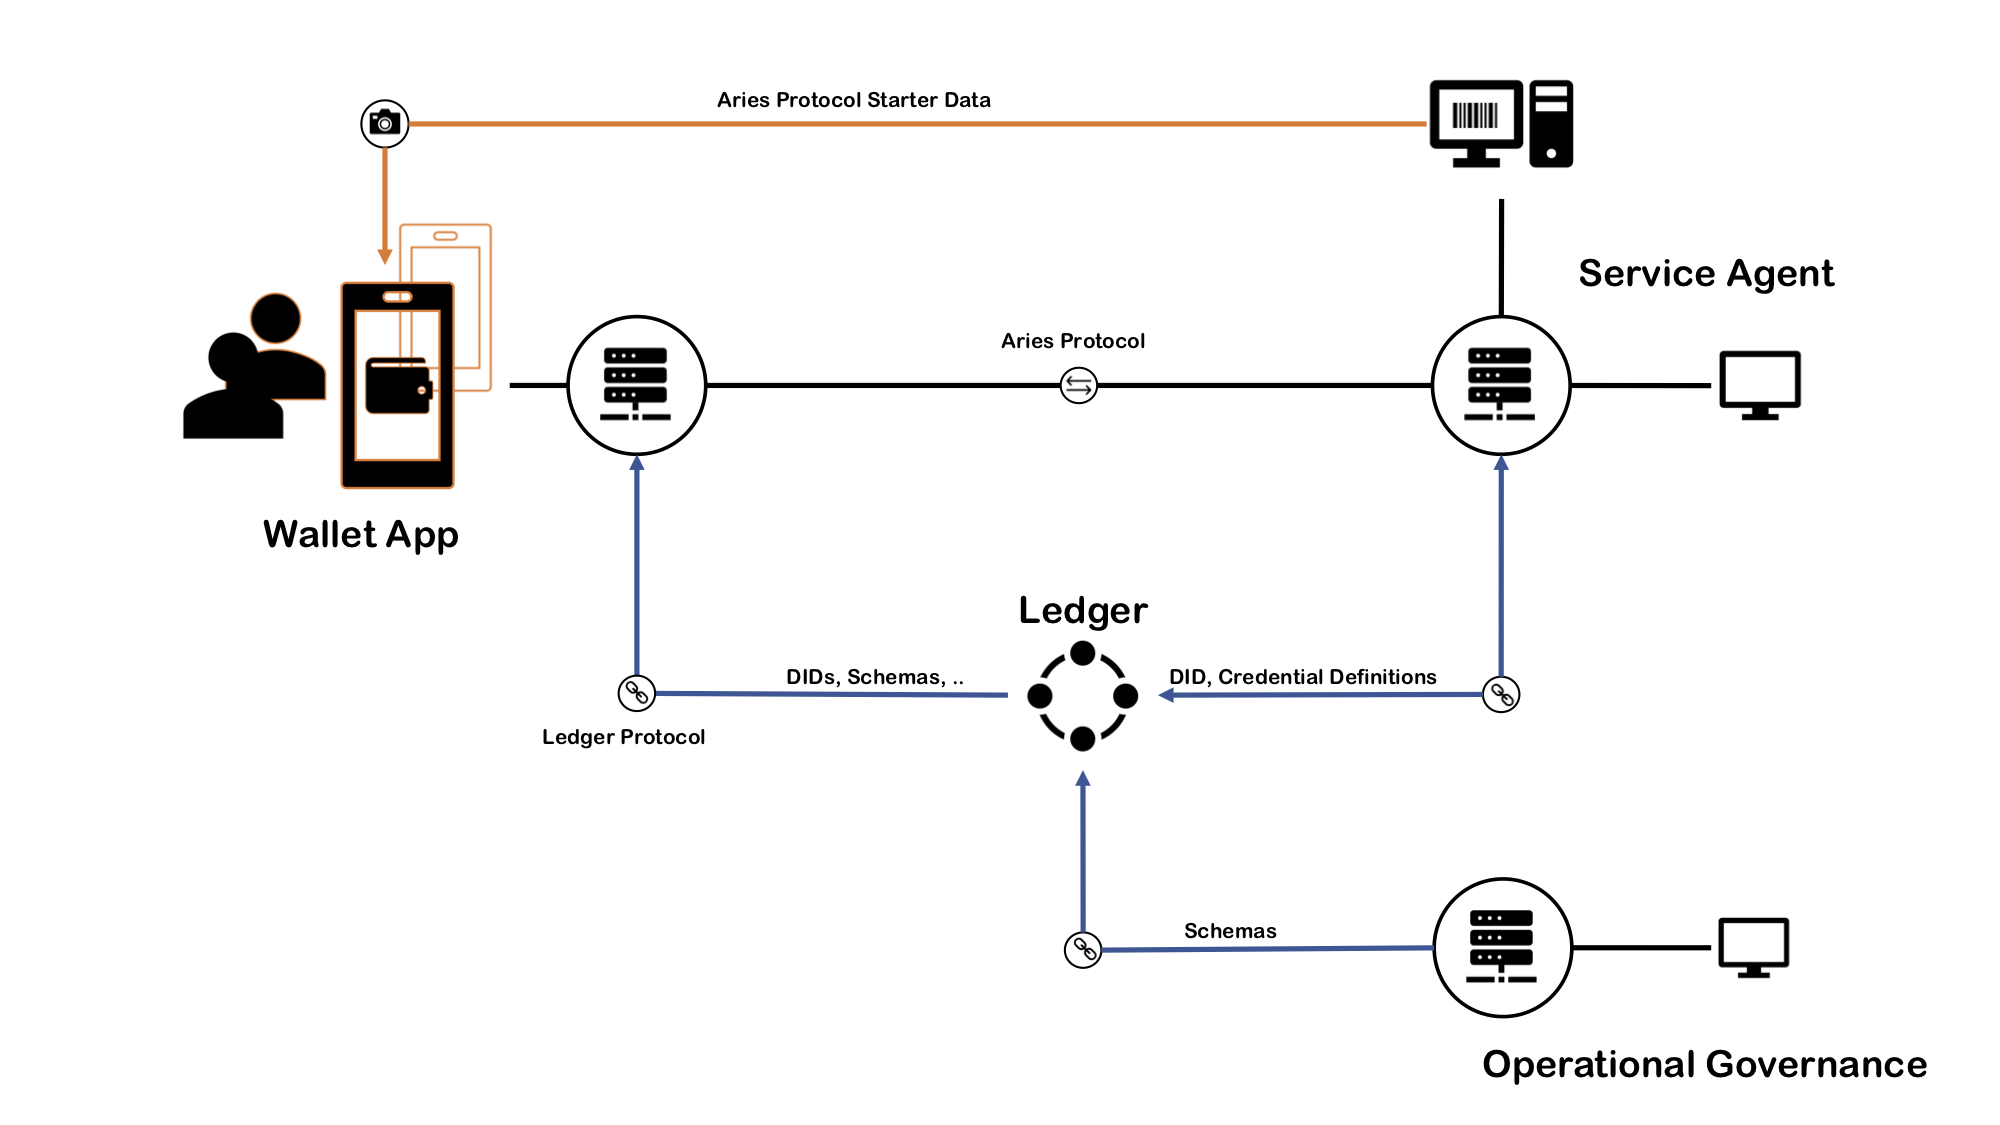
The following diagram shows all the components of a typical DID/SSI-based identity network. The server rack icon illustrates an agency. There are three in the picture, but typically there can be as many as needed, and agencies can run in a cluster for horizontal scalability.
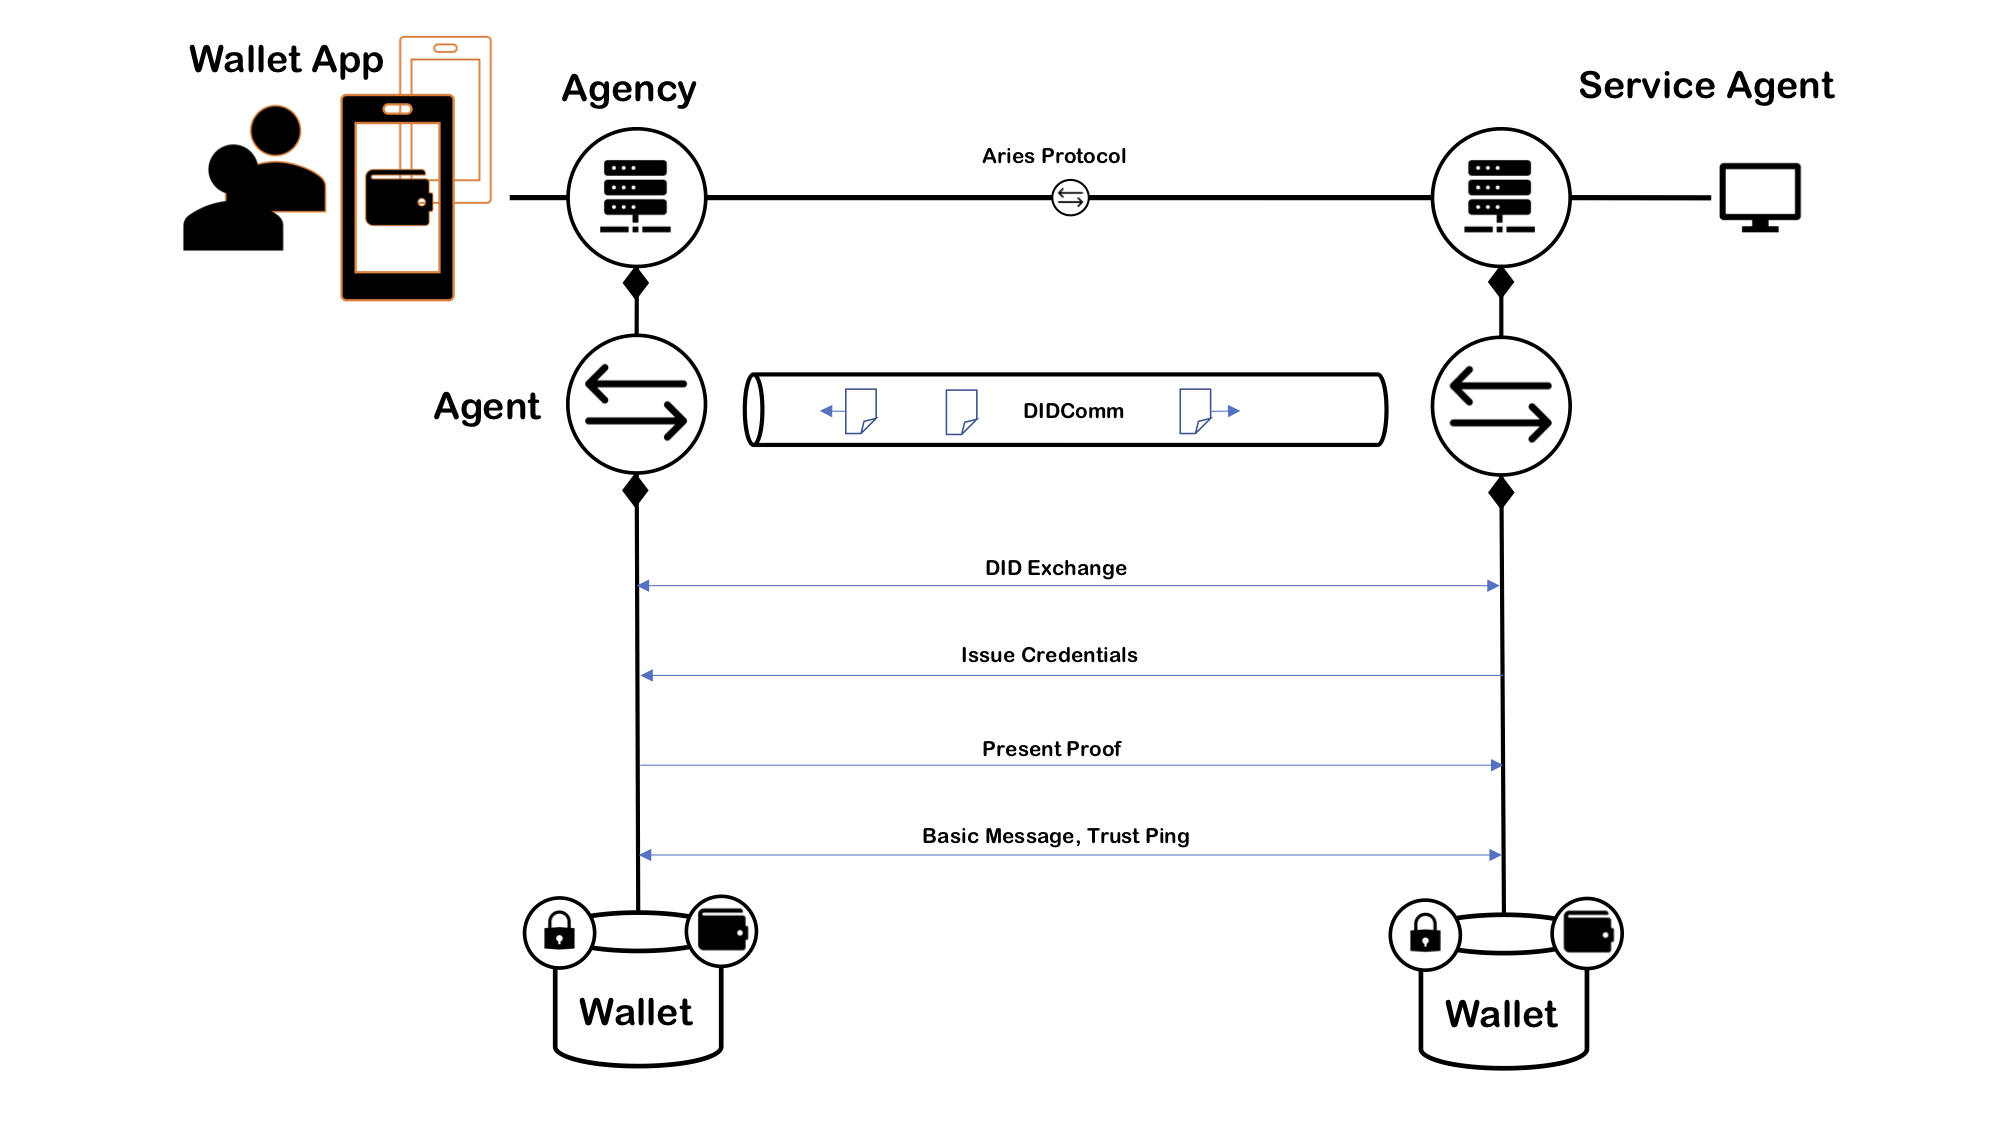
In the middle of the picture is the indy ledger. Depending on the installation and the type of the network, it can be a public ledger or just a development ledger. All the communication to the ledger goes through the agencies. Also, all the Aries agent-to-agent communication goes from agency to agency, as you can see in the following drawing.
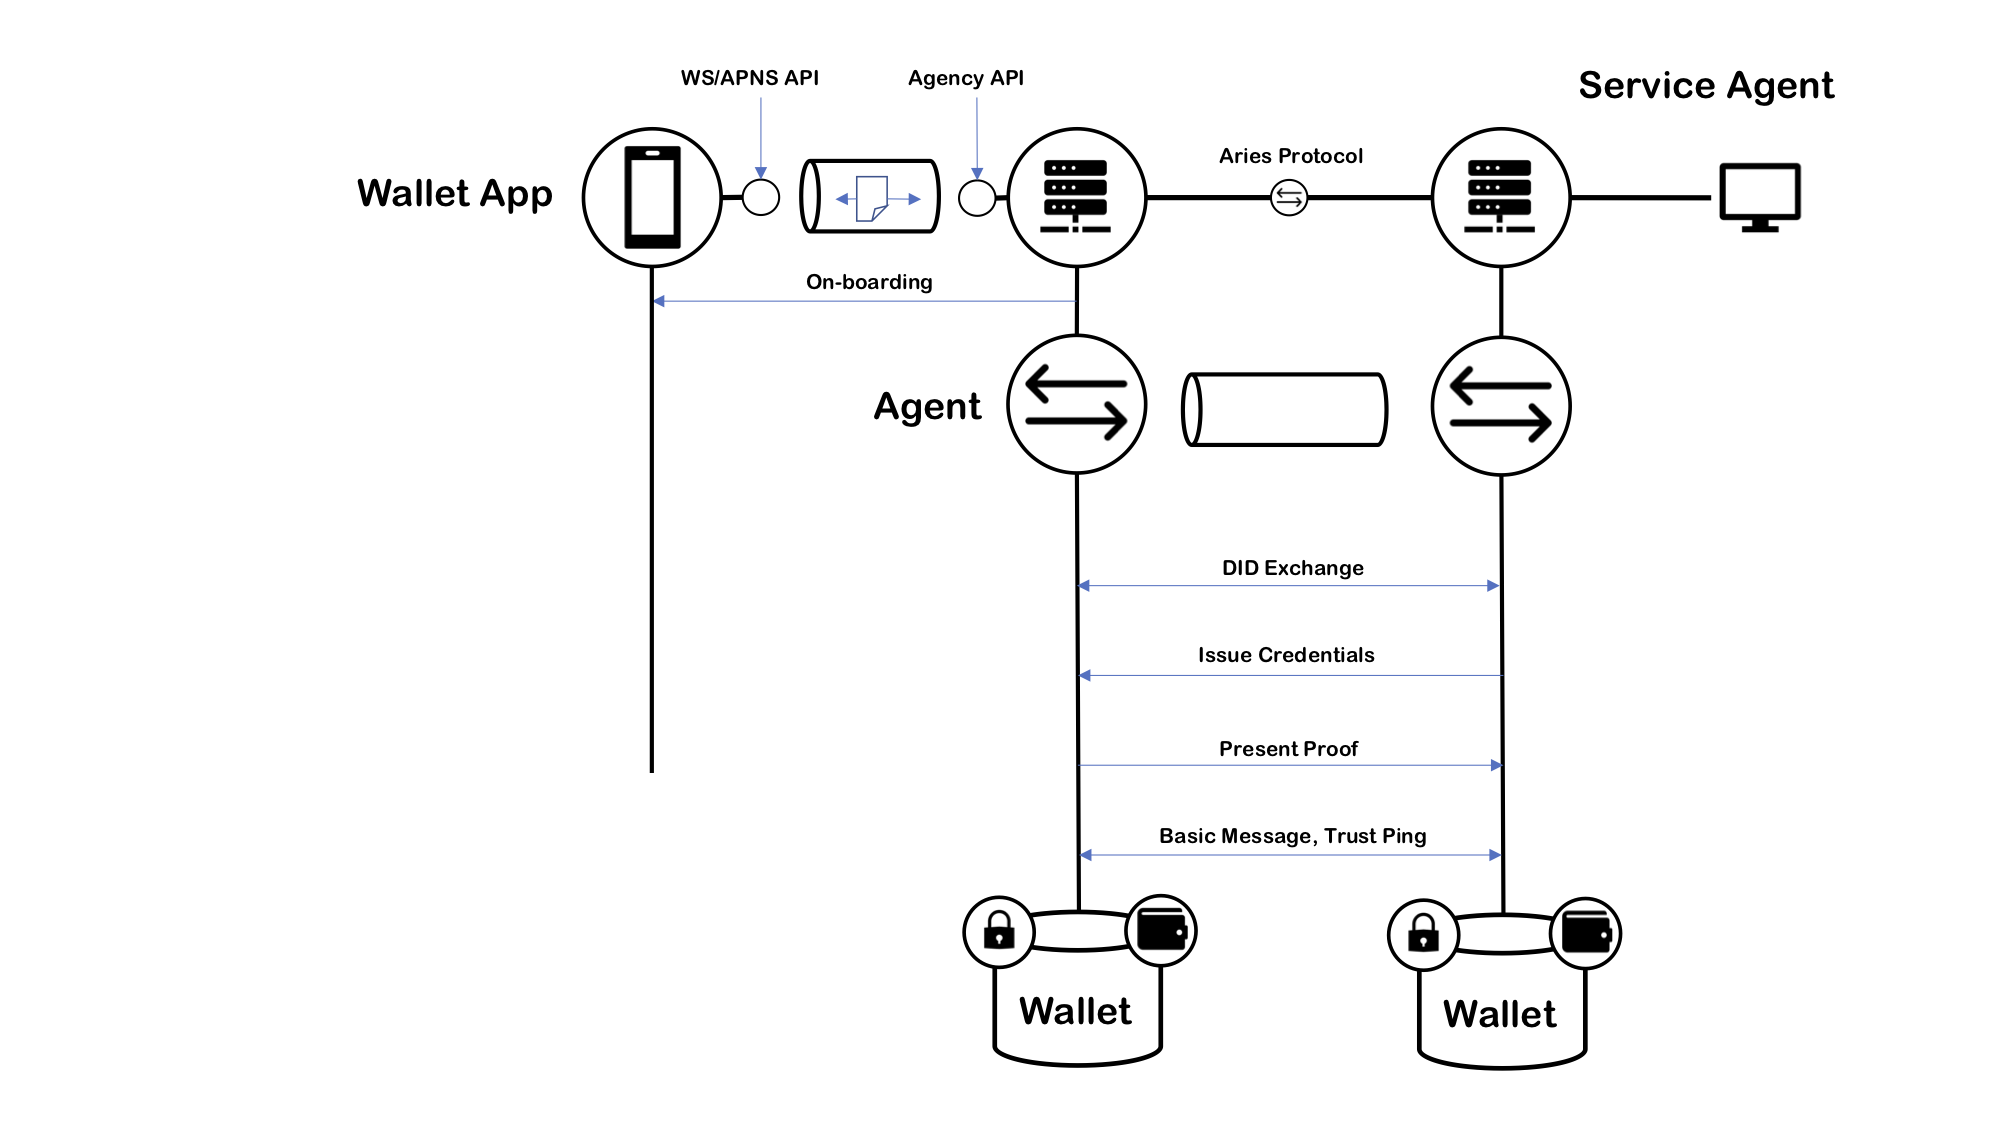
The application logic is inside the agent controllers. The next image illustrates when a mobile controller communicates findy-agent, it calls the agency's CA API and receives notifications.
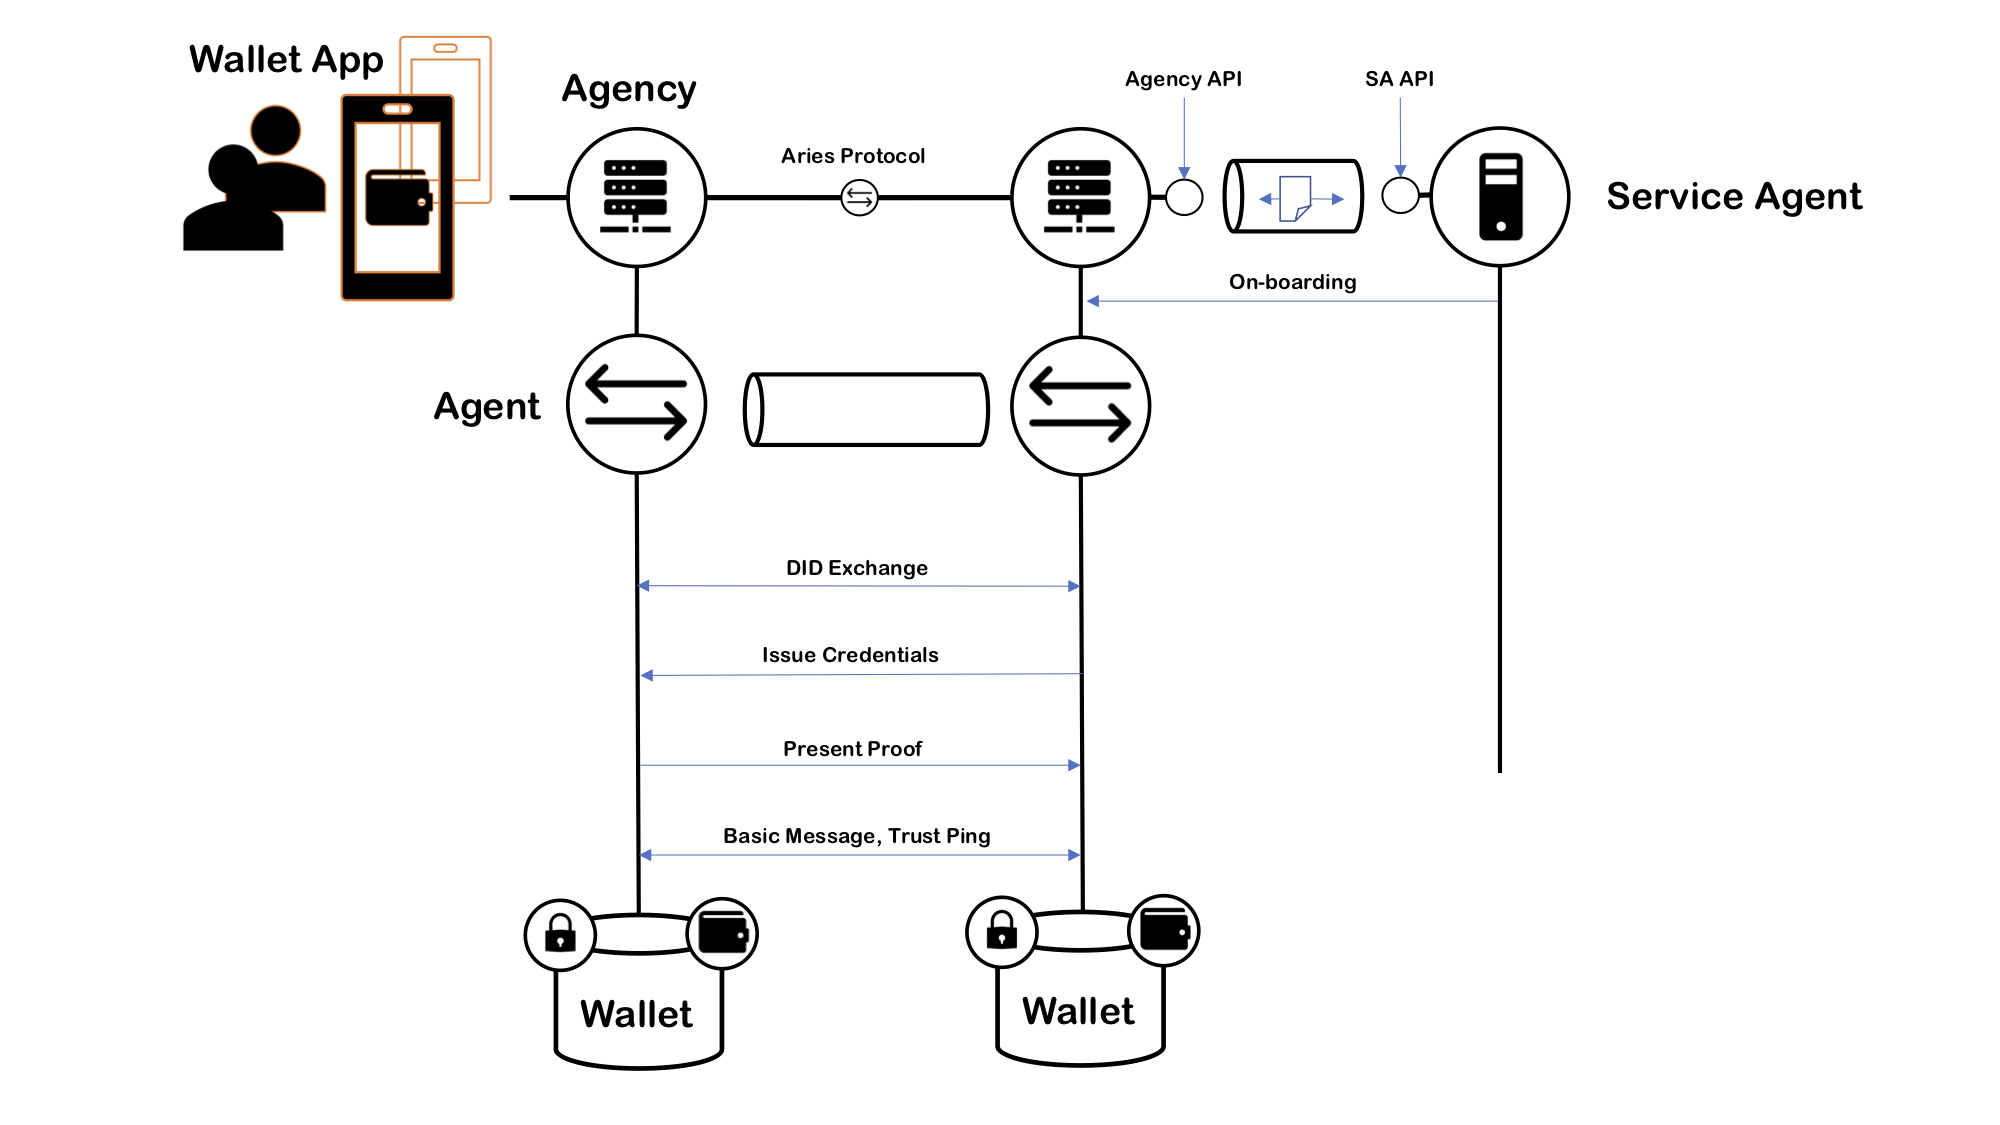
Likewise, when a SA communicates with an agency, it calls the agency's CA API and receives notifications and questions from the agency. The image below shows how CAs communicate with Aries.
Findy agency offers an extensive set of commands by itself, and other command
set exists in findy-agent-cli. In addition to that, many other tasks have to
be taken care of before a full agency setup can work. The following use case
diagram shows most of the tasks and uses system boundaries to illustrate which
of them are directly operable by findy-agent or findy-agent.
As the diagram shows the prerequisites to start the agency are:
- A steward wallet is available, or you have seed to create steward wallet by your self.
- You have to set up a server environment, like volumes for wallets, and databases.
During the agency run, you can monitor its logs. Between the starts, you can reset the all cloud agent allocations, or you can edit the register JSON. Note, that you cannot add new allocations only by editing the register JSON. The whole handshake procedure must be performed.
When an agency is running, you can operate with it findy-agent executable when you use it as a client mode. The following use case diagram shows the essential commands after the agency started.
The use case diagram is a summary of the creation commands available. With these commands, you can create all that is needed in the identity network from the command line.
Findy agency is a service that implements an Aries compatible identity agents. What makes it an agency is that it's multi-tenant. It can easily serve thousands of edge agents with one installation and with modest hardware.
Each CA controller gets a corresponding cloud agent as its service. The following deployment diagram illustrates the main components of the typical system where findy-agent is installed on a single node, and a wallet application is running as PWA in the browser. The picture includes an external agent that is running on another node (grey).
As the diagram shows, the main wallet of each agent is on the server, our we could say it is in the cloud. That simplifies things a lot. We can have cloud backups, recovery, and most importantly, it makes it possible to 24/7 presence in the cloud for each agent.
The issuer server could run on the same node as the agency, but the most common case is where it runs on its own. Typical SA includes application logic, and the issuing credential is a small part. The API between SA and the agency is quite straightforward. The API runs on DIDComm similarly to mobile agents.
The following sequence diagram shows an example of how two cloud agents send messages to each other and save them to Bolt DB (Go implementation of LMBD). The diagram shows the "transactional" implementation of HTTP-based message transfer. Receiving the message is done by first saving the incoming message to the database and after that returning OK. If the receiver cannot save the incoming message, it returns an error code.
The next UML diagram implements the connection protocol as a finite state machine, which has two top-level states: Waiting Start Cmd/Msg, and ConnectionProtocolRunning. The protocol waits for either a command or a message. The command can be an InvitationCmd, which means that we have received an invitation. In the current system, invitations are coming from other channels, and they are not protocol-messages (out-bound). The invitation includes connection information to an agent like an endpoint and its public key. The agent who receives the InvitationCmd sends a connection request message (ConnReq) to the receiving agent and starts to wait for a connection response message (ConnResp). As the state machine shows, the receiving agent sends the connection response back and finalizes its state machine. The agent who started the connection protocol receives the connection response message and finalizes its state machine.
The previously seen ConnectionProtocolRunning state divides two separate state machines. The left sub-state machine is on when the agent is an inviter, and the right-sided is on when the agent is an invitee. This same basic structure is in all of the Aries protocol state machines. One of the agents initiates the protocol, which gives the roles for them: inviter/invitee, issuer/holder, prover/verifier. However, most of the Aries protocols are more complicated because both of the roles can initiate the protocol, and depending on the message it sends, the role it gets for the protocol.
The issuing protocol state machine is waiting for a command to initiate the protocol or incoming message to connect already started protocol (Waiting Start Cmd/Msg -state). If an agent is in an issuer's role, it can start the protocol by sending a credential offer message (CredOffer). It can do that by sending CredOfferCmd to the protocol processor, as we can see in the state machine diagram. Similarly, when an agent is in a holder's role, it can start the protocol by sending a credential-propose message (CredProp), and it can do that by sending CredProposeCmd to the protocol processor. Naturally, when an agent receives either an offer or a propose, it responses accordingly. Receiving a credential offer puts an agent to a holder's role, and receiving a credential propose puts an agent to an issuer's role. Now we should understand how we have four related ways to initiate the protocol state machine for an issuing protocol (state transition from Waiting Start Cmd/Msg -state to IssuingProtocolRunning-state). The rest of the protocol is quite clear and easy to understand from the state machine diagram.
- Tests for fail cases.
- Interoperability testing with Aries testing harness.
- Indy wallet implementation with storage plug-in like PostgreSQL. Done: we have wallet pool.
- Crypto implementations for different server types, AWS Nitro, ...
- Backup system for current docker volumes.
- The PSM runner for restarts and non-delivery messages and cleanup old ones. Partially done, we have data pump and archiving now.
- Haven't been able to test with stable ledger.
- Check if we have received the message already.
- Check incoming order of the messages, same as declared in the PSM.
- libindy under pressure, wallet handles, etc. Done: wallet pool, more tests needed
- API for browsing connections, credentials etc. Done: we have
vault - PSM archive logic, dedicated storage for persistent client data (see the PSM runner).
- Credential revocation, if wanted to use (check upcoming anoncreds 2.0)
- Skipping DID-writes to ledger for individuals: moving to full
peer did. - Real
peer didimplementation. - Agent permissions. Separation of individuals and services in on-boarding -> e.g. no credential issuing for individuals (maybe Agency types).


