Here you can learn the basics principles behind Aseprite.
In Aseprite a sprite is a sequence of frames and a stack of layers. Each frame-layer intersection is called a cel.
This is a general overview of the timeline:
The basic workflow is:
- Create a new sprite from File > New menu.
- Draw with pencil tool
 using
using
Left clickorRight click, and pick colors from the color bar using those same buttons. - Save your work from File > Save menu as a
.asefile to preserve all your image information (layers, frames, etc.). - Export your sprite as a
.giffile to publish your image on a website, or.pngto save a sequence of files, or as a.pngsprite sheet, etc.
See the workspace to know more about the elements in the window. See workflow section for more details.
You should put your left hand on the keyboard (or your right hand if you are left-handed). As there are some handy keyboard shortcuts, you can use them from the very beginning to make a better use of Aseprite:
- Keys
1,2,3,4,5, and6can be used to change the zoom (you can use the Mouse Wheel to change zoom too). Bkey is the Pencil tool, andMthe rectangular marquee, maybe the most common tools that you will use.- You can pick colors with
Alt+ click. E.g.Alt+Left clickchanges the Foreground Color,Alt+Right clickchanges the Background Color (Eyedropper tool ).
). - The
Ctrlkey (or⌘on Mac OS X) can be used to select the Move tool .
With it you can easily select or move layers.
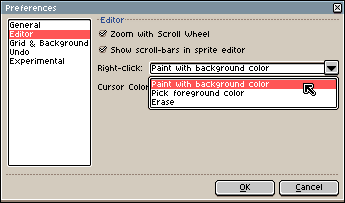
By default, Right click paints with the Background Color,
but you can change this configuration from Edit > Preferences > Editor:
SEE ALSO
