A OneNote add-in with powerful yet simple and effective features including:
- Access all features from the OneMore group menus added to the Home ribbon
- Create/edit/apply custom styles with advanced options
- Apply a style to selected text or all custom styles to the current page with one click
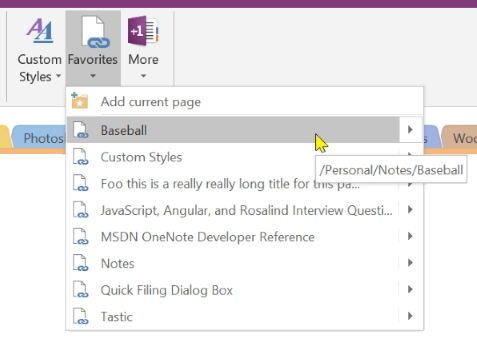
- Manage menu of Favorites for one-click link to your most referenced pages
Want more from OneMore? OneMore has more... Here's what's in the OneMore menu
General commands
- Disable spell-check on the current page (F4)
- Paste Rich Text (preserve colors when pasting code from Visual Studio)1 (Ctrl+Alt+V)
- Search and replace text on the current page (Ctrl+H)
- Change selected text to UPPERCASE or lowercase
- Increase/Decrease the font size of all content on the current page
- Collapse the page hierarchy to see only top-level pages
- Sort pages, sections, or notebooks
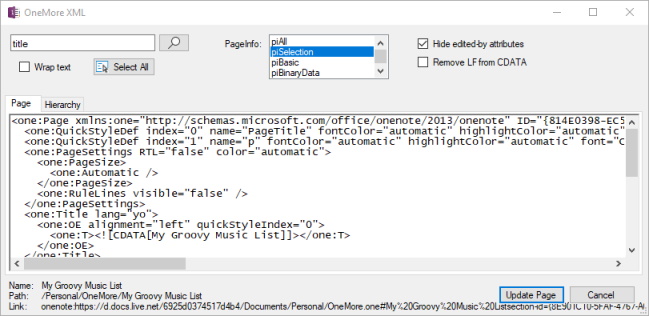
- View and edit the internal OneNote XML of the current page
- Change page background to any custom color with dark-mode awareness
- Save the current page or selected pages as HTML, PDF, MSWord, or as raw OneNote XML
- Invoke an external custom plugin to process a page
- Check for updates and install upgrades on-demand
Clean commands
- Remove author/citation information from paragraphs
- Remove pasted screen clipping and URL citation lines from page
- Remove empty headers and "extra" empty lines between paragraphs
- Remove spacing between paragraphs and headings
- Show/Hide the page date and time stamps under the title on page or all pages in section
- Trim trailing whitespace from selected text
Formula commands
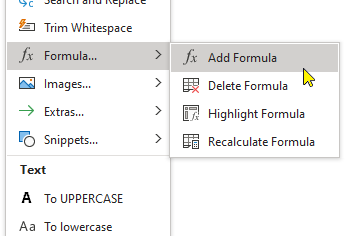
- Calculate Excel-like formulas in tables
- Delete formula from selected table cells
- Highlight all cells on the page with custom formulas
- Recalculate all formulas in selected tables on the page
Image commands
- Add caption to a selected image
- Precisely crop a selected image
- Resize a selected image or all images on the page
Numbering commands
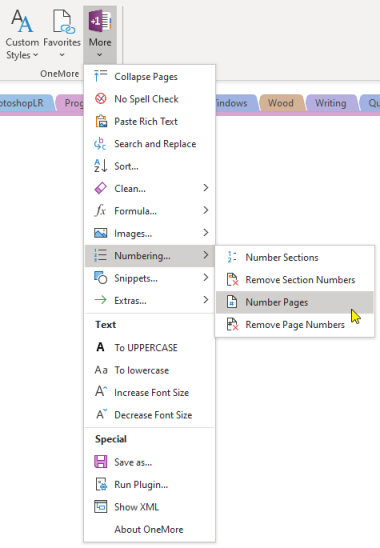
- Number page headings numeric or alpha-numeric outline prefixes
- Number all sections in the current notebook
- Number all pages in the current section with numeric or alpha-numeric prefixes
- Remove numbering from sections
- Remove numbering from pages
Snippets commands
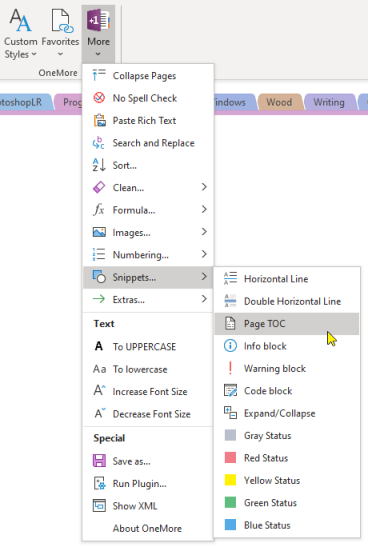
- Insert single or double horizontal line
- Insert Table of Contents of headers, pages, or sections
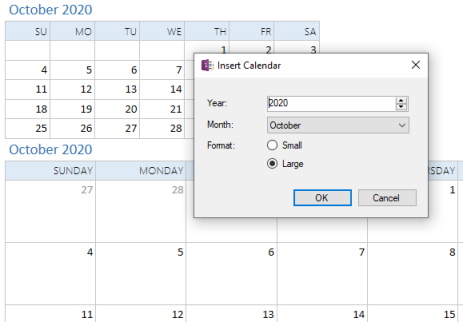
- Insert small or large monthly calendar for a specific month
- Insert Info/Warn boxes similar to Confluence Info and Warn macros
- Insert Code box similar to Confluence Code macro
- Insert collapsable sections to hide secondary or sensitive information
- Insert status labels similar to the Confluence status macro
Extra commands
- Add special icon to the page title, also appears in page hierarchy
- Add or remove footnotes (endnotes)
- Convert select text to a table
- Insert pronunciation of words from over a dozen languages
- Merge pages, preserving formatting and position of outlines
- Edit search engines that you want to appear in the context menu
- Indent content below headings or tagged paragraphs
- Replace hyperlinked URLs with their Web page titles
- Toggle strikethrough text next to all completed/incompleted tags
The following commands are available from the page context menu
- No Spell Check
- Remove Empty Paragraphs and Headings
- Remove Paragraph Spacing
- To UPPERCASE
- To lowercase
- One or more custom-defined search engines
While all commands can be accessed from the OneMore ribbon group menus, some commands also have their own key bindings:
| Command | Key Binding |
|---|---|
| Add footnote | Ctrl + Alt + F |
| Remove footnote | Ctrl + Shift + F |
| Insert horizontal line | Shift + Alt + Minus |
| Insert double horizontal line | Shift + Alt + Equals |
| No Spell Check | F4 |
| Paste Rich Text | Ctrl + Alt + V |
| Search and Replace | Ctrl + H |
| To uppercase | Ctrl + Shift + Alt + U |
| To lowercase | Ctrl + Shift + U |
| Increase font size | Cltr + Alt + Plus |
| Decrease font size | Ctrl + Alt + Minus |
| Show XML | Ctrl + Shift + Alt + X |
| Dump diagnostic info to log | F8 |
| Clear the diagnostic log file | Ctrl + F8 |
Why?
I wanted something more than what OneNote provided. I was overwhelmed by OneNote Gem, aghast at its bloated useless overloads of what was already otherwise available or features that I would never use in a million years - and, oh yeah, that price! I admit I was intrigued by the Onetastic Macro approach but thought it limited and obtuse, decipherable only by programmers. And both of these charge money for something that should be open source and neither provided exactly what I wanted. So I did what any self respecting software engineer would do... I built my own. Deal with it.
I do this as a hobby. I will never charge you to use OneMore. So it is with great humility and appreciation that I humbly suggest that you consider a small donation to support the development of OneMore. In exchange, I pledge to continue listening with an open mind and to respond to your questions and tips in a timely manner.
Minimum Prerequisites
- Developed for Windows 10
- Microsoft Visual Studio 2019, C# 7
- Microsoft Visual Studio 2019 Installer Projects extension
- .NET Framework 4.8
- Microsoft OneNote 2016 32-bit or 64-bit
Tested recently with Windows 10 2004 (19041.450), VS2019, and OneNote 2019/O365
How to Install
- Close OneNote if it is currently running
- Download the latest installer from here
- Right-click the downloaded installer msi and choose Properties, then tick the Unblock box and click OK
- Run the installer
- Run OneNote and enjoy
The Table of Contents command can run in one of three modes:
- Insert a table of contents at the top of the page with hyperlinks to all the standard and custom headings on the page. Optionally, add a "top of page" link to each heading on the page to quickly jump back to the top of the page.
- Create a new page at the top of the section with hyperlinks to all pages in the current section
- Create a new page at the top of the section with hyperlinks to all sections in the current notebook and optionally include all pages in each section.
Generate a Table of Contents based on both standard headings and custom user-defined headings where each line is hyperlinked to its heading and indented according to its heading level. Text colors are based on the page background color.
Table of Contents
Heading 1
. . Heading 2
. . . . Heading 3
Insert a collapsable section at the current position on the page. This can be used to hide secondary or sensitive information on your page. This snippet includes a single-cell table to which you can add content.
Insert colored status labels similar to the Status macros found in Confluence. These are not as smart as the Confluence macros but instead are just simple text with a highlight background that are fully editable inline.
Insert an information box or warning box with fully customizable headers and content. These snippets are actually just nested tables. Text colors are based on the page background color.
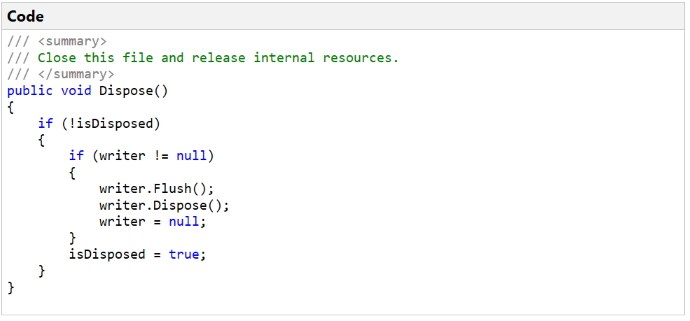
Insert a code box with heading and area for your code. Use the Paste Rich Text command to paste syntax-highlighted code directly from Visual Studio1. Text colors are based on the page background color.
Insert a monthly calendar for a selected month in either large or small format. The small format is good for a quick look at a month. The large format is good for entering brief daily notes.
1 If text copied from Visual Studio is pasted as plain text instead of rich text when using the Paste Rich Text command (Ctrl+Alt+V) then look at the VS Tools... Options... Text Editor... Advanced, and tick the box Copy rich text on copy/cut.
The Add Caption command will add a caption to the selected image by moving the image into a one-row, one-column table and centering the word "Caption" below the image, which of course you should edit immediately. If your custom styles has a style named exactly "Caption" then that style will be applied, otherwise, a default caption style is used.
The Crop command opens an image editing window that allows you to precisely crop and image by selecting a region, moving that region around the image, and even resizing the region.
The Resize command can be used to resize images on the page. If one image is selected then you can resize by percentage, absolute size, or to a preset width with aspect ratio maintained. If more than one image is selected, or no images are selected, then you can resize them all to a preset width. The preset width is saved so you don't need to keep entering it if you have a width you typically use.
OneNote doesn't offer to number headings like Word does but OneMore can apply numbers to headings after headings are in place. From the Outline Formatting dialog's Numbering section, choose to apply numeric or alphanumeric numbering to all headings on the page. Note that this is a one-time procedure so if you add new or delete old headings, re-apply numbering using this dialog. The Remove existing checkbox cleans up numbering that you've applied below; remember to tick this if you've already applied numbering, otherwise it will double-up!
The numeric numbering will prefix headings with "1.", "1.1.", "1.1.1.", etc. The alphanumeric numbering will prefix headings with "1.", "a.", "i.", etc.
The last settings you use in this dialog will be preserved. To reset the dialog back to its default settings, use the Reset Settings item from its system menu, accessed from the title bar icon.
OneMore makes it easy to indent paragraphs below all headings, below tagged headings, or below tagged paragraphs. If you want to indent only below tagged headings or paragraphs, take advantage of OneNote's tagging-by-keyboard feature by customizing a tag and moving it up to one of the first eight items in the list of tags; then you can use Ctrl-# to quickly apply tags to the headings or paragraphs you want before using the Outline Formatting dialog.
Automatically replaces all or selected hyperlinked URLs with the <title> specified on the associated Web pages. This only affects URLs for which the displayed text is the same as the link address, meaning if you've already customized the dispalyed text, OneMore will not alter your changes.
For example, given this URL on a OneNote page: https://github.com/
it would be replaced with its hyperlinked title: GitHub
Adding footnotes to a OneNote page seems somehow redundant but consider how often OneNote is used for research and then used to copy/paste content into Word or print as PDF... yeah, you get it then.
You can add a footnote anywhere on the page and a reference label is inserted at the current cursor location and a footnote is added to the bottom of the page. You can then edit the text in that footnote to your heart's desire. Text colors are based on the page background color.
Note that footenotes are hyperlinked so you jump from the content body down to the text of a footnote or back up again to the content that references a particular footnote.
And if you no longer want a footnote, place the cursor over the label or over the foonote text at the bottom of the page and click the Remove footnote command. Voila!
OneMore keeps track of footnotes and will automatically reorder them to keep them numbered sequentially from the top of the page. If you delete a footnote, it again will renumber the remaining footnotes so there are no gaps. Pretty slick, huh?
OneMore adds commands to the context menu that appears when you right-click on the body of a page. Additionally, you can define your own custom search engines to add to the context menu.
From the Extras menu, open the Edit Search Engines dialog. You can define one or more engines. Each engine needs a unique name and a URL pattern. The URL pattern must contains the phrase "{0}" which will be replaced with a selected word or phrase.
Some common search engine URL patterns are shown here:
| Name | URL Pattern |
|---|---|
| Bing | https://www.bing.com/search?q={0} |
| https://www.google.com/search?q={0} | |
| Google Books | https://www.google.com/search?q={0} |
| Google Scholar | https://scholar.google.com/scholar?q={0} |
| Duck Duck Go | https://duckduckgo.com/?q={0} |
| WikipediA | https://en.wikipedia.org/wiki/{0} |
If you define one engine then that is shown directly in the page context menu. If you define more than one engine, then a submenu is added to the context menu with a list of engines that you define.
Note that you need to restart OneNote when modifying the search engine list. Sadly, there is no way to dynamically reload the context menu without restarting.
Select a phrase, or place the text cursor in the middle of a word, and choose your search engine. Your default Web browser is opened, search for your selecte content using the selected engine.
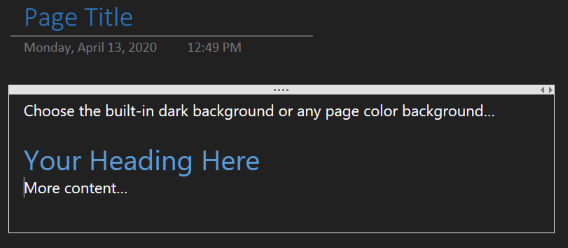
By default, OneNote lets you select from a light, pastel pallet for page backgrounds but it if you change the Office theme to Black then it does a fairly decent job of colorizing your content and the OneMore custom styles work just fine.
But if you don't want to affect all Office products then OneMore offers true dark-mode background capabilities as well as custom page color selections. And OneMore comes with a style theme named DarkStyles.xml that you can load.
Please see the pinned "Known Issues" item in the Issues area for an explanation of why colors might not look right when switching to a dark background.
If you've selected a darker page background color, OneMore will generate the information box, warning box, and code box with darker colors as well, such as:
OneMore doesn't apply syntax highlighting to source code. If you really want that then check out OneNoteHighlight2016 which seems to be a fanstastic solution. However, if you're a Visual Studio developer OneMore already knows how to paste rich text into OneNote, preserving all syntax highlighting. So why install two addins when you only need one?
The command menus are where you'll find all the features offered by OneMore. It's a simple and quick way to access powerful enhancements to OneNote.
| Main and advanced features | Main and Snippets menus |
|---|---|
 |
 |
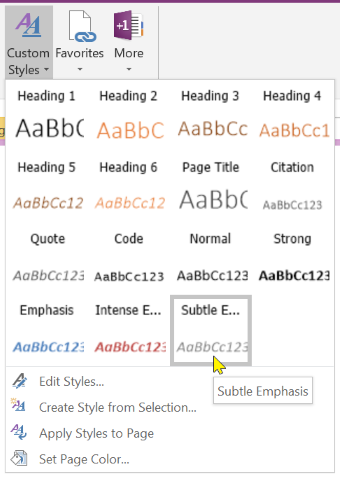
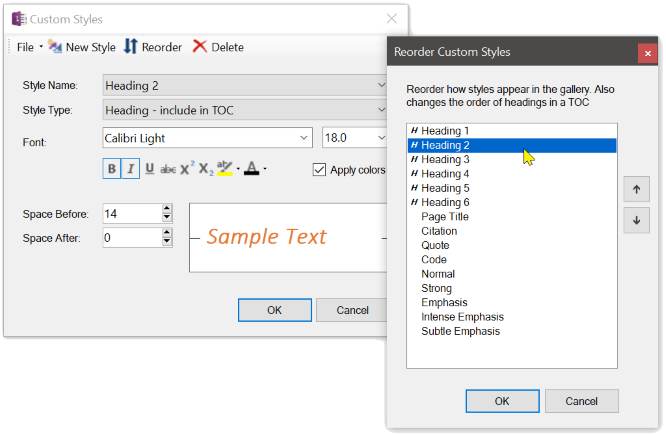
The Custom Styles gallery and Editor provide an easy way to create new styles from scratch or from the currently selected text, modify those styles and save them for later use. You can then either apply a single style to selected text by choosing a style from the gallery or use the Apply Custom Styles to Page command to apply all custom styles to the entire page, looking for headers, citations, quotes, code, and normal text.
The first nine custom styles are automatically bound to the key sequences Ctrl+Alt+Shift + 1, Ctrl+Alt+Shift + 2, etc., through Ctrl+Alt+Shift + 9
| Styles Gallery | Styles Editor |
|---|---|
 |
 |
Although OneNote has multiple slick ways of navigating around notebooks, sections, and pages, the most obvious feature missing is a Favorites menu. Well, you now have one with OneMore. Simply click Add current page to add a new favorite. Click the flyout menu to delete an indvidual favorites. Easy.
| Favorites Menu |
|---|
 |
OneNote lets you insert an Excel table on a page or convert a table to an Excel object. This is convenient if you want complicated formulas and charts... and you have Excel installed! But what if you don't?
OneMore offeres Excel-like formula functionality in native OneNote tables. Thanks to the work done by Jonathan Wood, you can apply a formula to one or more selected cells in a table. A formula can consist of basic mathematical operators, parenthesis, and most math functions such as abs, sum, average, sin, etc.
- Select the cell or cells into which you want to add a formula; they must be linear and contiguous, meaning in the same row or in the same column.
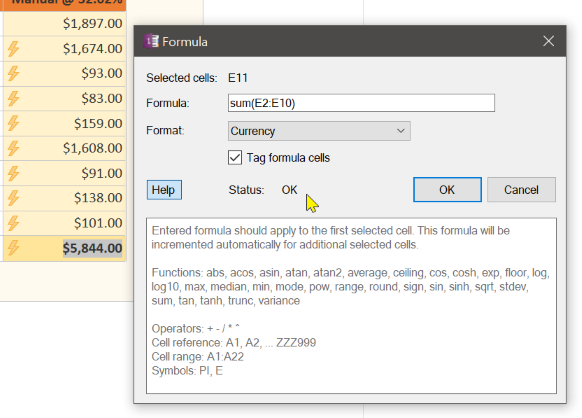
- Select the Add Formula command. The Formula dialog is displayed showing the names of the selected cells: A1, A2, A3, etc.
- Enter the formula. As you type, OneMore validates the syntax in real-time, showing whether the formula is valid or invalid. Only when it is valid will the OK button be enabled.
- Choose the format of the result: Number, Currency, or Percentage.
- Choose whether you want to tag the cell with a lightning bolt to make it easy to identify cells with formulas in them.
- Click OK.
If you use cell references in your formula and you've selected more than one cell then OneMore will automatically increment the references relative to each seleted cell. For example, if you select cells A10, B10, and C10 and enter the formula sum(A1:A9) then that will apply to A10, sum(B1:B9) will apply to B10, and sum(C1:C9) will apply to C10.
Formula processing is not recursive. This means that if cell A1 has a formula "A2+1" and cell A2 has a formula "1+1", then when A1 is calculated, it will not force A2 to be recalculated. Instead, each cell is calculated in order, top-down and left-to-right across the table.
The Recalculate command will recalculate all formulas in the selected table(s).
The Highlight command will select all cells on the page containing formulas so you know where you put them.
The Delete command will remove a formula from the selected cell(s) but retain the values displayed in those cell.
| Formula Menu | Formula Dialog |
|---|---|
 |
 |
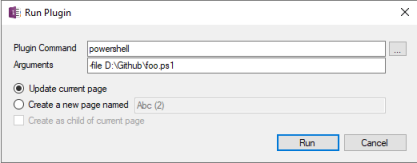
OneMore has a plugin facility that let you process a page using a program that you write. The workflow is very simple:
- Create a plugin program that accepts one command line argument; the argument will specify the path to a file containing the page XML.
- Run the Plugin command, specyfing the path to the program and any other arguments.
- The plugin must complete within 20 seconds or it will timeout and be aborted.
- The plugin must write any desired changes back to the file path it was given.
- If the plugin completes and has made changes to the XML file on disk then OneMore will update the current page with your updated XML from the file;
- If the plugin completes and has not made changes to the file then no changes are made to the current page.
- If you chose to create a new page then it will be created regardless of whether the plugin updated the XML file.
Any output that your plugin writes to stdout will be captured in the OneMore log file.
Note, if you run the plugin and a Web browser is invoked (IE) showing the XML file contents then you probably forgot to specify the right arguments to powershell.exe or python.exe.
The OneNote page schema is defined in the 0336.OneNoteApplication_2013.xsd file in the References folder of this repo.
Example
If the plugin is written in PowerShell then specify the Plugin Command as powershell.exe and use the Arguments line to specify the -file argument pointing to your plugin script as shown here.
NOTICE: I provide no guarantee, warranty, or promise that you won't screw it up and loose data! It's in your hands and if you mess up the XML and cause data loss, that's entirely on you. You've been warned.
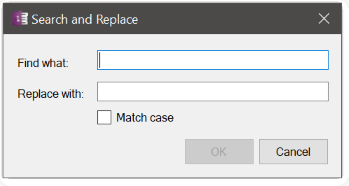
The Search and Replace command does exactly what you think. I can't believe Microsoft didn't add this most basic editing feature by default. Worry no longer. Here it is. And you can enter a regular expression in the Find what field so you can really brag to your friends. It searches line-by-line so expression will not span paragraphs or table cells. It uses standard regular expression syntax used by .NET's Regex.Match function.
The Add Title Icon command lets you chose from a selection of icons from the Segoe UI Emoji font to add to the page title; OneNote automatically displays that icon in the page navigator as well.
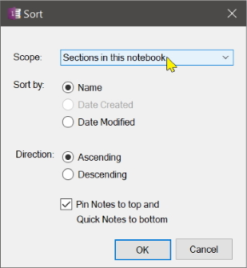
The Sort command lets you sort notebooks, sections, or pages with advanced options not found in any other plugin, even those bloated pay-to-use monstrosities.
| Search and Replace | Title Icons | Sort Notebooks, Sections, Pages |
|---|---|---|
 |
 |
Developing OneMore meant reverse-engineering the way Microsoft built OneNote. And it's XML schema reference documentation was only half the picture. This editor became invaluable while trying to decipher the behavior and how OneNote manages its page content.
| Page XML Editor |
|---|
 |
See the README file under the OneMore project folder for technical reference and information regarding developing and debugging this OneNote add-in.


