- Introduction
- Prerequisites
- Installation and setup
- Next steps
- Upgrading
- Teardown and cleanup
- Further reading
This document walks you through installing the Bitnami Kubernetes Production Runtime (BKPR) on any kubernetes cluster which has LoadBalancer support.
In addition to the requirements listed above, a domain name is also required for setting up Ingress endpoints to services running in the cluster. The specified domain name can be a top-level domain (TLD) or a subdomain. In either case you have to manually set up the NS records for the specified TLD or subdomain so as to delegate DNS resolution queries to a PowerDNS zone created and managed by BKPR. This is required in order to generate valid TLS certificates.
This article assumes you already have a Kubernetes cluster. The only requirement here is the Kubernetes cluster should be able to create LoadBalancer type services that have externally facing public IP addresses.
-
Verify that your cluster is up and running:
kubectl get nodes
-
Configure the following environment variables:
export DNS_ZONE=my-domain.com
export [email protected]
export OAUTH_AUTHZ_DOMAIN="my-domain.com"
export KEYCLOAK_PASSWORD="secretpassword"
export KEYCLOAK_GROUP=""
DNS_ZONEspecifies the DNS suffix for the externally-visible websites and services deployed in the cluster.ADMIN_EMAILspecifies the email address used in LetsEncrypt requestsOAUTH_AUTHZ_DOMAINspecifies the email domain of authorized usersKEYCLOAK_PASSWORDspecifies the admin password for the Keycloak serverKEYCLOAK_GROUPspecifies the keycloak group of authorized users
To bootstrap your Kubernetes cluster with BKPR:
kubeprod install generic \
  --dns-zone "${DNS_ZONE}" \
  --email "${ADMIN_EMAIL}" \
  --authz-domain "${OAUTH_AUTHZ_DOMAIN}" \
  --keycloak-password "${KEYCLOAK_PASSWORD}" \
  --keycloak-group "${KEYCLOAK_GROUP}"
Wait for all the pods in the cluster to enter Running state:
kubectl get pods -n kubeprodBKPR creates and manages a DNS zone which is used to map external access to applications and services in the cluster. However, for it to be usable, you need to configure the NS records for the zone.
BKPR installs a PowerDNS server for creating and managing a delegated DNS zone. This DNS is accessible externally via the nginx-ingress-udp service running in the kubeprod namespace.
Execute the following command to get the IP address of the nginx-ingress-udp service and configure the records with your domain registrar.
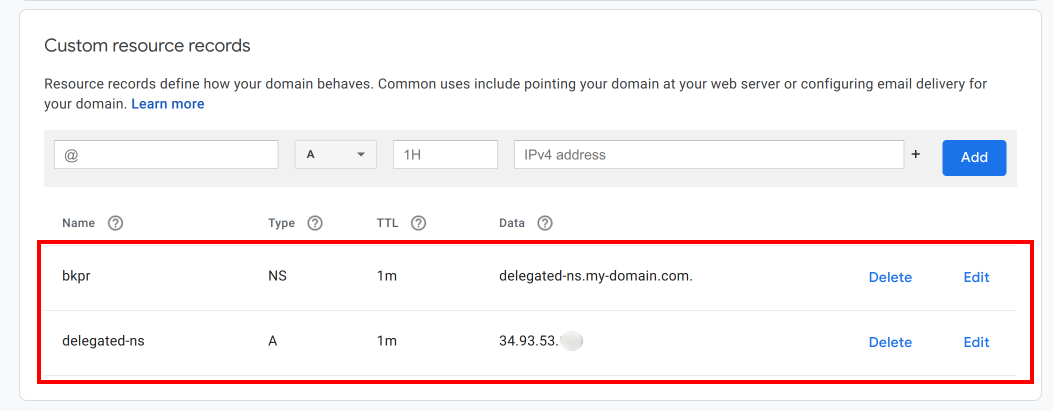
kubectl -n kubeprod get svc nginx-ingress-udp -o jsonpath='{.status.loadBalancer.ingress[0].ip}'The following screenshot illustrates the NS record configuration on a DNS registrar when a subdomain is used.
Please note, it can take a while for the DNS changes to propagate.
Login to the Keycloak server by visiting https://id.${DNS_ZONE}/auth/admin/ and create users in the BKPR realm for who you would like to configure access to the BKPR services. These users should have email addresses that satisfy the authz domain restriction.
Users should now be able to authenticate with the Prometheus, Kibana, Grafana and PowerDNS dashboards by visiting https://prometheus.${DNS_ZONE}, https://kibana.${DNS_ZONE}, https://grafana.${DNS_ZONE} and https://pdns.${DNS_ZONE} respectively.
Congratulations! You can now deploy your applications on the Kubernetes cluster and BKPR will help you manage and monitor them effortlessly.
Follow the installation guide to update the BKPR installer binary to the latest release.
Edit the kubeprod-manifest.jsonnet file that was generated by kubeprod install and update the version referred in the import statement. For example, the following snippet illustrates the changes required in the kubeprod-manifest.jsonnet file if you're upgrading to version v1.1.0 from version v1.0.0.
 // Cluster-specific configuration
-(import "https://releases.kubeprod.io/files/v1.0.0/manifests/platforms/generic.jsonnet") {
+(import "https://releases.kubeprod.io/files/v1.1.0/manifests/platforms/generic.jsonnet") {
  config:: import "kubeprod-autogen.json",
  // Place your overrides here
}Re-run the kubeprod install command, from the Deploy BKPR step, in the directory containing the existing kubeprod-autogen.json and updated kubeprod-manifest.jsonnet files.
kubecfg delete kubeprod-manifest.jsonnetkubectl wait --for=delete ns/kubeprod --timeout=300sYou should remove the NS entries configured at the domain registrar.
