原文链接:https://mirror.xyz/angelsay.eth/Fpqj6Hawn-IWGgXm9oEYXyscIgolotYscShuNaVTmI4
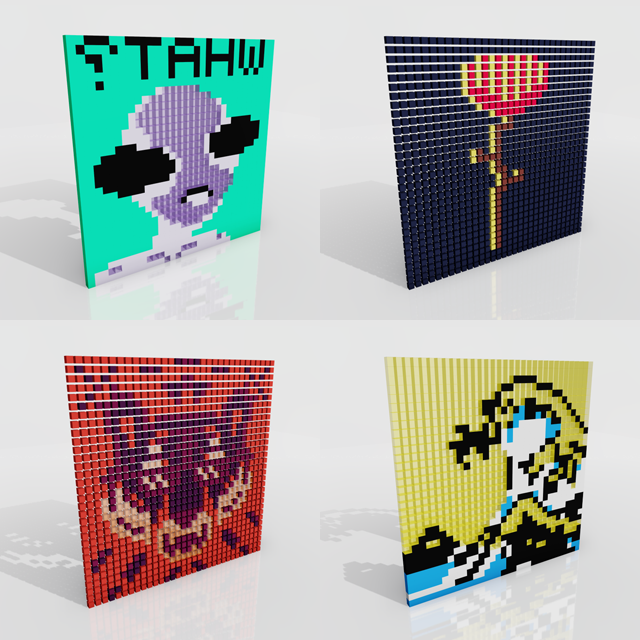
Blitblox is the first on-chain 3D NFT that contains all the glTF data in its contract. Blitbox turns the original 32x32 two-dimensional images of Blitmap (and Flipmap) into a 3D asset that is stored in a decentralized manner on the Ethereum blockchain. Because Blitmap artwork is in the public domain with the CC0 license, creators like myself have the ability to extend the original artwork and contracts in exciting new ways. If you’re new to web3 or not familiar with a lot of the terminology in the last few sentences hopefully this post clears some of it up. I’ll start with high level concepts about 3D NFTs then dive into the contract itself.
Blitblox is an experiment in extending types of assets that we can store on-chain. It’s also an example of what happens when creators like Dom Hofmann store data in its purest form in a contract so that others can extend it and the NFT can manifest itself in new ways on different mediums.
On-chain NFTs contain all of its data as a renderable format on the blockchain. This means it’s publicly auditable and can be immutable: it will last for as long as the Ethereum blockchain exists. This is drastically different from most NFTs where the digital asset is stored either on a project-owned server (not a good practice as the item can be lost if the server goes down) or stored on IPFS (a distributed file system to help better ensure accessibility).
The most common flavor of on-chain artwork today is in the SVG file format. Because SVGs are an established XML-based web render format, they’ve quickly become the defacto style for on-chain art. Creators can embed all the tags and parameters (such as text, colors or combinations of SVG children) into their contract and the file can be calculated at runtime. It’s important to distinguish that most on-chain art projects aren’t storing an actual SVG renderer, but rather a commonly accepted format that is universally accessible for browsers. In essence, the creator is storing data on the blockchain that can be rendered by clients using built-in or third party renderers. There are some interesting experiments like Shackled that are an entire renderer on-chain.
The most raw form of a Blitmap is less than 1kb of data and once that data manifests itself as renderable formats like SVGs or glTFs. It can be brought into applications and even IRL for new forms of interactivity.
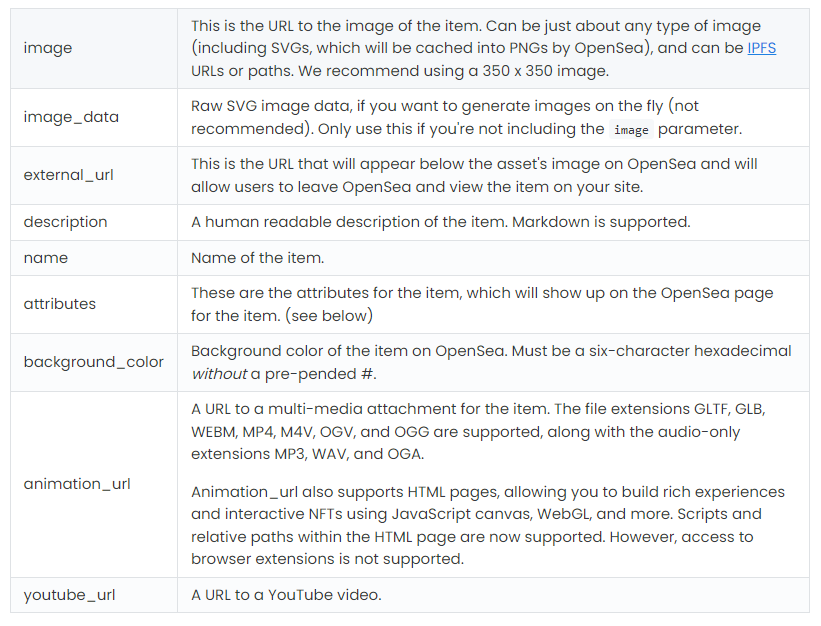
An SVG is a long string of tags and dynamic data—an on-chain art contract simply pieces together the SVG depending on various inputs. An ERC721 smart contract, a standard protocol for creating NFTs, is meant to display content on OpenSea or a wallet has several fields to return metadata. The image field is where the SVG data to be rendered is returned, but OpenSea and other web3 applications also support animation_url, a field that supports a wider array of multimedia formats. This is the field that can be used to present the NFT as a 3D file.
The OpenSea metadata spec
Blitblox is by no means the first 3D NFT. There are projects like Meebits, CyberKongz VX, Fyat Lux and more that are 3D asset NFTs. The key difference is how these projects store and display their data. The aforementioned projects store their data off-chain. I wanted to build a way for people to be able to use 3D NFT files without relying on me, the project developer, to host these files.
If you click on a Meebit asset on OpenSea all you’ll see is a picture of a 3D model. That’s how most 3D content is shared around the internet: a rendering of a pose at a given point in time. You can download the actual 3D data, but to fetch it and then interact with it you must interact with off-chain services. Fyat Lux is very similar in that it’s shown as an image and there’s 3D data as a glTF that can be downloaded on a website.
CyberKongz takes this interaction one step further. If you click on one of the items in the collection, you can actually interact with it. This is cool! What’s essentially happening here is the animation_url points to an external HTML + JS page that is loading the 3D model in their own viewer. This is basically an iFrame of an interactive 3D application.
Cyberkong VX Metadata:
{"image":"https://cyberkongz.fra1.cdn.digitaloceanspaces.com/public/1/1_preview.jpg","external_url":"https://www.cyberkongz.com/kong-vx/1","name":"CyberKong VX #1","attributes":[{"value":"Ghost","trait_type":"Legendary"}],"animation_url":"https://vxviewer.vercel.app/1","iframe_url":"https://vxviewer.vercel.app/1"}
Typically data for three-dimensional projects has to be hosted somewhere external that the smart contract points to. The worst place it can be hosted is on a centralized file system, such as Amazon S3. Why? If the project team decides to stop paying their AWS bill or walk away from the project, your asset will be gone forever. You own a token id in a smart contract and nothing more. This is an NFT in its purest essence, but probably not the reason you bought the piece. A better place to store data is IPFS, a distributed file system, where many of today’s 3D projects are stored. The hosted assets are rendered as images or the 3D models require a special external web page because of the complexity of these projects.
There are so many limitations with on-chain artwork that you can’t create 3D artwork as detailed as the projects mentioned above and store it within a smart contract. Meebits might be an exception if you could compact the way you store the voxel data. There is something fun about the challenge and aesthetic brought about by the constraints. The contract is part of the art. So I issued a challenge for myself to find a way to create a three-dimensional asset completely on-chain. I was able to pull it off and I’m proud that Blitbox is the first on-chain 3D NFT ever created. Let’s dive into it.
The first thing to understand about Blitblox is that the 3D data is represented as a glTF, or Graphics Language Transmission Format. It’s a standard for 3D data. It’s basically one giant JSON descriptor that describes a scene, meshes, materials, lights and more. And when plugged into 3D programs, such as Blender or Unity, they can easily be imported and rendered. It’s also one of the formats that OpenSea accepts in the animation_url field. Because it’s a universal standard OpenSea has a simple viewer that loads up any glTF and displays it natively on their site. If a smart contract can produce a glTF, Opensea or any 3D software like a game engine can fetch 3D assets that one owns and load them up trustlessly.
Since a glTF is one big string, a smart contract just has to figure out how to piece it together in the right way to make the visual representation of the NFT. That’s where the Blitblox.sol solidity contract comes into play.
There are a few major components to the contract that I will cover here. While reading through the breakdown below it might be helpful to pull up the Blitblox and Blitmap contracts, which are verified on Etherscan, so you can see everything in full context. This will help you compare the differences between constructing an on-chain 3D glTF versus a 2D SVG.
Blitblox.sol is your standard ERC721 contract using off-the-shelf OpenZeppelin contracts to handle ownership, minting, etc. The glTF magic happens in tokenGltfDataOf.
Before diving into the glTF on-chain construction, it’s worth addressing how the contract builds on existing Blitmap data. The primary reason for choosing to create a derivative project as my first experiment with on-chain 3D was to focus on the contract and avoid having to develop original artwork. Plus I like the creative community around Blitmap and the incredible diversity of artwork the original artists were able to create despite the on-chain constraints.
All Blitmaps are nicely encoded into 268 bytes that store a palette of 4 colors (12 bytes) and 1024 pixels in a 32x32 pixel grid (256 bytes). The Blitmap contract itself takes this data and constructs an SVG. Most of the SVG construction is boilerplate strings that you just concatenate by changing the pixel position and color variables. So to construct a glTF, you’d have to do something similar except the boilerplate strings must comply with the glTF format instead of SVG.
There was also additional overhead that came from the Blitmap integration that I won’t go into details about:
- Differentiating between original Blitmaps, siblings, and Flipmaps
- Checking if the user owns the corresponding Blitmap/Flipmap token
- Determining the artists associated with the composition and palette of the map being converted into a Blitblox so that artist royalties could be distributed
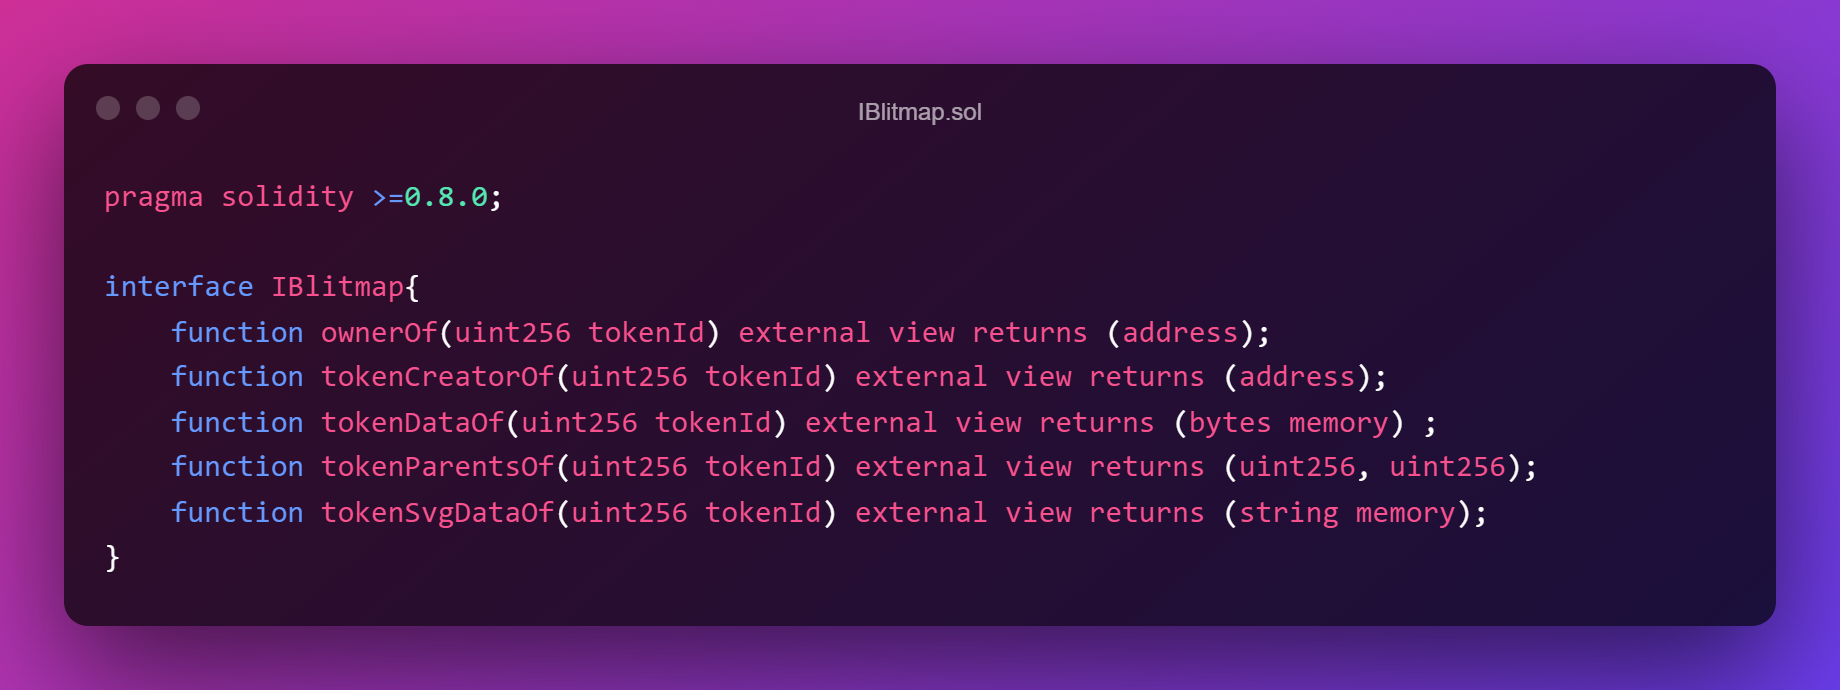
I tried to keep references to the original contracts as light as possible and just made an interface for the methods I needed.
The interface for the Blitmap contract
Now for the fun part: building the glTF from Blitmap data. The contract returns a glTF in the form of a string via tokenGltfDataOf, which accepts a token Id as a parameter. Under the hood this feeds the token’s 268 byte data and style byte (more on that shortly) to the tokenGltfData function which is what actually constructs the glTF string.
The tokenGltfData function shared a lot in common with the tokenSvgData function from the original Blitmap contract. Every byte in the 256 composition bytes represents a set of 4 pixels—2 bits per pixel indexing into a color—so it parses each byte and places a 3D cube, or voxel, of the corresponding color in that point in space.
The first thing the function does is extract the style parameters using styleByteToInts. On-chain projects have to be somewhat “simple” compared to off-chain counterparts that have more computing and storage wiggle room that allows the latter to be more visually complex. But this constraint breeds creativity: many on-chain projects have interactive minting experiences. This is possible because the NFT itself is being rendered dynamically by the contract, so your mint process can have options that a user provides to dynamically render what they chose.
Interestingly, an interactive minting process has become a hallmark of many on-chain NFT projects:the mint itself has become performance art. Blitmap pioneered this with one of the most iconic minting experiences of web3. The user was able to choose two different pieces, where the composition of one Blitmap would take the color palette of the second, resulting in a unique NFT that the Blitmap community refers to as a sibling. To keep with that tradition, I wanted to have interactivity when minting a Blitblox, so I allowed people to choose a style: normal versus exploded.
Blitbox style can be customized with transparency and voxel spacing
Additionally, with either style I gave the user the agency to make one of the four palette colors transparent. This choice can accentuate the 3D nature of a minted Blitblox.
These two parameters that change how a Blitblox renders are saved in a byte1, which is a single byte type. The first 4 bits are used to save the normal vs exploded option, and whether or not the user chose to make a color transparent. The last 4 bits save the color index that the user made transparent if chosen.
The styleBytesToInts function simply extracts that into integer variables that can be more easily used throughout the construction of the glTF.
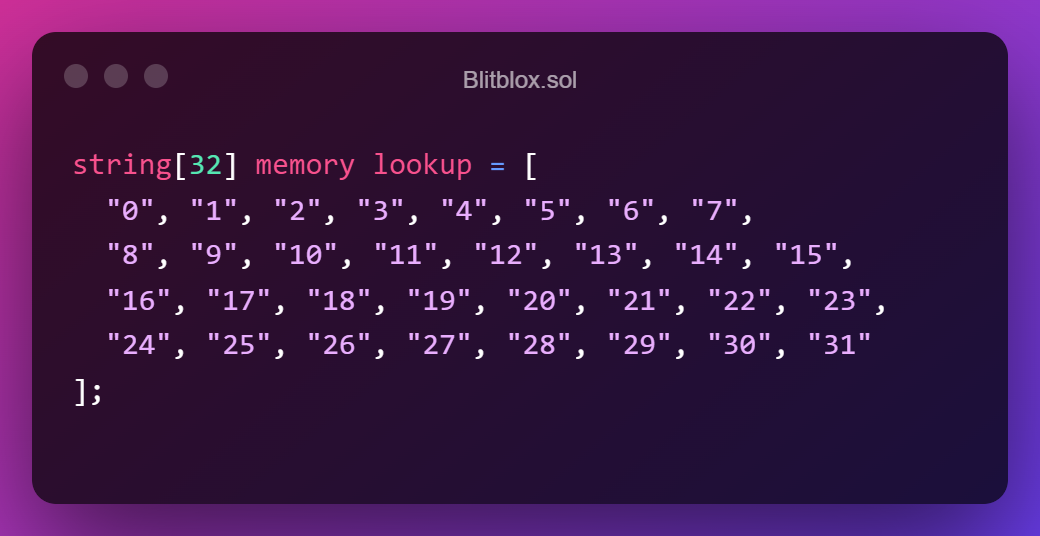
Next up is a lookup table of 32 strings corresponding to the numbers 0-31. This is pretty much copy pasta from the original Blitmap contract. It’s a clever way to save numbers that will be used for position data in the construction of the glTF without having to call toString and eating up call gas every time.
Position lookup table
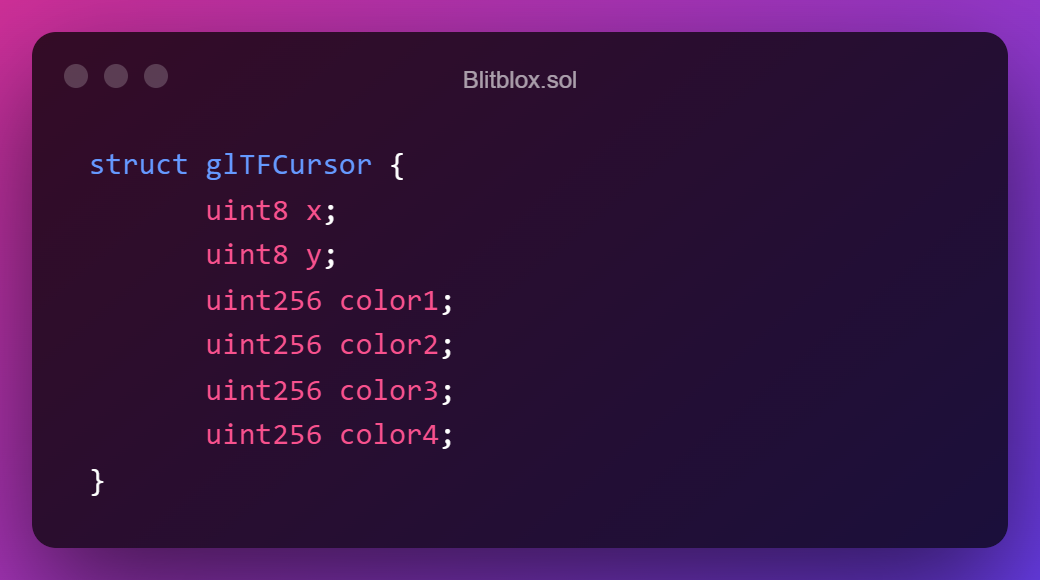
Then comes a struct called glTFCursor, which is also directly inspired by the Blitmap contract. This stores the position and color data for the set of 4 pixels/voxels currently being written to the glTF as the contract parses through all 256 sets of 4 encoded in the token data.
glTFCursor
One slight change from the Blitmap contract is that Blitblox uses uint256 for the colors instead of strings. The Blitmap contract builds up the SVG by embedding the actual hex code for color in each SVG tag for the pixel. A glTF stores color data once in the materials section and then meshes just reference an index to the material, so for Blitbox I just needed a number.
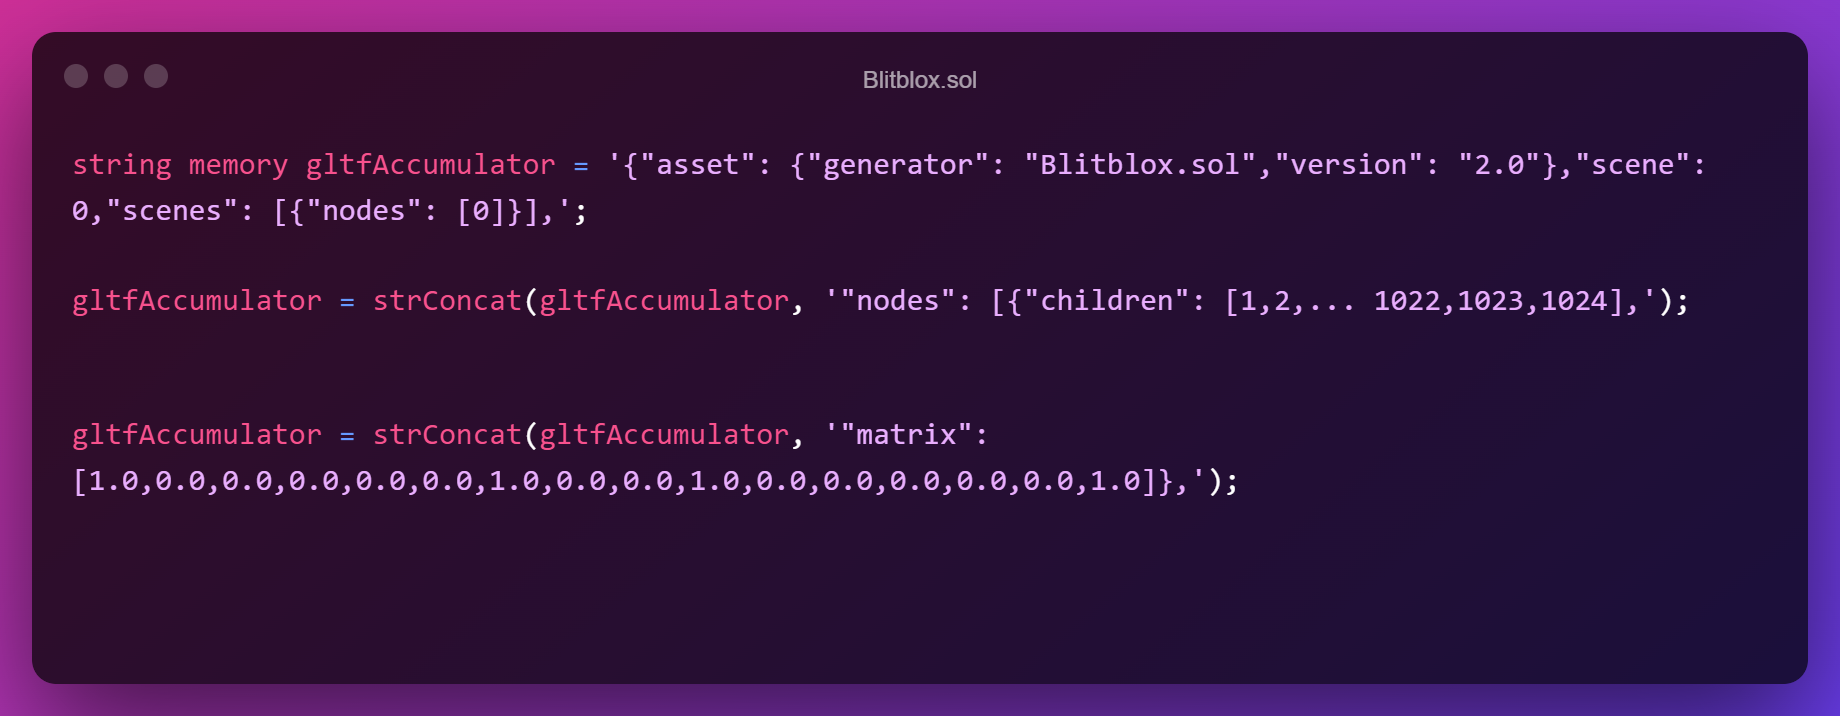
After this the contract starts to put together the glTF string. Everything is stored in a string called gltfAccumulator.
Starting the glTF string concatenation
The initial contents of the string are just high level descriptors. Every mesh that is to be drawn by the glTF needs to be described by a node in the glTF scene. The 32x32 Blitmap grid means that the glTF needs to store 1024 voxels. So I had to store the numbers 1-1024 in string form—this felt very inefficient to me. In the image of the code above, you can see the second line is a string that contains [1,2,… 1022, 1023, 1024]. The … is just for the image and in the actual contract it’s every number in between. My initial implementation didn’t store these as strings, but instead looped through the numbers in a uint256 sequence. It then converted the current number to a string and appended it to the accumulator string. But this increased the call time and gas, so I chose to take the hit on deployment gas instead 🤷
The next element appended to the accumulator is just a column-major transform matrix that describes the coordinate system for the scene.
Now that the boilerplate for the glTF has been created, the dynamic elements based on the Blitmap composition and palette are created in a loop. Like the original Blitmap contract, the 256 bytes describing the 1024 pixels are looped through in rows of 32. Recall that each byte describes the color of 4 pixels/voxels to be drawn so the contract loops in strides of 8.
Looping through bytes to get voxel data
Let’s break down what happens to construct the glTF strings that describe the 4 voxels based on the original data. First, the values of the glTFCursor struct variable, pos, are updated based on the byte data for the current group of voxels being evaluated. The colorIndex function is from the original Blitmap contract—it determines color by getting an index between 0-3 based on the combination of 2 bits corresponding to the current voxel.
The voxel4 function is what actually creates the glTF string for a group of 4 voxels. It uses the cursor to determine how to describe the color and position of a voxel. Since each voxel is a 1 by 1 cube, it can simply be placed at the corresponding position in space based on the lookup table value. I kept things simple for this first experiment and the Z translation is always 0 so the only depth is from the thickness of each voxel.
You might notice that the lookup reference is counting down from 31 instead of counting up towards 31 like in the original Blitmap contract. This is because the original contract builds the image with 0,0 being on the top left of the 2D canvas. If we construct the glTF the same way then the 3D model will be “under the floor” so to speak. I noticed this when running some early AR tests of the contract output and the meshes would always disappear below the surface I was projecting on because they were below the 0,0,0 origin. I wanted the glTFs to be easily usable in other mediums, including AR and 3D printing, so I made this slight tweak to the lookup index to make the mesh be constructed upwards, or “above the floor.”
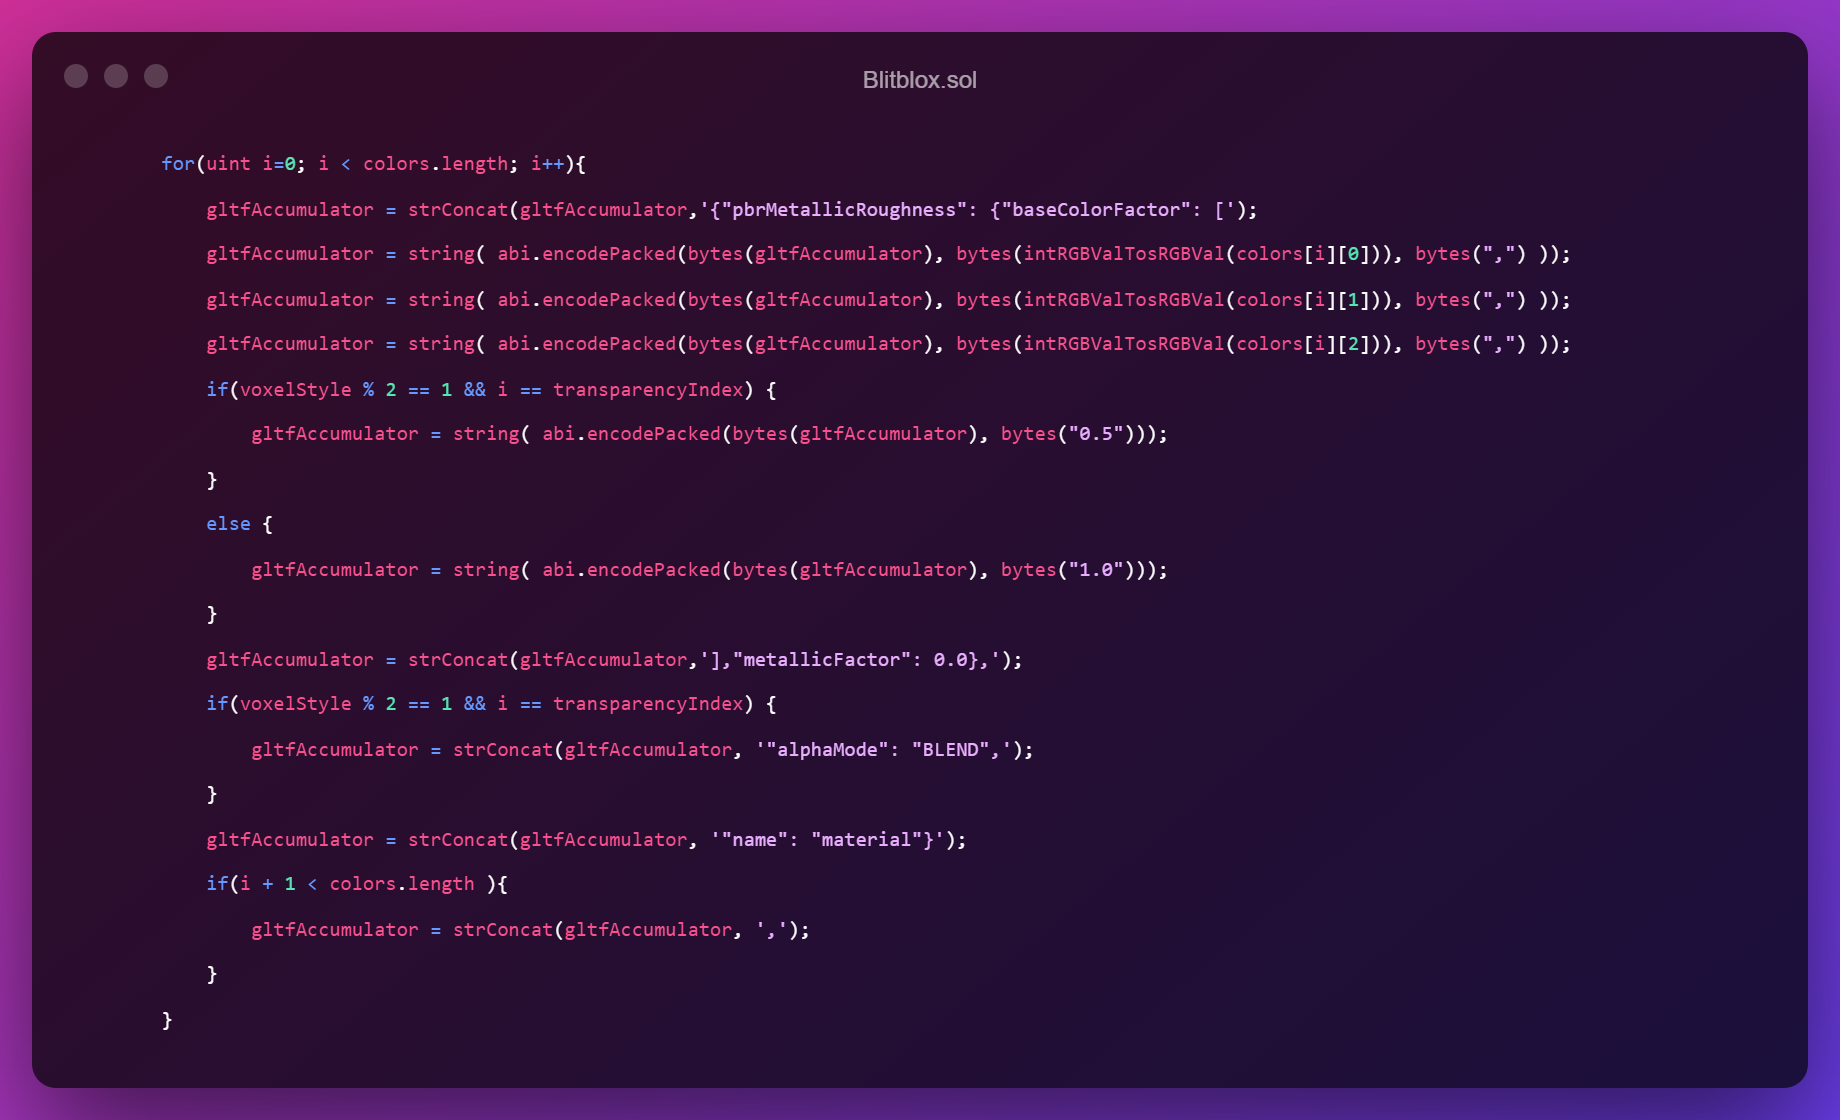
After all 1024 voxels are appended to the accumulator in the loop above, the contract adds material definitions to the glTF. Up until now we haven’t described materials with actual colors, just indices via the mesh field for each voxel node.
There are only 4 materials that need to be described and added to the glTF’s materials array. This was straightforward, except for one thing: the RGB values stored in the original Blitmap data are values between 0-255 and for glTF need to be transformed to values between 0-1. Without floating point arithmetic in Solidity, this proved to be a bit of a challenge. In an attempt to avoid bloating the contract, I just multiplied the values by 1000 and did all arithmetic with integers, then extracted the decimal values using the modulo operator.
I also ran into an issue with the color space. In my tests of viewing the contract glTF on OpenSea, I saw pale colors compared to the original palette. To correct this, the colors needed to be raised to the power of 2.2. But once again, I was faced with floating point arithmetic, so I approximated the color value by squaring the original value.
Creating the glTF materials
The last dynamic bit for materials is to make one material transparent if the individual made made this choice when minting. For the selected transparent color, the alpha value is set to 0.5 for the corresponding index and its alphaMode is set to BLEND.
To map the materials to meshes, the final step is to populate the array of meshes with descriptors of each type of mesh—there are 4 types that are all the same voxel shape but have a different material index.
The attributes are standard glTF entries that describe what kind of information is stored in the binary buffer describing the mesh. In this case, I only have position and normal data encoded in the buffer, and the buffer is a simple voxel or cube. The final part of the glTF construction is to add the buffer to the glTF. To accommodate the two styles mentioned earlier, the contract has two variations of the buffer in it. One version is where the voxels are 1x1x1 and in the other they are 0.75x0.75x0.75 to leave space between each.
Initially, I had only one buffer and was adding a scale modifier to each node, but this bloated the glTF and string concatenation because it added 1024 instances of the string scale:[0.75,0.75,0.75] so I opted to modify the position portion of the buffer once instead. The normals are the same regardless of scale so that part of the buffer is shared by both styles of Blitblox. And that’s it! After the buffer is added to the glTF, the tokenGltfDataOf function returns a string that describes a glTF.
The glTF is not explicitly generated as part of the tokenUri function which is what OpenSea calls to fetch the NFT’s metadata. The tokenUri function for Blitblox returns standard metadata like name and description, but it also returns an SVG based on the original map with an anaglyph filter applied. This is because OpenSea still needs a 2D version of the token to render thumbnails. It’s the animation_url field that actually holds the 3D data.
As discussed earlier, for most of today’s interactive 3D NFTs, the animation_url is pointing to a custom web page that renders the 3D model or an image. The Blitblox contract points to an HTTP proxy that simply calls tokenGltfDataOf and returns the glTF generated by the contract as it’s payload. OpenSea has a built-in glTF viewer which it uses to load up and render the returned glTF. This is similar to how the original Blitmap contract has an HTTP proxy to generate the image because native SVG rendering in OpenSea wasn’t supported when Blitmap first launched. I’m looking forward to the day I can also look back at Blitblox and say I’m relieved that now marketplaces have native glTF support instead of requiring a proxy. We’re still early, especially when it comes to 3D NFTs!
I realize that this post was very technical in nature, but I think that it was important to describe the effort to place the first ever 3D NFT on-chain. I left a number of comments in the Blitbox contract to assist any person interested in expanding the concept. But if you still have further questions, you can reach out to me on Twitter. There’s a lot more I learned and would do better the second time around, but I wanted to start by detailing this process in hopes that more people experiment with on-chain 3D art. In future posts I may discuss what I would do differently next time and what you can do with the glTF output besides look at it on a website, from 3D printing to augmented reality. I’m already posting a lot of these experiments on the Blitblox Twitter account, so follow along there for more updates!
Have a Blitmap or a Flipmap? Mint your Blitblox here.
Don’t have a Blitmap or a Flipmap? Explore Blitblox on OpenSea or pick up a Blitmap/Flipmap to get the full minting experience.
Special thanks to web3 frens mrmemes.eth and NiftyPins for the feedback on this post.

